26.2 Managing Workflows
This section includes procedures for managing provisioning workflows using the Workflow Administration plug-in.
26.2.1 Connecting to a Workflow Server
Before you can begin managing workflows, you need to connect to a workflow server. If the User Application driver is bound to a single workflow server, you can simply specify the name of the driver to use. If the driver is associated with multiple workflow servers, you need to select the target workflow server.
To connect to a workflow server:
-
Select the Identity Managercategory in iManager.
-
Open the role.
-
Click the task.
iManager displays the Workflows panel.

-
If you accessed the target workflow server previously, you can select the server from the drop-down list.
iManager fills in the remaining fields on the panel.
-
If you have not yet accessed a workflow server, specify the driver name in the field, then click .
iManager fills in the and fields.
-
Type the password for the user in the field.
-
Click Login.
The Workflow Administration plug-in displays a page that allows you to specify a filter for finding workflows:

26.2.4 Controlling the Active Workflows Display
The Workflows panel lists the workflows that match the search criteria you specified. In addition to filtering the list, you can control the display. For example, you can specify how often to refresh the list and sort the list on a particular column.
Refreshing the List of Workflows
When the workflow server is very busy, the list of active workflows can change very frequently. In this case, you should refresh the list of active workflows running on the server.
-
Click the command in the Workflows panel.
-
Specify the refresh interval you want to use by selecting one of these options from the menu:
-
Refresh Off
-
Refresh Now
-
10 seconds
-
30 seconds
-
60 seconds
-
5 minutes
-
-
Click .
Using Quick Filters to Control the Display
Sometimes you might want to show or hide workflows that have a particular status.
-
Click the command in the Workflows panel.
-
Select one of the following choices to filter the items in the list:
Choice
Description
Show all workflows
Disables all previous filters and displays all workflows in process.
Hide/show completed workflows
Hides or shows workflows that have completed processing.
Hide/show terminated workflows
Hides or shows workflows that have been terminated.
Hide/show stopped workflows
Hides or shows workflows that have been stopped by user action.
Hide/show running workflows
Hides or shows workflows that are still running.
Sorting the List of Workflows
If you have a large number of request definitions, you might want to sort the list by a particular column, such as or .
-
Click the heading for the sort column.
Displaying the Process Request ID
You can display and sort data based on the internal process ID for a request.
-
Click the command in the Workflows panel.
-
Click on the menu.

Depending on your display, you might need to scroll to the right to see the column.
To sort the data based on the process request ID, click the heading for the column.
26.2.7 Reassigning a Workflow Instance
If a workflow instance has stopped and cannot be restarted, you can reassign the work item to another user or group.
-
Select the current activity associated with the workflow by clicking the check box next to the name in the Workflow Detail panel.
-
Click the command in the Workflow Detail panel.

-
Select the user or group to which you want to reassign the work item.
26.2.8 Managing Workflow Processes in a Cluster
You can use the Workflows screen to reassign processes from one workflow engine to another. For example, you could use this feature to reassign processes back to a failed workflow engine when the workflow engine is brought back online, or you could redistribute processes to other engines when an engine is permanently removed from the cluster.
The source engine(s) must be a in a SHUTDOWN or TIMEDOUT state. The target engine must be restarted in order to restart the processes that were reassigned to that engine.
Reassigning a Process from One Workflow Engine to Another
-
In the Workflows panel, select the workflow that you would like to reassign by clicking the check box next to the workflow name.
-
Select .
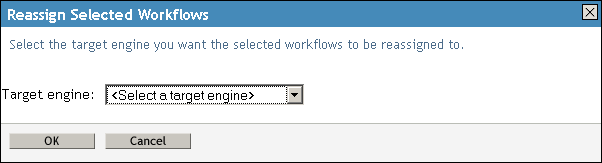
-
Select the workflow engine to which you want to reassign the workflow process from the list.
-
Click .
Reassigning a Percentage of Processes from One Workflow Engine to Another
-
In the Workflows panel, select the workflow that you would like to reassign by clicking the check box next to the workflow name.
-
Select .
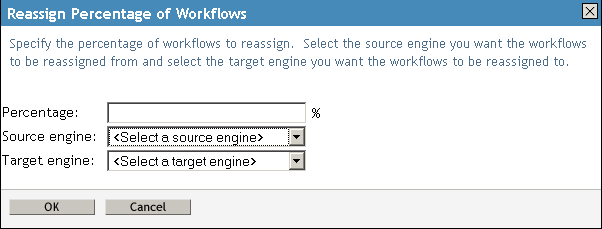
-
In the field, type the percentage of workflow processes that you would like to reassign from one workflow engine to another.
-
Use the list to select the workflow engine from which you want to reassign processes.
-
Use the field to select the workflow engine to which you want to reassign processes.
-
Click .
Reassigning All Processes from One Workflow Engine to Another
-
In the Workflows panel, select the workflow that you would like to reassign by clicking the check box next to the workflow name.
-
Select .
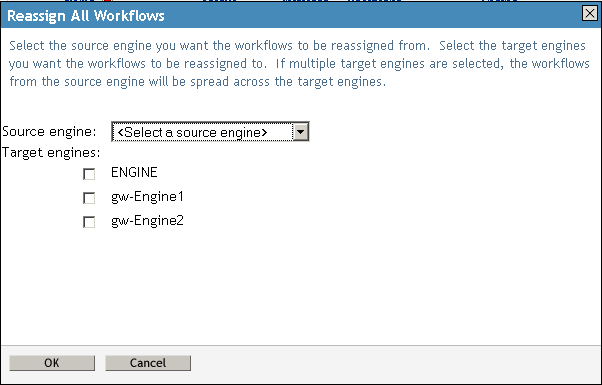
-
Use the list to select the workflow engine from which you want to reassign processes.
-
Select the workflow engines to which you would like to reassign processes by clicking the check box next to the name of the workflow engine.
If you select multiple target engines, the processes from the source engine will be evenly distributed to the target engine.
-
Click .