10.13 Changing Identity Applications Client Settings
Identity Manager Dashboard allows you to modify the settings for every client configured in identity applications. An administrator must have access to page to modify the client settings.
The page also allow you to add a client settings in the identity applications. To add a new client settings, click  and specify the and . You can perform the following activities in this page:
10.13.2 Managing User Access
You can control user accesses using tab, this allows you to specify which user accounts are trustees for the user and configuration based functions within the client. When a trustee logs in, the application displays the page that has been provisioned. Otherwise, the page is hidden. You can add users, groups, roles, and containers as trustees.
When configuring user access, you should consider the following conditions:
-
Make sure that the users specified in are having sufficient Identity Vault rights to perform tasks within the Identity Applications. However, trustees can access the page but operations on the page will fail if they do not have the proper Identity Vault rights.
-
Each has a set of default trustees suitable for the services that can be accessed through that page. However, if you remove all trustees for a navigation item, every user will be able to access that page.
-
If a user does not have access to the default navigation (or to the default menu item within a navigation area), the application redirects the user to the page. The application might also display an error message, such as when a user attempts to login to page without proper authorization. The user can log in but will be directed to the page.
-
When a user is in proxy mode, the application provides access according to the permissions for the account being proxied, as opposed to the permissions for the logged in user. The proxy can perform tasks on behalf of the other user but does not assume any of the role-type permissions. For example, a user cannot perform Domain Administrator functions on behalf of a Domain Administrator unless that user also has that role.
For more information, click ![]() on the Dashboard.
on the Dashboard.
10.13.3 Customizing the Views
The tab allows you to modify the page view for the selected client. You can specify general settings for notifications and request forms. In Identity Manager 4.8.1 and later, you can also modify the page view.
Select the following options from to customize views for your client:
User Settings
The settings enable you to configure the attributes displayed in the page for the selected client. In Identity Manager 4.8.1 and later, you can also configure the Organization Chart page attributes.
- Card View
-
Represents the attributes that you want the application to display by default when the user selects on the Users page. In Identity Manager 4.8.1 and later, these attributes will also appear on a user’s card on the page.
By default, the will display the full name of a user entity in addition to the attributes that you choose to display. The Identity Applications retrieves the full name of the user entity from the Identity Vault based on the full name entity settings.
IMPORTANT:
-
By default, the application displays only two primary and two secondary attributes on a card, even if you add more than two for each attribute in the . You can edit card properties in the sample CSS file downloaded from the Settings page to display more attributes on a card. For more information, see Modifying the Card Properties.
-
Because the is configured by default to display the full name of a user entity, when you select the First Name and Last Name as primary attributes, the user’s full name may appear twice in the on the Users page and in the organization chart.
-
To enable the option for sending emails in a Manager-Employee relationship on the Organization Chart page, add the Email attribute as a primary or secondary attribute in the . This allows a user to send emails to all team members who report directly to the Manager, as well as individual members in a Manager-Employee hierarchy. The option will appear in an employee’s only after you configure this setting.
-
- Other Attributes
-
Represents additional attributes that provide details about a selected user.
- Editable Attributes
-
Represents the attributes that can be modified for a user’s details. For most attributes, you can also enter text to serve as default values or examples to aid in new user creation, as desired.
The following example allows a client user to edit Title, Manager, Telephone Number, Manager, and Direct Report attributes:
Figure 10-1 Editable Attributes
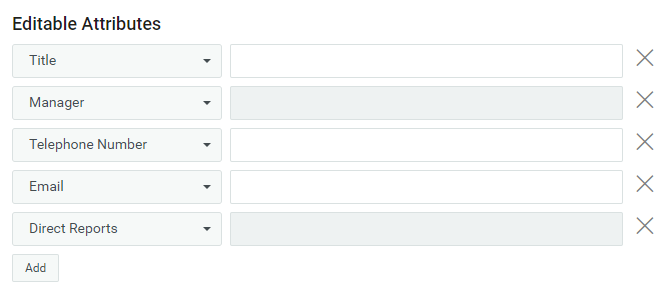
To add more attributes to the list, click . You can also select a different attribute from the list to modify the editable attributes.
- Use Default Photo
-
This only applies from Identity Manager 4.8.1.
Represents the image that you want the application to display by default when you enable the image toggle button in the .
- User Search Lookup Attributes
-
Represents the attributes that users can define when searching for a user entity. It applies to the fields that use the DN Lookup widget in the Identity Applications Dashboard.
- User Search Default Attribute
-
This only applies from Identity Manager 4.8.1.
Represents the attributes that users can define when searching for a user or filtering search results in the page.
- User General Settings
-
Represents the default container for storing users and how the application responds when displaying search results.
-
Base Container
Specifies the container in the Identity Vault that stores a newly created user.
When creating a user, you can see this value but cannot modify it. This limitation ensures that all users are stored in the same container for that client.
-
Users List Container
This only applies from Identity Manager 4.8.1.
Specifies the container in the Identity Vault that you want the application to use for listing users in the page.
-
User Profile Entry
This only applies from Identity Manager 4.8.1.
Specifies the entity that the application will display in the page. By default, a user entity is displayed.
-
Show All Permissions
This only applies from Identity Manager 4.8.2.
Enable this setting to list all permissions assigned to the user on the page. This include permissions directly assigned to the user and those assigned indirectly through groups or containers. By default, this settings is disabled, allowing the user to see the list of directly assigned permissions only.
-
User Search Limit
Specifies the maximum number of users that the application can list as a result of a user search.
-
Default Organization Chart Relationship
This only applies from Identity Manager 4.8.1.
Specifies the user to user relationship that the application will display by default in the page. By default, it is set to Manager-Employee.
The Identity Applications ships with a default set of relationships namely, Manager-Employee, Group’s membership, and User groups that is displayed in the drop-down list. The administrator can also define custom relationships in the Directory Abstraction Layer using the Designer. For more information, see Working with Relationships in the NetIQ Identity Manager - Administrator’s Guide to Designing the Identity Applications.
-
View Permissions Type
Enable the permission types such as Roles, Resources, and PRD. This allows your client users to view or request the permission types that are selected.
By default, all the permission types are enabled.
-
Enable Role Approval
This only applies to Identity Manager 4.8.2.1.
Enable the respective options in this setting to trigger an approval process before a role is assigned to groups, containers, or mapped to another role. The approval process will be triggered only if the approval is configured for that role. When this setting is disabled, the role will be assigned to the recipients directly, without seeking approval. The approver(s) will not receive an email notification, although the email approval setting is set to enabled.
By default, the is disabled for , whereas it is enabled for and options.
-
General Settings
The settings specify how the client responds upon user login and when the user initiates forms.
- Notification Expiry
-
Specifies the number of days before a task or role expires that the application begins displaying a notification when the user logs in.
- Enable Task Bulk Approval
-
Allows the client users to approve or deny multiple requests at a time.
- Disable Implicit Claim of Task
-
Specifies whether it is mandatory for the user to claim a task before approving or denying it. By default, this flag is set as false; user can approve or deny the task without claiming it. If you set this flag as true, user must claim the task explicitly. In this case, the approval and deny options are not displayed until the task is claimed by a user. The functioning of option also applies to bulk approval of tasks.
- Set Availability while creating a Delegation Assignment
-
Specifies whether the application displays options for providing the availability details when the user creates a delegation. When selected, the application displays the availability options at the same time when delegation is created. If you want to create delegation and specify availability details in separate actions, do not select this option.
- Show Add Workflow in Roles Page
-
Enabling this option displays the action in the Roles page. By default, it is enabled.
- Show Add Workflow in Resources Page
-
Enabling this option displays the action in the Resources page. By default, it is enabled.
- Feedback Message Span
-
Specifies the period for an information message to appear on the page.
- Identity Governance URL
-
Specifies the Identity Governance URL.
- Managers Hierarchy
-
Specifies the manager’s hierarchy. This helps the helpdesk users to reassign the helpdesk tickets to the managers of the specified level. You can set the hierarchy up to 3.
- Enable Eager Search Results in Roles and Resources Page
-
Enable this option to display the roles in the Roles page and the resources in the Resources page. By default, this option is enabled. Disabling this option will not display the roles and resources when the Roles and the Resources pages are loaded.
- Organization Chart separator for multi-valued attributes
-
This only applies from Identity Manager 4.8.1.
Specifies the symbol that the application will use to separate values when displaying a multi-valued attribute for an entity (user or custom) in the page. By default, comma is used. For example, if the email attribute has more than one value for an entity, the application will display the email addresses separated by comma.
- Organization Chart hierarchy depth
-
This only applies from Identity Manager 4.8.1.
Specifies the maximum depth of the organization chart that the application can display for a user relationship in the page. For example, an organization chart hierarchy depth of 3 for a given relationship will display the hierarchy of a user up to level 3 from the root user, where the root user is identified as level 1.
- Notification Interval
-
This only applies from Identity Manager 4.8.2.1.
Specifies the time interval at which the application calls the notifyService API to retrieve the information on any new task, role, or resource assigned to the logged-in user, then notify the user on the Dashboard. The default value of this setting is 120000 milliseconds (2 minutes).
By default, the Dashboard opens a new window when the user requests for a new permission or selects a task for approval.
Entity Settings
The Entity settings enable you to configure the attributes. The entities are created using Designer. For more information see, About Entities and Attributes in the NetIQ Identity Manager - Administrator’s Guide to Designing the Identity Applications.
To configure an entity, click the icon and select the entity type from the drop down menu. The deployed entities are displayed in the drop down menu. Click . This displays the selected entity in the tab and in the menu.
To delete an entity, select the entity from the menu and click the  icon. The deleted entity will not be listed under the tab.
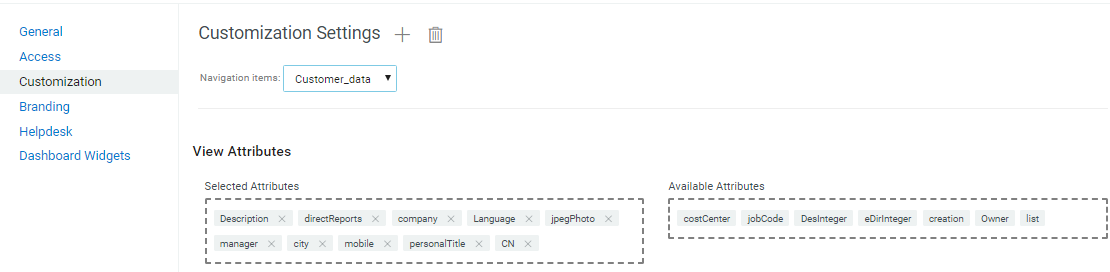
- View Attributes
-
Represents the attributes that you want the application to display by default when you select the created entity in the tab
In the example shown in Figure 10-2, description, direct reports, company, language, photo, manager, city, mobile, title, and CN are selected for display by default.
Figure 10-2 View Attributes
- Editable Attributes
-
Represents the attributes that can be modified for an entity. You can add or delete attributes from the list of available entities.
In the example shown in Figure 10-3, direct reports, description, city, company, language, photo, manager, mobile, and title attributes are editable.
Figure 10-3 Editable Attributes
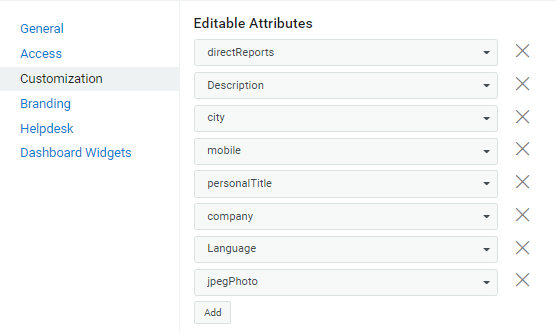
To add additional attributes to the list, click .
- Search Attribute
-
It represents the attributes that can be used to search an object, such as Description and CN of an entity. This setting is used to list the entities. This is a mandatory attribute.
Starting from Identity Manager 4.8.3, you can configure the Search Attribute for groups. For example, if you want to customize the search attributes on > page for your client, select from the menu and choose the required attributes in the option. On saving, the users will be able to search groups based on the selected attributes. The following figure shows Description and CN as search attributes selected for the “Group” entity type.
Figure 10-4 Search Attribute
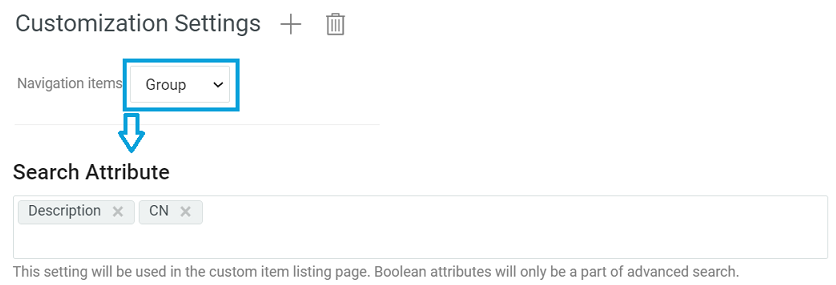
NOTE:Identity Applications does not support attributes of the type DN as search attributes for group entity.
- Base Container
-
Specifies the container in the Identity Vault that stores a newly created entity.
This value cannot be modified. Therefore, all entities are stored in this container for a particular client.
- Default Organization Chart Relationship
-
This property has been added in Identity Manager 4.8.1 version.
Specify the relationship that will be displayed by default in the organization chart page for this entity. This field is not mandatory.
If the default organization chart relationship is not defined, then the user has the option to select the required relationship on the entities page, given that this entity has more than 1 relationship to display. If an entity has only one relationship, then the prompt for selection of relationship is not displayed on the entities page. When the user clicks to view the organization chart of this entity, the same relationship will be displayed by default.
- Organization Chart View
-
This property has been added in Identity Manager 4.8.1 version.
Drag and drop the required attributes into and from field. You are allowed to add only two primary and two secondary attributes in the card view.
These attributes are displayed when you want to view the organization chart for this entity under the menu. If the primary and secondary attributes of an entity are not defined, then the Identity Applications displays the CN attribute of that entity in the card view.
- Organization Chart Photo
-
This property has been added in Identity Manager 4.8.1 version.
This field is displayed when you enable the image toggle button in the .
Specify the attribute whose value will be used to display the image for this entity in the organization chart under the menu. If an attribute has multiple values, the first value is selected for display by default.
- Display Attributes for Organization Chart Search
-
This property has been added in Identity Manager 4.8.1 version.
Specify the display attributes for organization chart search results. A maximum of two attributes are allowed for selection.
10.13.4 Changing the Client Branding Attributes
You can use your organization’s logo and name in the header and footer of the dashboard. You also can specify your brand colors and localize the content in the header.
In , you can specify the customized cascading style sheet (CSS).
-
Click , to download the sample Custom.css file.
-
Modify the Custom.CSS file values and click .
For more information about applying your brand to the Dashboard, click ![]() on the Dashboard and see Customize the Branding.
on the Dashboard and see Customize the Branding.
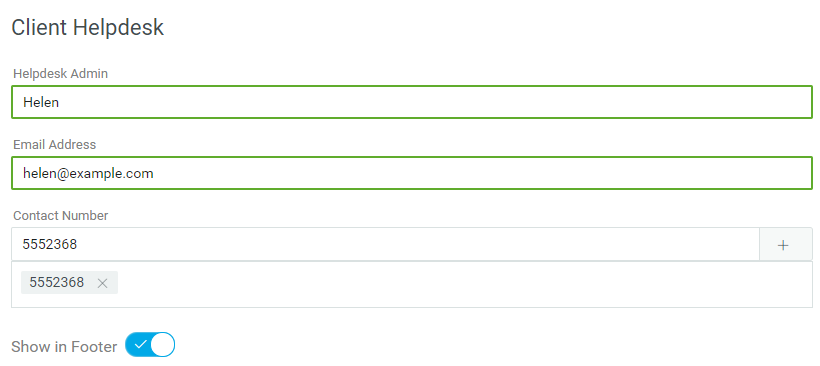
10.13.5 Configuring a Client Helpdesk
Helpdesk configuration is a two-part process. First you set up the Helpdesk contact details followed by setting up granular permission details for the Helpdesk users.
As part of configuring Helpdesk contact details, you can specify Helpdesk information such as ,, and for each of the clients configured in the system. A client user will immediately see the Helpdesk contact information when the administrator completes configuring the Helpdesk for the client.
A Helpdesk user is a user configured to perform certain tasks for the tickets raised by the client users. For more information about what tasks can be performed by a Helpdesk user, see Understanding a Client Helpdesk.
NOTE:
-
Ensure that the helpdesk admin user has access to property of the user container.
-
NetIQ recommends not to assign helpdesk admin role to a team manager to avoid conflicts in between these roles.
-
A Provisioning Administrator or any user with access to the Settings page cannot assign Helpdesk access rights to users directly. They must also have the Resource Administrator privileges to manage the Helpdesk resources, which includes the ability to assign and revoke the resources.
For granting permissions, you must assign Helpdesk resources to the corresponding Helpdesk users.
NOTE:You cannot assign Helpdesk resources directly to a team or group. If you want to grant helpdesk accesses to a team or group, you must include each members from the group or team individually for the required access rights. Alternatively, you can perform the following steps:
-
Create a role for helpdesk users. See Creating a New Role.
-
Map the required helpdesk resources to the newly created role. See Mapping Resources to Roles.
-
(Conditional) Assign this role to a group. See Assigning Roles to Users.
-
(Conditional) Team Manager can request for this role on behalf of team members. Approving this role to the team allows team members to use helpdesk resources.
The Helpdesk section lists all Helpdesk resources.
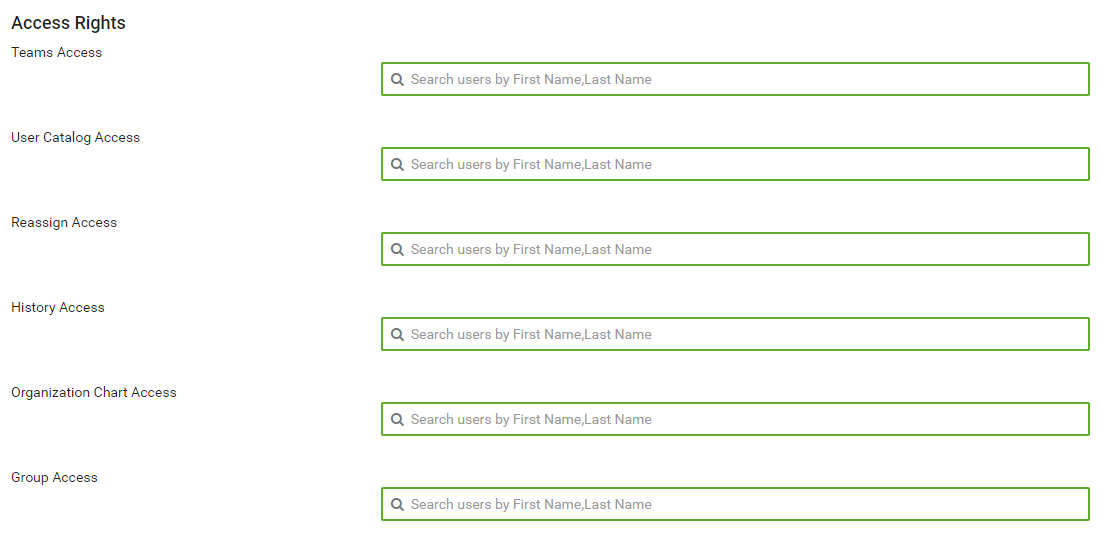
- Teams Access
-
Selected users are allowed to view teams and team members configured for the respective client.
- User Catalog Access
-
Selected users can view details of any user of the respective client.
- Reassign Access
-
Selected users can reassign the user’s tasks to the approver’s manager.
NOTE:You can configure in to help the Helpdesk users to reassign the user’s tasks to the managers of the specified level, if necessary.
- History Access
-
Selected users can view request history of any user of the respective client.
- Organization Chart Access
-
Selected users can view the organization chart of the respective client.
- Group Access
-
Selected users can view groups of the respective client.
Using Helpdesk
After Helpdesk is configured, users can find the Helpdesk information in the following places:
-
.
-
On the page.
-
(Conditional) At the footer.
To show the Helpdesk information in the footer, enable .
NOTE:You must ensure that the footer is enabled for the client that you have selected. To enable it, go to . For more information, click
 on the Dashboard.
10.13.6 Managing Dashboard Widgets
You can provision for a User, Group, Container, or a Role.
You also can modify the Trustees for a selected widget. For more information, click ![]() on the Dashboard.
on the Dashboard.
10.13.8 Deleting the Client Settings from Identity Applications
If you want to remove a client settings from identity applications, perform the following steps:
-
Click
 .
. -
Select the client settings from the table that you want to delete.
-
Click
.