A.2 Setting Up the Approvals App
Before your users can use the Approvals app, you must first configure your Identity Manager Roles Based Provisioning Module environment.
After installing the app, users can configure the app manually or automatically. Because manually configuring the Approvals app can be difficult, we recommend that administrators simplify the configuration process by providing users the necessary information as part of the provisioning process.
You provide configuration information to your users through a configuration link you customize for your Identity Manager Roles Based Provisioning Module environment. The structure of the configuration link is as follows:
idmapproval://settings/?userid=Username&passwordInKeychain=Password&host=HostName&port=PortNumber&
rbpmContext=Context&userContainer=UserContainer&timeout=Timeout&vdxUserEntity=UserEntity&
vdxNameFormatAttribute=NameFormat&vdxFirstNameAttribute=FirstNameAttr&vdxLastNameAttribute=
LastNameAttr&vdxPhotoAttribute=UserPhotoAttr&vdxPhotoAttributeLdap=PhotoLDAPAttr&vdxPhoneAttribute=
WorkPhoneAttr&vdxMobileAttribute=MobilePhoneAttr&vdxEmailAttribute=EmailAttr&namingAttribute=
NamingAttr&provAdminGetTasksWorkaroundInPlace=ProvisioningAdmin
The link must include settings specific to your environment, so that users can easily connect to the Identity Applications server from the Approvals app. However, none of the settings are explicitly required for the link. If you leave any setting values empty, each user must configure those settings on their device.
For example, if you want to provide a standard configuration link for all users in your environment, you would leave the userid and passwordInKeychain values empty:
idmapproval://settings/?userid=&passwordInKeychain=&host=123.112.20.109&port=8180&
rbpmContext=IDMProv&userContainer=ou=users,o=data&timeout=5&vdxUserEntity=user&vdxNameFormatAttribute=
FirstName%20LastName&vdxFirstNameAttribute=FirstName&vdxLastNameAttribute=LastName&
vdxPhotoAttribute=UserPhoto&vdxPhotoAttributeLdap=photo&vdxPhoneAttribute=TelephoneNumber&
vdxMobileAttribute=mobile&vdxEmailAttribute=Email&namingAttribute=cn&
provAdminGetTasksWorkaroundInPlace=YES
For detailed information about the configuration settings, see Understanding Approvals App Settings.
You can provide a configuration link to your users in one of the following ways:
-
Customize and deploy the default “Request Mobile Approval App” process request definition (PRD) to your identity applications. A user can log into the identity applications and request access to the app using the PRD, which sends an email notification with a personalized configuration link that includes information specific to that user.
-
Embed your custom configuration link in an HTML page hosted on a Web server in your environment. All users in your environment can navigate to the HTML page in a browser on their device and then click the configuration link.
-
Create a QR code from the configuration link and embed the QR code in an HTML page. Users can use a QR code reader on their device to scan the code.
A.2.2 Customizing and Using the Default Approvals App Provisioning Request Definition
As an administrator, you can use Designer to customize a generic “Request Mobile Approval App” PRD that your users can use, through the identity applications, to request access to the Approvals application.
When a user requests access, Identity Manager then verifies that the user has the permissions required to access the mobile interface and that the Identity Applications server supports the application. If the server is not configured correctly or does not have the correct patch installed, the PRD generates a task for the provisioning administrator that lets the administrator know what needs to be fixed in order to enable use of the Approvals app.
After Identity Manager verifies the user and environment meet all requirements, the PRD triggers an email notification to the user. The user should open this email on the iPhone or iPad where the user has already installed the Approvals app.
This email notification includes a special idmapproval://settings link that automatically provides the settings the user needs to access the Approvals app from their device. The user clicks the link from their device and can then access their tasks through the Approvals app.
The default “Request Mobile Approval App” is included in the User Application Base package, which you can upgrade in Designer.
NOTE:The PRD and notification template provided in the User Application Base package are generic. Most administrators need to modify the generic PRD and template for their specific environments. However, we recommend that only users familiar with PRDs modify the default templates.
Customizing the Generic Notification Template
We recommend customizing the generic email notification template for your environment. To customize the default template to notify users they have access to the Approvals app and provide a link to automatically configure the app:
-
Ensure your Identity Manager environment meets all necessary requirements. For more information about prerequisites for using the Approvals app, see Product Requirements.
-
In Designer, ensure you have a valid User Application driver in production. If a User Application driver does not exist in your Designer installation, install the driver before proceeding.
-
Upgrade the User Application Base package to the latest available version and install any dependent packages. For information about upgrading packages in Designer, see Upgrading Installed Packages in the NetIQ Designer for Identity Manager Administration Guide.
-
In the Outline view, expand .
-
Right-click and select .
-
Modify the field, if necessary.
-
In the field, modify the notification HTML as necessary for your environment. You can customize the email message text sent to your users, include graphics, or change the color and layout of the message to fit your company’s branding. The following image shows the default email message in the template editor:
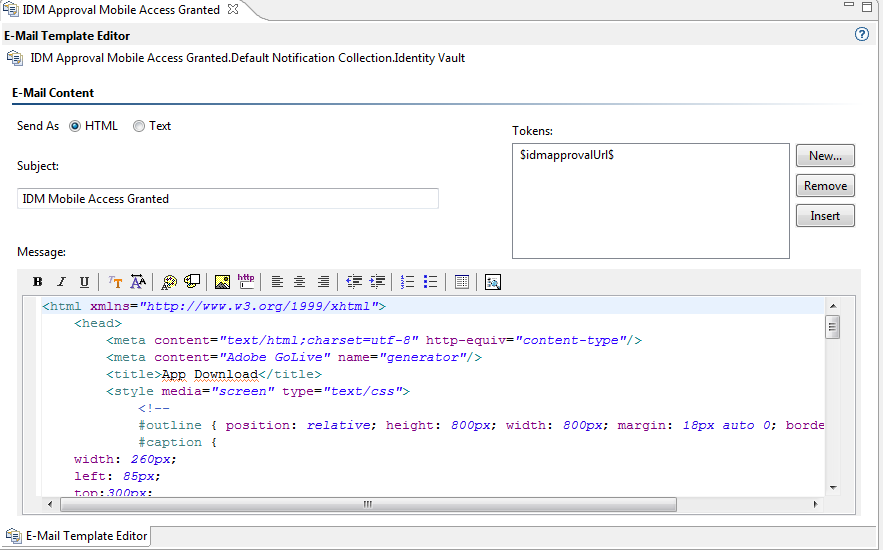
WARNING:If you customize or modify the default notification template, do not remove or modify the token $idmapprovalUrl$, either in the Tokens list or in the HTML. The PRD uses the $idmapprovalUrl$ token to provide the notification template a customized configuration link for the requesting user.
-
When finished making any customizations, close and save the notification template.
-
In the Outline view, right-click and select .
-
Click .
-
Click .
Customizing the Generic PRD
We recommend customizing the generic PRD for your environment. You can customize the category, workflow activities, entities, and forms. The PRD includes three forms by default:
-
request_form: Request form users use to request access to the Approvals app.
-
approval_form: Approval form managers use to approve or deny requests for access.
-
approval_form_prov_admin: Approval form provisioning administrators use to fix issues with the provisioning server configuration.
To create and customize a PRD to automatically configure your users’ settings in the Approvals app:
-
In the Outline view, navigate to the User Application driver.
-
Expand .
-
Right-click and select .
-
Modify the and fields, if necessary.
-
(Optional) If you want to move the PRD from the default Accounts category, click the drop-down menu and select the category you want to use.
NOTE:Most users do not need to modify the , , and fields for the generic PRD. We recommend only advanced users modify these fields.
-
(Optional) By default, the User DAL entity does not have an attribute configure for a user’s mobile telephone number. If you do not currently have a Mobile attribute configured for User entities in your environment, you may need to add the attribute. Complete the following steps to add the attribute to the entity:
-
In the Provisioning view, expand .
-
Right-click and select .
-
In the Data Abstraction Layer view, expand .
-
Right-click and select .
-
In the Add Attribute window, select the mobile attribute in the Available Attributes for Entity Class list.
-
Click to move the attribute to the Entity Attributes list.
-
Click .
-
Close and save the Data Abstraction Layer.
-
-
Click the Workflow tab.
-
Click .
-
Click .
-
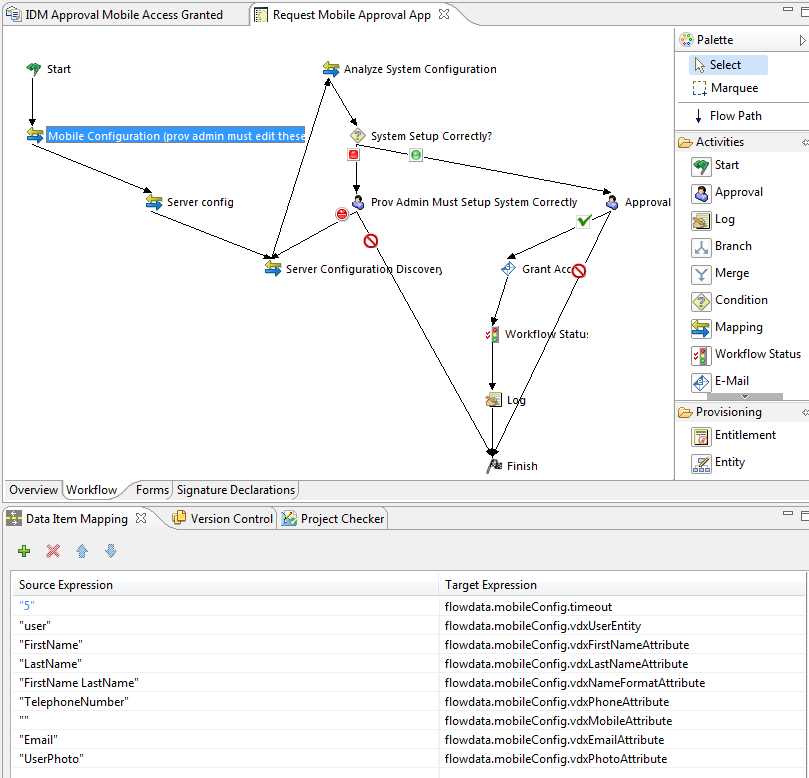
Edit the data item mapping expressions for the Mobile Configuration workflow activity. Ensure that the data item mapping matches the way your DAL User entity is configured.
The following image shows the workflow activity and data item mapping:
-
(Optional) If you want to modify the default for the PRD, complete the following steps:
-
Click the Overview tab.
-
Click the plus icon.
-
Select the group or user you want to be able to request access to the Approvals app.
NOTE:By default, the PRD trustee rights are set to [ROOT]. This default setting allows all users to request access to the Approvals app. Administrators can configure the trustee rights to limit access to only certain users, if necessary.
-
Click .
-
-
(Optional) If you want to customize the default PRD request and approval forms, complete the following steps:
-
In the Forms view, click the name of the form.
-
Modify the fields in the Form Controls window, as necessary.
-
Click the Preview icon to view the form.
-
Click when finished.
-
-
When finished, close and save the Request Mobile Approval App tab.
-
In the Outline view, right-click and select .
-
Right-click and select .
-
Click .
-
Click .
A.2.4 Creating and Deploying a Custom Configuration QR Code
If your users cannot access their work email from their devices, you can create a QR code from the Approvals app configuration link and email that code to your users.
You can use any QR code generator you want to create the code, generating the code using a configuration link customized for your environment. Embed the code in an HTML page on a Web server your users can access.
For the example provided in Setting Up the Approvals App, the QR code could look like the following image:

A user can then install the app, open the email on their work computer, and use a QR code reader on their device to scan the code displayed on the screen.
The QR code acts as a configuration link, automatically configuring the app with any settings you include in the link. In most environments, your users need to then manually configure their Username and Password settings within the app.