7.6 Working with Package Prompts

After you create a base package, we recommend you create package prompts for use in your packages. Package prompts should be stored in the base package, rather than in specific feature sub-packages, so that all feature packages can use the configured prompts if needed.

7.6.1 Understanding Package Prompts

Package prompts allow users to configure the packages included in a driver during the driver installation process. When a user installs a driver, they provide configuration information necessary for that user’s environment.

Some packages include default configuration information built into the package by the package developer, but many configuration properties must be specified at the time of installation. For example, users may need to specify the IP address of the target system or the name of the Identity Vault container used to store user or group information.

The Driver Configuration Wizard provides one or more windows that includes fields where the user can configure the driver. The windows the Driver Configuration Wizard displays are package prompts. You can use package prompts to modify any of the properties of a driver, including the driver name, driver configuration parameters, GCVs, or job parameters.

Prompts are stored as Resource objects and are typically stored in the base package of a driver. Each prompt Resource object can contain one or more fields, which is displayed to the user in the Driver Configuration Wizard. Each prompt corresponds to a window within the Wizard and can be required or optional, as necessary.

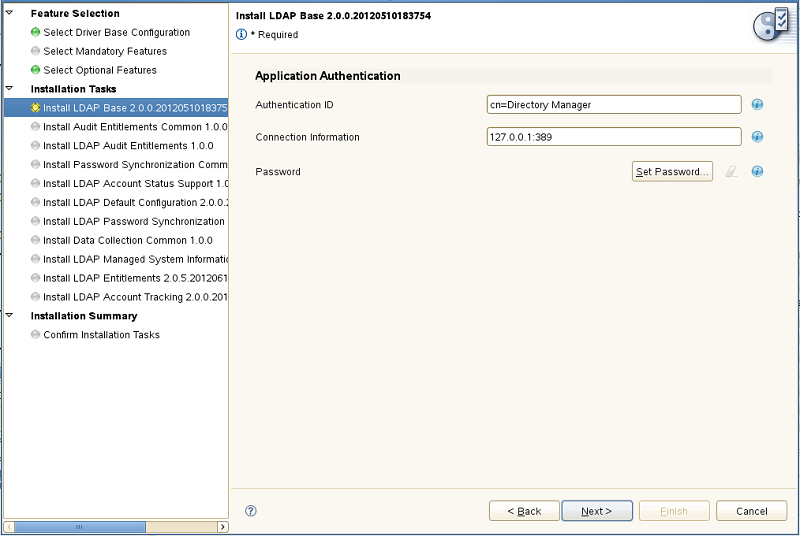
The following graphic provides an example of a default Initial Settings prompt:

NOTE:

  • A package can contain no prompts or many prompts, depending on the needs of the driver.

  • When you install a package, the Driver Configuration Wizard displays package prompts according to the Order parameter value of each prompt. To configure the order in which your prompts appear, right-click the prompt resource in the Outline view and select Properties, specify the value you want to use for the Order parameter, and click OK.

  • Each package prompt is a Resource object of the type application/vnd.novell.dirxml.pkg-prompt+xml.

Designer creates a default pair of XSL style sheets when you create a new package prompt. You can modify those style sheets to fit your needs. Designer uses XSL style sheets to transform both the prompt fields displayed in the Driver Configuration Wizard and package items contained in the target packages specified for the prompt.

The prompt transform configures the way the prompt looks in the Wizard, while the target transform takes information users input using the prompts and modifies objects in your environment depending on that input. Prompts can set values in GCVs and be used to configure specific features of the driver, such as using entitlements or synchronizing passwords. For more information about package transformations, see Understanding Package Prompt Transformations.

7.6.2 Understanding Package Prompt Types

There are eight types of default package prompts available in Designer:

  • Driver Name

  • Global Configuration

  • Initial Settings

  • Job

  • Remote Loader

  • Upgrade Settings

  • MSysInfo Classification

  • Custom

Each type of package prompt has its own set of default fields. However, you can add new fields to a package prompt to configure other driver configuration properties, as necessary in your environment. When you add a new prompt field, Designer creates a GCV for that field.

The following sections describe the different default package prompt types.

NOTE:

  • You can only generate package prompt resources of the Driver Name, Initial Settings, Remote Loader, or Upgrade Settings types from the Package Catalog.

  • To generate Global Configuration and Job package prompts, you must first create a corresponding object, then generate a prompt for the object and add the prompt to a package.

  • To generate a Custom package prompt, you must create a Resource object of the application/vnd.novell.dirxml.pkg+prompt+xml type.

  • MSysInfo Classification package prompts are created outside of the package prompt interface.

  • You can only generate Driver Name and Remote Loader package prompt resources on a base package.

Driver Name

This type of package prompt allows users to specify the name of the driver. The only prompt field included in this package prompt is Driver Name.

Field Display Name

Field Attribute Name

Driver Name

name

This package prompt is only available for base packages.

Global Configuration

This type of package prompt allows users to modify the properties of one or more GCV resources.

For more information about creating a Global Configuration package prompt, see Creating Global Configuration Prompts.

Initial Settings

This type of package prompt allows users to configure the initial driver configuration properties of a driver object. For example, a user can specify the connection information and password they want to use for the driver.

For more information about configuring the initial settings for a driver, see Configuring Initial Settings.

Field Display Name

Field Attribute Name

Authentication ID

shim-auth-id

Connection Information

shim-auth-server

Password

shim-auth-password

Job

This type of package prompt allows users to modify specific parameters of a job contained in the package.

Remote Loader

This type of package prompt allows users to configure the Remote Loader settings for the driver. If your driver supports the Remote Loader, you must include the Remote Loader package prompt in your package. Packages typically display the Remote Loader package prompt last during driver installation.

Field Display Name

Field Attribute Name

Connect To Remote Loader

use-remote-loader

Host Name

rl-hostname

Port

rl-port

KMO

rl-kmo

Other parameters

rl-other

Remote Password

rl-password

Driver Password

driver-password

Manager Password

ManagerPassword

This package prompt is only available for base packages.

Upgrade Settings

This type of package prompt contains style sheets that maintain your custom package settings so that they are not overwritten when you upgrade or downgrade the package.

The Upgrade Settings package prompt contains no prompt fields.

MSysInfo Classification

This type of package prompt allows users to specify the classification of a particular managed system and the type of environment the managed system provides. The Reporting module can then classify the driver by managed system or environment in reports.

NOTE:This package prompt is typically only used in specialized drivers like eDirectory.

Users can select one of the following options for the classification of a managed system:

  • Mission-Critical

  • Vital

  • Not-Critical

  • Other

Users can select one of the following options for the environment of a managed system:

  • Development

  • Test

  • Staging

  • Production

  • Other

Custom

This type of package prompt can be customized to modify anything the package installs. The target of a custom package prompt is any object in the package that you want users to be able to change when installing and configuring the driver. For example, if you want users to modify a policy during the installation process, you can create a custom package prompt and specify the policy as the target for the prompt.

For more information about creating custom package prompts, see Creating Package Prompt Resources.

7.6.3 Understanding Package Prompt Transformations

When you install a package, Designer performs the following tasks for each prompt that belongs to the package:

  • Reads the prompt

  • Applies the prompt transform XSL on the prompt XML

  • Displays the transformed prompt in the Driver Configuration Wizard

  • Receives the values specified by the user in the Driver Configuration Wizard

  • Applies the target transform XSL on the target object using the values specified by the user and the initial package settings

The following diagram displays the Designer workflow for prompt transformations:

Prompt transforms are typically used for conditional prompting, where the Driver Configuration Wizard only displays a prompt if specific conditions are met. For example, when you install a driver, the Driver Name prompt allows you to specify a name for the driver. However, when you run view the driver properties after installation, Designer does not display the Driver Name prompt.

Target transforms are typically used to modify different types of targets during the driver installation process. For example, target transforms allow you to modify the named password used by a particular driver, based on the password the user specifies in a package prompt.

NOTE:Most package developers can use an existing XSL style sheet for their package-creation needs. However, advanced users may need to customize the XSL style sheets. To customize prompt and target transforms, you should understand the style sheets and the inputs the style sheets receive. See the sections below for information about default style sheets and inputs.

Each transform includes three XML documents, defsDoc, curDoc, and npDoc, as well as the boolean propertyWizard flag.

These four components allow you to apply a transform to a prompt or target, depending on your needs. You add defsDoc, curDoc, npDoc, or propertyWizard to your transform as parameters in the XSL code. For more information about the transform parameters, see the following sections.

defsDoc

This XML parameter contains the prompts, or configuration value definitions, including the values specified by the user on the prompt page.

Sample document:

    <configuration-values>
        <definitions>
            <header display-name="Authentication"/>
            <definition display-name="SAP User ID" mandatory="true" name="shim-auth-id" type="string">
                <description>The ID of the User this driver will use for SAP Logon.  This is referred to as 'User' in the SAP Logon screen.</description>
                <value>idmdriver</value>
            </definition>
            <definition display-name="SAP User Password" mandatory="true" name="shim-auth-password" type="password-ref">
                <description>The User password this driver will use for SAP Logon.  This is referred to as 'Password' in the SAP Logon screen.</description>
                <value>shim-auth-password</value>
            </definition>
        </definitions>
    </configuration-values>

curDoc

In the case of an upgrade or downgrade using the Installation Wizard, this parameter contains the XML content of the currently installed prompt target. In the case of an initial install using the Driver Configuration Wizard, this document is empty.

Sample document (only an excerpt, as these docs are rather large):

    <ds-attributes>
        <ds-attribute ds-attr-name="shim-auth-id">
            <ds-value>idmdriver</ds-value>
        </ds-attribute>
        <ds-attribute ds-attr-name="shim-auth-server">
            <ds-value>127.0.0.1</ds-value>
        </ds-attribute>
        <ds-attribute ds-attr-name="driver-start-option">
            <ds-value>2</ds-value>
        </ds-attribute>
    </ds-attributes>

npDoc

In the case of an upgrade or downgrade, this parameter contains an XML representation of all named passwords available on the prompt target.

Only the names of existing passwords are available, not their values. If a named password has been set using a prompt, both its name and value are available.

To set a named password, append the following structure to the transform target:

    <ds-attribute ds-attr-name="named-password">
        <ds-value display-name="Password 1" name="pwd1">1</ds-value>
        <ds-value display-name="Password 2" name="pwd2">2</ds-value>
    </ds-attribute>

NOTE:

  • The transform target must support named passwords.

  • You cannot get or modify passwords using a handle to the npDoc document. For security reasons, the value of the password itself is never displayed.

Sample document:

    <named-passwords>
        <named-password name="promptedPwd">promptedValue</named-password>
        <named-password name="existingPwd"/>
    </named-passwords>

propertyWizard Flag

This boolean parameter indicates if the package is installed from the Installation Wizard, which is launched from the package Properties window, or from the Driver Configuration Wizard, which Designer launches when you install a new driver. The possible options are true (Installation Wizard) or false (Driver Configuration Wizard).

This parameter allows you to configure a package prompt to be displayed or hidden depending on the wizard. For the Driver Name prompt, this parameter is set to false by default, so that Designer only prompts users for the driver name in the Driver Configuration Wizard.

7.6.4 Example Default Prompt Transformations

As discussed previously, each of the default package prompt types contains both a prompt transformation and a target transformation. The following subsections provide examples of some of the default prompt transformation stylesheets.

Driver Name

The default prompt transformation for a Driver Name package prompt uses the propertyWizard flag to check if the user is viewing the prompt in the Installation Wizard or Driver Configuration Wizard, then pre-populates the prompt with an existing value, if a driver name already exists.

  <xsl:param name="propertyWizard"/>
  <xsl:template match="header[@driver-name='true']">
    <xsl:if test="$propertyWizard='false'">
      <xsl:copy>
        <xsl:apply-templates select="@*|node()"/>
      </xsl:copy>
    </xsl:if>
  </xsl:template>
  <xsl:template match="definition[@driver-name='true']">
    <xsl:if test="$propertyWizard='false'">
      <xsl:copy>
        <xsl:apply-templates select="@*|node()"/>
      </xsl:copy>
    </xsl:if>
  </xsl:template>
  <!-- pre-populate prompts with existing values -->
  <xsl:template match="definition/value">
    <xsl:variable name="name" select="../@name"/>
    <xsl:variable name="curVal">
      <xsl:choose>
        <xsl:when test="$curDoc//ds-value[../@ds-attr-name=$name]/text()">
          <xsl:value-of select="$curDoc//ds-value[../@ds-attr-name=$name]/text()"/>
        </xsl:when>
        <xsl:otherwise>
          <xsl:value-of select="$curDoc//value[../@name=$name]/text()"/>
        </xsl:otherwise>
      </xsl:choose>
    </xsl:variable>
    <xsl:choose>
      <!-- backfilling from current value -->
      <xsl:when test="$curVal">
        <value>
          <xsl:value-of select="$curVal"/>
        </value>
      </xsl:when>
      <!-- no current value found -->
      <xsl:otherwise>
        <xsl:copy>
          <xsl:apply-templates select="@*|node()"/>
        </xsl:copy>
      </xsl:otherwise>
    </xsl:choose>
  </xsl:template>
  <!-- identity transformation template -->
  <xsl:template match="node()|@*">
    <xsl:copy>
      <xsl:apply-templates select="@*|node()"/>
    </xsl:copy>
  </xsl:template>

Initial Settings

The default prompt transformation for an Initial Settings package prompt pre-populates the prompt fields with existing values, if applicable.

  <xsl:param name="propertyWizard"/>
  <xsl:template match="header[@driver-name='true']">
    <xsl:if test="$propertyWizard='false'">
      <xsl:copy>
        <xsl:apply-templates select="@*|node()"/>
      </xsl:copy>
    </xsl:if>
  </xsl:template>
  <xsl:template match="definition[@driver-name='true']">
    <xsl:if test="$propertyWizard='false'">
      <xsl:copy>
        <xsl:apply-templates select="@*|node()"/>
      </xsl:copy>
    </xsl:if>
  </xsl:template>
  <!-- pre-populate prompts with existing values -->
  <xsl:template match="definition/value">
    <xsl:variable name="name" select="../@name"/>
    <xsl:variable name="curVal">
      <xsl:choose>
        <xsl:when test="$curDoc//ds-value[../@ds-attr-name=$name]/text()">
          <xsl:value-of select="$curDoc//ds-value[../@ds-attr-name=$name]/text()"/>
        </xsl:when>
        <xsl:otherwise>
          <xsl:value-of select="$curDoc//value[../@name=$name]/text()"/>
        </xsl:otherwise>
      </xsl:choose>
    </xsl:variable>
    <xsl:choose>
      <!-- backfilling from current value -->
      <xsl:when test="$curVal">
        <xsl:variable name="checkRemote">
          <xsl:choose>
            <xsl:when test="$name='shim-auth-server' or $name='shim-auth-password'">
              <xsl:value-of select="'true'"/>
            </xsl:when>
            <xsl:otherwise>
              <xsl:value-of select="'false'"/>
            </xsl:otherwise>
          </xsl:choose>
        </xsl:variable>
        <xsl:choose>
          <xsl:when test="$checkRemote='true' and starts-with($curVal, 'REMOTE')">
            <value>
              <xsl:value-of select="substring-after($curVal, ')')"/>
            </value>
          </xsl:when>
          <xsl:otherwise>
            <value>
              <xsl:value-of select="$curVal"/>
            </value>
          </xsl:otherwise>
        </xsl:choose>
      </xsl:when>
      <!-- no current value found -->
      <xsl:otherwise>
        <xsl:copy>
          <xsl:apply-templates select="@*|node()"/>
        </xsl:copy>
      </xsl:otherwise>
    </xsl:choose>
  </xsl:template>
  <!-- identity transformation template -->
  <xsl:template match="node()|@*">
    <xsl:copy>
      <xsl:apply-templates select="@*|node()"/>
    </xsl:copy>
  </xsl:template>

7.6.5 Example Default Target Transformations

The following subsections provide examples of some of the default target transformation stylesheets.

Global Configuration

The default target transformation for a Global Configuration package prompt applies the specified prompt values to a global configuration object.

  <xsl:param name="propertyWizard"/>
  <!-- handle non-existing named passwords -->
  <xsl:template match="ds-attributes">
    <xsl:copy>
      <xsl:apply-templates select="@*"/>
      <xsl:choose>
        <!-- no named passwords defined in initial settings -->
        <xsl:when test="count(ds-attribute[@ds-attr-name='named-password'])=0">
          <ds-attribute ds-attr-name="named-password">
            <xsl:for-each select="$npDoc//named-passwords/named-password[count($defsDoc//definition[@type='password-ref']/value[text()=@name])>0]">
              <ds-value display-name="a" name="a">bb</ds-value>
            </xsl:for-each>
          </ds-attribute>
        </xsl:when>
        <!-- named passwords defined in initial settings -->
        <xsl:otherwise>
          <xsl:apply-templates select="node()"/>
        </xsl:otherwise>
      </xsl:choose>
    </xsl:copy>
  </xsl:template>
  <!-- handle existing named passwords -->
  <xsl:template match="ds-attribute[@ds-attr-name='named-password']">
    <xsl:copy>
      <xsl:apply-templates select="@*"/>
      <xsl:for-each select="ds-value">
        <xsl:copy>
          <xsl:apply-templates select="@*"/>
          <xsl:variable name="npName" select="@name"/>
          <xsl:variable name="npValue" select="$npDoc//named-passwords/named-password[@name=$npName]/text()"/>
          <xsl:choose>
            <xsl:when test="string-length($npValue)>0">
              <xsl:value-of select="$npValue"/>
            </xsl:when>
            <xsl:otherwise>
              <xsl:value-of select="."/>
            </xsl:otherwise>
          </xsl:choose>
        </xsl:copy>
      </xsl:for-each>
    </xsl:copy>
  </xsl:template>
  <!-- inject prompt values into target definitions -->
  <xsl:template match="definition/value">
    <xsl:variable name="name" select="../@name"/>
    <xsl:variable name="promptVal" select="$defsDoc//value[../@name=$name]"/>
    <xsl:choose>
      <!-- inject value from prompt -->
      <xsl:when test="$promptVal">
        <xsl:copy>
          <xsl:value-of select="$promptVal"/>
        </xsl:copy>
      </xsl:when>
      <!-- no current value found -->
      <xsl:otherwise>
        <xsl:copy>
          <xsl:apply-templates select="@*|node()"/>
        </xsl:copy>
      </xsl:otherwise>
    </xsl:choose>
  </xsl:template>
  <!-- identity transformation template -->
  <xsl:template match="node()|@*">
    <xsl:copy>
      <xsl:apply-templates select="@*|node()"/>
    </xsl:copy>
  </xsl:template>

Remote Loader

The default target transformation for a Remote Loader package prompt handles Remote Loader-specific prompt fields. The target transformation also provides the Remote Loader parameters and password to the Initial Settings package prompt to use in the Connection Information and Password fields.

<xsl:param name="propertyWizard"/>
  <xsl:template match="ds-attribute[@ds-attr-name='driver-password']"/>
  <!-- Remove the native module if we are running remote -->
  <xsl:template match="ds-attribute[@ds-attr-name='native-module']">
    <xsl:variable name="useRemoteLoader" select="$defsDoc//definition[@name='use-remote-loader']/value/text()"/>
    <xsl:if test="$useRemoteLoader='false'">
      <xsl:copy>
        <xsl:apply-templates select="@*|node()"/>
      </xsl:copy>
    </xsl:if>
  </xsl:template>
  <!-- Replace the java module with the remote shim if we are running remote -->
  <xsl:template match="ds-attribute[@ds-attr-name='java-module']/ds-value/text()">
    <xsl:variable name="useRemoteLoader" select="$defsDoc//definition[@name='use-remote-loader']/value/text()"/>
    <xsl:choose>
      <xsl:when test="$useRemoteLoader='true'">
        <xsl:value-of select="'com.novell.nds.dirxml.remote.driver.DriverShimImpl'"/>
      </xsl:when>
      <xsl:otherwise>
        <xsl:value-of select="."/>
      </xsl:otherwise>
    </xsl:choose>
  </xsl:template>
  <xsl:template match="ds-attributes">
    <xsl:variable name="useRemoteLoader" select="$defsDoc//definition[@name='use-remote-loader']/value/text()"/>
    <xsl:variable name="rlHost" select="$defsDoc//definition[@name='rl-hostname']/value/text()"/>
    <xsl:variable name="rlPort" select="$defsDoc//definition[@name='rl-port']/value/text()"/>
    <xsl:variable name="rlKMOTemp" select="$defsDoc//definition[@name='rl-kmo']/value/text()"/>
    <xsl:variable name="rlKMO">
      <xsl:choose>
        <xsl:when test="string-length($rlKMOTemp)>0">
          <xsl:choose>
            <xsl:when test="contains($rlKMOTemp, ' ')">
              <xsl:variable name="c1" select="concat(&quot;&apos;&quot;, $rlKMOTemp)"/>
              <xsl:variable name="c2" select="concat($c1, &quot;&apos;&quot;)"/>
              <xsl:value-of select="concat(' kmo=', $c2)"/>
            </xsl:when>
            <xsl:otherwise>
              <xsl:value-of select="concat(' kmo=', $rlKMOTemp)"/>
            </xsl:otherwise>
          </xsl:choose>
        </xsl:when>
        <xsl:otherwise>
          <xsl:value-of select="''"/>
        </xsl:otherwise>
      </xsl:choose>
    </xsl:variable>
    <xsl:variable name="rlOtherTemp" select="$defsDoc//definition[@name='rl-other']/value/text()"/>
    <xsl:variable name="rlOther">
      <xsl:choose>
        <xsl:when test="string-length($rlOtherTemp)>0">
          <xsl:value-of select="concat(' ', $rlOtherTemp)"/>
        </xsl:when>
        <xsl:otherwise>
          <xsl:value-of select="''"/>
        </xsl:otherwise>
      </xsl:choose>
    </xsl:variable>
    <xsl:variable name="rlPwd" select="$npDoc//named-password[@name='rl-password']/text()"/>
    <xsl:copy>
      <xsl:apply-templates select="@*|node()"/>
      <xsl:if test="$useRemoteLoader='true'">
        <!-- inject the driver password if running remote -->
        <xsl:for-each select="$npDoc//named-passwords/named-password[@name='driver-password']/text()">
          <ds-attribute ds-attr-name="driver-password">
            <ds-value>
              <xsl:value-of select="."/>
            </ds-value>
          </ds-attribute>
        </xsl:for-each>
        <!-- Add a java module attribute node if one does not exist -->
        <xsl:choose>
          <xsl:when test="ds-attribute[@ds-attr-name='java-module']">
            <!--  Do nothing -->
          </xsl:when>
          <xsl:otherwise>
            <ds-attribute ds-attr-name="java-module">
              <ds-value>com.novell.nds.dirxml.remote.driver.DriverShimImpl</ds-value>
            </ds-attribute>
          </xsl:otherwise>
        </xsl:choose>
        <xsl:if test="$rlHost">
          <!-- Add a shim-auth-server attribute node if one does not exist -->
          <xsl:choose>
            <xsl:when test="ds-attribute[@ds-attr-name='shim-auth-server']/ds-value/text()">
              <!--  Do nothing -->
            </xsl:when>
            <xsl:otherwise>
              <ds-attribute ds-attr-name="shim-auth-server">
                <ds-value>REMOTE(hostname=<xsl:value-of select="$rlHost"/> port=<xsl:value-of select="$rlPort"/>
                  <xsl:value-of select="$rlKMO"/>
                  <xsl:value-of select="$rlOther"/>)</ds-value>
              </ds-attribute>
            </xsl:otherwise>
          </xsl:choose>
        </xsl:if>
        <xsl:if test="$rlPwd">
          <!-- Add a shim-auth-password attribute node if one does not exist -->
          <xsl:choose>
            <xsl:when test="ds-attribute[@ds-attr-name='shim-auth-password']/ds-value/text()">
              <!--  Do nothing -->
            </xsl:when>
            <xsl:otherwise>
              <ds-attribute ds-attr-name="shim-auth-password">
                <ds-value>REMOTE(<xsl:value-of select="$rlPwd"/>)</ds-value>
              </ds-attribute>
            </xsl:otherwise>
          </xsl:choose>
        </xsl:if>
      </xsl:if>
    </xsl:copy>
  </xsl:template>
  <!-- Fix up shim-auth-server if running remote and one already exists -->
  <xsl:template match="ds-attribute[@ds-attr-name='shim-auth-server']/ds-value/text()">
    <xsl:variable name="useRemoteLoader" select="$defsDoc//definition[@name='use-remote-loader']/value/text()"/>
    <xsl:variable name="rlHost" select="$defsDoc//definition[@name='rl-hostname']/value/text()"/>
    <xsl:variable name="rlPort" select="$defsDoc//definition[@name='rl-port']/value/text()"/>
    <xsl:variable name="rlKMOTemp" select="$defsDoc//definition[@name='rl-kmo']/value/text()"/>
    <xsl:variable name="rlKMO">
      <xsl:choose>
        <xsl:when test="string-length($rlKMOTemp)>0">
          <xsl:choose>
            <xsl:when test="contains($rlKMOTemp, ' ')">
              <xsl:variable name="c1" select="concat(&quot;&apos;&quot;, $rlKMOTemp)"/>
              <xsl:variable name="c2" select="concat($c1, &quot;&apos;&quot;)"/>
              <xsl:value-of select="concat(' kmo=', $c2)"/>
            </xsl:when>
            <xsl:otherwise>
              <xsl:value-of select="concat(' kmo=', $rlKMOTemp)"/>
            </xsl:otherwise>
          </xsl:choose>
        </xsl:when>
        <xsl:otherwise>
          <xsl:value-of select="''"/>
        </xsl:otherwise>
      </xsl:choose>
    </xsl:variable>
    <xsl:variable name="rlOtherTemp" select="$defsDoc//definition[@name='rl-other']/value/text()"/>
    <xsl:variable name="rlOther">
      <xsl:choose>
        <xsl:when test="string-length($rlOtherTemp)>0">
          <xsl:value-of select="concat(' ', $rlOtherTemp)"/>
        </xsl:when>
        <xsl:otherwise>
          <xsl:value-of select="''"/>
        </xsl:otherwise>
      </xsl:choose>
    </xsl:variable>
    <xsl:choose>
      <xsl:when test="$useRemoteLoader='true'">
        <xsl:variable name="curVal" select="."/>
        <xsl:variable name="tmpVal" select="concat(concat('REMOTE(hostname=', $rlHost), ' port=')"/>
        <xsl:variable name="remoteVal" select="concat(concat($tmpVal, $rlPort), $rlKMO)"/>
        <xsl:variable name="withKMO" select="concat($remoteVal, $rlOther)"/>
        <xsl:variable name="withOther" select="concat($withKMO, ')')"/>
        <xsl:variable name="serverVal" select="concat($withOther, $curVal)"/>
        <xsl:value-of select="$serverVal"/>
      </xsl:when>
      <xsl:otherwise>
        <xsl:value-of select="."/>
      </xsl:otherwise>
    </xsl:choose>
  </xsl:template>
  <!-- Fix up shim-auth-password if running remote and one already exists -->
  <xsl:template match="ds-attribute[@ds-attr-name='shim-auth-password']/ds-value/text()">
    <xsl:variable name="useRemoteLoader" select="$defsDoc//definition[@name='use-remote-loader']/value/text()"/>
    <xsl:variable name="rlPwd" select="$npDoc//named-password[@name='rl-password']/text()"/>
    <xsl:choose>
      <xsl:when test="$useRemoteLoader='true'">
        <xsl:variable name="curVal" select="."/>
        <xsl:variable name="remoteVal" select="concat(concat('REMOTE(', $rlPwd), ')')"/>
        <xsl:variable name="pwdVal" select="concat($remoteVal, $curVal)"/>
        <xsl:value-of select="$pwdVal"/>
      </xsl:when>
      <xsl:otherwise>
        <xsl:value-of select="."/>
      </xsl:otherwise>
    </xsl:choose>
  </xsl:template>
  <!-- identity transformation template -->
  <xsl:template match="node()|@*">
    <xsl:copy>
      <xsl:apply-templates select="@*|node()"/>
    </xsl:copy>
  </xsl:template>

7.6.6 Examples of Modified Prompt Transformations

In this section, we provide a few examples to demonstrate how you can modify a prompt transform and why modifying a prompt transform can be useful.

Use Case 1: Need to configure different behavior for package installation through the Driver Configuration Wizard and the Installation Wizard

If you upgrade a package using the Installation Wizard, Designer does not need to prompt you for the driver name, as the driver name should already be configured.

To avoid the Wizard prompting you for the driver name, use the flag propertyWizard in the prompt transform. Depending on the flag, we remove the given prompt from prompt display.

Sample XSL code:

<xsl:template match="header[@driver-name='true']">
          <xsl:if test="$propertyWizard='false'">
                <xsl:copy>
                        <xsl:apply-templates select="@*|node()"/>
                </xsl:copy>
          </xsl:if>
</xsl:template>

Use Case 2: Need to pre-fill prompts with existing values during the upgrade process

During an upgrade or downgrade, Designer ensures that Designer displays the values you entered during the initial installation. The user therefore does not need to remember all the values specified during the first installation.

For each definition in the input document (in this case, the prompt document), Designer tries to find the corresponding definition in the current document (curDoc). When Designer finds a matching definition, the application stores the corresponding value in a temporary variable, curVal.

Designer then populates the prompt document with the curVal value and displays the pre-filled prompts to the user during the upgrade or downgrade process.

Sample XSL code:

<xsl:template match="definition/value">
    <xsl:variable name="name" select="../@name"/>
    <xsl:variable name="curVal">
      <xsl:choose>
        <xsl:when test="$curDoc//ds-value[../@ds-attr-name=$name]/text()">
          <xsl:value-of select="$curDoc//ds-value[../@ds-attr-name=$name]/text()"/>
        </xsl:when>
        <xsl:otherwise>
          <xsl:value-of                                                     select="$curDoc//value[../@name=$name]/text()"/>
        </xsl:otherwise>
      </xsl:choose>
    </xsl:variable>
    <xsl:choose>
      <!-- backfilling from current value -->
      <xsl:when test="$curVal">
        <value>
          <xsl:value-of select="$curVal"/>
        </value>
      </xsl:when>
      <!-- no current value found -->
      <xsl:otherwise>
        <xsl:copy>
          <xsl:apply-templates select="@*|node()"/>
        </xsl:copy>
      </xsl:otherwise>
    </xsl:choose>
</xsl:template>

7.6.7 Example of Modified Target Transformation

In this section, we provide an example to demonstrate how you can modify a target transform and why modifying a target transform can be useful.

Use Case: Need to provide the driver name at the necessary place during target transformation

In this case, you want to add the driver name to the initial data so that the driver name prompt changes the name in all necessary locations on the driver.

Sample XSL code:

<xsl:template match="ds-attributes">
    <xsl:copy>
      <xsl:apply-templates select="@*|node()"/>
      <xsl:if test="$propertyWizard='false' and boolean(ds-attribute[@ds-attr-name='name']/ds-value)=false()">
        <!-- Make sure we have a name when called from the DCW -->
        <xsl:variable name="promptVal" select="$defsDoc//value[../@name='name']"/>
        <xsl:variable name="driverName">
          <xsl:choose>
            <!-- use prompt value -->
            <xsl:when test="$promptVal">
              <xsl:value-of select="$defsDoc//value[../@name='name']/text()"/>
            </xsl:when>
            <!-- no prompt value found, use default value -->
            <xsl:otherwise>Driver</xsl:otherwise>
          </xsl:choose>
        </xsl:variable>
        <ds-attribute ds-attr-name="name">
          <ds-value>
            <xsl:value-of select="$driverName"/>
          </ds-value>
        </ds-attribute>
      </xsl:if>
    </xsl:copy>
</xsl:template>

7.6.8 Adding Default Package Prompts

To add package prompts to a base package:

  1. Verify that you have created a base package. Otherwise, follow Creating a Base Package to create a new base package.

  2. Right-click the package in the package catalog and select Generate Prompt Resource.

  3. Select the type of package prompt you want to configure.

    NOTE:You can only create one of each type of prompt for a particular package.

  4. In the package catalog, expand the package version and Resources directory.

  5. Right-click the new package prompt and select Properties.

  6. Verify the type of package prompt.

  7. Specify the order in which you want the Driver Configuration Wizard to display the current package prompt. The Wizard displays prompts in ascending order starting from 0.

  8. Verify the target displayed is correct for the package prompt. If you want to add the prompt to a different package, click Add, browse to the package, and click OK.

  9. Click the Prompts tab. The Properties window displays what the current package prompt looks like in the Driver Configuration Wizard.

You now have default package prompts created and you can edit and change these prompts for your own needs.

7.6.9 Creating Custom Package Prompts

In addition to adding default, auto-generated prompts to your packages, you can create a custom prompt to modify a specific GCV object in your package or create a package prompt resource to modify any non-GCV target object in your package.

Creating Global Configuration Prompts

You can create a package prompt that modifies a GCV object contained in your custom package.

NOTE:To create a Global Configuration prompt, you must first install the base package on the development driver.

For more information, see the Global Configuration Value Definition Editor in the NetIQ Identity Manager - Using Designer to Create Policies.

To create and configure a Global Configuration package prompt, complete the following steps:

  1. Install the base package you want to use on your development driver. For more information about installing the development driver, see Creating a Development Driver.

  2. In the Outline view, right-click the driver name and select New > Global Configuration.

  3. Specify a name for the new GCV resource object and click OK.

  4. In the Outline view, right-click the new GCV resource object and select Add to Package.

  5. Select the base package where you want to add the GCV resource and click OK.

  6. In the Outline view, navigate to the base package and expand Global Configurations.

  7. Right-click the new GCV resource object and select Generate Prompt Resource. Designer creates a new package prompt for the GCV in the Resources directory.

  8. Right-click the new GCV package prompt and select Properties.

  9. Verify that the target of the package prompt is the GCV resource object you created.

  10. Specify the order in which you want the Driver Configuration Wizard to display the GCV package prompt. The Wizard displays prompts in ascending order starting from 0.

  11. Click Prompts.

  12. Click Add to add each new prompt you want to include in the GCV package prompt Resource object. For information about adding new prompts, see Adding Prompts.

  13. When finished adding prompts, click Apply.

  14. Click Prompt Transformation. This window allows you to configure how you want to display the prompt in the Driver Configuration Wizard.

  15. Modify the default Global Configuration transform as necessary for your GCV package prompt. For more information about the default Global Configuration prompt transform, see Global Configuration. For more information about prompt transforms, see Understanding Package Prompt Transformations.

  16. Click Apply.

  17. Click Target Transformation. This window allows you to configure how you want to modify the target of the transform.

  18. Modify the default Global Configuration transform as necessary for your GCV package prompt. For more information about the default Global Configuration target transform, see Global Configuration. For more information about target transforms, see Understanding Package Prompt Transformations.

  19. Click OK.

Creating Package Prompt Resources

You can create custom package prompts directly as resource objects themselves. You can create a package prompt to modify any object the package installs on the driver.

To create a custom package prompt, complete the following steps:

  1. In the Outline view, right-click the development driver and select New > Resource.

  2. Specify the name you want to use for the custom prompt.

  3. In the Content type drop-down menu, select application/vnd.novell.dirxml.pkg+prompt+xml.

  4. Clear Open the editor after creating the object and click OK.

  5. (Optional) If prompted to save, click Yes.

  6. In the Outline view, right-click the custom package prompt Resource object and select Add to Package.

  7. Select the base package where you want to add the package prompt resource and click OK.

  8. In the Outline view, navigate to the base package and expand Resources.

  9. Right-click the custom package prompt and select Properties.

  10. Next to the Targets field, click Add.

  11. Expand the Package Catalog and select the base package to which you added the custom prompt, then click OK.

  12. Specify the order in which you want the Driver Configuration Wizard to display the custom prompt. The Wizard displays prompts in ascending order starting from 0.

  13. Click Prompts.

  14. Click Add to add each new prompt you want to include in the custom prompt Resource object. For information about adding new prompts, see Adding Prompts.

  15. When finished adding prompts, click Apply.

  16. Click Prompt Transformation. This window allows you to configure how you want to display the prompt in the Driver Configuration Wizard.

  17. (Conditional) If you want to use a default prompt transform as the prompt transform for your custom prompt, click Generate from template and select the template you want to use, then click OK. Designer automatically populates the Stylesheet window with the selected template.

    WARNING:When you generate the prompt transform from a template, Designer overwrites any XML currently in the Stylesheet window. If you have any previously-customized XML, ensure that you save the existing XML before clicking Generate from template.

  18. Modify the default transform as necessary for your custom package prompt. For more information about default prompt transforms, see Understanding Package Prompts. For more information about transforms, see Understanding Package Prompt Transformations.

  19. Click Apply.

  20. Click Target Transformation. This window allows you to configure how you want to modify the target of the transform.

  21. (Conditional) If you want to use a default target transform as the target transform for your custom prompt, click Generate from template and select the template you want to use, then click OK. Designer automatically populates the Stylesheet window with the selected template.

    WARNING:When you generate the target transform from a template, Designer overwrites any XML currently in the Stylesheet window. If you have any previously-customized XML, ensure that you save the existing XML before clicking Generate from template.

  22. Modify the default transform as necessary for your custom package prompt. For more information about default target transforms, see Understanding Package Prompts. For more information about transforms, see Understanding Package Prompt Transformations.

  23. Click OK.

7.6.10 Editing Package Prompts

You can edit the properties of a Resource object to change the package prompts to meet your needs. You can add new prompts, edit the existing prompts, or add default values for the prompts that are displayed when the package is installed.

Adding Prompts

  1. In the Outline view, right-click the Prompt Resource object in the package, then click Properties.

  2. Click Prompts, then click Add. For more information about adding a GCV resource as a prompt, see Global Configuration Value Definition Editor in NetIQ Identity Manager - Using Designer to Create Policies.

  3. Click Finish to save the changes and close the page.

Editing Existing Prompts

  1. In Outline view, right-click the Prompt Resource object in the package, then click Properties.

  2. Click Prompts.

  3. Select the prompt, then click Edit.

  4. Make the desired changes, then click Finish.

Setting Default Values for the Prompts

  1. In the Outline view, right-click the Prompt Resource object in the package, then click Properties.

  2. Click Prompts.

  3. Specify the default value in each prompt, then click Apply to save the changes.

  4. Click OK to close the Prompts page.