3.1 Creating the Driver Object in Designer

You create the ServiceNow driver by importing the driver’s packages and then modifying the configuration to suit your environment. After you have created and configured the driver, you need to deploy and start it.

3.1.1 Importing the Driver Packages in Designer

The driver packages contain the items required to create a driver, such as policies, entitlements, filters, and schema mapping policies. These packages are only available in Designer and can be updated after they are installed. You should use the most current version of the packages in the Package Catalog before you can create a new driver object.

To verify that you have the most recent version of the driver packages in the Package Catalog:

  1. Open Designer.

  2. In the toolbar, click Help > > Check for Package Updates.

  3. Click OK to update the packages.

  4. In the Outline view, right-click Package Catalog.

  5. Click Import Package.

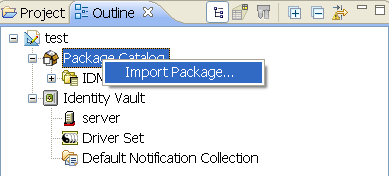
  6. Select any ServiceNow driver packages.

    or

    Click Select All to import all of the packages displayed.

    By default, only the base packages are displayed. Deselect Show Base Packages Only to display all packages.

  7. Click OK to import the selected packages, then click OK in the successfully imported packages message.

  8. After the current packages are imported, continue with Installing the Driver Packages.

NOTE:Designer does not display the name of the driver or the driver symbol when you import the ServiceNow driver from Identity Vault. This issue is seen in Modeler only.

3.1.2 Installing the Driver Packages

  1. In Designer, open your project.

  2. In the Modeler, right-click the driver set where you want to create the driver, then click New > Driver.

  3. Select ServiceNow Base, then click Next.

  4. Select the optional features to be installed, then click Next. The options are:

    • ServiceNow Default Configuration: This package contains the default policies required to enable the driver to create user and group accounts. Leave this option selected.

    • ServiceNow Password Synchronization: This package contains the policies that enable the ServiceNow driver to synchronize passwords.To synchronize passwords, verify that this option is selected. For more information, see the NetIQ Identity Manager Password Management Guide.

    • ServiceNow Driver Entitlements: This package contains configuration information and policies for synchronizing user accounts, group membership, roles, and departments. If you want account creation and auditing enabled through entitlements, verify that this option is selected. For more information, see the NetIQ Identity Manager Entitlements Guide.

  5. (Conditional) If there are package dependencies for the packages you selected to install, you must install these dependencies to install the selected package. Click OK to install the package dependencies listed.

  6. (Conditional) The Common Settings page is only displayed if the Common Settings package is installed as a dependency. On the Install Common Settings page, fill in the following fields, then click Next:

    User Container: Select the Identity Vault container where ServiceNow user accounts will be added if they do not already exist in the vault. This value becomes the default for all drivers in the driver set.

    Group Container: Select the Identity Vault container where ServiceNow groups will be added if they do not already exist in the vault. This value becomes the default for all drivers in the driver set.

  7. On the Install ServiceNow Base page, specify a name for the driver that is unique within the driver set, and then click Next.

  8. On the new Install ServiceNow Base page, fill in the following fields, then click Next:

    • ServiceNow Base URL: Specify the URL to connect to ServiceNow.

    • ServiceNow Login ID: Specify a ServiceNow account with administrative privileges to be used by Identity Manager.

    • ServiceNow Login Password: Provide the password for the specified ServiceNow account.

    • Always Accept Server Certificate: This option eliminates the need for manually maintaining a truststore. If you select No, you must have a truststore configured with the appropriate certificates.

    • Truststore File Path: Specify the name and path of the truststore file containing the trusted certificates. For example, c:\security\truststore.

    • Proxy host and port: Specify the proxy host address and port. For example, 192.10.1.3:18180. Otherwise, leave the field blank.

    • Set Proxy Authentication Parameters: Select Show to display the proxy authentication parameters.

      • Proxy User ID: Specify the user name for authentication.

      • Proxy User Password: Specify the proxy user password.

    • Use Custom Application Schema: To use a custom schema with the driver, select Yes. By default, the value is set to No, which allows Identity Manager to load the default schema with the driver.

      • Custom Schema File Path: To use a custom schema file, provide the local directory path where the entire schema file exists. For the driver to use the new schema, restart the driver. The default ServiceNow schema file is bundled with the NIdM_Driver_4.5_ServiceNow.zip file.

  9. Connect to Remote Loader: Select Yes or No to determine if the driver will use the Remote Loader. If you select No, skip to Step 10. If you select Yes, use the following information to complete the Remote Loader configuration, then click Next:

    Host Name: Specify the host name or IP address of the server where the Remote Loader Service is installed and running for this driver.

    Port: Specify the port number where the Remote Loader Service is installed and running for the ServiceNow driver. The default port is 8090.

    Remote Password: Specify the Remote Loader password as defined in the Remote Loader service. The Identity Manager engine (or Remote Loader shim) requires this password to authenticate to the Remote Loader.

    Driver Password: Specify the driver object password that is defined in the Remote Loader service. The Remote Loader requires this password to authenticate to the Identity Manager server.

  10. On the Confirm Installation Tasks page, review the summary of tasks and click Finish.

The driver is now created. You can modify the configuration settings, by continuing with the next section, Configuring the Driver Object.

3.1.3 Configuring the Driver Object

Configuring the Driver Parameters: There are many settings that can help you customize and optimize the driver. The settings are divided into categories such as Driver Configuration, Engine Control Values, Global Configuration Values (GCVs), Health, Log Level, Packages, and so on. Although it is important for you to understand all of the settings, your first priority should be to review the Driver Properties located on the Driver Configuration page. The Driver Parameters and the Global Configuration Values let you configure the ServiceNow login information and other parameters associated with the driver. These settings must be configured properly for the driver to start and function correctly.

The driver requires an account with ServiceNow that is an administrator for your ServiceNow subscription. You should create a new account in your ServiceNow specifically for this purpose. Make sure that this new account is set to administer your ServiceNow application.

After completing the configuration tasks, continue with the next section Deploying, Starting and Activating the Driver.