1.3 Creating SCIM Driver Object for Connecting to SAP Cloud
To begin with the configuration, you need to set up the SCIM driver object in the Designer, and configure certain parameters to connect to SAP Cloud.
The procedure to set up the SCIM driver in Designer is similar for any connected application. The generic steps to set up a driver object in Designer is shown from step 1 to step 20. If you are familiar with the generic driver object set up, you can choose to skip Step 17 to continue with the configuration parameters specific to SAP Cloud.
-
Open Designer.
-
In the toolbar, click > .
-
Select the required package as shown in Installing the Driver Packages in Designer to download and click . The Designer is updated with the selected packages.
-
In view, open your project.
-
Right click project > > , or drag and drop Identity Vault from the Palette to Modeler window.
-
In the screen, select the following field values and click .
-
Server DN
-
Identity Manager Version
-
Identity Manager Edition
The Identity Vault Credentials window appears.
-
-
In Identity Vault Credentials window, enter:
Field
Description
Host
The identity vault hosting machine's IP address
Username
The name of the user, for example, Admin, if the user is an administrator.
Password
The password of the user to login to the identity vault
-
Select , if you want to save your password for easy logins in the future.
-
Click .
The Identity Vault with the Driver Set appears in the window.
-
In the right pane, drag and drop the driver icon from tab to the window.
-
In the , select (Contains the base functionality for a driver. You must install a driver base configuration package first).
NOTE:You can only select one base package.
-
Click .
-
In the page, select the , and click .
-
In the page, select the , and if required select , and click .
IMPORTANT:Though the appears in the page, to configure the SCIM driver for SAP Cloud you must select this package mandatorily.
-
Verify if the required items are met, and click .
-
On the page, specify a name for the driver, then click . The page appears.
-
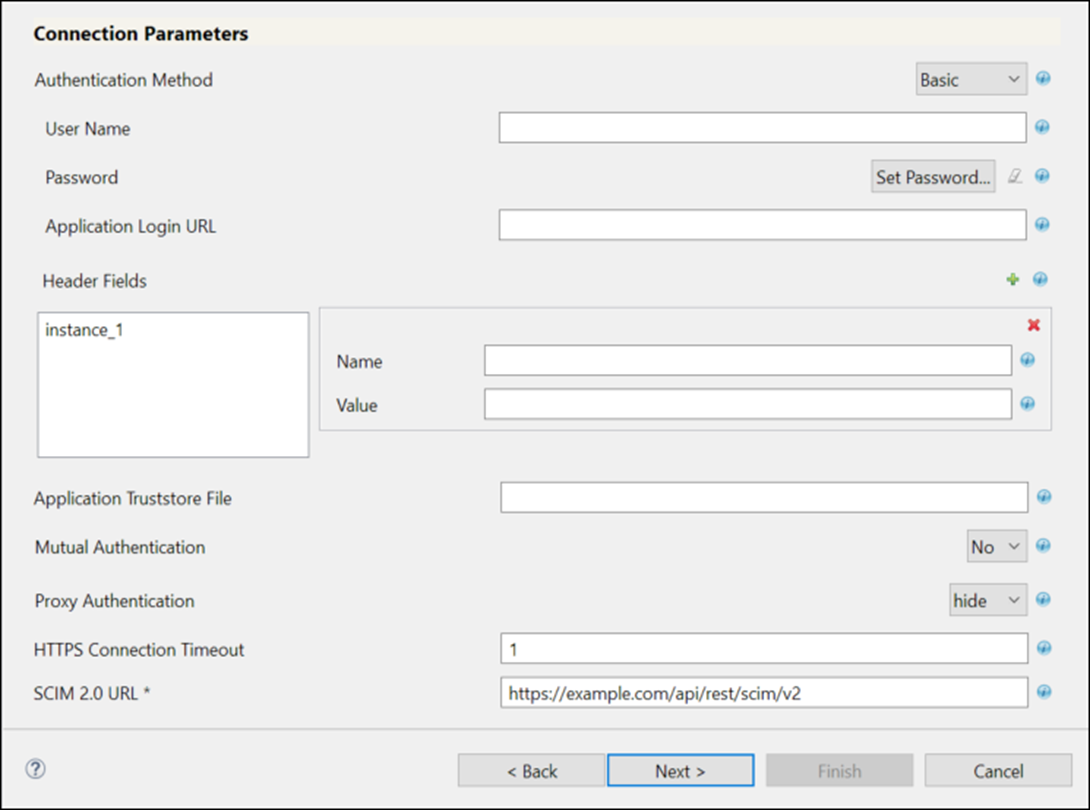
Select in the field.
IMPORTANT:The SCIM driver for SAP Cloud is currently certified with Basic authentication only.
-
Enter the following fields as shown in the table below:
Field
Sample Values
Authentication Method
Select .
User Name: Specify the User ID obtained from SAP Cloud. The procedure to obtain the User ID is explained in Prerequisites.
<be1a0804-7e91-46a1-be48-8a728fb60ef8>
Password: Specify the password in the and fields that you have set in SAP Cloud. The procedure to set the password is explained in Prerequisites.
<user defined password set in SAP Cloud>
Application Login URL: The login URL of SAP Cloud.
<https://tenant_name.accounts.ondemand.com/admin/>
Header Fields: Click the
 icon to create the header fields. Enter the required header fields and supported values for the selected authentication method.
-
Name: Content-Type
-
Value: application/scim+json
Application Truststore File: The path and the name of the keystore file that contains the trusted certificates for the remote server to achieve SSL handshake. The trusted DigiCert CA certificate must be imported from the SAP Cloud portal.
Import the keystore file by running the following command: keytool -import -file <name_of_cert_file> -trustcacerts -noprompt - keystore <filename> -storepass <password>
</root/scim_configuration/trustSapCloud/SapCloud>
Mutual Authentication:Enable and specify this field, if the authentication is supported by the connected application. You must ensure to have both the server certificates stored in Identity Manager and the connected application.
Mutual Authentication is not mandatory for SAP Cloud.
Proxy Authentication: Defaults to . Select if you want to set proxy authentication parameters. Specify the host address and the host post when a proxy host and port are used.
-
: <192.168.0.0:port>. Choose an unused port number on the proxy server.
-
: <user name for proxy authentication>
-
: <password for proxy authentication>
-
: <password for proxy authentication>
HTTPS Connection Timeout: Specify the HTTP connection time out value.
The timeout value must be greater than 0.
NOTE:The driver waits for the time specified (in minutes) and terminates the HTTPS connection displaying the error codes that are configured in the field.
SCIM 2.0 URL: Enter the URL for the SCIM Application. SCIM Resources like User, Group etc. will be appended to this URL.
<https://<tenant ID>.accounts.ondemand.com/service/scim/>
-
-
In the page, specify the and , and click .
Field
Description and Sample Values
Subscriber Options
: Specify the HTTPS errors that must return a retry status. Error codes must be a list of integers separated by spaces. For example: <307 408 503 504>
NOTE:The operation will be retried if these errors are encountered.
Publisher Options
-
: Select to enable the Publisher channel.
-
: The time interval to poll resources from SAP Cloud. Specify the polling interval in minutes.
For example: <10>
-
: This option is used to configure the driver shim to send a periodic status message on the Publisher channel. By default, this is set to 10 minutes.
IMPORTANT:: This field does not appear when you are setting up the driver for the first time. These fields appear after configuring the driver in Designer. Once the driver is configured, double click the connector line in the modeler window and navigate to tab.
-
Select the option to poll on all resources that are configured as part of the schema settings.
-
Select the option and click
to configure customized polling and .-
For User:
-
: Specify the schema’s Uniform Resource Name (URN) of the user. Example, urn:ietf:params:scim:schemas:core:2.0:User
-
: Specify the schema’s Uniform Resource Locator (URL) of the user. Example, https://<tenant ID>.accounts.ondemand.com/service/scim/Users?startIndex=1&count=100
NOTE:In the above URL’s, the startIndex refers to the resource from where the poll must start and count refers to the number of resources from the startIndex for polling.
-
-
For Group:
-
: Specify the schema’s Uniform Resource Name (URN) of the group. Example, urn:ietf:params:scim:schemas:core:2.0:Group
-
: Specify the schema’s Uniform Resource Locator (URL) of the group. Example, https://<tenant ID>.accounts.ondemand.com/service/scim/Groups?startIndex=1&count=100
-
-
-
-
In the page, enter the values as shown in the following table:
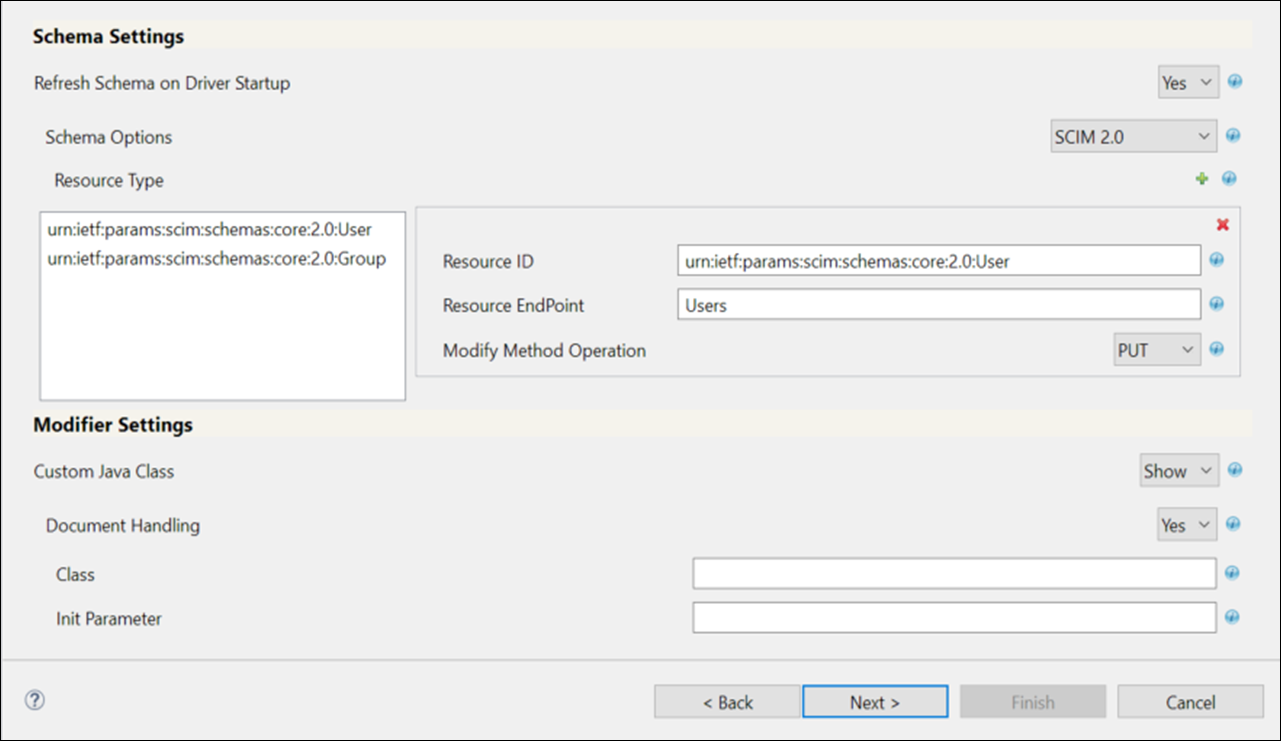
Table 1-1 Schema Settings
Field
Description with Sample Values
Specify , to refresh the schema.
IMPORTANT:You must select only for the first time to load the application schema or if the application schema has changed. It is recommended to change it to after you load the application schema.
Select .
-
: SCIM 2.0 Schema for User and Group, as defined in RFC7643.
Specify the Resource ID and the Resource EndPoint for resources like Users, Groups, Roles, Entitlements etc. in Uniform Resource Name (URN) Format.
-
The schema’s Uniform Resource Name (URN) of the user. For example, urn:ietf:params:scim:schemas:core:2.0:Users
-
: Specify the resource endpoint of the Resource ID. For example, Users.
-
: This option is used to make partial updates to the resources in SAP Cloud. Select .
Similarly for Groups:
-
: Specify the schema’s Uniform Resource Name (URN) of the group. For example, urn:ietf:params:scim:schemas:core:2.0:Group
-
: Groups
-
: Select .
Table 1-2 Modifier Settings
Field
Description with Sample Values
Not Applicable for SAP Cloud.
Not Applicable for SAP Cloud.
-
-
Review the summary of tasks that will be completed to create the driver, then click . The configured driver appears in the Designer screen.