5.2 Creating SCIM Driver Object for Connecting to Salesforce in Designer
To begin with the configuration, you need to set up the SCIM driver object in the designer, and configure the SCIM driver with the specific parameters to connect to Salesforce application.
The generic steps to set up a driver object and the configuration parameters is shown below. If you already have the driver object setup in designer, you can skip to Step 20 to proceed with Salesforce specific configuration.
-
Open Designer.
-
In the toolbar, click > .
-
Select the required versions of the SCIM Base and SCIM Default packages as mentioned below:
-
SCIM Base Package:
-
Package Name: NETQSCIMBASE
-
Version: 1.0.0
-
Build Date: 20201117
-
Build Number: 124957
-
-
SCIM Default Package:
-
Package Name: NETQSCIMDCFG
-
Version: 1.0.0
-
Build Date: 20201113
-
Build Number: 132234
-
-
SCIM JSON Package (Optional):
-
Package Name: NETQSCIMJSON
-
Version: 1.0.0
-
Build Date: 20200721
-
Build Number: 184051
-
-
SCIM Entitlements (Mandatory)
-
Package Name: NETQSCIMENT
-
Version: 1.0.0
-
Build Date: 20201113
-
Build Number: 141225
-
-
-
Click to update the packages.
-
In the Outline view, right-click the .
-
Click and scroll to find the package.
-
SCIM Salesforce Configuration Package (Mandatory):
-
Package Name: NETQSCIMSFCG
-
Version: 1.0.0
-
Build Date: 20200721
-
Build Number: 184139
-
-
-
Click to import the selected packages, then click in the successfully imported packages message. The designer is now updated with the selected package.
-
In view, open your project.
-
Right click project > > , or drag and drop from the to window.
-
In the screen, select the following field values and click .
-
Server DN
-
Identity Manager Version
-
Identity Manager Edition
The Identity Vault Credentials window appears.
-
-
In Identity Vault Credentials window, enter:
Field
Description
Host
The IP address of the Identity Vault's host machine.
Username
The name of the user.
Password
The password of the user to login to the identity vault.
-
Select , if you want to save your password for easy logins in the future.
-
Click .
The Identity Vault with the Driver Set appears in the window.
-
In the right pane, drag and drop the driver icon from the tab in the window, to the Identity Vault.
-
In the , select (Contains the base functionality for a driver. You must install a driver base configuration package first), and click .
NOTE:You can only select one base package.
-
In the page, select the , and click .
-
(Optional) In the page, select , and click .
-
Verify if the required items are met, and click .
-
On the page, specify a name for the driver, then click .
-
Select in the Authentication Method field, as the SCIM driver should be configured to connect to Salesforce with as the authentication method.
-
In the field select the option as required. The available options are:
-
: To configure SCIM Driver with new bearer token, see Configuring SCIM Driver with Bearer Token.
-
: To configure SCIM Driver using , see Configuring SCIM Driver with JWT
-
: To configure SCIM Driver using an available bearer token, see Configuring SCIM Driver Manually with an Available Token
NOTE:Configuring a JWT is recommended as it is more secured with a digital server certificate.
Configuring SCIM Driver with Bearer Token
is an access token issued by servers (Salesforce) to achieve multi-server authentication.
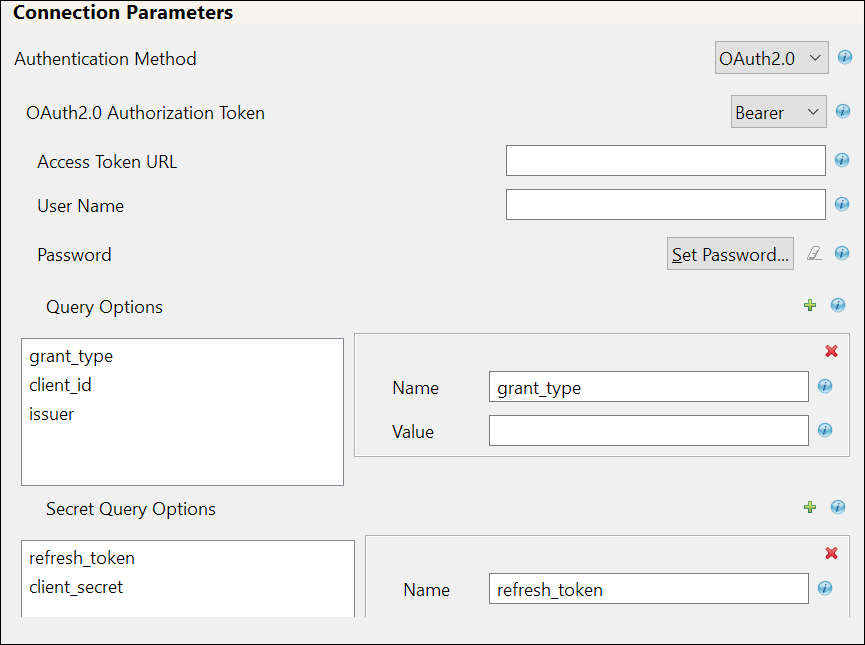
If you select , the following fields appear. Enter the values as shown in the following table.
IMPORTANT:For any operation performed on the Salesforce application using OAuth 2.0, an access token is sent for authorization of the user from Salesforce. The access token expires post the session idle time set for Salesforce, or in case of a system restart. Salesforce displays Unauthorized Access error or an Invalid Session error for any request initiated with an expired access token. The presence of a refresh token helps to re-establish the failed session internally by generating a new access token without user’s intervention.
Field
Sample Field Value
Access Token URL
<https://login.salesforce.com/services/oauth2/token>
User Name
The user name to login to Salesforce.
Password
The password to login to Salesforce.
Query Options: The following fields appear.
-
grant_type
-
client_id
-
issuer
-
grant_type: password
-
client_id: <3MVG97quAmFZJfVwk3ylU.8elhRYBqG9h25m3TWewozjKnFIY0HrhOEJl7LMET9HHocaHnTB1k04kophr1CgW>
-
issuer: <https://login.Salesforce.com>
-
username: <username to login to Salesforce>
NOTE:In case of a driver upgrade, the issuer field does not auto populate the earlier configured value. You must enter the issuer field manually.
Secret Query Options: The values specified in these options are hidden for security purposes.
-
refresh_token
-
client_secret
-
refresh_token: 5Aep861Xq7VoDavIt6UxKW62EAmfy0hKFv1T_X8yhb9PRQWtsOCrr97CYDrVasefykdl_f.DTVaJGKxjmz50XjQ
-
client_secret: E734505442694ECD0156D83F965B42C0F07601BB8BFDCA9879420C1FF23C8A87
-
password: <password to login to Salesforce>
Header Fields
-
Name: Content-Type
-
Value: application/x-www-form-urlencoded
Common fields in Connection Parameters
NOTE:The fields mentioned in the below rows are common for OAuth2.0 and Basic Authentication.
Application Truststore File: The path and the name of the keystore file that contains the trusted certificates for the remote server to achieve SSL handshake.
IMPORTANT:For , add the public certificate to cacerts, present in the path /opt/netiq/common/jre/lib/security.
</root/scim_configuration/trustSalesforce/Salesforce>
NOTE:Create the truststore file in .jks format for the connected application. For more information on how to create the truststore file, see Configuring the Subscriber Channel in
NetIQ Identity Manager Driver Administration Guide
.Mutual Authentication
Not supported in Salesforce
Proxy Authentication
-
: <192.168.0.0:port>. Choose an unused port number on the proxy server.
-
-
-
HTTPS Connection Timeout
The timeout value must be greater than 0.
NOTE:The driver waits for the time specified (in minutes) and terminates the HTTPS connection displaying the error codes that are configured in the field.
SCIM 2.0 URL
<https://salesforce.com/api/rest/scim/v2/339216517038085>
Configuring SCIM Driver with JWT
The JSON Web token is an access request token in the JSON Web Token (JWT) format. It is an encrypted data string consisting of a header, payload, and a signature, and is used to transfer authorization data in client-server applications to authenticate the identity of the resource.
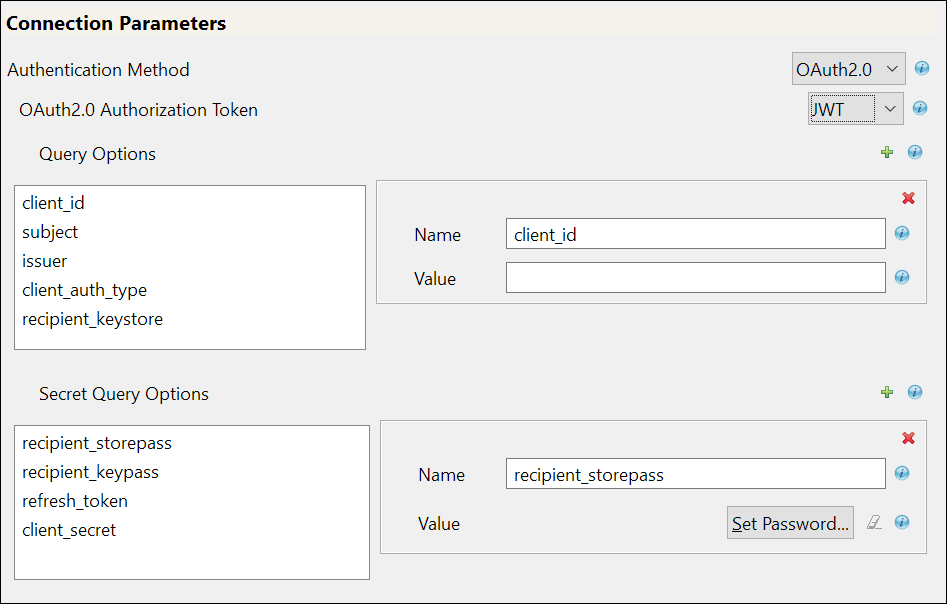
If you select the following fields appear:
Field
Sample Field Value
Query Options: The following fields appear:
-
client_id
-
subject
-
issuer
-
client_auth_type
-
recipient_keystore
-
client_id: <3MVG97quAmFZJfVwk3ylU.8elhRYBqG9h25m3TWewozjKnFIY0HrhOEJl7LMET9HHocaHnTB1k04kophr1CgW>
-
subject:<username@microfocus.com>
-
issuer: <https://login.salesforce.com>
-
client_auth_type: private_key_jwt
-
recipient_keystore: </Soft/Certs/recipient.jks>
Secret Query Options: The values specified in these options are hidden for security purposes.
-
recipient_storepass
-
recipient_keypass
-
refresh_token
-
client_secret
-
recipient_storepass: <novell>
-
recipient_keypass: <novell>
-
refresh_token: 5Aep861Xq7VoDavIt6UxKW62EAmfy0hKFv1T_X8yhb9PRQWtsOCrr97CYDrVasefykdl_f.DTVaJGKxjmz50XjQ
-
client_secret: E734505442694ECD0156D83F965B42C0F07601BB8BFDCA9879420C1FF23C8A87
For the other common fields such as Application Truststore File, Mutual Authentication, Proxy Authentication, HTTPS connection Timeout, and SCIM 2.0 URL, see Common fields in Connection Parameters The fields mentioned in the below rows are common for OAuth2.0 and Basic Authentication.
Configuring SCIM Driver Manually with an Available Token
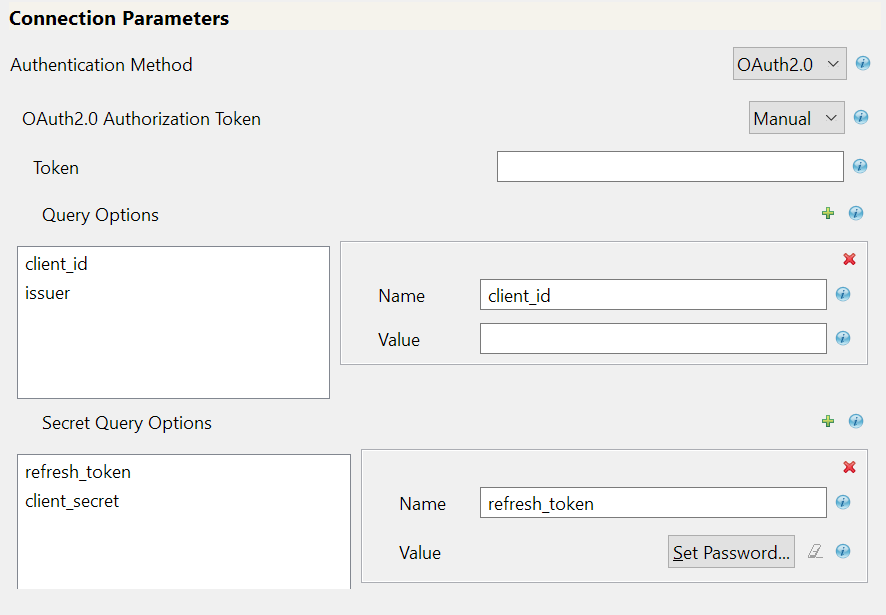
Select if you already have an access token available or created by an external application.
Field
Sample Field Value
Token
<00D2v000002mBdQ!ARQAQAzAXhpgilDpcvN3RDgCkrfh4pyzCOv2G1Iq5kEMh0TRi>
Query Options: The following fields appear.
-
client_id
-
issuer
-
client_id: <3MVG97quAmFZJfVwk3ylU.8elhRYBqG9h25m3TWewozjKnFIY0HrhOEJl7LMET9HHocaHnTB1k04kophr1CgW>
-
issuer: <https://login.Salesforce.com>
Secret Query Options: The values specified in these options are hidden for security purposes.
-
refresh_token
-
client_secret
-
refresh_token: 5Aep861Xq7VoDavIt6UxKW62EAmfy0hKFv1T_X8yhb9PRQWtsOCrr97CYDrVasefykdl_f.DTVaJGKxjmz50XjQ
-
client_secret: E734505442694ECD0156D83F965B42C0F07601BB8BFDCA9879420C1FF23C8A87
For the other common fields such as Application Truststore File, Mutual Authentication, Proxy Authentication, HTTPS connection Timeout, and SCIM 2.0 URL, see Common fields in Connection Parameters The fields mentioned in the below rows are common for OAuth2.0 and Basic Authentication.
-
-
In the page, specify the and , and click .
Field
Sample Field Value
Subscriber Options
: <307 408 503 504>
NOTE:The operation is retried if these errors are encountered.
Publisher Options
-
: Select to enable the Publisher channel.
-
: <10>
-
: <10>
IMPORTANT:: After configuring the driver, double click the connector line in the modeler window and navigate to tab to specify the polling resource options. Select the option as required:
-
: to poll all resources that are configured as part of the schema settings.
-
: Click
 to configure customized polling and , as shown below:
-
For User:
-
: Example, urn:ietf:params:scim:schemas:core:2.0:User
-
: Example, https://ap16.salesforce.com/services/scim/v2/Users?startIndex=1&count=100
-
-
For Group:
-
: Example, urn:ietf:params:scim:schemas:core:2.0:Group
-
: Example, https://ap16.salesforce.com/services/scim/v2/Groups?startIndex=1&count=100
-
-
-
-
-
In the page, specify the parameters as shown in the following table, and click .
Table 5-1 Schema Settings
Field
Sample Field Value
Defaults to , specify if you want to refresh the schema.
For more information on schema, see Section 6.0, SCIM Schema Utility.
Select the option as required, the default value is .
The available options are:
-
-
: <https://ap17.salesforce.com/services/scim/v2/Schemas>
-
: Import the user defined schema JSON file from the local file system.
-
Resource ID in URN Format. For example, urn:ietf:params:scim:schemas:core:2.0:Users
-
: The resource endpoint for the Resource ID. For example, Users.
-
: Select when you want to modify a resource in Salesforce.
Similarly for Groups:
-
: Example, urn:ietf:params:scim:schemas:core:2.0:Group
-
: Groups
-
: Select .
Table 5-2 Modifier Settings
Field
Sample Field Value
Defaults to , select to configure Modifiers.
: Defaults to , select .
-
: com.example.MyNewClass
-
: Specify the parameters in string format that you want to pass to the init() method of your class.
-
-
In the page, if you are configuring the driver with a remote loader select , else select . Click .
For more information about installing Remote Loader, see Deciding Whether to Use the Remote Loader in
NetIQ Identity Manager Driver Administration Guide
. -
Review the summary of tasks, and click . The configured driver appears in the designer screen.