2.5 Configuring the SCIM Driver for a Connected Application
To begin with the configuration, you need to set up the SCIM driver object in the designer and configure the SCIM driver with the specific parameters to connect to an external SCIM based application.
-
If you do not have the driver set and Identity Vault created in Designer, see Setting Up a New Driver Object in
NetIQ Identity Manager Driver Administration Guide
. -
If you already have the driver set and Identity Vault in Designer, proceed with the following sections to configure the SCIM driver with a connected application.
You can configure a SCIM driver with authentication methods such as, Basic or OAuth2.0, as shown below:
-
: The OAuth 2.0 authentication method uses query options and secret options that require token values to be configured for authentication. If the connected application supports OAuth2.0 authentication method, it is recommended to configure the SCIM driver with OAuth 2.0. For more information, see Configuring SCIM Driver with OAuth 2.0 Authentication.
-
: The basic authentication method uses a simple user name, a user password, and the connected application’s login URL to authenticate a user to login to the application. Basic Authentication requires the password to be stored in the application itself, and this is can be accessed by other applications that are associated with it. To configure SCIM driver with basic authentication, see Configuring SCIM Driver with Basic Authentication.
2.5.1 Configuring SCIM Driver with OAuth 2.0 Authentication
The OAuth 2.0 authentication method is used for authenticating the driver with enhanced security to connect to an application. OAuth 2.0 authentication can be established using Bearer tokens or JWT’s.
The following steps explain the procedure to configure the SCIM driver:
-
In the select .
-
In the select the option as required. The available options are:
-
: A bearer token is a lightweight security token (a short string of hexadecimal characters) that grants the bearer access to a protected resource. The Bearer token is created for you by the connected application’s authentication server. By selecting the option, you can generate a new bearer token to authorize the SCIM driver with connected application.
To configure SCIM Driver using bearer token, see Configure SCIM Driver with Bearer Token.
-
: A JSON Web Token (JWT) is part of OAuth authorization and authentication framework. A JWT securely authenticates the driver to connect to an external application to perform operations as required. By selecting the option, you can generate a new JWT to authorize the SCIM driver with connected application.
To configure SCIM Driver using JWT, see Configuring SCIM Driver with JWT.
-
: Select if you already have a token available or created by an external application.
To configure SCIM Driver using an available bearer token, see Configuring SCIM Driver with an Available Token.
NOTE:Configuring a JWT is preferred as it is more secured with a digital server certificate.
Configure SCIM Driver with Bearer Token
is an access token issued by connected application to achieve multi-server authentication.
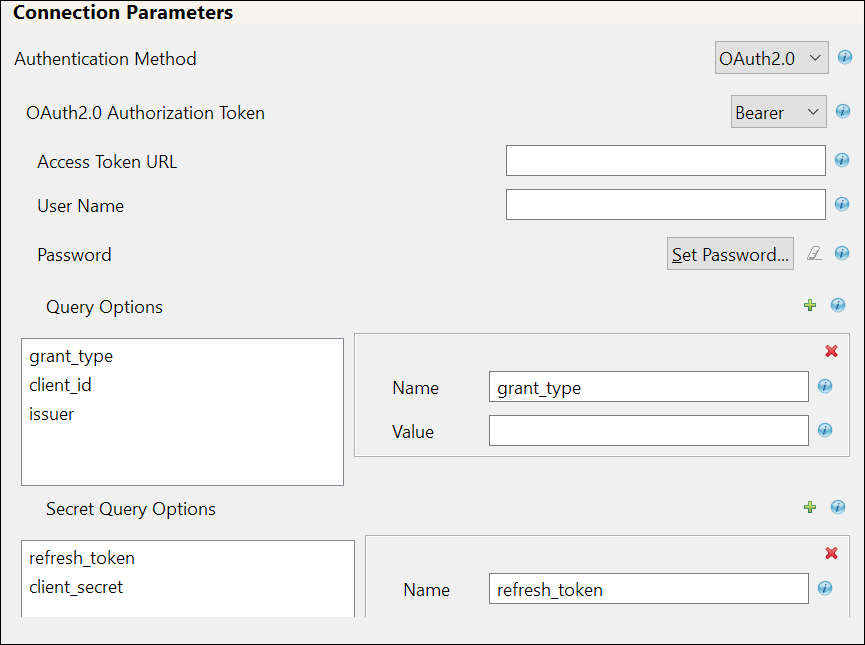
If you select , the following fields appear. The sample values are shown in the following table, however you must enter values as applicable for your environment.
IMPORTANT:For any operation performed on the connected application using OAuth 2.0, an access token is sent for authorization of the user from the connected application. The access token expires post the session idle time set by the connected application, or in case of a system restart. The connected application displays the Unauthorized Access error or an Invalid Session error for any request initiated with an expired access token. The presence of a refresh token helps to re-establish the failed session internally by generating a new access token without user’s intervention.
Field
Sample Field Value
Access Token URL
<https://login.salesforce.com/services/oauth2/token>
User Name
The user name to login to the connected application.
Password
The password to login to connected application.
Query Options: The following fields appear:
-
grant_type: It is the method used by the application to procure an access token.
-
client_id: The client_id is a public identifier for connected application.
-
issuer: The authorization server's URL that uses the https protocol.
-
grant_type: password
-
client_id: <3MVG97quAmFZJfVwk3ylU.8elhRYBqG9h25m3TWewozjKnFIY0HrhOEJl7LMET9HHocaHnTB1k04kophr1CgW>
-
issuer: <https://login.Salesforce.com>
NOTE:In case of a driver upgrade, the issuer field does not auto populate the earlier configured value. You must enter the issuer field value manually.
Secret Query Options: The values specified in these options are hidden for security purposes.
-
refresh_token: Refresh Token is a web token which is used to acquire new access tokens when current access tokens expire or become invalid. The authorization server provides refresh tokens to Identity Manager to obtain new access token without user’s interaction in the backend.
-
client_secret: The client secret is used to establish the ownership of the client_id.
-
refresh_token: 5Aep861Xq7VoDavIt6UxKW62EAmfy0hKFv1T_X8yhb9PRQWtsOCrr97CYDrVasefykdl_f.DTVaJGKxjmz50XjQ
-
client_secret: E734505442694ECD0156D83F965B42C0F07601BB8BFDCA9879420C1FF23C8A87
Common fields in Connection Parameters
NOTE:The fields mentioned in the below rows are common for and authentication methods.
Application Truststore File: The path and the name of the keystore file that contains the trusted certificates for the remote server to achieve SSL handshake.
IMPORTANT:For , add the public certificate to cacerts, present in the path /opt/netiq/common/jre/lib/security.
</root/scim_configuration/trustSalesforce/Salesforce>
NOTE:Create the truststore file in .jks format for the connected application. For more information on how to create the truststore file, see Configuring the Subscriber Channel in
NetIQ Identity Manager Driver Administration Guide
.Mutual Authentication: Enable and specify this field if the authentication is supported by the connected application. You must ensure to have both the server certificates stored in Identity Manager and the connected applications.
Defaults to . Select if you want to set mutual authentication information.
-
: Specify the path and the name of the keystore file that contains the trusted certificates for the connected application server to provide mutual authentication. For example, C:\security\keystore.
-
: Specify the password for the keystore file.
Proxy Authentication: Defaults to . Select if you want to set proxy authentication parameters.
Specify the proxy host address and proxy host port in this field.
-
: <192.168.0.0:port>. Choose an unused port number on the proxy server.
-
: <user name for proxy authentication>
-
: <password for proxy authentication>
-
: <password for proxy authentication>
HTTPS Connection Timeout: Specify the HTTPS connection time out value.
The timeout value must be greater than 0.
NOTE:The driver waits for the time specified (in minutes) and terminates the HTTPS connection displaying the error code. The error codes are configured in the field.
SCIM 2.0 URL: Enter the URL for the connected application. SCIM Resources like User, Group etc., will be appended to this URL.
<https://salesforce.com/api/rest/scim/v2/339216517038085>
Configuring SCIM Driver with JWT
This is a secured and digitally signed access token in the JWT format. A JWT is an encrypted data string consisting of a header, payload, and a signature, and is used to transfer authorization data in client-server applications to authenticate the identity of the resource.
If you select , the following fields appear:
Field
Sample Field Value
Query Options: The following fields appear:
-
client_id: The client_id is a public identifier for the connected application.
-
subject: The user’s unique identity for which the access token is being requested.
-
issuer: The authorization server's URL that uses the https protocol.
-
client_auth_type: The client's authorization types configured for granting access to the application.
-
recipient_keystore: The keystore file that is used to search for the digital signature that contains the public key in the connected application.
The following steps explain how to create the recipient_keystore.
-
Create the digital signature. For more information, see Create a Private Key and Self-Signed Digital Certificate.
-
Create the PKCS12 file by combining the server key and the server certificate, as shown below:
openssl pkcs12 -inkey <server key> -in <server certificate> -export -out <filename>.pkcs12
-
Import the PKCS12 file into the recipient_keystore, as shown below:
/opt/netiq/common/jre/bin/keytool -importkeystore -srckeystore <filename>.pkcs12 -srcstoretype pkcs12 -destkeystore <recipient keystore>
-
-
client_id: <3MVG97quAmFZJfVwk3ylU.8elhRYBqG9h25m3TWewozjKnFIY0HrhOEJl7LMET9HHocaHnTB1k04kophr1CgW>
-
subject:<username@microfocus.com>
-
issuer: <https://login.salesforce.com>
-
client_auth_type: private_key_jwt
-
recipient_keystore: </Soft/Certs/recipient.jks>
Secret Query Options: The values specified in these options are hidden for security purposes.
-
recipient_storepass: Password for the recipient_keystore file that is mentioned above.
-
recipient_keypass: Password for the server certificate that is available in the recipient_keystore file.
-
refresh_token: Refresh Token is a web token which is used to acquire new access tokens when current access tokens expire or become invalid. The authorization server provides refresh tokens to Identity Manager to obtain new access token without user’s intervention.
-
client_secret: The client secret is used to establish the ownership of the client_id.
-
recipient_storepass: <novell>
-
recipient_keypass: <novell>
-
refresh_token: 5Aep861Xq7VoDavIt6UxKW62EAmfy0hKFv1T_X8yhb9PRQWtsOCrr97CYDrVasefykdl_f.DTVaJGKxjmz50XjQ
-
client_secret: E734505442694ECD0156D83F965B42C0F07601BB8BFDCA9879420C1FF23C8A87
For the other common fields such as Application Truststore File, Mutual Authentication, Proxy Authentication, HTTPS Connection Timeout, and SCIM 2.0 URL, see Common fields in Connection Parameters The fields mentioned in the below rows are common for OAuth2.0 and Basic authentication methods.
Configuring SCIM Driver with an Available Token
Select if you already have an access token available or created by an external application.
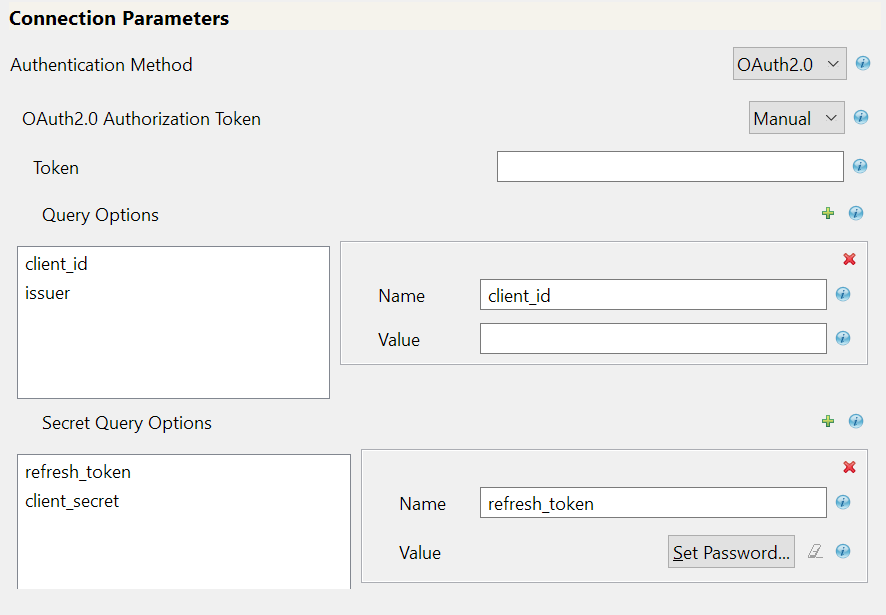
Field
Sample Field Value
Token: Specify access token value that is generated using API calls. For example, call REST API using Postman and specify the Bearer Token.
<00D2v000002mBdQ!ARQAQAzAXhpgilDpcvN3RDgCkrfh4pyzCOv2G1Iq5kEMh0TRi>
Query Options: The following fields appear.
-
client_id: The client_id is a public identifier for the connected application.
-
issuer: The authorization server's URL that uses the https protocol.
-
client_id: <3MVG97quAmFZJfVwk3ylU.8elhRYBqG9h25m3TWewozjKnFIY0HrhOEJl7LMET9HHocaHnTB1k04kophr1CgW>
-
issuer: <https://login.Salesforce.com>
NOTE:In case of a driver upgrade, the issuer field does not auto populate the earlier configured value. You must enter the issuer field value manually.
Secret Query Options: The values specified in these options are hidden for security purposes.
-
refresh_token: Refresh Token is a web token to acquire new access tokens when current access tokens expire or become invalid. The authorization server provides refresh tokens to the Identity Manager to obtain new access token without user’s intervention.
-
client_secret: The client secret is used to establish the ownership of the client_id.
-
refresh_token: 5Aep861Xq7VoDavIt6UxKW62EAmfy0hKFv1T_X8yhb9PRQWtsOCrr97CYDrVasefykdl_f.DTVaJGKxjmz50XjQ
-
client_secret: E734505442694ECD0156D83F965B42C0F07601BB8BFDCA9879420C1FF23C8A87
For the other common fields such as Application Truststore File, Mutual Authentication, Proxy Authentication, HTTPS Connection Timeout, and SCIM 2.0 URL, see Common fields in Connection Parameters The fields mentioned in the below rows are common for OAuth2.0 and Basic authentication methods.
-
-
In the page, specify the and , and click .
Field
Description with Sample values
Subscriber Options
: Specify the HTTPS errors that must return a retry status. Error codes must be a list of integers separated by spaces. For example: <307 408 503 504>
NOTE:The operation is retried if these error codes are encountered.
Publisher Options
-
: Select to enable the Publisher channel.
-
: Specify the polling interval in minutes
For example: <10>
-
: This option is used to configure the time interval for which the driver shim sends a periodic status message on the Publisher channel. By default, this is set to 10 minutes.
IMPORTANT:: This field does not appear in this page when you are setting up the driver for the first time. These options are to be specified once the driver is configured. After configuring the driver, double click the connector line in the modeler window and navigate to tab to specify the polling resource options.
-
Select the option to poll on all resources that are configured as part of the schema settings.
-
Select the option and click
 to configure customized polling and .
-
For User:
-
: Example, urn:ietf:params:scim:schemas:core:2.0:User
-
: Example, https://ap16.salesforce.com/services/scim/v2/Users?startIndex=1&count=100
NOTE:In the above URL’s, the startIndex refers to the resource from where the poll must start and count refers to the number of resources from the startIndex for polling.
-
-
For Group:
-
: Example, urn:ietf:params:scim:schemas:core:2.0:Group
-
: Example, https://ap16.salesforce.com/services/scim/v2/Groups?startIndex=1&count=100
-
-
-
-
-
In the page, specify the parameters as shown in the following table, and click .
Table 2-1 Schema Settings
Field
Description with Sample Values
Defaults to , specify if you want to refresh the schema.
IMPORTANT:Select this option as to load the connected application’s schema for the first time, or if the connected application’s schema has changed. It is recommended to change this field to once the schema is fetched successfully. If this field remains selected as , the driver will fetch the schema from the connected application every time the driver restarts and might cause mapping issues.
For more information on schema, see Section 6.0, SCIM Schema Utility.
Select required method to fetch the connected application’s schema.
The available options are:
-
: SCIM 2.0 Schema for User and Group, as defined in RFC 7643.
-
: The application’s end point for SCIM schema. Example, https://ap17.salesforce.com/services/scim/v2/Schemas.
-
: Import the user defined schema JSON file from the local file system. This file must comply to SCIM JSON format as per RFC 7643.
Specify the Resource ID and Resource Endpoint’s of the resources in Uniform Resource Name (URN) Format. For example, Users, Groups, Roles, Entitlements etc.
-
Resource ID in URN Format. For example, urn:ietf:params:scim:schemas:core:2.0:Users
-
: The resource endpoint of the Resource ID. For example, Users.
-
: Specify the method of operation to be performed on the resources. Select the option as supported by the connected application.
The available options are:
-
: This option is used to modify an entire resource which is already a part of the collection of resources in the connected application.
-
: This option is used to make partial updates to resources in the connected application.
-
Similarly for Groups:
-
: Example, urn:ietf:params:scim:schemas:core:2.0:Group
-
: Groups
-
: Select the option as required.
Table 2-2 Modifier Settings
Field
Description
The custom Java classes that are used to extend the driver's functionality.
Defaults to , select to configure document modifiers.
:
Select this option to customize the Java classes for processing the data as JSON objects.
Defaults to , select . The Class and Init Parameter fields appear.
-
: Specify the class using a full package identifier. For example, com.example.MyNewClass
-
: Specify the parameters in string format that you want to pass to the init() method of your class. The init method of your class is responsible for parsing the information contained in this string. Leave this field blank if your class does not require a configuration string to be passed to the init method.
-
-
In the page, if you are configuring the driver with a remote loader instance select , else select . Click .
For more information about configuring the driver with Remote Loader, see Deciding Whether to Use the Remote Loader in
NetIQ Identity Manager Driver Administration Guide
. -
Review the summary of tasks and click . The configured driver appears in the designer screen.
2.5.2 Configuring SCIM Driver with Basic Authentication
The basic authentication method uses a simple user name, a user password, and the connected application’s login URL, to authenticate a user to login to an application. If you select in the field, the following fields appear:
|
Field |
Description |
|---|---|
|
User Name |
Specify the name of the user. |
|
Password |
Specify the password. |
|
Application URL |
Specify the URL of the connected application. |
|
Header Fields: Click the |
|
|
For the other common fields such as Application Truststore File, Mutual Authentication, Proxy Authentication, HTTPS Connection Timeout, and SCIM 2.0 URL, see Common fields in Connection Parameters The fields mentioned in the below rows are common for OAuth2.0 and Basic authentication methods. |
|
After you have specified the fields that are required for authentication, continue with Step 3.