4.1 Preparing for Installation

4.1.1 Securing Driver Communication

The driver communicates over SSL with Azure AD and Identity Manager Exchange Service.

IMPORTANT:The connection accepts certificates only from a Java keystore. Make sure that the keystore for the certificates is a Java keystore.

The following sections provide instructions for creating a secure connection:

Secured Communication with Microsoft Graph API

To set up SSL between the driver and Azure AD graph REST endpoints, perform the following steps:

  1. Open the following URL from your browser:

    • https://login.microsoftonline.com/

    • https://graph.microsoft.com/

    • https://azure.microsoft.com/

  2. Obtain the public certificate and import it into the keystore.

    For example (Suppose you are accessing https://graph.microsoft.com/), if you are using Google Chrome, perform the following steps:

    1. In the address bar, click and then click next to browser address bar(for example:graph.microsoft.com).

    2. Select Certificate (Valid). The certificate is displayed.

    3. Click Certification Path. The Certification Path displays the hierarchical structure of the structure of all the certificates.

    4. Select the root certificate (the top most parent certificate), and click View Certificate. The root certificate is displayed.

    5. To save the certificate to your system, click Details > Copy to File > Next > Next.

    6. Enter a filename for the certificate and save it to a location as required.

    7. Add the exported key to the driver keystore using the following Java keytool command:

      You might have to create a new keystore(.jks file), if one such file doesn’t exist already. This keystore file will contain the public certificate of the Azure graph endpoint and the exchange service certificate.

      keytool -import -file <path to the graph cert file>\<certname.crt> -keystore <mykeystore> -alias <aliasname>

      For example: keytool -import -file msgraph.cer -keystore azuread.jks -alias msgraph

      NOTE:

      • Ensure to place the new keystore in IDM Server. In case of Remote Loader place the keystore file in the system where the Azure AD driver is running.

      • Ensure that you follow the above steps to import all the certificates into the keystore.

Securing Communication with Identity Manager Exchange Service

To set up SSL between the driver and Identity Manager Exchange Service, you need to create and import a server certificate into the root certificate store of the Windows server where the service is deployed. The following procedure assumes eDirectory as the Certificate Authority (CA).

  1. Create a server certificate.

    1. In iManager, log in to the connected eDirectory server with administrator rights.

    2. Click Roles and Tasks > NetIQ Certificate Server > Create Server Certificate.

    3. Select the server and provide a nickname for the certificate.

      The nickname is same that you specified for Certificate Alias (example azuread as shown in previous section) while installing Identity Manager Exchange Service.

    4. Click Next, then click Finish to complete the certificate creation.

  2. Export the server certificate from the connected eDirectory server and save it to a file in the pfx format.

    1. In iManager, log in to the connected eDirectory server with administrator rights.

    2. Click Roles and Tasks > NetIQ Certificate Access > Server Certificates, then select any server certificate.

    3. Click Export.

    4. Select the certificate by nickname and select Export Private Key.

    5. Enter the password and click Next.

    6. To save the certificate to a file, click Save the exported certificate.

  3. Import the certificate to the trusted store of the Windows server on which you will run Identity Manager Exchange Service.

    1. Copy the .pfx file to the Windows server.

    2. Click Start > Run> mmc.

    3. Click File > Add/Remove Snap-in.

    4. Select Certificates and click Add to import this snap-in by choosing Computer account.

    5. Click Finish.

    6. Navigate to Certificates > Trusted Root Certification Authorities.

    7. Right-click and then select All Tasks > Import.

    8. On the Welcome to the Certificate Import Wizard page, click Next.

    9. Click Browse and select the eDirectory certificate you exported in

    10. Specify the password and click Next.

    11. Click Finish to import the certificate into the trust store.

  4. Start Identity Manager Exchange Service. For more information, see Verifying and Starting the Identity Manager Exchange Service.

  5. Open the following Exchange service URL from your browser:

    https://<Exchange_Service>:Port/ExchServer

  6. Obtain the public certificate and import it into the same keystore which was created and placed in IDM Server as mentioned in (for example, the keystore azuread).

    For example, perform the following steps to obtain a public certificate on Google Chrome:

    1. Click from the address bar and then click Details.

    2. In the Security tab, click View Certificate.

    3. In the Details tab, click Copy to File.

    4. In the Certificate Import Wizard, click Next.

    5. Select DER encoded binary and click Next.

    6. Click Browse and navigate to the directory where you want to save the certificate.

    7. Specify a name for the certificate and click Next.

    8. Click Finish to complete the export.

    9. Add the exported key to the driver keystore by using the following Java keytool command:

      keytool -import -file <path to the exchange cert file>\<certname.cer> -keystore <mykeystore> -alias <aliasname>

      NOTE:Ensure that certificates inside the keystore have different alias names for all the imported certificates.

Certificate Based Authentication support in Azure AD Driver 5.1.5.

The driver now supports two kinds of authentications.

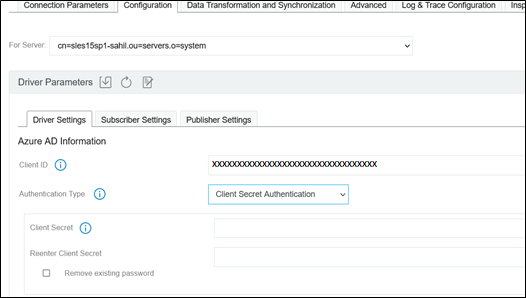
  1. Client Secret Authentication: This is the existing authentication mechanism.If this option is chosen, specify the Client Secret Value.

  2. Certificate based Authentication: This is the new authentication type supported by the driver.

Based on selected authentication types, perform the following steps to configure authentication types:

  1. Client Secret Authentication - This is the existing authentication mechanism.

    1. Provide ClientSecret

      Figure 4-1

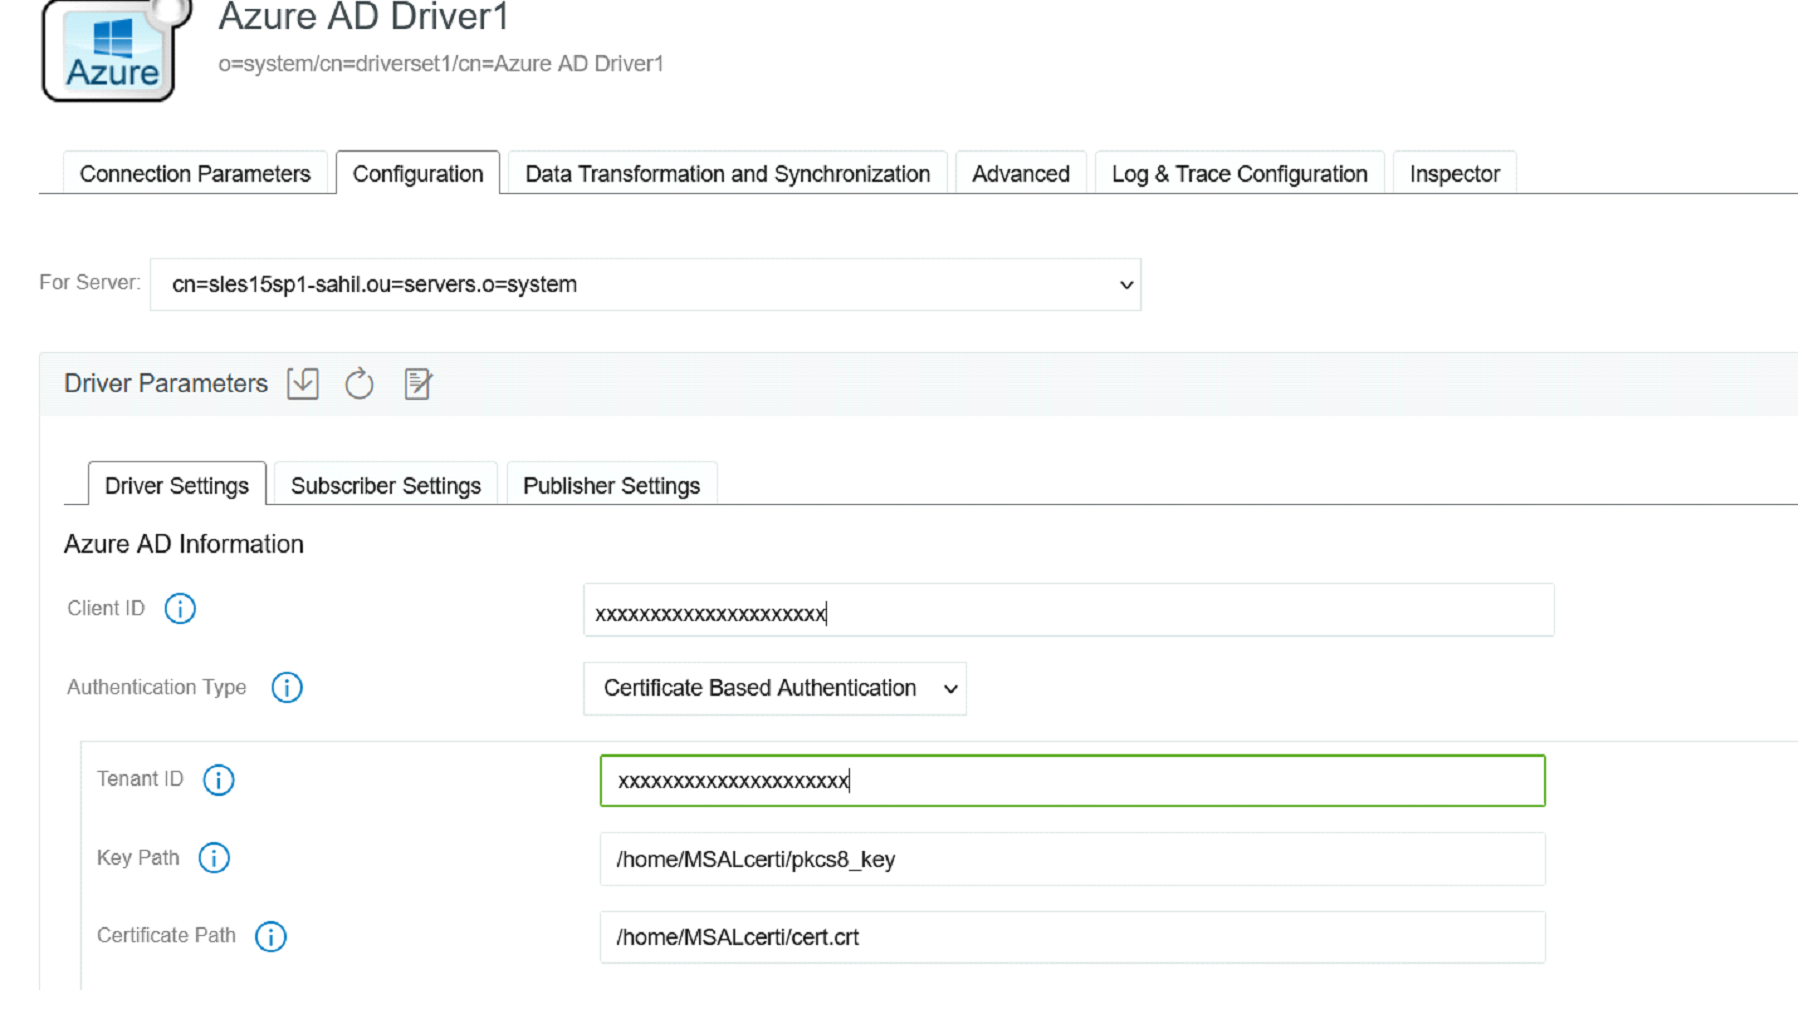
  2. Certificate Based Authentication - This is the new authentication type supported by the driver.

    A pair of private key and public certificate is required for this type of authentication as shown in the below image.

    Figure 4-2

    1. Generate a private key in PKCS8 format by executing the below commands.

      1. You can use an existing private key in PEM format or create a private key using the below command.

        openssl genrsa -out private_key.pem 2048

      2. Convert the private key into the PKCS8 format using the below command.

        openssl pkcs8 -topk8 -inform PEM -outform DER -in private_key.pem -nocrypt > pkcs8_key

    2. Generate a certificate signing request using the private key.

      1. openssl req -new -key private_key.pem -out cert.csr

        NOTE:This command will ask for a variety of extra information, like company name, country, and a password. None of this is used by the sample, so you can set these values as nothing/anything you want.

      2. openssl x509 -req -days 365 -in cert.csr -signkey private_key.pem -out cert.crt

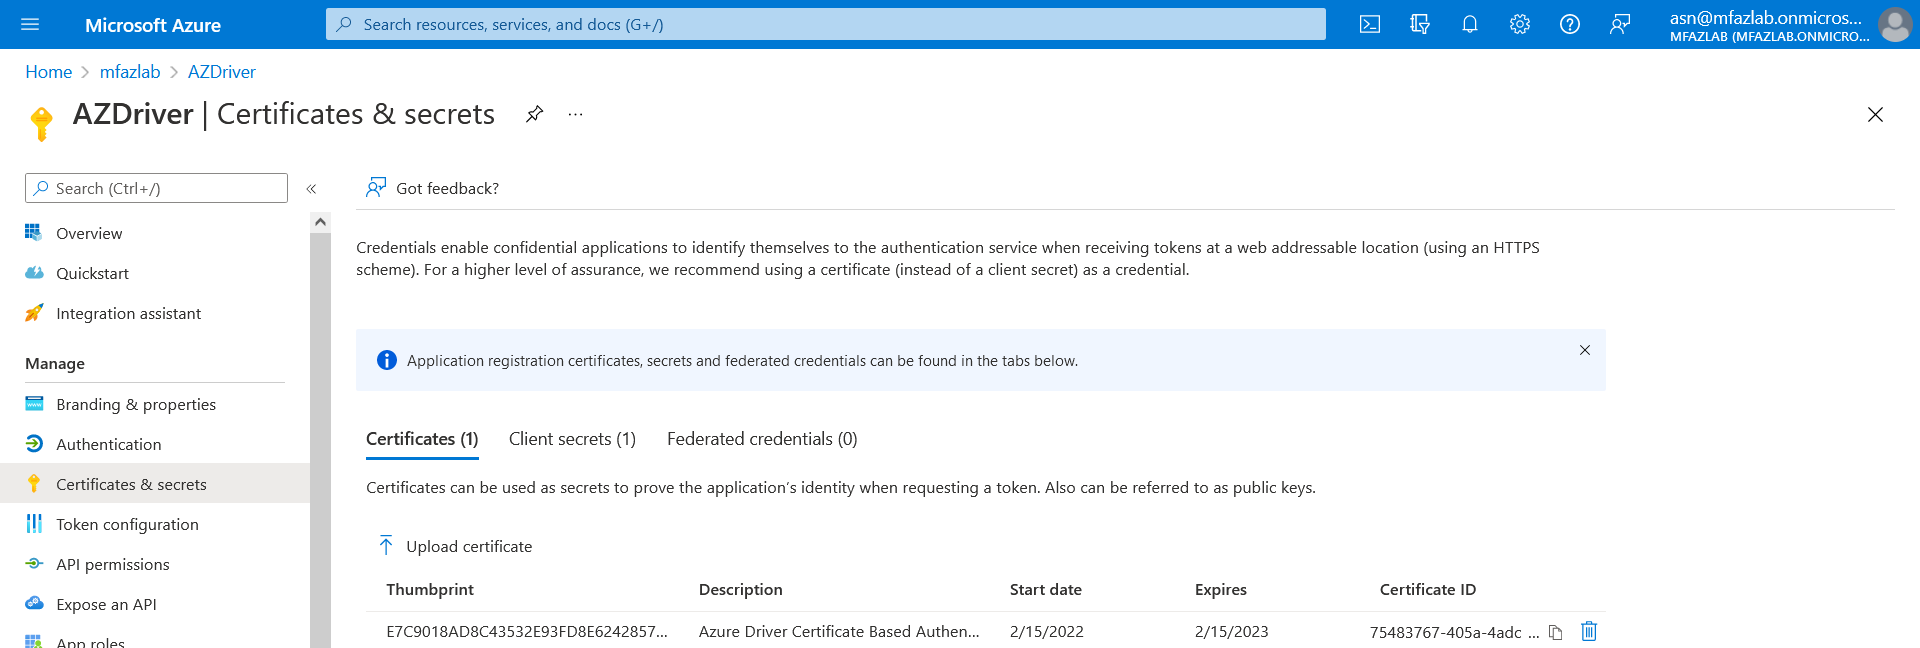
  3. Uploading certificate to Azure AD and configure the driver parameters.

    1. Login to the Azure portal. In the Application menu blade, click on the Certificates & secrets, in the Certificates section, upload certificate generated in Step 2b2.

      Figure 4-3

    2. Using Designer, perform the following steps.

      1. Right Click Driver Object and click Properties

      2. Goto Driver Configuration -> Driver Parameter

      3. Under Driver Options, choose Certificate Based Authentication as authentication type and provide following details.

        • Tenant ID

        • Key Path (Ex: /azcerts/515/cba/pkcs8_key) - is the absolute location to key file created in Step 2a2.

        • Certificate Path (Ex: /azcerts/515/cba/cba-cert.crt) -s the absolute location to the certificate created in Step 2b2.

4.1.2 Prerequisites

This section provides the prerequisites, considerations, and system setup needed to install the driver:

Prerequisites for the Driver

The driver requires the following applications:

  • Identity Manager 4.8.4 or later

  • Identity Manager Designer 4.8.4 or later

  • Identity Manager REST driver 1.1.2.0300 or later

Prerequisites for the User Account Configured in the Driver

You must ensure that the user account you are configuring in the driver has the following Roles or Permissions in the Azure application:

  • At a minimum, the user account must have the following roles:

    • User Administrator

    • Exchange Service Administrator

    • Privileged Role Administrator

  • The multi-factor authentication for the user account is disabled.

  • A user account has conditional access. For more information on providing conditional access, see What is Conditional Access.

Prerequisites for Identity Manager Exchange Service

  • Microsoft Windows Server 2016, or Microsoft Windows Server 2019

  • Microsoft Visual C++ 2017 Redistributable packages for Visual Studio

    Download the packages from the Microsoft Downloads website.

  • Install the ExchangeOnlineManagement module by executing the below command in PowerShell:

    Install-Module -Name ExchangeOnlineManagement

  • Windows Azure AD Module for Windows Powershell on the computer where you will install Windows Powershell service.

    Perform the following steps to upgrade PowerShell to the latest version:

    1. Open a Windows PowerShell console.

    2. Run the following Install-Module cmdlet or Install-Script cmdlet:

      • If it is a module: Install-Module -Name <moduleName> -RequiredVersion <version>

        For example, Install-Module -Name MSOnline -RequiredVersion 1.1.166.0

      • If it is a script: Install-Script -Name <scriptName> -RequiredVersion <version>

Identity Manager Exchange Service can be run on a user configured port. However, the service cannot be used with any other REST client tools.

Prerequisites for OAuth 2.0

The driver uses OAuth 2.0 protocol to authenticate to Azure AD. To support this protocol for authentication, you need to have a proxy application for the Azure AD driver on Azure AD. The Client ID and Client Secret allotted to the application will be later used in the Azure AD driver configuration. For more information about Azure Active Directory Application Proxy, see Microsoft Azure documentation.

Creating a Proxy Application on Azure AD

A proxy application is created in the Azure Portal. Creating a proxy application involves the following steps:

  1. Registering an application and obtaining a client ID. For more information see, Registering an Application.

  2. Generating an application password or the client secret. For more information see, Certificates and Secrets.

  3. Configuring API permissions (Delegated and Application permissions). Set the delegated and application permissions as shown in the following table. For more information see, Add permissions to access web APIs.

    Table 4-1 List of Application type of APIs

    API

    Type

    Description

    Admin Consent

    Application.Read.All

    Application

    Read all applications

    Grant Admin Consent

    Application.ReadWrite.All

    Application

    Read and write all applications

    Grant Admin Consent

    AuditLog.Read.All

    Application

    Read all audit log data

    Grant Admin Consent

    Device.Read.All

    Application

    Read all devices

    Grant Admin Consent

    Device.ReadWrite.All

    Application

    Read and write devices

    Grant Admin Consent

    Directory.Read.All

    Application

    Read directory data

    Grant Admin Consent

    Directory.ReadWrite.All

    Application

    Read and write directory data

    Grant Admin Consent

    Domain.ReadWrite.All

    Application

    Read and write domains

    Grant Admin Consent

    Group.Create

    Application

    Create groups

    Grant Admin Consent

    Group.Read.All

    Application

    Read all groups

    Grant Admin Consent

    Group.ReadWrite.All

    Application

    Read and write all groups

    Grant Admin Consent

    GroupMember.Read.All

    Application

    Read all group memberships

    Grant Admin Consent

    GroupMember.ReadWrite.All

    Application

    Read and write all group memberships

    Grant Admin Consent

    UserAuthenticationMethod.Read.All

    Application

    Read all user authentication methods

    Grant Admin Consent

    UserAuthenticationMethod.ReadWrite.All

    Application

    Read and write all users authentication methods

    Grant Admin Consent

    User.Read.All

    Application

    Read all users' full profiles

    Grant Admin Consent

    User.ReadWrite.All

    Application

    Read and write all users' full profiles

    Grant Admin Consent

    Table 4-2 List of Delegated type of APIs

    API

    Type

    Description

    Admin Consent

    Directory.AccessAsUser.All

    Delegated

    Access directory as the signed in user

    Grant Admin Consent

    Directory.Read.All

    Delegated

    Read directory data

    Grant Admin Consent

    Directory.ReadWrite.All

    Delegated

    Read and write directory data

    Grant Admin Consent

    Group.Read.All

    Delegated

    Read all groups

    Grant Admin Consent

    Group.ReadWrite.All

    Delegated

    Read and write all groups

    Grant Admin Consent

    GroupMember.Read.All

    Delegated

    Read group memberships

    Grant Admin Consent

    GroupMember.ReadWrite.All

    Delegated

    Read and write group memberships

    Grant Admin Consent

    RoleManagement.Read.All

    Delegated

    Read role management data for all RBAC providers

    Grant Admin Consent

    RoleManagement.Read.Directory

    Delegated

    Read directory RBAC settings

    Grant Admin Consent

    UserAuthenticationMethod.Read

    Delegated

    Read user authentication methods

    Grant Admin Consent

    UserAuthenticationMethod.Read.All

    Delegated

    Read all user’s authentication methods

    Grant Admin Consent

    UserAuthenticationMethod.ReadWrite

    Delegated

    Read and write user authentication methods

    Grant Admin Consent

    UserAuthenticationMethod.ReadWrite.All

    Delegated

    Read and write all user authentication methods

    Grant Admin Consent

    User.Read

    Delegated

    Sign in and read user profile

    Grant Admin Consent

    User.Read.All

    Delegated

    Read all users' full profiles

    Grant Admin Consent

    User.ReadBasic.All

    Delegated

    Read all users' basic profiles

    Grant Admin Consent

    User.ReadWrite

    Delegated

    Read and write access to user profile

    Grant Admin Consent

    User.ReadWrite.All

    Delegated

    Read and write all users' full profiles

    Grant Admin Consent

NOTE:You may need to provide additional permissions based on their requirement.

As a minimal requirement, the user account used in Azure AD Driver configuration should have the following Roles:

  • User Administrator

  • Exchange Administrator

    NOTE:You may need to provide additional roles based on their requirement.

The Client ID and Client Secret can now be used for driver configurations or any other REST clients.

Assigning the Rights to the Application

  1. In the server where you have installed the exchange service, login to PowerShell and connect to the Office 365 Exchange Online service, using the following command:

    Connect-MSolService
  2. To obtain the Client ID for your application, replace <AppPrincipalId> with the Client ID that you obtained from Creating a Proxy Application on Azure AD and run the following commands in PowerShell.

    Get-MsolServicePrincipal | ft DisplayName, <AppPrincipalId> -AutoSize
    
    $ClientIdWebApp = '<AppPrincipalId>'
    
    $webApp = Get-MsolServicePrincipal –AppPrincipalId $ClientIdWebApp
  3. Assign the Company Administrator rights to your application using the Client ID obtained in Step 2 by running the following command:

    Add-MsolRoleMember -RoleName "Company Administrator" -RoleMemberType ServicePrincipal -RoleMemberObjectId $webApp.ObjectID

    The Company Administrator role will give you rights to delete the directory objects.

    IMPORTANT:The Company Administrator role in Identity Manager is mapped to the Global Administrator role in Azure AD.

Ensure that the account used by the driver to connect to the Exchange Online service has the correct roles to load and execute the following cmdlets:

  • New-Mailbox

  • Set-Mailbox

  • Get-Mailbox

  • Remove-Mailbox

  • New-MailUser

  • Set-MailUser

  • Get-MailUser

  • Remove-MailUser

  • Set-User

  • Get-User

  • New-DistributionGroup

  • Set-DistributionGroup

  • Set-Group

  • Get-DistributionGroup

  • Get-Group

  • Remove-DistributionGroup

  • Add-DistributionGroupMember

  • Remove-DistributionGroupMember

  • Get-DistributionGroupMember

  • Add-RoleGroupMember

  • Remove-RoleGroupMember

  • Get-RoleGroupMember

  • New-UnifiedGroup

  • Get-UnifiedGroup

  • Set-UnifiedGroup

  • Remove-UnifiedGroup

  • Add-UnifiedGroupLinks

  • Remove-UnifiedGroupLinks

  • Get-UnifiedGroupLinks

Absence of the required roles prevents the driver from executing the cmdlets that require those roles.

Prerequisites for Support of Modern Authentication

As Microsoft Office 365 is deprecating the Basic authentication, you must now configure the driver with modern authentication method. You must also ensure to have the earlier mentioned prerequisites (Prerequisites for the Driver, Prerequisites for Identity Manager Exchange Service, and Prerequisites for OAuth 2.0) met, and then proceed with the following prerequisites.

The following prerequisites are specific to modern authentication. It is highly recommended to upgrade the driver version 5.1.x to 5.1.3 or later to support modern authentication.

Installing the Microsoft Exchange Online PowerShell V2 (EXO V2)

You must install the Microsoft Exchange Online PowerShell V2 module to support the new API’s. For more information on EXO V2 module, see About the Exchange Online PowerShell V2 module.

Configuring Azure AD Proxy Application for Modern Authentication Methods

You must enable the permission in the Azure portal to access Microsoft Office 365 with modern authentication.

The procedure to set the permission is shown below:

  1. Login to the Azure AD Portal.

  2. Select Azure Active Directory.

  3. Navigate to App Registration > find and select your application in the list (for example: <MySample_Azure_Appln>) > Authentication > Advanced Settings.

  4. Set Treat Application as a Public Client permission to Yes.

    IMPORTANT:The multi-factor authentication (MFA) must be disabled for the Azure account which is used with the driver.