8.1 Sample Deployment of REST Driver for Salesforce
This section explains the specific configuration details required for deploying the driver with Salesforce.
8.1.4 Creating REST Driver Object for Connecting to Salesforce in Designer
To begin with the configuration, you need to set up the REST driver object in the designer first, and then configure the REST driver with the specific parameters to connect to Salesforce application.
The procedure to set up the REST driver in designer is similar for any connected application. However, configuring the driver to an application depends on the configuration parameters required for that specific application.
The generic steps to set up a driver object in designer is shown from step 1 to step 20, and the configuration parameters specific to Salesforce is mentioned in step 21. If you are familiar with the generic driver object set up, you can choose to skip to Step 21 to see the configuration parameters specific to Salesforce application.
-
Open Designer.
-
In the toolbar, click > .
-
Click to update the packages
or
Click if the packages are up-to-date.
-
In the Outline view, right-click the .
-
Click .
-
Select any REST driver package
or
Click to import all of the packages displayed.
By default, only the base packages are displayed. Deselect to display all packages.
-
Click to import the selected packages, then click in the successfully imported packages message.
-
In view, open your project.
-
Right click project > > , or drag and drop Identity Vault from the Palette to Modeler window.
-
In the Add Server Association screen, select the following field values and click .
-
Server DN
-
Identity Manager Version
-
Identity Manager Edition
The Identity Vault Credentials window appears.
-
-
In Identity Vault Credentials window, enter:
Field
Description
Host
The identity vault hosting machine's IP address
Username
The name of the user, for example, Admin, if the user is an administrator.
Password
The password of the user to login to the identity vault
-
Select , if you want to save your password for easy logins in the future.
-
Click .
The Identity Vault and the Driver Set appears in the Modeler window.
-
In the right pane, drag and drop the REST Server from the tab to the Modeler.
-
In the Driver Configuration Wizard, select (Contains the base functionality for a driver. You must install a driver base configuration package first).
NOTE:You can only select one base package.
-
Click .
-
Select the optional features to install for the REST driver, the options are:
-
REST Default Package
-
REST JSON Package: This package contains the default JSON configurations
-
REST Password Sync: This packages contains the policies that enable the REST driver to synchronize passwords. If you want to synchronize passwords, verify that this option is selected. For more information, see the NetIQ Identity Manager Password Management Guide.
-
-
Click .
The package dependencies window appears.
-
(Conditional) Click to install the package dependency listed.
NOTE:If there are any dependent packages associated with the selected package, you must install them to proceed.
-
On the Driver Information page, specify a name for the driver, then click . The Subscriber Options page appears.
-
Select in the Authentication Method field, as the REST Driver will be configured to connect to Salesforce with as the authentication method.
-
In the select the option as required. The available options are:
-
: The Bearer token is a security token without a signed digital server certificate. Accessing Salesforce with a bearer token may restrict you to execute or perform some operations in Salesforce. You may configure a bearer token if you need access to perform minimal operations.
To configure REST Driver using , see Configuring REST Driver with Bearer Token.
-
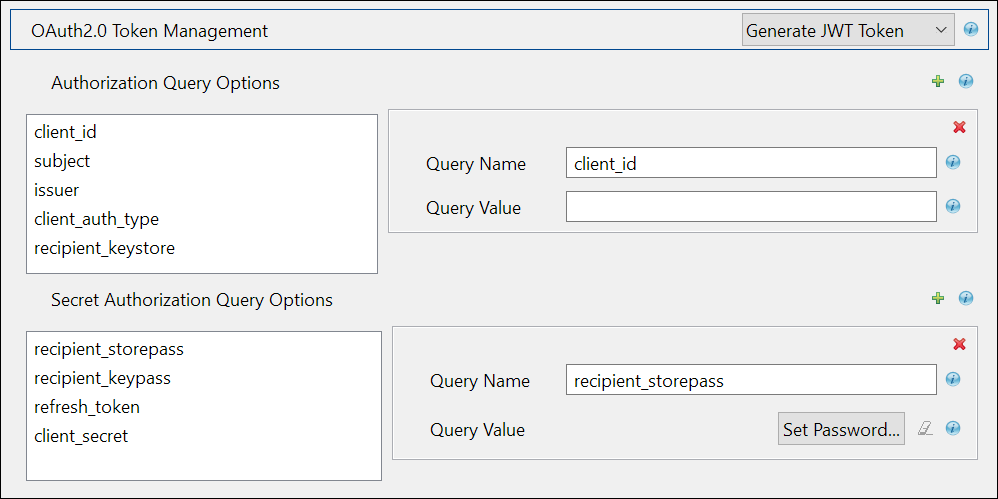
: A JSON Web Token (JWT) is signed by a digital server certificate for enhanced security to connect to Salesforce. You can perform all operations without any access restrictions when you configure a JWT Token. Select this option if you want to configure the REST driver with a JWT Token.
To configure REST Driver using , see Configuring REST Driver with JWT Token
-
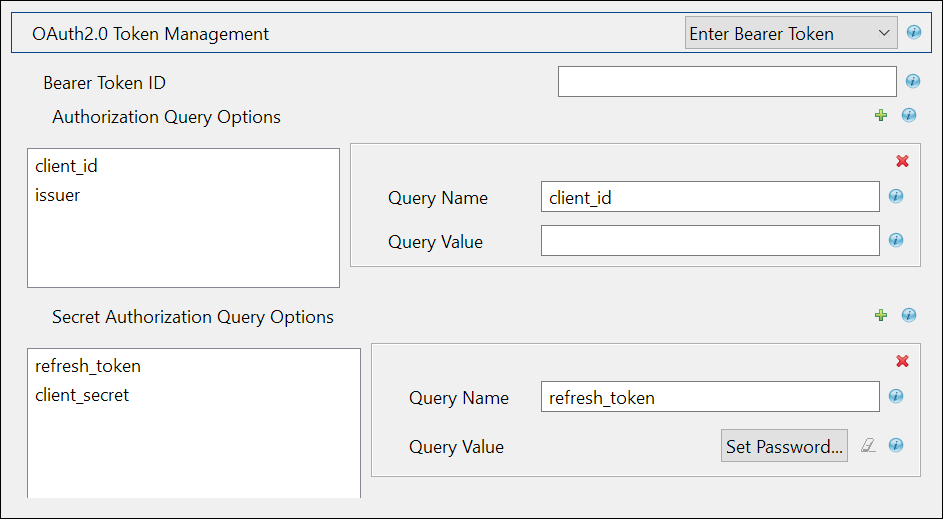
: Select if you already have one available or created by an external application.
To configure REST Driver using an available bearer token, see Configuring REST Driver with an Available Bearer Token
NOTE:Configuring a JWT Token is preferred over a Bearer Token, as it is more secured with a digital server certificate, and enables you to perform all operations without any access restrictions.
-
-
There are no publisher options to be specified in the subsequent screen, as the publisher channel is not supported for Salesforce application, hence click .
-
Review the summary of tasks that will be completed to create the driver, then click . The configured driver appears in the designer screen.
-
After competing the above steps, refer to Configuring Resources to Synchronize, to configure the resources to synchronize with Salesforce.
Configuring REST Driver with Bearer Token
is an access token issued by servers (Salesforce) to achieve multi-server authentication.

If you select , the following fields appear. Enter the values as shown in the following table.
IMPORTANT:For any operation performed on the Salesforce application using OAuth 2.0, an access token is sent for authorization of the user from Salesforce. The access token expires post the session idle time set for Salesforce, or in case of a system restart. The session idle time for access token expiry is set to 4 hours in the Salesforce application by default. However, the session idle time is configurable as per your requirement. Salesforce displays Unauthozied Access error or an Invalid Session error for any request initiated with an expired access token. The presence of a refresh token helps to re-establish the failed session internally by generating a new access token without the user having to log in again.
NOTE:The * indicates mandatory fields and ^ indicates non mandatory fields.
|
Field |
Sample Field Value |
|---|---|
|
Access Token URL |
<https://login.salesforce.com/services/oauth2/token> |
|
Authorization Query Options |
NOTE:In case of a driver upgrade, the issuer field does not auto populate the earlier configured value. You must enter the issuer field manually. |
|
Secret Authorization Query Options: These parameters are set to configure a refresh token. Though not mandatory, if configured the set refresh token value is not overridden with the new value when the access token expires. This may cause login issues until the new refresh token is added. |
|
|
Truststore File: The path and the name of the keystore file that contains the trusted certificates for the remote server to achieve SSL handshake. IMPORTANT:For add the public certificate to cacerts, present in /opt/netiq/common/jre/lib/security/path. For more information on securing communication using Truststore file see, Configuring the Subscriber Channel |
</home/username/SFDer.jks> NOTE:Create the truststore file in .jks format for Salesforce. |
|
Set mutual authentication parameters^: Select if you want to set mutual authentication information. |
|
|
Http Connection Timeout^: Specify the HTTP errors that must return a retry status. Error codes must be a list of integers separated by spaces. |
<307 408 503 504>, and specify the HTTP connection time out value. The driver waits for the time specified and terminates the HTTP connection. The timeout value must be greater than 0. |
|
Proxy host and port^: Specify the host address and the host post when a proxy host and port are used. |
192.168.0.0:port. Choose an unused port number on your server. Otherwise, leave this field blank. |
|
Set proxy authentication parameters^ Defaults to . To specify the values select . |
|
|
HTTP errors to retry^: Specify the HTTP errors that must return a retry status. Error codes must be a list of integers separated by spaces. |
<307 408 503 504> |
|
Base URL for REST Resources*: The URL to which the endpoint paths of Salesforce are appended. |
<https://ap16.salesforce.com/> |
Configuring REST Driver with JWT Token
The JSON Web token is an access request token in the JSON Web Token (JWT) format. It is an encrypted data string consisting of a header, payload, and a signature, and is used to transfer authorization data in client-server applications to authenticate the identity of the resource.
If you select , the following fields appear:
|
Field |
Sample Field Value |
|---|---|
|
Access Token URL |
<https://login.salesforce.com/services/oauth2/token> |
|
Authorization Query Options |
|
|
Secret Authorization Query Options: These parameters are set to configure a refresh token. Though not mandatory, if configured the set refresh token value is not overridden with the new value when the access token expires. This may cause login issues until the new refresh token is added. |
|
|
Truststore File: The path and the name of the keystore file that contains the trusted certificates for the remote server to achieve SSL handshake. For add the public certificate to cacerts, present in /opt/netiq/common/jre/lib/security/path. For more information on securing communication using Truststore file see, Configuring the Subscriber Channel |
</home/username/SFDer.jks> NOTE:Create the truststore file in .jks format for Salesforce. |
|
Set mutual authentication parameters^: Select if you want to set mutual authentication information. |
|
|
Http Connection Timeout^: Specify the HTTP errors that must return a retry status. Error codes must be a list of integers separated by spaces. |
<307 408 503 504>, and specify the HTTP connection time out value. The driver waits for the time specified and terminates the HTTP connection. The timeout value must be greater than 0. |
|
Proxy host and port^: Specify the host address and the host post when a proxy host and port are used. |
192.168.0.0:port. Choose an unused port number on your server. Otherwise, leave this field blank. |
|
Set proxy authentication parameters^ Defaults to . To specify the values select . |
|
|
HTTP errors to retry^: Specify the HTTP errors that must return a retry status. Error codes must be a list of integers separated by spaces. |
<307 408 503 504> |
|
Base URL for REST Resources*: The URL to which the endpoint paths of Salesforce are appended. |
For example: <https://ap16.salesforce.com/> |
Configuring REST Driver with an Available Bearer Token
Select if you already have one available or created by an external application. It is mandatory to configure refresh_token and client_secret if you select .
|
Field |
Sample Field Value |
|---|---|
|
Authorization Query Options |
|
|
Secret Authorization Query Options: These parameters are set to configure a refresh token. Though not mandatory, if configured the set refresh token value is not overridden with the new value when the access token expires. This may cause login issues until the new refresh token is added. |
|
|
Truststore File: The path and the name of the keystore file that contains the trusted certificates for the remote server to achieve SSL handshake. For add the public certificate to cacerts, present in /opt/netiq/common/jre/lib/security/path. For more information on securing communication using Truststore file see, Configuring the Subscriber Channel |
</home/username/SFDer.jks> NOTE:Create the truststore file in .jks format for Salesforce. |
|
Set mutual authentication parameters^: Select if you want to set mutual authentication information. |
|
|
Http Connection Timeout^: Specify the HTTP errors that must return a retry status. Error codes must be a list of integers separated by spaces. |
<307 408 503 504>, and specify the HTTP connection time out value. The driver waits for the time specified and terminates the HTTP connection. The timeout value must be greater than 0. |
|
Proxy host and port^: Specify the host address and the host post when a proxy host and port are used. |
192.168.0.0:port. Choose an unused port number on your server. Otherwise, leave this field blank. |
|
Set proxy authentication parameters^ Defaults to . To specify the values select . |
|
|
HTTP errors to retry^: Specify the HTTP errors that must return a retry status. Error codes must be a list of integers separated by spaces. |
<307 408 503 504> |
|
Base URL for REST Resources*: The URL to which the endpoint paths of Salesforce are appended. |
For example: <https://ap16.salesforce.com/> |
Configuring Resources to Synchronize
Resources are configured to perform operations with the specified method of operation. These operations and methods are appended to the base URL specified to perform the required operation in Salesforce.
The steps to configure resources are as follows:
-
In Designer, double-click the connector.
-
In the Properties screen that appears, select from the left pane.
-
In the Driver Configuration screen, select tab.
-
Select . The Resources section appears.
-
Add instance, by clicking the
 icon.
icon.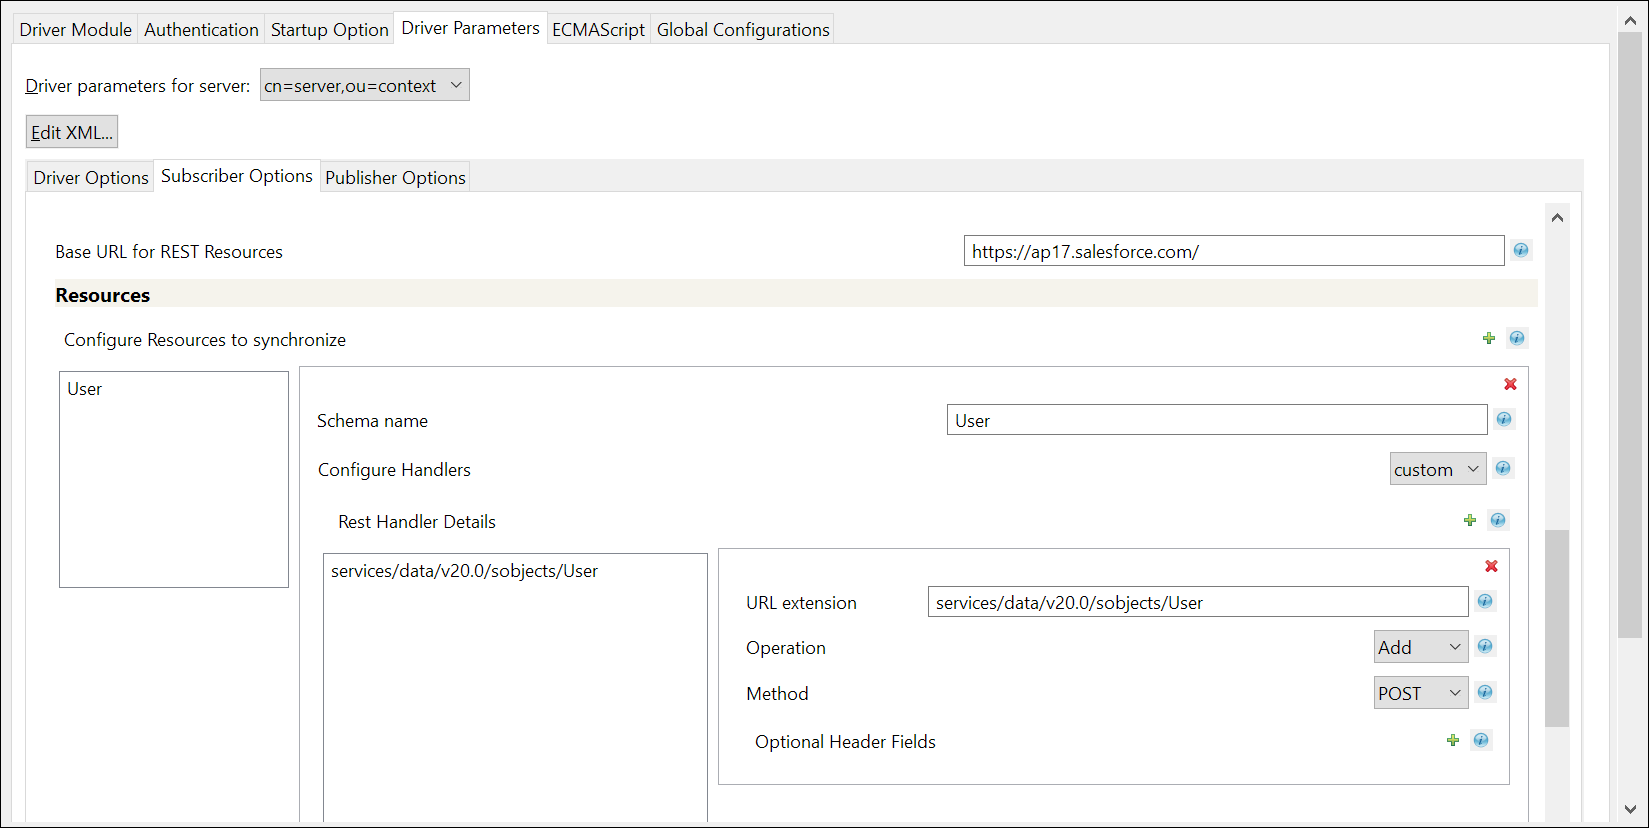
-
Provide a schema name, for example <User>, as shown in the image to configure handlers.
-
Set the Configure Handlers to , and click to add the schema name.
-
Add a instance by clicking the
icon, and specify the details as shown in the following table:Field
Description
Sample value
URL extension
Specify the customized URL extension to be appended to the base URL (the object entity on which the action is to be performed), in this case the object entity is User.
services/data/<v20.0>/sobjects/User
Operation
Specify the type of operation to be performed on the object entity.
The options are:
-
Add: to add the object entity
-
Modify: to modify a object entity
-
Query: to fetch details about the object entity
-
Delete: to delete the object entity
Method
Specify the method for the selected operation
The options are:
-
GET: the method to perform a fetch operation
-
POST: the method to perform a create or add operation
-
PUT: the method to update
-
PATCH: the method to modify
-
DELETE: the method to delete
Example: For adding a user, enter services/data/<v20.0>/sobjects/User as the URL extension, set the Operation as , and Method as . This URL extension is appended to the base URL, so that the URL generated to perform the add user operation is https://<ap17>.salesforce.com/services/data/<v20.0>/sobjects/User
NOTE:Ensure to replace the variable values in the URL as required.
-
-
Click .
Sample Configuration of Handlers
|
REST Handler Details |
Sample URL Extension |
Operation |
Method |
REST end point URL |
|---|---|---|---|---|
|
Add user |
services/data/<v20.0>/sobjects/User |
Add |
POST |
<https://<tenant name>.salesforce.com/services/data/<v20.0>/sobjects/User |
|
Modify user |
services/data/<v20.0>/sobjects/User/<association> |
Modify |
PATCH |
<https://<tenant name>.salesforce.com/services/data/<v20.0>/sobjects/User/<association> |
|
Add group |
services/data/<v20.0>/sobjects/Group |
Add |
POST |
<https://<tenant name>.salesforce.com/services/data/<v20.0>/sobjects/Group |
|
Modify group |
services/data/<v20.0>/sobjects/<association> |
Add |
PATCH |
<https://<tenant name>.salesforce.com/services/data/<v20.0>/sobjects/<association> |
|
Delete group |
services/data/<v20.0>/sobjects/Group/<association> |
Delete |
DELETE |
<https://<tenant name>.salesforce.com/services/data/<v20.0>/sobjects/Group/<association> |
Customizing REST Driver Options for Salesforce
This section explains about the policies that can be customized for transforming generic JSON data to Salesforce specific JSON data. The policies that are based on certain rules, perform several actions which can also be customized as required. The REST driver performs multiple transformation operations for any REST based connected system. An example for Salesforce transformation policy is shown below.
IMPORTANT:The below mentioned policies are examples and must be used for reference purposes only. You must ensure not to use them directly in your production environment.
-
Select the REST Driver Object in designer.
-
Select tab.
-
Select from the transformation diagram. This shows you all the input transformation policies.
-
Select the policy from the tab, and disable all the rules that are present.
-
Create a new policy by clicking
to add a new input transformation policy, and name it as . This policy will add the association to the new User or Group, and must be imported into the Input Transformation on Publisher Channel. -
After the policy is added, navigate to the tab.
-
Copy the following content into the display area.
<?xml version="1.0" encoding="UTF-8"?><!DOCTYPE policy PUBLIC "policy-builder-dtd" "C:\netiq\idm\apps\Designer\plugins\com.novell.idm.policybuilder_4.0.0.202002050656\DTD\dirxmlscript4.8.dtd"><policy xmlns:es="http://www.novell.com/nxsl/ecmascript"> <rule> <description>Check For Association - ADD</description> <conditions> <and> <if-operation op="equal">status</if-operation> <if-xpath op="true">driver-operation-data/response/url-token[@association]</if-xpath> <if-xpath op="not-true">driver-operation-data[@command='modify']</if-xpath> </and> </conditions> <actions> <do-set-local-variable name="vl-response"> <arg-string> <token-xpath expression=".[@level='success']/driver-operation-data[@command='add']/response/value[last()]/text()"/> </arg-string> </do-set-local-variable> <do-set-local-variable name="vl-association"> <arg-node-set> <token-split delimiter='"'> <token-local-variable name="vl-response"/> </token-split> </arg-node-set> </do-set-local-variable> <do-add-association> <arg-dn> <token-xpath expression="driver-operation-data/@dest-dn"/> </arg-dn> <arg-association> <token-xpath expression="$vl-association[4]"/> </arg-association> </do-add-association> </actions> </rule> </policy> -
Click the tab. The new policy screen appears.
-
Save all your changes.
-
Similarly, customize the transformation policies by selecting in the transformation diagram.
-
Add the following three rules to the policy xml, to appear above the rule.
<rule> <description>Remove association and password</description> <comment xml:space="preserve">Remove association and password</comment> <conditions> <and> <if-operation mode="nocase" op="equal">add</if-operation> </and> </conditions> <actions> <do-strip-xpath expression="association"/> <do-strip-xpath expression="operation-data/password-subscribe-status/association"/> <do-strip-xpath expression="password"/> </actions> </rule> <rule> <description>populate mandatory attributes</description> <comment xml:space="preserve">populate mandatory attributes</comment> <conditions> <and> <if-operation mode="nocase" op="equal">add</if-operation> <if-class-name mode="nocase" op="equal">User</if-class-name> </and> </conditions> <actions> <do-add-dest-attr-value class-name="User" name="TimeZoneSidKey"> <arg-value type="string"> <token-text xml:space="preserve">Asia/Kolkata</token-text> </arg-value> </do-add-dest-attr-value> <do-add-dest-attr-value class-name="User" name="LocaleSidKey"> <arg-value type="string"> <token-text xml:space="preserve">en_US</token-text> </arg-value> </do-add-dest-attr-value> <do-add-dest-attr-value class-name="User" name="EmailEncodingKey"> <arg-value type="string"> <token-text xml:space="preserve">ISO-8859-1</token-text> </arg-value> </do-add-dest-attr-value> <do-add-dest-attr-value class-name="User" name="ProfileId"> <arg-value type="string"> <token-text xml:space="preserve">00e2v000004F2XO</token-text> </arg-value> </do-add-dest-attr-value> <do-add-dest-attr-value class-name="User" name="LanguageLocaleKey"> <arg-value type="string"> <token-text xml:space="preserve">en_US</token-text> </arg-value> </do-add-dest-attr-value> </actions> </rule> <rule> <description>remove attrs from event</description> <comment xml:space="preserve">remove attrs from event</comment> <conditions> <and> <if-operation mode="nocase" op="equal">modify</if-operation> </and> </conditions> <actions> <do-strip-xpath expression="modify-attr/remove-value/value"/> <do-strip-xpath expression="modify-attr/remove-value"/> </actions> </rule> -
Select policy in the window to create a new policy below it.
-
Create a new policy by clicking
in the window, and name it . -
Double click the newly created policy, and navigate to tab in the right pane.
-
Paste the following xml content for this policy in the display area.
<?xml version="1.0" encoding="UTF-8"?><policy> <rule> <description>remove array identifiers</description> <comment xml:space="preserve">remove array identifiers</comment> <conditions> <and> <if-xpath op="true">../driver-operation-data/request/value</if-xpath> </and> </conditions> <actions> <do-set-local-variable name="valueattribute" scope="policy"> <arg-string> <token-xpath expression="request/value"/> </arg-string> </do-set-local-variable> <do-strip-xpath expression="request/value"/> <do-append-xml-element expression="request" name="value"/> <do-append-xml-text expression="request/value" notrace="true"> <arg-string> <token-replace-all regex='\"\}\,' replace-with='",'> <token-replace-all regex="\}\}" replace-with="}"> <token-replace-all regex='\{\"add\"\:' replace-with=""> <token-replace-all regex="\]" replace-with=""> <token-replace-all regex="\[" replace-with=""> <token-local-variable name="valueattribute"/> </token-replace-all> </token-replace-all> </token-replace-all> </token-replace-all> </token-replace-all> </arg-string> </do-append-xml-text> </actions> </rule> </policy> -
Save all your changes and deploy these policies to Identity Manager. This customized REST driver will manage Salesforce system for all the use cases mentioned above.