11.2 Deployment Procedure
Identity Manager components can be deployed on a private or a public network based on your requirement. Figure 11-1, Identity Manager Deployment on AWS EC2 illustrates a sample deployment that is used in the subsequent sections.
Figure 11-1 Identity Manager Deployment on AWS EC2
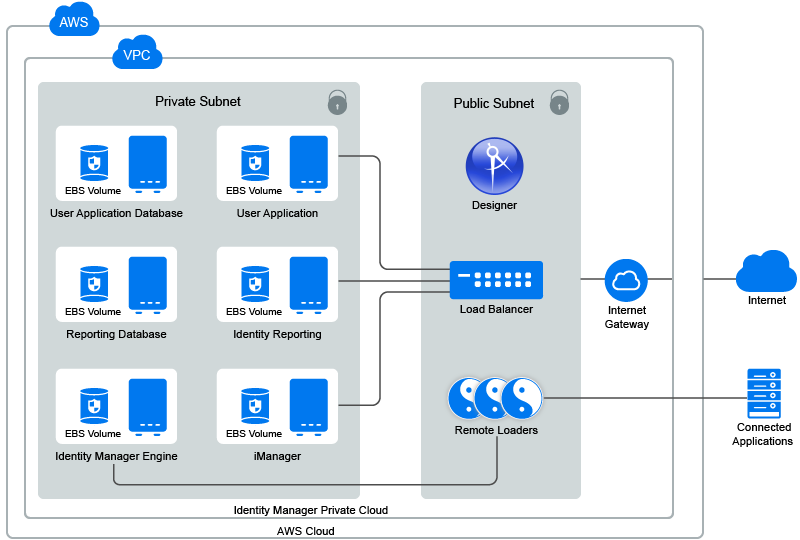
Identity Manager components can be deployed in different combinations depending on how the components are distributed on different servers. However, the deployment procedure is the same for all scenarios.
The deployment procedure consists of the following steps:
11.2.1 Preparing AWS Virtual Private Cloud
This section outlines general steps to set up AWS VPC to use with Identity Manager. For more information, see the Amazon Elastic Compute Cloud Documentation.
Perform the following steps to create AWS VPC services:
-
Log in to the AWS Management Console.
-
Click Services and create the following services:
Service
Steps
VPC
-
Click Services > VPC under Networking & Content Delivery.
-
Click Start VPC Wizard.
-
Select a VPC configuration type and click Select.
-
Specify the details in the form, and then click Create VPC.
This creates a private network of the specified size. VPC and subnet creation use the CIDR notation for address ranges. The largest VPC size is a /16 network.
For more information, see the Amazon Virtual Private Cloud Documentation.
IMPORTANT:Creating a VPC using Start VPC Wizard creates Subnets, Internet gateways, and Route table for the VPC. You can view or edit these items as follows:
Subnets
To deploy Identity Manager components as shown in Figure 11-1, create three subnets in VPC. For example, privateSN, publicSN1, and publicSN2.
Perform the following steps to create a subnet.
-
In the left menu, click Subnets.
-
Click Create Subnet.
-
Specify Name tag to identify the subnet.
-
Specify IPv4 CIDR block within VPC.
For example: 10.0.0.0/24
You must create public subnets in different availability zones.
-
Click Yes, then click Create.
-
(Conditional) For public subnets, enable auto-assign public IP address:
-
Select Subnet Actions > Modify auto-assign IP settings.
-
Select Enable auto-assign public IPv4 address.
-
Click Save.
-
Repeat these steps to create additional subnets.
Internet gateways
-
In the left menu, click Internet Gateways.
-
Click Create Internet Gateway.
-
Specify Name tag, then click Create.
-
Select the newly created Internet gateway and attach it to VPC:
-
Select Actions > Attach to VPC.
-
Select the VPC from the list and click Attach.
-
Route table
-
In the left menu, click Route Tables.
-
Select the route table that was automatically created for this VPC.
-
In the Routes tab:
-
Click Edit.
-
Click Add another route.
-
In Destination, specify 0.0.0.0/0.
-
In Target, select the Internet Gateway table that is associated with this VPC. See, Internet gateways.
-
Click Save.
-
-
In the Subnet Association tab:
-
Click Edit.
-
Locate the subnet that you want to associate with this VPC and click Save.
-
(Optional) Hosted Zones
If you have a registered domain, you can use it to host Identity Manager components by performing the following actions:
-
Click Services > Route 53 > Hosted Zones.
-
Click Create Hosted Zone, specify the details such as:
-
Domain Name: Specify the domain name.
-
Comment: Add a comment.
-
Type: Specify the type of the hosted zone.
-
-
Click Create.
Elastic IP address
-
Click Services > EC2.
-
In the left menu, select Elastic IPs.
-
Click Allocate New address.
-
Click Allocate.
A static IPv4 address is allocated that is not used by any other resource.
-
Click Close.
-
11.2.2 Creating and Deploying Instances
This section outlines steps to create and deploy instances for a basic setup of Identity Manager, which includes the Identity Manager engine, iManager, Identity Applications, Reporting, User Application database, and Reporting database.
Perform the following steps to create instances for Identity Manager components.
-
Click Services > EC2.
-
Click Launch Instance.
-
Select the SLES 12 SPx or RHEL 7.x image.
-
Select the instance type that meets the requirements of the base operating system and deployment of Identity Manager components. See System Requirements.
-
Click Next: Configure Instance Details.
Ensure that the instance is using the correct VPC and subnet. This page auto-populates the subnet settings.
Field
Action
Auto-assign Public IP
Set to Enable for the public. This setting automatically populates the subnet settings. For private subnet, set the value to Disable.
-
Click Next: Add Storage.
The default storage size is 10 GB. Change the storage size as per your requirement. See System Requirements.
-
Click Next: Add Tags.
Add tags as desired. Tags enable you to organize instances. For example, you can add the following two tags to each instance:
-
A tag indicating what the instance is being used for
-
A tag indicating who is the owner of this machine
-
-
Click Next: Configure Security Group.
Security groups are virtual firewall rules for groups of instances. It is recommended to create a separate security group for each group of instances with the same firewall requirements.
For example, you can configure a security group for all nodes of the Identity Manager engine, one security group for all nodes of Identity Applications, and one security group for all nodes of Identity Reporting. By default, a new security group only allows incoming traffic on port 22, so that you can only connect to the instance by using SSH.
For more information, see Amazon EC2 Security Groups for Linux Instances.
-
Create a new security group; specify a name and description for it.
Add additional port rules before installing the following Identity Manager components:
Component
Port
Description
LDAP for Identity Vault
TCP 636
Required for the secured LDAP communication.
iManager
TCP 8443
Required for the HTTPS communication to access iManager.
Identity Applications
TCP 8543
Required for the HTTPS communication to access Identity Applications.
Identity Reporting
TCP 8643
Required for the HTTPS communication to access Identity Reporting.
PostgreSQL Database
TCP 5432
Required for the secured database communication to access PostgreSQL.
-
Click Review and Launch.
-
After reviewing the details, click Launch.
-
Select an existing key pair or create a new one.
This key pair is used for SSH access to the instance. You can use the same key pair with multiple machines.
-
Click Download Key Pair.
IMPORTANT:You can connect to and manage your instances only using the private key. Therefore, do not lose the private key after downloading it.
-
Attach the Elastic IP address that is created when the instance is initializing.
11.2.3 Preparing the EC2 Instances
Launch an instance and verify the software repositories. To verify the configured software repositories, perform the following:
-
Log in to an instance using the key pair.
-
Switch to root user.
-
Verify that the following updates are available in your operating system:
SLES12-SP3-Pool and SLES12-SP3-Updates on SLES: To verify, run zypper lr –n command.
rhui-REGION-rhel-server-releases/7Server/x86_64 on RHEL: To verify, run yum repolist command.
NOTE:If repositories are not present in your operating system, verify that the configured elastic IP address is attached to the instance and then restart the instance.
-
Install the following prerequisites for your operating system:
- SLES
-
Use zypper command to install glibc-32bit library.
- Red Hat
-
Use yum install command to install the following prerequisites:
-
unzip
-
ksh
-
bc
-
glibc-*.i686
-
libXau-1.0.8-2.1.el7.i686
-
libxcb.i686
-
libX11.i686
-
libXtst.i686
-
libXrender.i686
-
libgcc.i686
-
lsof
For Identity Manager engine, you can edit the prerequisite.sh script and remove the occurrences of compat-libstdc++-33.x86_64. This package is no longer necessary for Identity Manager installation.
-
-
Set up /etc/hosts and hostname:
-
Use the private IP address of the instance to secure Identity Manager servers within the firewall.
-
Assign a DNS name to the instance and update the hosts file.
For example:
# 10.0.0.1 identityEngine.example.com identityEngine
-
Set hostname and domain name.
- SLES
-
yast lan
- RHEL
-
hostnamectl set-hostname idmengine.example.com
-
-
(Conditional) Create an encrypted Elastic Block Store (EBS) volume to encrypt the data in the cloud.
-
Click Services > EC2.
-
In Elastic Block Store, select Volumes and click Create Volume.
-
Specify the required size for your volume.
-
Select Encrypt this volume and click Create Volume.
-
Select the newly created volume in the list.
-
In Actions, click Attach Volume to attach the volume to EC2 instance.
-
Repeat these steps for each instance.
For more information about EBS, see Amazon EBS.
-
-
Format the volume and mount the partition by using your operating system tools:
- SLES
-
Run the yast disk command to format the volume.
- RHEL
-
Run mkfs to format and add to /etc/fstab. For more information, see Red Hat Enterprise Linux Deployment Guide.
NOTE:
-
Mount Identity Manager engine data partition. By default, the data partition is /var/opt/novell/.
-
Mount other Identity Manager components in /opt/netiq/.
-
Update the /etc/hosts file on all instances with DNS to IP address of all machines.
11.2.4 Setting Up Identity Manager Components
Before installing the Identity Manager components, perform the following steps:
-
Download the Identity_Manager_4.7_Linux.iso on the instance where you want to install the Identity Manager component.
-
Mount the downloaded .iso file.
-
(Conditional) Create the database for Identity Applications and Identity Reporting. For more information, see Setting Up Database for Identity Applications and Identity Reporting.
-
From the root directory of the .iso file, run ./install.sh command.
-
Read through the license agreement and type y to accept the license agreement.
-
Select custom installation option and select the component that you want to install on the instance. Configure the component. For more information, see Table 4-2, Custom Configuration.
-
Run configupdate.sh on Identity Reporting and Identity Applications to set all clients.
11.2.5 Setting Up Database for Identity Applications and Identity Reporting
If you want to install the PostgreSQL database for Identity Applications and Identity Reporting on an external server, you should perform the following steps before installing:
-
Navigate to the location where you have mounted the Identity_Manager_4.7_Linux.iso.
-
Locate the /common/packages/postgres/ directory and install PostgreSQL.
rpm -ivh netiq-postgresql-9.6.6-0.noarch.rpm
-
Associate the group to postgres user by running the following command:
/usr/sbin/usermod -a -G postgres postgres
-
Change the postgres user’s home directory path to /opt/netiq/idm/postgres/ in the /etc/passwd file.
-
Navigate to the /etc/ directory.
-
Edit the passwd file.
vi /etc/passwd
-
Change the home directory of the postgres user to /opt/netiq/idm/postgres/.
-
-
Log in as postgres user.
For example:
su - postgres
-
Create a data directory in the PostgreSQL install location.
mkdir -p <POSTGRES_HOME>/data, where <POSTGRES_HOME> is /opt/netiq/idm/postgres
For example:
mkdir -p /opt/netiq/idm/postgres/data
-
Export the PostgreSQL home directory
export PGHOME=<postgres home directory path>
For example:
export PG_HOME=/opt/netiq/idm/postgres
-
Export the PostgreSQL password:
export PGPASSWORD=<enter the database password>
-
Initialize the database.
"LANG=en_US.UTF-8 <POSTGRES_HOME>/bin/initdb -D <POSTGRES_HOME>/data"
For example:
"LANG=en_US.UTF-8 /opt/netiq/idm/postgres/bin/initdb -D /opt/netiq/idm/postgres/data"
-
Create a database for the following components in the /opt/netiq/idm/postgres/ directory.
- Identity Applications
$ createdb idmuserappdb
$ psql -s idmuserappdb
# create user idmadmin password 'somepassword';
# GRANT ALL PRIVILEGES ON DATABASE idmuserappdb TO idmadmin;
# ALTER DATABASE idmuserappdb OWNER TO idmadmin;
- Identity Reporting
$ createdb idmrptdb
-
Log out as postgres user.
-
Modify the postgresql.conf file to allow the PostgreSQL instance to listen on network instances other than localhost.
-
Navigate to the /opt/netiq/idm/postgres/data/ directory.
-
Edit the postgresql.conf file:
vi postgresql.conf
-
Add the following line in the file:
listen_addresses = '*'
-
-
Create pg_log directory under <postgres home directory path>/data.
For example:
mkdir -p /opt/netiq/idm/postgres/data/pg_log
-
Change the permissions for the pg_log directory.
chown -R postgres:postgres <postgres directory path>/data/pg_log
For example:
chown -R postgres:postgres /opt/netiq/idm/postgres/data/pg_log
-
Start the PostgreSQL service.
systemctl start netiq-postgresql
This will start the new PostgreSQL service.
11.2.6 Setting Up Designer
You must install Designer on a Windows machine to use it.
-
On a public subnet, launch a supported Windows instance.
For the Windows security group, use rdesktop port only. For example, 3389
-
Install Designer on a Windows instance. For more information, see Installing Designer in NetIQ Identity Manager Setup Guide for Windows.
11.2.7 Creating an AWS EC2 Load Balancer
You can create a load balancer to balance the load of incoming requests across Identity Manager components. The load balancer can be used to secure the Identity Manager servers from public access.
The following procedures explain the configuration details required to set up a load balancer for the sample deployment scenario:
Create a Certificate for a Load Balancer to Use Secured Communication
The load balancer uses this certificate to establish a secured communication among Identity Manager components. You can create a certificate for a load balancer in three ways:
Using AWS Certificate Manager (ACM)
-
Click Services > Certificates Manager.
-
Click Request Certificate.
-
Specify the DNS name for which you want to create a certificate.
-
Verify the DNS authority.
Uploading an External Certificate to ACM
-
Click Services > Certificates Manager.
-
Click Import Certificate.
-
Specify the certificate details.
Uploading an External Certificate to IAM
-
Click Services.
-
In Security, Identity & Compliance, click IAM.
-
Specify the certificate details using IAM API. For more information, see Uploading Server Certificate Using IAM API.
Creating Target Groups
A target group provides a way to associate the load balancer to the IP addresses of instances (targets) among which the load will be distributed.
Perform the following steps to create a target group:
-
In the EC2 Dashboard, click Target Groups under LOAD BALANCING.
-
Click Create target group.
-
Specify the following details:
Field
Description
Target group name
Specify a name for the target group.
You can specify the name of a component for which this target group is configured. For example, Identity Applications, Identity Reporting, or iManager.
Protocol
Select HTTPS.
Port
Specify the port on which the server is configured for listening.
Following are the example port values used for different Identity Manager Components:
-
Identity Applications: 8543
-
Identity Reporting: 8643
-
iManager: 8443
Target type
Select Instance.
VPC
Select the same VPC that you have selected for the instances of Identity Manager components.
Health Check Settings
Protocol
Select HTTPS.
The load balancer uses this protocol while performing health checks.
Path
Specify the destination path for health checks.
Following are the default paths of the Identity Manager components to perform health checks:
-
Identity Applications: /idmdash/index.html
-
Identity Reporting: /IDMRPT/index.html
-
iManager: /nps/login.html
Advanced health check settings
Keep the default values.
-
-
Click Create.
-
Enable session stickiness.
-
Select the target group you have created.
-
In the Description tab, click Edit attributes.
-
Select Enable for Stickiness.
-
-
Repeat these steps to create target groups for each application.
NOTE:If SSPR is installed on a different server, create a separate target group for this component.
Create the Load Balancer
Perform the following steps to create a load balancer:
-
In the left menu, click Load Balancers.
-
Click Create Load Balancers.
-
Click Create under Application Load Balancer.
-
Specify the following details:
Field
Description
Name
Specify a name for the load balancer.
Scheme
Select internet-facing.
Listeners
To add more listeners to your load balancer, click Add Listener.
Specify the listener ports as follows:
For iManager:
-
Load Balancer Protocol: HTTPS
-
Load Balancer Port: 8443
For Identity Applications:
-
Load Balancer Protocol: HTTPS
-
Load Balancer Port: 8543
For Identity Reporting:
-
Load Balancer Protocol: HTTPS
-
Load Balancer Port: 8643
Availability Zones
-
Select the same VPC that you have created earlier for Identity Manager components.
-
Select the Availability Zone in which public subnets are available.
NOTE:You must select at least two subnets.
Tags
(Optional) You can add a tag to identify your load balancer.
-
-
Click Next: Configure Security Settings.
-
Specify the certificate details to use HTTPS protocol. You can perform one of the following:
-
Select the certificate type that you created in Create a Certificate for a Load Balancer to Use Secured Communication.
-
Upload the certificate to IAM or ACM – Specify the certificate details.
-
-
Click Next: Configure Security Groups.
-
In Assign a security group, select Create a new security group.
-
(Optional) Specify the name and description for the load balancer.
-
Add rules to the security group that routes the traffic to the configured listeners:
Field
Description
Type
Select Custom TCP Rule.
Protocol
This displays the protocol type used for the rule.
Port Range
Select the port range for the Identity Manager Components:
-
iManager: 8443
-
Identity Applications: 8543
-
Identity Reporting: 8643
Source
Select Anywhere to connect to the instance where the Identity Manager component is deployed.
-
-
Click Next: Configure Routing.
-
In Target group, specify the following details:
Field
Description
Target group
Select Existing target group. This list displays the target groups created for Identity Manager Components in Creating Target Groups.
Name
Select a target group from the list.
You can select only one target group here. For example, select the target group that you have created for Identity Applications.
After creating the load balancer, you will need to modify the listener port 8443 to use the target group that is configured for the HTTPS protocol. See Step 18 of this section.
Protocol
Populated with the value that you have configured in the specified target group. Review to ensure that the value is listed correctly.
Port
Populated with the value that you have configured in the specified target group. Review to ensure that the value is listed correctly.
Target type
Populated with the value that you have configured in the specified target group. Review to ensure that the correct value is listed.
-
Under Health Checks, review the following details:
-
Click Next: Register Targets.
The list of all targets registered with the target group that is selected. You can modify this list only after creating the load balancer.
-
Click Next: Review.
-
Verify that the load balancer details are correct.
-
Click Create and then click Close.
-
(Conditional) If you skipped to create listeners ports for Identity Manager components or you want to add new listener ports, update the listener ports to use the appropriate target groups:
-
Select the load balancer you have created.
-
Select the Listeners tab.
-
Click Add Listener and specify the required details for each listener, see Step 4.
-
Select the certificate that is used for the load balancer, see Create a Certificate for a Load Balancer to Use Secured Communication.
-
Click Create.
If SSPR is configured on a separate machine, you might need to add a listener.
IMPORTANT:To use a single load balancer in a distributed setup, create a separate DNS alias record to differentiate the servers in the setup. Otherwise, create a separate load balancer for each web application.
-
11.2.8 (Optional) Creating Alias DNS with the Registered Hosted Zone
If you have a registered site, you can use it to create an individual record set for each Identity Manager component.
-
Click Services > Route 53.
-
In the left-side menu, click Hosted Zones and select the hosted zone that is created while setting up AWS EC2 services. See, Preparing AWS Virtual Private Cloud.
-
Click Go to Record Sets.
-
Click Create Record Set:
Field
Description
Name
Specify a meaningful name for your record set.
For example: Name Identity Applications record set as rbpm.
Type
Select A – IPv4 address.
Alias
Select Yes.
Alias Target
Select the load balancer which is configured to connect Identity Manager components
Routing Policy
Select Simple
-
Click Create.
-
Repeat the Step 4 and Step 5 to create a record set for each Identity Manager instance.
-
Run configupdate.sh on Identity Applications, Identity Reporting, and OSP instances and update SSO configuration with the public DNS name.
-
Restart Tomcat.
-
Verify the configuration by accessing the applications using the public DNS.
https://<public-DNS-name>:<port>/<application-context-name>
11.2.9 Accessing Identity Manager Components
You can access the Identity Manager instances using the public DNS name of the load balancer or the alias DNS record set. To allow Identity Manager instances to communicate with one another, edit the /etc/hosts files on each instance and add an entry to resolve its hostname to its private IP address.
Update the following instances to internally access the other instances
|
Instance |
Description |
|---|---|
|
OSP |
The OSP instance requires access to the SSPR instance to reset passwords. Host file location: /etc/hosts Modify the hosts file with the following entry: <IP_address> <Private_DNS_Name> <Public_DNS_Name> For example: 10.0.1.5 sspr.privatedns.local sspr.publicdns.com |
|
Identity Applications |
The Identity Applications instance requires an access to OSP instance for login purposes. Host file location: /etc/hosts Modify the hosts file with the following entry: <IP_address> <Private_DNS_Name> <Public_DNS_Name> For example: 10.0.1.6 osp.privatedns.local osp.publicdns.com |
|
Identity Reporting |
The Identity Reporting instance requires an access to OSP instance for login purposes. Host file location: /etc/hosts Modify the hosts file with the following entry: <IP_address> <Private_DNS_Name> <Public_DNS_Name> For example: 10.0.1.6 osp.privatedns.local osp.publicdns.comm |