3.7 Configuring Drivers

A driver provides the connection between an application and the Identity Vault. The driver is the connector that enables data synchronization and sharing between systems. To view or change settings, double-click a driver or driver line in the Modeler.

3.7.1 Driver General Settings

The following table contains a description of the general settings for drivers.

Table 3-12 General Settings

Field

Description

Name

Displays the driver name, which you can change.

Notes

Enables you to type notes about your driver implementation.

Server/Driver Version

Displays the server name to which driver is associated. The driver version only shows if the driver is running. Driver versions vary for each driver.

(Deprecated) Basic configuration file

The field is populated only if you configured your driver by using a driver configuration file instead of packages.

Displays the configuration filename that this driver uses. Contains the filename of the configuration file that was used during import.

To view the path to this file, click the information icon next to the filename. You might want to view the file to find out version information.

If you haven’t yet run the import wizard, this field is set to None.

Supported DN format

Displays the format (for example, LDAP) that is supported for each driver. This DN information is important for policy building and simulation.

For additional details, click the information icon next to the format field.

3.7.2 Driver Configuration

The driver configuration page is dynamic. Labels and descriptions are dynamically read from the driver configuration information.This information is unique for each driver.

The two required options for every driver are Driver Configuration and GCVs. With the Driver Configuration option selected, fill in the required values and parameters that are necessary to have the driver run in your network environment. However, because each driver contains different values and parameters, you need to consult the driver manual for specific values. Go to the Identity Manager Drivers Web site, then select the manual for the driver you are configuring.

Driver Module

Table 3-13 Driver Module Settings

Field

Description

Java: Name of the Java class

Specify the name of the Java class that will be instantiated for the shim component of the driver. This class can be located in the classes directory as a class file, or in the lib directory as a .jar file.

Native: Name of the DLL

Specify the name of the .dll file that will be instantiated for the application shim component of the driver.

Connect to Remote Loader

Select this option if you want to connect the driver to the Identity Manager engine that uses the Remote Loader.

Driver object password: Set Password

Set a password for the Driver object. If you are using the Remote Loader, you must enter a password on this page or the remote driver cannot run. The Remote Loader uses this password to authenticate itself to the remote driver.

Remote Loader client configuration for documentation: Include in documentation

Enables you to document your Remote Loader configuration for the driver. From the drop-down list, select a name that you specified on the driver’s documentation property page.

To use this option, see Engine Control Values.

Startup Option

Table 3-14 Startup Settings

Setting

Description

Auto start

The driver starts automatically when the Identity Manager engine loads.

Manual

You must start the driver manually from the driver state location.

Disabled

Disables the driver.

Do not automatically synchronize the driver

If you don't select this option, a driver that has been deployed but disabled resynchronizes on startup. If you select this option, a driver that has been deployed but disabled does not resynchronize.

Driver Parameters

From this tab, you can enter common driver options, Subscriber and Publisher channel options, as well as edit XML. Because the Driver Parameters options are different for each driver, refer to the Identity Manager Drivers Web site for configuration information on the driver you have selected.

ECMAScript

Displays an ordered list of ECMAScript resource files that are loaded when the driver starts. The ECMAScript files contain extension functions that can be used in policies.

To add an ECMAScript from another driver:

  1. Click Add, then browse to and select the ECMAScript object from another driver.

  2. Click OK.

  3. Click Apply to save the change.

For more information, see Using ECMAScript in Policies in NetIQ Identity Manager - Using Designer to Create Policies.

Global Configuration

You can link in Global Configuration objects to extend GCV definitions for the driver that Identity Manager loads when the driver starts. This allows you to reuse Global Configuration objects instead of creating multiple GCVs for the driver.

To add a Global Configuration object:

  1. Click Add, then browse to and select the Global Configuration object.

  2. Click Apply to save the change.

You can change the order that the Global Configuration objects are listed by selecting the object, then clicking Up or Down.

3.7.3 Engine Control Values

The engine control values enable you to change certain default behaviors of the Identity Manager engine. You can access the values only if a server is associated with the Driver Set object. The values are populated based on the Identity Manager version of the servers that are associated with the driver set (servers can be associated through the Engine Controls for Server entry).

Changing a version of an Identity Manager server affects the engine controls for all drivers in a driver set that is associated with the server. When the Identity Manager version is changed, the engine controls for all associated drivers are updated to match the specified version. During the update process, all current settings for existing engine controls are merged into the new engine controls. If the engine controls are not valid for the version of the selected server, they are removed as options.

  1. In the Modeler, right-click the driver line.

  2. Select Properties > Engine Control Values.

  3. Click the tooltip icon to the right of the Engine Controls for Server field. If a server is associated with the Identity Vault, and if you are authenticated, the engine control values display in the large pane.

Table 3-15 Engine Control Values

Field

Description

Subscriber channel retry interval in seconds

Controls how frequently the Identity Manager engine retries the processing of a cached transaction after the application shim's Subscriber object returns a retry status.

Qualified form for DN-syntax attribute values

Controls whether values for DN-syntax attribute values are presented in unqualified slash form or qualified slash form. When the control is set to True, the attribute values are presented in qualified form.

Qualified form from rename events

Controls whether to present the new-name portion of rename events coming from the Identity Vault to the Subscriber channel with type qualifiers. For example, CN=. When the control is set to True, the names are presented in qualified form.

Maximum eDirectory replication wait time in seconds

Controls the maximum time that the Identity Manager engine waits for a particular change to replicate between the local replica and a remote replica. This only affects operations where the Identity Manager engine is required to contact a remote eDirectory server in the same tree to perform an operation and might need to wait until some change has replicated to or from the remote server before the operation can be completed. For example, object moves when the Identity Manager server does not hold the master replica of the moved object or the file system rights operations for users created from a template.

Use non-compliant backwards-compatible mode for XSLT

Sets the XSLT processor used by the Identity Manager engine to a backward-compatible mode. This allows the XSLT processor to use non- XPath 1.0 and XSLT 1.0 standards-compliant behaviors. This is required for backward compatibility with existing Identity Manager style sheets that depend on the non-standard behaviors.

For example, the behavior of the XPath “!=” operator when one operand is a node set and the other operand is other than a node set is incorrect in DirXML releases up to and including Identity Manager 2.0. This behavior has been corrected; however, the corrected behavior is disabled by default through this control to allow backwards compatibility with existing DirXML style sheets.

Maximum application objects to migrate at once

Limits the number of application objects that the Identity Manager engine requests from an application during a single query that is performed as part of a Migrate Objects from Application operation.

If java.lang.OutOfMemoryError errors are encountered during a Migrate from Application operation, this number should be set lower than the default. The default is 50.

NOTE:This control does not limit the number of application objects that can be migrated; it merely limits the batch size.

Set creatorsName on objects created in Identity Vault

Determines whether Identity Manager engine sets the creatorsName attribute to the DN of a driver on all objects created in the Identity Vault by the driver.

Setting this attribute allows for easy identification of objects created by the driver and also carries a performance penalty. In absence of a value, the attribute defaults to the DN of the NCP Server object that is hosting the driver.

Write pending associations

Determines whether the Identity Manager engine writes a pending association on an object during Subscriber channel processing.

Writing a pending association confers little or no benefit but incurs a performance penalty. Nevertheless, the option exists to turn it on for backwards compatibility.

Use password event values

Determines the source of the value reported for the nspmDistributionPassword attribute for Subscriber channel add and modify events.

When this control is set to False, the current value of the nspmDistributionPassword is obtained and reported as the value of the attribute event. This means that only the current password value is available. This is the default behavior.

When the control is set to True, the value recorded with the eDirectory event is decrypted and is reported as the value of the attribute event. Both the old password value (if it exists) and the replacement password value at the time of the event are available. This is useful for synchronizing passwords to certain applications that require the old password to enable setting a new password.

Enable password synchronization status reporting

Determines whether the Identity Manager engine reports the status of Subscriber channel password change events.

Reporting the status of Subscriber channel password change events allows applications such as the Identity Manager User Application to monitor the synchronization progress of a password change that should be synchronized to the managed application.

Combine values from template object with those from add operation

Determines how the Identity Manager engine uses values from a template object when the template is used to create objects in the Identity Vault.

The default value is True. The multi-valued attribute values from the template are used in addition to the values for the same attribute that are specified in the add operation.

When the control is set to False, the values from the template are ignored if the values for the same attribute are specified in the add operation.

Allow event loopback from publisher to subscriber channel

Determines whether the Identity Manager engine allows an event to loopback from the Publisher channel of a driver to the Subscriber channel of the same driver.

The default value is False. The events are not looped back into the Subscriber channel of the driver.

When the control is set to True, the events loopback into the Subscriber channel of the driver.

Revert to calculated membership value behavior

Prior to Identity Manager 3.6, the Identity Manager engine retrieved calculated values for Member and Group Membership attributes.

The default value is false. The Identity Manager 4.5 engine retrieves static values. This behavior is useful for synchronizing Nested Groups.

When the control is set to True, the engine reverts to the pre-3.6 behavior.

You can read calculated values for Member and Group Membership attributes with post-3.6 default behavior by using "[pseudo].Member" and "[pseudo].Group Membership" special attribute names.

Maximum time to wait for driver shutdown in seconds

Determines the maximum time in seconds for which the Identity Manager engine waits for the driver’s Publisher channel to shutdown. If the driver does not shutdown within the provided time value, the driver is terminated by the engine.The default value is 60 seconds.

Regular Expression escape meta-characters

Determines the meta-characters that will be escaped while evaluating regular expressions. If a meta-char is not present in the value, the character is not escaped during local variable expansion containing a regular expression.

To escape all the regular expression meta-characters, "\,$,^,.,?,*,+,[,],(,),|" should be added as the value of the control. The default value is $.

If you do not want a meta-character to escape, remove the character from the value. The control value should be a valid comma(,) separated list. Otherwise, you might get errors during policy evaluation.

Retry of Out of Band event

Determines whether the Identity Manager engine retries an out of band event when the status is RETRY.

This control is false by default. The Identity Manager engine will not retry the out of band event on a RETRY status.

If this control is set to true, the engine retries the out of band event on a RETRY status.

Use Rhino ECMAScript engine

Determines whether the Identity Manager engine uses the Rhino ECMAScript engine. The engine uses Nashorn as the default ECMAScript engine.

This control is true by default.

Enable Subscriber Service Channel

Determines whether the Identity Manager engine processes the out of band queries, such as code map refresh, data collection, and queries triggered from dxcmd, on the Subscriber Service channel of the JDBC Fan-Out driver.

By default, this control is set to true. The channel separately processes these queries without interrupting the normal processing of events.

Ignore Entitlement Changes of other drivers

This control determines whether the Identity Manager engine ignores or processes entitlement changes of other drivers. The default value is true. This means that the driver automatically ignores the entitlement changes of other drivers.

If this control is set to false, the entitlement changes of other drivers are cached and processed by this driver.

Allow Entitlement event loopback from cprs to subscriber channel

This control determines whether the Identity Manager engine allows an entitlement event that is generated by a CPRS assignment to loopback to the Subscriber channel of the driver. The default value is false. This means that the event is not looped back to the Subscriber channel.

If this control is set to true, the event flows to the Subscriber channel of the driver.

3.7.4 Driver Global Configuration Values

Global configuration values (GCVs) are settings that are similar to driver parameters. GCVs can be specified for an individual driver as well as a driver set. If a driver does not have a GCV, the driver inherits the value for that GCV from the driver set.

GCVs allow you to specify settings for Identity Manager features such as password synchronization and driver heartbeat, as well as settings that are specific to the function of an individual driver configuration. Some GCVs are provided with the drivers, but you can also add your own. You can refer to these values in a policy to help you customize your driver configuration.

To edit the driver set’s GCV settings, double-click the Driver Set object in the Modeler view. From the Global Configuration Values page, you can add, edit, remove, or edit the XML for GCVs.

To view or change the driver’s GCV settings, double-click the driver. From the Global Configuration Values page, you can add, edit, or remove values, or edit the XML file for the driver. To select a value, click the value or the control field to the right of the value’s name. Use the Add, Edit, Remove, and Edit XML buttons at the bottom of the page.

Figure 3-3 The Global Configuration Values Page

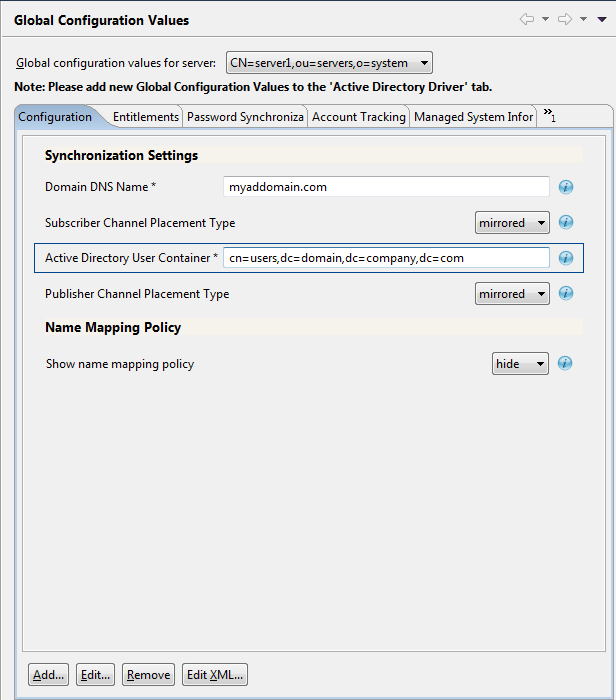
You can add, edit, and remove GCVs on the Global Configuration Values page, except for those values found under the Password Management heading. Password values are accessed through the Password Synchronization page; click the Launch Password Sync Dialog icon to the right of the Information icon for the control field.

The two required options for configuring a driver are Driver Configuration and GCVs. However, because each driver contains different values and parameters, you need to consult the driver manual for specific values. Go to the Identity Manager Drivers Web site, then select the manual for the driver you are configuring.

3.7.5 Driver Health Configuration

The Driver Health Configuration allows you to monitor a driver’s state of health (green, yellow, or red), and to specify the actions to perform in response to each of these health states.

To do so, you define the conditions (criteria) that determine each of the health states, and the associated actions to perform whenever the driver’s health state changes. For example, if the driver’s health changes from a green state to a yellow state (based on the conditions you establish), you can perform such actions as restarting the driver, shutting down the driver, and sending an e-mail to the person designated to resolve issues with the driver.

You can also define custom driver states that are independent of the standard green, yellow and red. Whenever the driver meets the conditions for the custom state, Designer performs the associated actions.

To use the Driver Health Configuration to monitor a driver’s health state, you must complete the following tasks:

Additionally, you can perform the following tasks to further configure the Driver Health Check environment:

NOTE:Monitoring driver health is applicable only to deployed drivers. Designer does not indicate driver health in the Modeler or any other pre-deployment interface. After you set up the health configuration, you use iManager to actually monitor the health of deployed drivers. For more information about driver health monitoring in iManager, see Monitoring Driver Health in the NetIQ Identity Manager Driver Administration Guide.

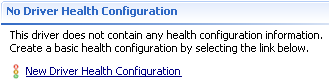
Creating a Driver Health Configuration

The health configuration of drivers is configured automatically, unless you are running older versions of Identity Manager. If you are running anything older than Identity Manager 3.6, you must complete the following section to create a driver health configuration. Otherwise, skip this section.

  1. In the Modeler or Outline view, right-click the driver, then select Properties.

  2. In the left-side navigation, select Health.

  3. Select New Driver Health Configuration.

    Designer creates a basic health configuration with sample conditions for the green and yellow states (none for red).

  4. Continue with Modifying the Health State Conditions.

Modifying the Health State Conditions

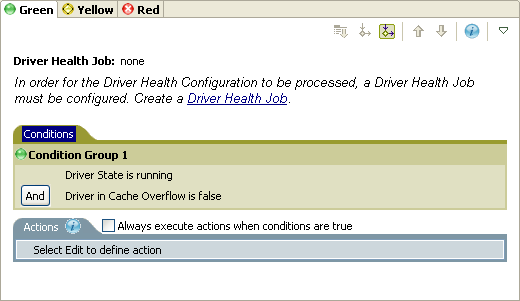
The driver health configuration lets you define the conditions that determine each health state. The green state contains conditions intended to represent a healthy driver, and a red state represents an unhealthy driver that has failed the conditions for both green and yellow states.

The Driver Health job evaluates the conditions for the green state first. If the driver fails to meet the green conditions, it evaluates the yellow conditions. If the driver fails to meet the yellow conditions, it is automatically assigned a red state.

To modify the conditions for a state:

  1. In the Modeler or Outline view, right-click the driver where you want to modify the health check configuration, then select Properties.

  2. In the left-side navigation, select Health.

  3. Click the state tab (Green or Yellow) that you want to modify.

    The tab displays the current conditions for the health state. Conditions are organized into groups, with logical operators (either AND or OR), to link each condition and condition group.

    Table 3-16 describes the conditions that the Driver Health job can evaluate.

    Table 3-16 Driver Health Check Conditions

    Condition

    Description

    Driver State

    Running, stopped, starting, not running, or shutting down. For example, one of the default conditions for the green health state is a Driver State that indicates the driver is running.

    Driver in Cache Overflow

    The state of the cache used for holding driver transactions. If the driver is in cache overflow, all available cache has been used. For example, the default condition for the green health state is Driver in Cache Overflow is false and the default for the yellow health state is Driver in Cache Overflow is true.

    Newest

    The age of the newest transaction in the cache.

    Oldest

    The age of the oldest transaction in the cache.

    Total Size

    The size of the cache in bytes.

    Unprocessed Size

    The size of all unprocessed transactions in the cache.

    Unprocessed Transactions

    The number of unprocessed transactions in the cache. You can specify all transactions types or specific transaction types (such as adds, removes, or renames).

    Transaction History

    The number of transactions processed at various points in the Subscriber or Publisher channel over a given period of time. This condition uses multiple elements in the following format:

    <transaction type> <transaction location and time period > <relational operator> <transaction number>.

    • <transaction type>: Specifies the type of transaction being evaluated. For example, adds, removes, renames, and so forth.

    • <transaction location and time period>: Specifies the point in the Subscriber or Publisher channel and the time period being evaluated. For example, you might evaluate the total number of transactions processed as Publisher events over the last 48 hours. The time period cannot exceed the Transaction Data Duration setting, which is configurable in the Driver Health job. For more information, see Modifying the Driver Health Job Settings.

    • <relational operator>: Specifies the relationship between the identified transactions and the <transaction number> (equal to, less than, greater than, and so forth.)

    • <transaction number>: Specifies the number of transactions being used in the evaluation.

    For example:

    <number of adds> <as publisher commands> <over the last 10 minutes> <is less than> <1000>

    Available History

    The amount of transaction history data that is available for evaluation. This condition helps ensure that a Transactions History condition does not cause the current state to fail because it does not have enough transaction history data collected for the time period being evaluated.

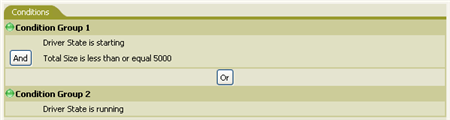
    For example, assume that you want to use the Transactions History condition to evaluate the number of “Add as Publisher” commands over the last 48 hours. However, you don't want the condition to fail if there is less than 48 hours of data. You could create condition groups similar to the following:

    Group1 Available History <is less than> <48 hours> or Group2 Available History <is greater than or equal to> <48 hours> and Transactions History <number of adds> <as publisher commands> <over the last 48 hours> <is less than> <1000>

    The state evaluates to true if either condition group is true.

    The state evaluates to false if both conditions evaluate to false.

  4. Modify the condition criteria as desired.

    • To add a new group, select the Conditions tab, then click Append Condition Group .

    • To add a condition, select an existing condition group, then click Append Condition .

    • To reorder condition groups or individual conditions, select the condition group or condition, then click Move Up or Move Down . You can also use these buttons to move a condition from one group to another.

    • Cut, copy, and paste a condition group or condition to the clipboard by right-clicking the item, then selecting the appropriate clipboard action.

  5. Click Apply to save your changes without closing the Properties page, or click OK to save the changes and close the Properties page.

  6. If you want to change the actions associated with the conditions you set, continue with Modifying the Health State Actions.

Creating a Driver Health Job

The Driver Health job executes periodically to evaluate the health of a driver configured for health checks. The job evaluates the conditions defined for each of the driver’s health states, then assigns the driver the appropriate state. The job also executes any actions associated with the assigned state.

If a Driver Health job does not exist, the Driver Health Configuration page displays a New Driver link from which you can configure the Driver Health job. If a Driver Health job already exists, the Driver Health Configuration page does not display this prompt.

To create a Driver Health job:

  1. In the Modeler or Outline view, right-click the driver, then select Properties.

  2. In the left-side navigation, select Health.

  3. Click Driver Health Job to open the Job dialog box. Select the appropriate job, then click OK.

    Follow the prompts to import the configuration file for the Driver Health job. Refer to the following information for details:

    • Where to place the driver: Place the job in the same driver set as the driver. The correct driver set is selected by default. You can only have one Driver Health job per driver set.

    • Import a configuration: Import the configuration from the server. In the Show field, select Identity Manager 4.7 configurations, then select the Driver Health job in the Configurations field.

    • Email server: Select the e-mail server that you want used for any actions that initiate e-mail. If you have not defined additional e-mail servers, select the Default Notification Collection server.

    • Servers: If the driver set is associated with only one server, that server is selected and cannot be changed. If the driver set is associated with multiple servers, select the server where you want to run the job.

After creating the Driver Health job, you can modify job settings as needed. For example, you can configure how often the job runs, which drivers use the job, and how much data the job maintains to support transaction history. For more information, see Modifying the Driver Health Job Settings.

Modifying the Health State Actions

The Driver Health Configuration lets you define the actions that the Driver Health job performs when the driver health state changes. For example, if the state changes from green to yellow, you can shut down or restart the driver, generate an event, or start a workflow.

The Driver Health job performs a health state’s actions only once each time the conditions are met; as long as the driver state remains the same, the actions do not repeat. If the driver state changes because its conditions are no longer met, the Driver Health job performs the state’s actions again the next time its conditions are met.

  1. In the Modeler or Outline view, right-click the driver where you want to modify the health check configuration, then select Properties.

  2. In the left-side navigation, select Health.

  3. Select the state tab (Green or Yellow) that you want to modify.

    The tab displays the current actions for the health state. If no action is assigned, the Driver Health Configuration displays Define new action here in the Actions tab.

  4. Select the Actions tab, then click Append Action to add an action to the health state.

  5. Select an action from the drop-down list.The table below describes the actions that the Driver Health job can perform.

    Some actions require additional information before they will execute.

    Action

    Description

    Clear Driver Cache

    Removes all transactions, including unprocessed transactions, from the cache.

    Execute ECMAScript

    Executes an existing ECMAScript. Specify the DirXML-Resource object that contains the ECMAScript.

    Generate Event

    Generates an event that can be used by NetIQ Sentinel and the Identity Reporting Module.

    On Error

    If an action fails, this action tells Designer what to do with the remaining actions, the current health state, and the Driver Health job.

    Restart Driver

    Restarts the driver (stop, then start)

    Send Email

    Sends an e-mail to one or more recipients. The template you want used in the e-mail message body must already exist.

    Start Driver

    Starts the driver.

    Start Workflow

    Starts a provisioning workflow. For more information about the Start Workflow action, see Start Workflow in the NetIQ Identity Manager - Using Designer to Create Policies Guide.

    Stop Driver

    Stops the driver.

    Write Trace Message

    Writes a message to the Driver Health job's log file or the driver set's log file if the trace file is not configured on the Driver Health job.

  6. Click Apply to save your changes without closing the Properties page., or click OK to save the changes and close the Properties page.

Creating a Custom State

The Driver Health Configuration lets you create one or more custom states to perform actions independent of the driver’s current health state (green, yellow, red). If the driver meets the custom state’s conditions, the Driver Health job performs its actions.

As with the standard driver health states (green, yellow, red), the Driver Health job performs a custom state’s actions only once each time the conditions are met; as long as the driver state remains the same, the actions do not repeat. If the driver state changes because the custom state’s conditions are no longer met, the Driver Health job performs the custom state’s actions again the next time its conditions are met.

  1. In the Modeler or Outline view, right-click the driver where you want to create a custom state, then select Properties.

  2. In the left-side navigation, select Health.

  3. Select the drop-down menu , then select New Custom State.

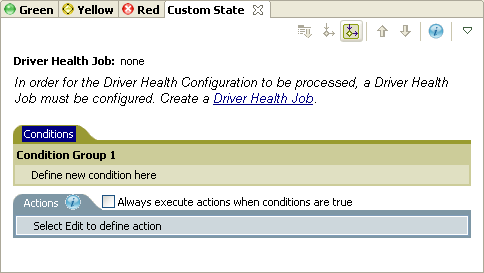
  4. Define the conditions and actions for the custom state, then click Apply to save the changes without closing the Properties page, or click OK to save the changes and close the Properties page.

    For information about defining state conditions, see Modifying the Health State Conditions. For information about defining state actions, see Modifying the Health State Actions.

Modifying the Driver Health Job Settings

The Driver Health job evaluates the conditions for the health states and assigns the driver the appropriate state. The job also executes any actions associated with the assigned state.

As with all driver jobs, there are several settings that you can modify to optimize the job’s performance for your environment, including how often the job runs, which drivers use the job, and how much data the job maintains to support transaction history.

  1. In the Modeler or Outline view, open the driver set object where the driver health job is stored.

  2. Right-click the appropriate job object, then select Edit.

  3. Change the desired settings on the following tabs, then click OK to save your changes:

    Tab

    Description

    Schedule

    The Driver Health job is a continuously running job, meaning that it does not stop unless a health state action shuts it down or you shut it down manually. The job must run continuously to be able to support transaction data collection for use in Transactions History conditions.

    If the job does stop, it is restarted based on the schedule. The default schedule checks every minute to see if the job is running. If the job is not running, it is started.

    Scope

    By default, the job applies to all drivers in the driver set. This means that you only need one Driver Health job per driver set. However, you can create multiple Driver Health jobs for different drivers within the same driver set. For example, you might have some drivers whose health you want updated more frequently than other drivers, in which case you would need at least two Driver Health jobs.

    Parameters

    You can change any of the following job parameters:

    • Login ID: This defaults to the login ID that was used when creating the driver job. You should only change this if you want the driver to authenticate using different credentials.

    • Login password: This is the password required for the login ID that you supplied in the Login ID field.

    • Polling interval: Determines how often the job evaluates the conditions for the health states, assigns the driver the appropriate state, executes any actions associated with the assigned state, and stores the driver’s transaction data. The default polling interval is one minute.

    • Polling interval units: Specifies the time unit (minutes, hours, days, weeks) for the number specified in the Polling interval setting.

    • Duration transaction data is kept: Specifies how long a driver’s transaction data is kept. The default retains a transaction for two weeks before being deleted. Longer transaction durations require more memory.

      For example, to store transaction data for one driver every minute (Polling interval) for two weeks requires approximately 15 MB of memory.

    • Duration units: Specifies the time unit (minutes, hours, days, weeks) for the number specified in the Duration transaction data is kept setting.

3.7.6 Driver Log Level

The Driver Log Level options enable you to view high-level information. For lower-level information, use the Trace option. See Driver Trace Levels.

By default, logging inherits the setting from the driver set. To change the default:

  1. Right-click the driver and select Driver > Properties.

  2. Select Log Level.

  3. Select a logging option.

    The option that you select determines which information is available in the log.

  4. To configure the audit instrumentation, select Log specific events, click the event selector button, select events, then click OK.

  5. Specify the number of entries in the log.

    The default is 50 entries (lines) in the log. If you want a longer history, increase the number.

  6. Save changes by clicking OK.

The driver log contains messages from the driver. The messages are related to operations that the driver performed or tried to perform. To view the log, use iManager. Select the log icon on the Driver object in the Identity Manager Overview.

3.7.7 Driver Manifest

The driver manifest is like a resume for the driver. The driver manifest states what the driver supports, and includes a few configuration settings. The driver developer should provide the driver manifest. Usually a network administrator does not need to edit the driver manifest.

For more information, see the developer documentation for Identity Manager drivers.

3.7.8 Driver Named Passwords

The Named Passwords property page allows you to manage (add, edit, delete) named passwords for the selected driver. You can define named passwords on both drivers and driver sets.

Named passwords let you store multiple passwords securely by referring to each password by a key, or name. When you refer to the named password in a driver policy, you use the name only, not the password value. Then, when the driver needs the password value to execute the policy, it requests the password value from the Identity Manager engine. This method lets you avoid revealing the password value in the code for a driver policy.

The following example shows how a named password can be referenced in a driver policy on the Subscriber channel in XSLT: <xsl:value-of select="query:getNamedPassword($srcQueryProcessor,'mynamedpassword')" xmlns:query="http://www.novell.com/java/com.novell.nds.dirxml.driver.XdsQueryProcessor/>

You can store and retrieve named passwords for any driver without making changes to the driver shim.

As a security measure, in addition to using named passwords, you should control access to all Identity Manager objects in eDirectory. Named passwords are only deployed in a secure connection with eDirectory.

NOTE:A driver developer can also customize a driver to use named passwords in other ways, such as retrieving named passwords when the driver starts up, instead of requesting them from the Identity Manager engine each time they are needed.

For example, the Identity Manager Driver for Lotus Notes has been customized to support additional ways of using named passwords, and examples of those methods are included in the sample driver configurations. For more information, see the Identity Manager Driver Documentation.

3.7.9 Driver Packages

The Packages option allows you to manage any packages at the driver set level. A package at the driver set level is applied to all of the drivers that reside in the selected driver set.

The following table lists the options available to manage packages. For more information about packages, see Section 6.0, Managing Packages.

Table 3-17 Options for Managing Packages

Options

Descriptions

Add package

Adds a package to the driver. You must add a package before you can install a package. Click the Add package icon, then select the package to install and click OK.

Create package

The Create package option is only available if the Enable Package Developer Mode is selected on the Identity Vault Configuration page. Only developers create packages for redistribution.

Package

Lists the name and current state of the package.

Version

Lists the version of the package.

Upgrades

Indicates that there is a newer version of a package imported into the package catalog, but it has not been installed. The package needs to be upgraded.

Operations

Lists the operations that can be performed on a package:

  • Install: This option is only available after a package is added to the driver. Select Install, then click Apply to install the package.

  • Uninstall: This option is only available after a package is installed to the driver. Select Uninstall, then click Apply to uninstall the package.

  • Upgrade: This option is only available if there is a newer version of the package available for installation. Select Upgrade, then click OK to upgrade the package.

  • Downgrade: This option is only available if you have upgraded a package and the older package is installed in the package catalog. Select Downgrade, then click OK to downgrade the package.

  • Revert Customizations: This option is only available if you have made changes to the policies that are installed with a package. Select Revert Customization, then click Apply to remove the customization.

  • Sync Customizations: This option is only available if the Enable Package Developer mode is enabled on the Identity Vault and you have made changes to content in a custom package that is installed on this driver. The Sync Customizations option synchronizes any changes you have made to the package content to the package. For more information, see Section 7.0, Developing Packages.

Run driver in Factory Mode

Allows you to revert any customizations to content installed with packages. For more information, see Running a Driver in Factory Mode.

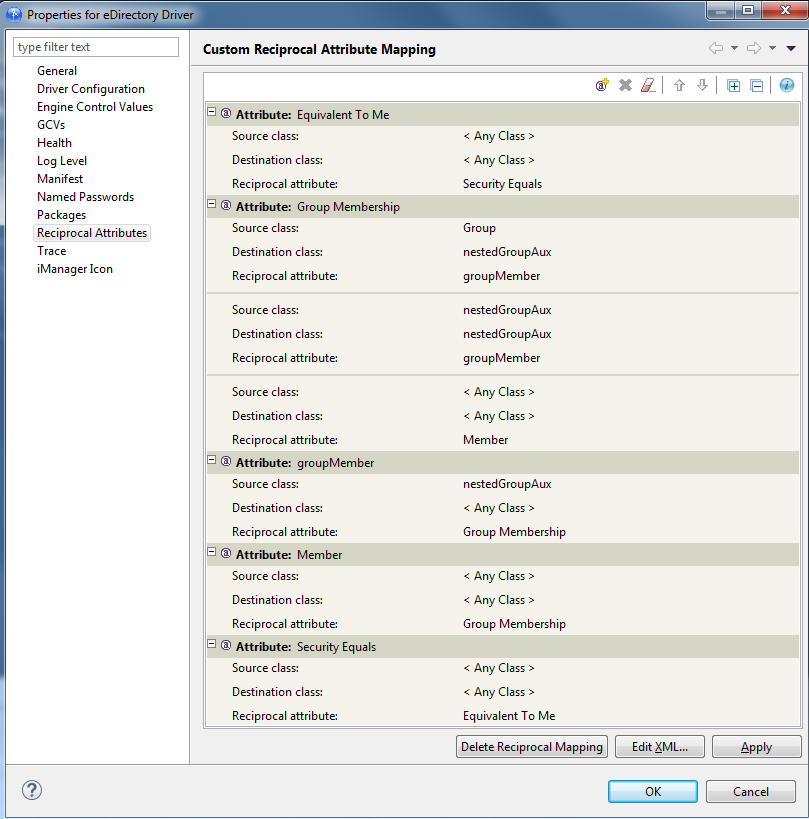
3.7.10 Reciprocal Attributes

The Reciprocal Attributes property page lets you create and manage backlinks between objects. For example, the Group object includes a Members attribute that contains pointers to all User objects that belong to that group. Similarly, each User object includes a Group Membership attribute that points to the Group objects of which that user is a member. These two-way links between objects are known as reciprocal mappings.

Figure 3-4 Custom Reciprocal Attribute Mapping Property Page for Driver Objects

You can manage all reciprocal mapping configuration from the toolbar in the property page, which contains the following toolbar icons:

Icon

Description

Use the New Attribute icon to add a new attribute to the reciprocal mapping list.

Use the Delete icon to delete the currently selected reciprocal mapping entry from the list.

Use the Clear All Attribute Mappings icon to delete all reciprocal mappings.

Use the Move Up icon to move the currently selected attribute up in the mapping list. To do so, select the attribute entry you want to move up, then click Move up.

Use the Move Down icon to move the currently selected attribute down in the mapping list. To do so, select the attribute entry you want to move down, then click Move Down.

Use the Expand All icon to expand all reciprocal attribute mapping entries.

Use the Collapse All icon to expand all reciprocal attribute mapping entries.

The Custom Reciprocal Mapping page lets you do the following:

Adding a Reciprocal Attribute Mapping

When you create a reciprocal attribute mapping, you must first add one of the attributes to the reciprocal mapping list:

  1. On the Reciprocal Attributes page, click New Attribute .

  2. In the new attribute entry, select the desired attribute from the drop-down list, then click OK.

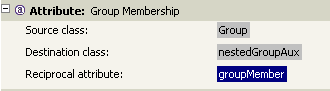
  3. Specify the details of the reciprocal mapping, then click OK.

    Source Class

    Specifies the class name to which the attribute in the mapping list is associated. For example, if you placed the Group Membership attribute in the reciprocal mapping list, the associated Source Class is User.

    Destination Class

    Specifies the class name associated with the attribute to which you want to create a reciprocal mapping.

    Reciprocal Attribute

    Specifies the attribute name to which you want to create a reciprocal mapping.

Removing a Reciprocal Attribute Mapping

To remove a reciprocal mapping between attributes:

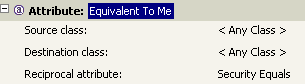
  1. In the reciprocal mapping list, select the reciprocal mapping you want to remove.

    When the mapping is selected, the attribute name in the Attribute tab is highlighted.

  2. Click Delete .

Removing an Attribute from the Reciprocal Mapping List

  1. Select the attribute you want to remove by selecting it in the reciprocal mapping list.

    When selected, the attribute name in the Attribute tab is highlighted.

  2. Click Delete .

    To remove all attributes from the reciprocal attribute mapping list, click Clear All Attribute Mappings .

Editing Reciprocal Attribute XML

If desired, you can directly edit the XML for a reciprocal attribute. To do so, click Edit XML on the Custom Reciprocal Attribute Mapping page. This opens a basic XML editor that lets you modify the XML. When you finish, click OK or Cancel to close the XML editor.

3.7.11 Driver Trace Levels

You can add a trace to your driver. With the driver trace level set, DS Trace displays driver-related Identity Manager events, at the level of detail specified by the driver trace level, as the engine processes the events. The driver trace level affects only the driver or driver set where it is set.

IMPORTANT:You should use the trace level only for testing or for troubleshooting driver issues. Setting a driver trace level on a production driver can cause Identity Manager server to process events slowly.

To set a driver’s trace characteristics:

  1. In the Outline view or Modeler, right-click the driver, then select Properties.

  2. In the driver properties, select Trace in the left navigation.

  3. On the Trace page, specify the driver’s trace settings, then click OK.

Field

Description

Trace level

The Identity Manager engine supports the following trace levels:

  • Trace level 0: Displays fatal messages, errors, warnings and successes.

  • Trace levels 1: Displays informational messages in addition to the information from Trace level 0.

  • Trace level 2: Displays contents of XML documents in addition to the information from Trace level 1.

  • Trace level 3: Displays policy information in addition to the information from Trace level 2.

Consult the driver documentation for additional trace options that might be available.

NOTE:You can also set the driver trace level in Designer by right-clicking a driver (in the Outline or Modeler views) and selecting Live > Set Driver Trace Level.

This immediately deploys the trace level to the selected driver. To update the driver trace level in your project as well, select Update local model.

Trace level: Use setting from the driver set

If you select this option, all trace levels set at the driver set take precedence over any driver settings. Otherwise, the driver settings are effective.

Trace file

Specify a filename and location where the Identity Manager information is written for the selected driver. When a value is set in this field, all Java information for the driver is written to file.

As long as the file is specified, Java information is written to this file. If you do not need to debug Java, leave this field blank.

Trace file: Use setting from the driver set

If you select this option, all trace levels set at the driver set level take precedence over any driver settings. Otherwise, settings at the driver level are effective.

Trace File Encoding

The trace file uses the system’s default encoding. You can specify another encoding if desired.

Trace file size limit

Allows you to set a limit for the Java trace file. Select Unlimited to allow the file to grow to fill the disk.

NOTE:The trace file is created in multiple files. Identity Manager automatically divides the maximum file size by ten and creates ten separate files. The combined size of these files equals the maximum trace file size.

Trace file size limit: Use setting from the driver set

If you select this option, all trace levels set at the driver set level take precedence over any driver settings. Otherwise, settings at the driver level are effective.

Trace name

Helps you track trace messages. The name that you specify here appears with the driver trace messages. Use a trace name if the driver name is very long.

The following methods help you capture and save Identity Manager trace information.

Windows

Open the Control Panel, select NDS Services, then click DS Trace.DLM > Start. A window named NDS Server Trace Utility opens.

To set the filters to capture the Identity Manager trace information:

  1. Click Edit > Options > Clear All.

  2. Click the boxes next to DirXML and DirXML Drivers, then click OK.

To save the information to a file:

  1. Click File > New.

    A dialog box prompts for a filename.

  2. Enter a filename with the extension of .log.

  3. To stop capturing information, click File > Close.

    The file is saved.

UNIX

Use the ndstrace command at the console to display the Identity Manager events. The exit command quits the trace utility.

Table 3-18 ndstrace Commands

Command

Description

Set ndstrace=nodebug

Turns off all trace flags.

Set ndstrace on

Displays trace messages to the console.

Set ndstrace file on

Captures trace message to the ndstrace.log file in the /var/nds directory.

Set ndstrace file off

Stops capturing trace messages to the file.

Set ndstrace=+dxml

Displays the Identity Manager events

Set ndstrace=+dvrs

Displays the Identity Manager driver events.

iMonitor

Use iMonitor to get DS Trace information from a Web browser.

Table 3-19 Platforms and Commands for Web Browsers

Platform

Command

Windows

ndsimon.dlm

Linux/Solaris/AIX/HP-UX

ndsimonitor

  1. Access iMonitor from http://server_ip:8008/nds (the default port).

  2. Click Trace Configuration.

  3. Click Clear All.

  4. Click DirXML and DirXML Drivers.

  5. Click Trace On, then click Trace History.

  6. Click the Current document icon to view the live trace.

3.7.12 Driver Icon

You can navigate to and select an image for your drivers and applications in the Icon editor. The image formats supported in Designer are PNG, JPG, JPEG, GIF, and BMP.

To browse for driver icons, in the Modeler, right-click an application, click Properties, click iManager Icon, and then click the Browse button to locate the image or icon that you want.

To browse for application icons, in the Modeler, right-click an application, click Properties, click General, and then click the Browse button to locate the image or icon that you want.