Identity Manager 4.7 Driver for Mainframes: ACF2 Implementation Guide
This guide explains implementation of the NetIQ® Identity Manager 4.7 driver for ACF2 on mainframes (z/OS operating system).
The driver synchronizes data from a connected mainframe system using ACF2, the IBM* security system, with NetIQ Identity Manager 4.7, the comprehensive identity management suite that allows organizations to manage the full user life cycle, from initial hire, through ongoing changes, to ultimate retirement of the user relationship.
About NetIQ Corporation
We are a global, enterprise software company, with a focus on the three persistent challenges in your environment: Change, complexity and risk—and how we can help you control them.
1.0 Overview
The NetIQ® Identity Manager 4.7 driver for ACF2 synchronizes data between Identity Manager and an ACF2 installation on a connected mainframe. Identity Manager, installed on any Identity Manager supported platform, communicates with the driver on the target z/OS system over a secure network link.
The driver gives you access to ACF2 Logonid fields in accordance with the z/OS ACF2 schema. The driver also allows you to issue arbitrary TSO commands on the z/OS system. Identity Manager gives you access to eDirectory™ objects and their attributes via its Identity Vault.
The driver uses embedded Remote Loader technology to communicate with Identity Manager, bidirectionally synchronizing changes between the Identity Vault and ACF2. It implements this technology using its own embedded Remote Loader component as part of the main driver shim, which runs as a started task on the connected z/OS system.
The driver shim’s Subscriber function commits changes to ACF2 using customizable REXX execs that issue native TSO commands through the z/OS service routine IKJEFTSR. This flexible interface provides the option for implementing additional business logic through REXX programming.
The driver shim’s Publisher function uses standard security system exit routines to capture events of interest and submits them to the Identity Manager Metadirectory engine.
The Identity Manager 4.7 driver for ACF2 combines the flexibility of the Fan-Out driver and the bidirectional support and Identity Manager policy options available from traditional Identity Manager drivers. Key features of the driver include:
-
Bidirectional synchronization of data
-
Customizable schema to integrate all aspects of account administration
-
Customizable REXX execs to handle all data to be synchronized
-
Driver shim implemented as a traditional z/OS started task
-
Operator command control for starting and stopping the driver shim, configuring Remote Loader options, and displaying status information
-
Support for ACF2 passwords and password phrases
The following sections present a basic overview of the driver:
1.1 Driver Architecture
The driver synchronizes information between the Identity Vault on the Identity Manager platform and ACF2 on the connected z/OS system.
When Identity Manager detects relevant changes to identities in its Identity Vault, it uses the Subscriber channel to process and communicate the updates to all connected systems. Events are received by the Subscriber component of the ACF2 driver, which runs as a started task on the z/OS host system. This Subscriber component securely passes the information to customizable REXX execs that carry out the updates to ACF2.
When changes to passwords and other items relevant to Identity Manager are made at the local ACF2 installation, two security system exit routines are used to capture the changes and place them in a cross memory queue. The change log, another z/OS started task, moves events from the memory queue to the change log data set, where they are stored for processing. At configurable intervals, the Publisher component of the driver polls the change log for events and submits them to Identity Manager, where they are processed for posting to the Identity Vault.
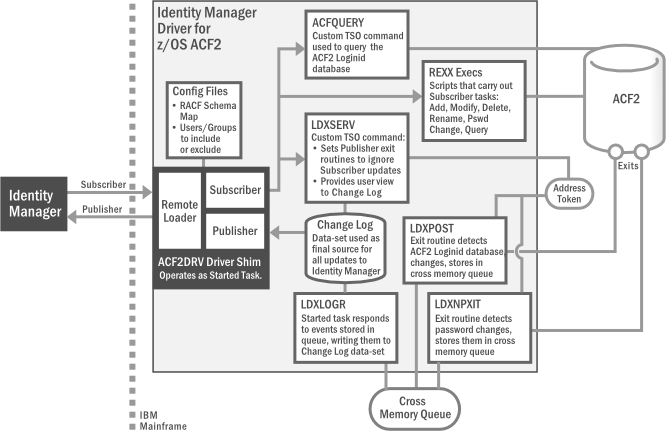
Figure 1-1 illustrates the driver’s architecture.
Figure 1-1 ACF2 Driver Architecture
The following topics describe the driver architecture in more detail:
1.1.1 Component Summary
Most components of the bidirectional ACF2 driver can be associated with one of the two channels of communication—Subscriber and Publisher—used by the driver and Identity Manager in general.
Subscriber Channel Represents data flowing from Identity Manager to the driver on the connected z/OS system, then on to its final destination in ACF2. In this way, ACF2 functions as a subscriber to Identity Manager events, receiving any updates from the central Identity Vault via the Subscriber channel.
Publisher Channel Represents data flowing from ACF2, through the driver on the host z/OS system, and on to Identity Manager. In this way, ACF2 functions as a publisher of events to Identity Manager, sending any updates from its individual ACF2 installation to the central Identity Vault via the Publisher channel.
NOTE:The term “channel,” within the context of Identity Manager data flow, should not be confused with the same term used in mainframe nomenclature to describe a physical cable or connection.
Given this general organization, Table 1-1 provides a summary description for each of the driver’s main components, including the data channel it relates to.
Table 1-1 Summary of Driver Components
|
Data Channel |
Component |
Description |
|---|---|---|
|
Subscriber |
Schema Map |
Provides a reference to the hierarchy of objects and attributes available in ACF2. The driver reads the schema map, usually at startup. It’s also used by Identity Manager’s Policy Editor to map the schema of the Identity Vault to the schema for ACF2. |
|
Include/Exclude File |
Optional configuration file for listing local ACF2 identities that you wish to be included or excluded from the central Identity Vault. Allows local system policy to enforce which objects receive provisioning through the Subscriber channel. |
|
|
REXX Execs |
Mainframe scripts that apply the schema map and standard TSO commands to issue changes to ACF2 accounts—including adds, modifies, deletes, and renames—for User objects, and to handle password synchronization. Can be extended to support other object types and events. |
|
|
Publisher |
LDXPOST |
Exit routine that detects changes to the ACF2 Logonid database. These changes are written to the cross memory queue; the change log started task is notified each time an event is placed in the memory queue. |
|
LDXNPXIT |
Exit routine that detects password changes to ACF2. These changes are written to the cross memory queue; the change log started task is notified each time an event is placed in the memory queue. |
|
|
LDXNPHXT |
Exit routine that detects password phrase changes to ACF2. These changes are written to the cross memory queue; the change log started task is notified each time an event is placed in the memory queue. |
|
|
LDXLOGR |
z/OS started task that responds to events stored in the cross memory queue by writing them to the change log data set. The exit routines LDXPOST and LDXNPXIT notify LDXLOGR of each event added to the memory queue. |
|
|
Change Log |
z/OS data-set representing the final location where updates are placed in the driver’s portion of the Publisher channel before sending to Identity Manager. The driver’s Publisher component removes events from the change log at configurable intervals and submits them to Identity Manager. |
|
|
Both |
ACF2DRV (Driver Shim) |
z/OS started task that encapsulates the Remote Loader, Subscriber and Publisher channels. It maintains the network connectivity between the ACF2 system and the Identity Vault; it delivers event data to the REXX scriptable framework, where it is used to modify the ACF2 database; it retrieves event data from the ACF2 change log to be published to the Identity Vault. |
|
Remote Loader |
Enables communication between Identity Manager and ACF2 as if they were running in a common environment. Identity Manager has no specific knowledge of the Remote Loader. For improved efficiency, the ACF2 driver has its own embedded remote loader, which is used in place of the standard version bundled with Identity Manager. |
|
|
Subscriber Component |
Translates XDS event data from the Identity Vault into REXX variables, which are processed by the REXX execs. This component also replies to the Metadirectory engine with XDS status documents. |
|
|
Publisher Component |
Polls the change log for new event data and sends it to the Metadirectory engine for processing. It also clears each event entry from the change log after it has been processed. |
|
|
LDXSERV |
Custom, APF-authorized, TSO command providing two key services for the driver:
|
|
|
ACFQUERY |
Tool used by both channels to query the ACF2 Logonid database for records and fields. |
|
|
None (z/OS Components) |
ACF2 |
(Access Control Facility) CA product option for z/OS security system requirement. |
|
Token Address Space |
z/OS system memory space used to process changes detected by ACF2 exit routines. Can be flagged with tokens by LDXSERV for changes initiated through Subscriber channel to prevent loopback to Identity Manager. |
|
|
Cross Memory Queue |
The memory queue is an encrypted, in-storage buffer used to record events sequentially. Events are added to the memory queue by the ACF2 exit routines, and are removed from the queue by the LDXLOGR started task. The memory queue is located in Subpool 231 (fetch-protected ECSA). |
1.1.2 Component Discussion
This section discusses each of the driver components in more detail.
Driver Shim Started Task
The driver shim, ACF2DRV, runs as a started task. Only one system that shares the security system database runs the driver shim started task. The driver shim started task must be started as part of your normal z/OS system initialization procedure and stopped during normal system shutdown.
Subscriber Channel Components
The Subscriber channel of the driver shim started task receives XDS command documents from the Metadirectory engine, stores them using z/OS name/token callable services, then calls the appropriate REXX execs to handle the command.
The Subscriber shim calls the LDXSERV command on startup to identify itself to the security system exit routines for loopback detection. This prevents the exit routines from generating events for commands issued by the Subscriber shim.
REXX Execs
REXX Execs are essentially scripts that are designed to run on a mainframe. The provided REXX execs support adds, modifies, deletes, and renames for User objects, and handle password synchronization. The REXX execs use standard TSO commands to apply the changes. You can extend the REXX execs to support other object types and events. The REXX execs have secure access to the original XDS command data using the IDMGETV command. IDMGETV accesses z/OS name/token callable services and places the data in REXX variables.
Scriptable Framework
The interface between the security system and the driver shim uses customizable REXX execs. You can extend the execs that are provided with the driver to support other applications and databases.
Several utility execs and helper commands are provided with the driver to enable communication with the driver shim and the change log. An extensible connected system schema file allows you to add your own objects and attributes to those already supported by the driver.
For more information about the REXX execs and the scriptable framework, see Section 6.1, The Scriptable Framework.
Schema File
The configuration of class and attribute definitions for the connected system is specified using the schema file. You can modify and extend this file to include new objects and attributes. For details about configuring the schema file, see Section 6.2, The Connected System Schema File.
The driver uses the keywords of the ACF2 administrative commands to define the schema. The schema includes one classe: Logonid. This corresponds to ACF2 Logonid records.
Some items in the schema refer to keywords used to create and modify ACF2 Logonids, but cannot be queried or synchronized. These attributes can be used only by Identity Manager policies to make event-time decisions that affect the behavior of the ACF2 administrative command. The auxiliary schema used to extend eDirectory does not include these attributes.
Include/Exclude File
The include/exclude file allows local system policies to enforce which objects are included or excluded from provisioning by the Subscriber channel. This allows for administrative rules to be set and enforced locally rather than having processing decisions made by the Metadirectory engine. For details about using the include/exclude file, see Section 6.3, The Connected System Include/Exclude File.
To control which objects are processed by the Publisher channel, use policies. For details about customizing policies, see the Identity Manager 4.7 Documentation Web site.
Publisher Channel Components
The Publisher shim periodically examines the change log for events. When the Publisher shim finds events in the change log, it decrypts, processes, and sends them to the Metadirectory engine over a Secure Sockets Layer (SSL) network link. The Metadirectory engine applies policies, takes appropriate actions, and posts the events to the Identity Vault.
Security System Exit Routines
ACF2 provides two exit interfaces. The driver uses these exits to detect activities of interest and to place events in the memory queue. When the driver exit routines place an event in the memory queue, they notify the change log started task. The change log started task then moves the event information to the change log data set. Each system that shares the security system database must run these exit routines provided by the driver in modules LDXPOST, LDXNPXIT and LDXNPHXT.
The driver exit routines perform the following tasks:
-
Monitor password changes from the local security system and record user and password information in the memory queue.
-
Monitor security system administrative commands entered by users, either directly from the TSO command line, or as generated by the administrative panels. The exit routines record these commands and related information, such as the issuer and time stamp, in the memory queue.
Memory Queue
The memory queue is an encrypted, in-storage buffer that holds events. Events are added to the memory queue by the security system exit routines, and are removed from the queue by the change log started task. The memory queue is located in Subpool 231 (fetch-protected ECSA).
Change Log Started Task
The change log started task is notified of events added to the memory queue by the driver exit routines and moves them to the change log data set.
Each system that shares a security system database must run the change log started task. The change log started task must be started as part of your normal z/OS system initialization procedure and stopped during normal system shutdown.
Change Log Data Set
The change log started task removes encrypted events from the memory queue and stores them in the change log data set for processing by the Publisher shim. The Publisher shim removes events from the change log at configurable intervals and submits them to the Metadirectory engine. If communication with the Metadirectory engine is temporarily lost, events remain in the change log until communication becomes available again.
The change log data set is a standard z/OS direct access (DSORG=DA) data set. There is one change log data set for the set of systems that share the security system database. The change log data set must reside on a shared device unless the security system database is not shared.
LDXSERV Command
LDXSERV is an APF-authorized, TSO command used in both the Publisher and Subscriber channels.
When updates are passed to ACF2 in the Subscriber channel, LDXSERV is called (with the NOLOG parameter) to flag those items with a token in the Publisher event address space. The token’s presence causes the exit routines to ignore the updates. This prevents redundant loopback to Identity Manager for any changes made through the Subscriber channel.
LDXSERV can also be executed manually (with the STATUS parameter) to display information in the change log data set. To use the command, you must include the driver load library in the logon procedure STEPLIB concatenation.
1.2 Configuration Overview
This section discusses driver configuration details specific to the Identity Manager driver for ACF2. For basic configuration information, see the Identity Manager 4.7 Administration Guide on the Identity Manager 4.7 Documentation Web site. For detailed information about configuring the driver, see Section 5.0, Configuring the ACF2 Driver.
The following topics include each Designer ACF2 Package available for configuration:
1.2.1 ACF2 Base
The ACF2 Base provides the policies and settings necessary to provide a basic functioning ACF2 Driver.
The ACF2 Base Package includes the following Global Configuration Variables:
-
Remote Loader: A boolean true/false value indicating whether or not to use the Remote Loader service. For this driver, this value should always be set to true.
-
Host Name: The physical DNS hostname or IP address for the ACF2 system to connect to.
-
Port: The TCP/IP port of the remote loader running on the ACF2 system (default 8090).
-
KMO: The SSL KMO object to use for secure communication.
-
Remote Password: The remote loader password.
-
Driver Password: The driver object password.
The ACF2 Base Package provides the following Identity Manager policies:
-
NOVLACF2BASE-ot-AppendACF2CMD: This output transform converts XDS documents from the Subscriber channel into ACF2 commands that will be executed by the ACF2 driver shim.
-
NOVLACF2BASE-it-ChangeLog: This input transform converts ACF2 ChangeLog events into XDS that can be interpreted by the rest of the Publisher channel.
1.2.2 ACF2 Default Configuration
The ACF2 Default Configuration provides a set of configuration settings to begin synchronizing ACF2 Logonid records with Identity Vault users.
The ACF2 Default Configuration Package includes the following Global Configuration Variables (GCVs):
-
User Base Container: A DN value that represents a container in the Identity Vault from which Subscriber events are restricted from and new and matched User objects are created under on the Publisher channel.
-
Subscriber Passphrase Synchronization: A boolean true/false value indicating whether to synchronize Vault passwords with ACF2 passphrases.
-
Publisher Passphrase Synchronization: A boolean true/false value indicating whether to synchronize ACF2 passphrases with Vault passwords.
The ACF2 Default Configuration Package provides the following Identity Manager policies:
-
NOVLACF2DCFG-pub-cp: This Publisher Create Policy provides a default Surname using either the Full Name field or Association value from the add event.
-
NOVLACF2DCFG-pub-mp: This Publisher Matching Policy attempts to match Users by the CN attribute within the User Base Container GCV.
-
NOVLACF2DCFG-pub-pp: This Publisher Placement Policy sets the target DN for new users to be the concatenation of the User Base Container GCV and the lowercase value of the CN attribute.
-
NOVLACF2DCFG-sub-cp: This Subscriber Create Policy requires the CN and Password and reformats the CN value to be uppercase.
-
NOVLACF2DCFG-sub-et: This Subscriber Event Transform vetoes events not in the User Base Container and also renames and moves.
-
NOVLACF2DCFG-sub-mp: This Subscriber Matching Policy queries ACF2 for Users that match the CN attribute.
The ACF2 Default Configuration Package provides the NOVLACF2DCFG-smp schema mapping policy and the NOVLACF2DCFG-filter filter policy. See Section C.5, Default ACF2 Schema for details.
Table 1-2 Default Schema Mapping and Filter
|
eDirectory Class |
eDirectory Attribute |
ACF2 Record |
ACF2 Field |
|---|---|---|---|
|
User |
CN |
Logonid |
LID |
|
User |
Login Disabled |
Logonid |
SUSPEND |
|
User |
nspmDistributionPassword |
Logonid |
PASSWORD |
|
User |
Full Name |
Logonid |
NAME |
|
User |
Telephone Number |
Logonid |
PHONE |
In addition, the remaining ACF2 fields are automatically mapped to corresponding attributes in the ACF2 Auxiliary Schema. For a complete list, see Table C-5. Each additional auxiliary attribute in the filter is intentionally set to ignore on both channels by default, so they can be conveniently configured otherwise if necessary.
1.2.3 ACF2 Entitlements
The ACF2 Entitlements Package provides a basic entitlement for an ACF2 Logonid record. This package leverages the DirXML-EntitlementsRef attribute, set by the Role Based Entitlements Driver. When entitlements are granted or revoked, you can take the appropriate action in ACF2 by creating, suspending or deleting the Logonid record.
The ACF2 Entitlements Package provides the following Identity Manager policies:
-
NOVLACF2ENT-pub-et-DisallowDeletes: When this Publisher Event Transformation detects a user is deleted from ACF2, it removes the user’s Vault association and vetoes the event.
-
NOVLACF2ENT-sub-cp-EntitlementsImpl: This Subscriber Create Policy blocks account creation when an Entitlement is not granted.
-
NOVLACF2ENT-sub-ct-EntitlementsImpl: When this Subscriber Command Transformation detects a removed entitlement, it results in a delete or suspension. It is based upon the on-account-remove GCV.
-
NOVLACF2ENT-sub-mp-EntitlementsImpl: When this Subscriber Matching Policy detects an ACF2 User account managed by entitlements, it vetoes the matching existing account.
The ACF2 Entitlements Package also provides a filter that includes the User attribute DirXML-EntitlementsRef. This attribute, configured for notification on the Subscriber channel, is set outside the driver whenever a process grants or removes an entitlement for a User.
1.2.4 ACF2 Password Synchronization
The ACF2 Password Synchronization Package leverages the Common Password Synchronization policies to provide email notifications for failed password synchronization and configuration options for Universal Passwords.
The ACF2 Password Sychronization Package provides the following Identity Manager policies:
-
NOVLPWDSYNC-pub-ctp-AddPwdPayload: Publish password payloads.
-
NOVLPWDSYNC-pub-ctp-CheckPwdGCV: Publish password changes.
-
NOVLPWDSYNC-pub-ctp-DefaultPwd: On User add, provide default password if none exists.
-
NOVLPWDSYNC-pub-ctp-PublishDistPwd: Publish passwords to NMAS distribution password.
-
NOVLPWDSYNC-pub-ctp-PublishNDSPwd: Publish passwords to NDS password.
-
NOVLPWDSYNC-sub-ctp-AddPwdPayload: Payloads for subscribe to password changes.
-
NOVLPWDSYNC-sub-ctp-CheckPwdGCV: Subscribe to password changes.
-
NOVLPWDSYNC-sub-ctp-DefaultPwd: On User add, provide default password of Surname if no password exists.
-
NOVLPWDSYNC-sub-ctp-TransformDistPwd: Transform NMAS attribute to password elements.
-
NOVLPWDSYNC-itp-EmailOnFailedPwdSub: Email notifications for failed password subscriptions.
-
NOVLPWDSYNC-otp-EmailOnFailedPwdPub: Email notifications for failed password publications.
The ACF2 Password Synchronizatio Package includes the following Global Configuration Variables (GCVs):
-
Connected System or Driver Name: The name of the connected system, application or Identity Manager driver. This value is used by the e-mail notification templates.
-
Application accepts passwords from Identity Manager: Option to allow passwords to flow from the Identity Manager vault to the connected system.
-
Identity Manager accepts passwords from application: Option to allow passwords to flow from the connected system to the Identity Manager data store.
-
Publish passwords to NDS password: Use the password from the connected system to set the non-reversible NDS password in eDirectory.
-
Publish passwords to Distribution Password: Use the password from the connected system to set the NMAS Distribution Password used for Identity Manager password synchronization.
-
Require password policy validation before publishing passwords: Option to apply the NMAS password policies during password operations on the Publisher channel. The password is not written to the data store if it does not comply.
-
Reset user’s external system password to the Identity Manager password on failure: Attempt to reset the password in the connected system by using the Distribution Password from the Identity Vault when a publish Distribution Password failure occurs.
-
Notify the user of password synchronization failure via e-mail: Notify the user of a password synchronization failure via email.
1.2.5 ACF2 Account Tracking
The ACF2 Account Tracking Package allows the driver to track the accounts and identities of each user in your system.
The ACF2 Account Tracking Package (with the prerequisite Data Collection Common and Account Tracking Common packages) provides the following Identity Manager policies:
-
NOVLATRKBASE-itp-Publish
-
NOVLATRKBASE-itp-WriteAccounts
-
NOVLATRKBASE-otp-Subscribe
-
NOVLDATACOLL-itp-DataCollectionQuerySupport: Convert selected attributes to a form most commonly used in the Identity Vault.
-
NOVLDATACOLL-smp-SkipSchemaMapping
The ACF2 Account Tracking Package (with the prerequisite Data Collection Common and Account Tracking Common packages) includes the following Global Configuration Variables (GCVs):
-
Enable account tracking: If true, account tracking policies are enabled. If false, account tracking policies are not executed.
-
Realm: Name of realm. The realm must be set to the ACF2 DNS name (Example: acf2.yourcompany.org).
-
Object class: Add the object class to track. Class names must be in the application namespace.
-
Identifiers: Add the account identifier attributes. Attribute names must be in the application namespace.
-
Status attribute: Name of the attribute in the application namespace to represent the account status.
-
Status active value: Value of the status attribute that represents an active state.
-
Status inactive value: Value of the status attribute that represents an inactive state.
-
Subscription default status: Default status the policies will assume when an object is subscribed to the application and the status attribute is not set in the identity vault.
-
Publication default status: Default status the policies will assume when an object is published to the identity vault and the status attribute is not set in the application.
1.2.6 ACF2 Managed System Information
The ACF2 Managed System Information Package provides settings that help the Identity Reporting Module generate reports.
The ACF2 Managed System Information Package includes the following Global Configuration Variables (GCVs):
-
General Information
-
Name: Descriptive name for the ACF2 connected system. This name is displayed in the reports.
-
Description: Brief description of this connected ACF2 system. This description is displayed in the reports.
-
Location: The physical location of this connected ACF2 system. This location is displayed in the reports.
-
Vendor: The vendor of this connected ACF2 system (Computer Associates). This information is displayed in the reports.
-
Version: The version of this connected ACF2 system. This version information is displayed in the reports.
-
-
System Ownership
-
Business Owner
-
Application Owner
-
-
System Classification
-
Classification
-
Environment
-
-
Connection and miscellaneous Information: This options is always set to hide so that you don’t make changes to these options. These options are system options that are necessary for reporting to work. If you make any changes, reporting stops working.
2.0 Planning for the ACF2 Driver
This section helps you plan for deployment of the NetIQ® Identity Manager 4.7 driver for ACF2. Topics include
For more information about planning, see the Identity Manager 4.7 Installation Guide on the Identity Manager Documentation Web site.
2.1 Deployment Planning
-
Review Section 3.0, Installing the ACF2 Driver and Section 5.0, Configuring the ACF2 Driver.
-
Is this a new installation or an upgrade?
-
If you are installing the ACF2 driver on a system for the first time, use Section 3.0, Installing the ACF2 Driver, as your main procedural reference.
-
If you are upgrading a system that already uses an ACF2 driver, begin with Section 4.0, Upgrading from the Fan-Out Driver, which includes instructions for upgrading from both the Fan-Out ACF2 driver.
-
-
Consider where and how you will install each component.
The driver shim libraries (SAMPLIB, IDMLOAD, ACF2EXEC) must be installed on a volume that is shared by each system that shares the security system database.
-
If you will use the Publisher channel to track changes made in ACF2, you will need to:
-
Run the driver shim started task on only one system that shares the ACF2 security system database.
-
Create the change log data set on a volume that is shared by all systems that share the security system database.
-
Install the Exit routines on each system that shares the security system database.
-
Schedule an IPL for the Exit installations.
-
-
How will you stage, test and roll out your deployment of the ACF2 driver?
-
What are the host names or IP addresses of your Metadirectory server and the ACF2 system that will run the driver shim started task?
-
Will you use the default TCP port numbers (see Table 2-1) and are they accessible through your network infrastructure?
Table 2-1 Default TCP Port Numbers
Purpose
TCP Port Number
Driver shim connection to the Metadirectory engine
8090
Driver shim HTTP services for log viewing
8091
Secure LDAP port
636
Non-secure LDAP port
389
2.2 Migration Planning
Since identities will be synchronized between the Vault and ACF2, you will need to consider the following:
-
Where will these identities be located and managed in the Vault?
-
Can you use the default Matching policy to associate Logonid LID fields with the Vault CN attribute, or will you need to base matching on other properties?
-
How will you handle existing Vault IDs that do not meet the requirements for ACF2?
You will also need to decide whether to use the migration tool provided with Identity Manager or a more manual process for importing your data.
2.3 Customization Planning
-
Do you plan to customize the REXX execs provided with the driver?
For details about the provided execs, see Table 6-1, Identity Vault Command Processing Execs; Table 6-2, Other Execs; and the execs themselves.
-
Do you plan to add attributes or classes to the connected system schema file?
For details about the connected system schema file, see Section 6.2, The Connected System Schema File.
-
What options do you plan to use in your driver shim configuration file?
For details about the driver shim configuration file, see Section 5.1, The Driver Shim Configuration File.
-
Do you plan to customize the include/exclude file?
For details about the include/exclude file, see Section 6.3, The Connected System Include/Exclude File.
-
Do you plan to customize policies?
For details about customizing policies, see the Identity Manager 4.7 Documentation Web site.
-
Are the resources needed to perform the customization available within your organization?
2.4 Establishing a Security-Equivalent User
The driver object must run with security equivalence to a user with sufficient rights. You can set the driver equivalent to Admin or a similar user. For stronger security, you can define a user with only the minimal rights necessary for the operations you want the driver to perform.
The driver user must be a trustee of the containers where synchronized users reside, with the rights shown in Table 2-2. Inheritance must be set for [Entry Rights] and [All Attribute Rights].
Table 2-2 Base Container Rights Required by the Driver Security-Equivalent User
|
Operation |
[Entry Rights] |
[All Attribute Rights] |
|---|---|---|
|
Subscriber notification of account changes (recommended minimum) |
Browse |
Compare and Read |
|
Creating objects in the Identity Vault without group synchronization |
Browse and Create |
Compare and Read |
|
Creating objects in the Identity Vault with group synchronization |
Browse and Create |
Compare, Read, and Write |
|
Modifying objects in the Identity Vault |
Browse |
Compare, Read, and Write |
|
Renaming objects in the Identity Vault |
Browse and Rename |
Compare and Read |
|
Deleting objects from the Identity Vault |
Browse and Erase |
Compare, Read, and Write |
|
Retrieving passwords from the Identity Vault |
Browse and Supervisor |
Compare and Read |
|
Updating passwords in the Identity Vault |
Browse and Supervisor |
Compare, Read, and Write |
If you do not set Supervisor for [Entry Rights], the driver cannot set passwords. If you do not want to set passwords, set the Subscribe setting for the User class nspmDistributionPassword attribute to in the filter to avoid superfluous error messages. For details about accessing and editing the filter, see the Identity Manager 4.7 Documentation Web site.
For complete information about rights, see the NetIQ eDirectory™ Administration Guide.
3.0 Installing the ACF2 Driver
This section provides the information you need for first-time installation of the NetIQ® Identity Manager 4.7 driver for ACF2.
NOTE:If you are upgrading a system that already uses an Identity Manager ACF2 driver, begin with Section 4.0, Upgrading from the Fan-Out Driver, which includes instructions for upgrading from the Fan-Out ACF2 driver.
Topics include
3.1 Before You Begin
-
Ensure that you have the most recent distribution, support pack, and patches for the driver.
-
Review the most recent support information for the driver on the NetIQ Support Web site.
3.2 Required Knowledge and Skills
To successfully install, configure, and use the driver, you must have system administration skills and rights for Identity Manager, z/OS, and ACF2. You must be proficient with using iManager to configure Identity Manager drivers. You must be familiar with the facilities of the driver, and you must have developed a deployment plan.
For an overview of driver facilities, see Section 1.0, Overview.
For information about planning for the driver, see Section 2.0, Planning for the ACF2 Driver.
For information about administering your target systems, see your IBM and ACF2 documentation.
3.3 Prerequisites
3.3.1 Connected System Requirements
-
z/OS
-
ACF2 Security for z/OS
For information about supported platforms and operating environments, see the Identity Manager 4.7 Drivers Documentation Web site. From this index page, you can select a readme file associated with the platform(s) for which you need support.
3.3.2 Identity Vault Requirements
-
NetIQ Identity Manager (Metadirectory engine) 4.0.4.0 or later with the latest Support Pack
3.4 Getting the Installation Files
-
Obtain the most recent distribution of the Identity Manager 4.7 Driver for ACF2 from the NetIQ Downloads Web site.
At the time of this Implementation Guide’s initial release, the -driver was included in the following ISO package:
NIdM_Integration_Module_4.7_Mainframes_Midrange.iso
-
Based on the version of the Identity Manager Metadirectory engine you are using, determine which files you will need to copy from the software distribution.
-
Regardless of the Metadirectory engine version you are running, the following files are required for all installations:
  SAMPLIB.XMT
  IDMLOAD.XMT
  ACF2EXEC.XMT
These files are located under ACF2.
-
-
Copy the files the files you will need (see Step 2) onto the workstation you will use for the installation. You will use this workstation to set up the driver on the Metadirectory server and to FTP files to the target z/OS system.
3.5 Creating the Driver in Designer
The ACF2 Driver supports Designer 4 Package features, which allows you to create a driver by selecting which packages to install. After you create and configure the driver, you need to deploy it to the Identity Vault and start it.
Topics include
3.5.1 Importing the Current Driver Packages
Driver packages can be updated at any time and are stored in the Package Catalog. Packages are initially imported into the Package Catalog when you create a project, import a project, or convert a project. It is important to verify you have the latest packages imported into the Package Catalog before you install the driver.
To verify you have the latest packages imported into the Package Catalog:
-
Open Designer.
-
In the toolbar, click > .
-
Click if there are no package updates.
or
Click OK to import the package updates.
-
In the Outline view, right-click the Package Catalog.
-
Click .
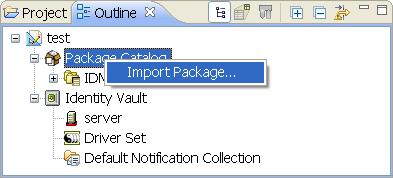
-
Select the ACF2 packages.
or
Click to import all of the packages displayed, then click .
NOTE:By default, only the base packages are displayed. Deselect to display all packages.
-
Click to import the selected packages, then click in the successfully imported packages message.
-
After the current packages are imported, continue to the next section, Section 3.5.2, Installing the Driver Packages.
3.5.2 Installing the Driver Packages
After you have imported the current driver packages into the Package Catalog, you can install the driver packages to create a new driver.
-
In Designer, open your project.
-
In the Modeler, right-click the driver set where you want to create the driver, then select > .
-
Select from the list of base packages, then click .
-
Select the optional features to install for the ACF2 driver. The options are:
NOTE:Publications referenced in the following option descriptions can be accessed at the Identity Manager 4.7 Documentation Web site.
Default Configuration: This package contains the default configuration information for the ACF2 driver. Always leave this option selected.
Entitlements: This package contains configuration information for synchronizing ACF2 accounts and policies that enable account creation and auditing for the ACF2 driver. To enable account creation and auditing, verify that this option is selected. For more information, see the Identity Manager 4.7 Entitlements Guide.
Password Synchronization: This package contains the policies that enable the ACF2 driver to synchronize passwords. To synchronize passwords, verify that this option is selected. For more information, see the Identity Manager 4.7 Password Management Guide.
Data Collection: This package contains the policies that enable the driver to collect data for reports. If you are using the Identity Reporting Module, verify that this option is selected. For more information, see the Identity Reporting Module Guide.
Account Tracking: This package contains the policies that enable you to track accounts for reports. If you are using the Identity Reporting Module, verify that this option is selected. For more information, see the Identity Reporting Module Guide.
-
After selecting the optional packages, click .
-
(Conditional) If the packages you selected to install have package dependencies, you must install them to install the selected package. Click to install the package dependencies listed.
-
(Conditional) If more than one type of package dependency must be installed, you are presented with these packages separately. Continue to click to install any additional package dependencies.
-
(Conditional) The Common Settings page is only displayed if the Common Settings package is installed as a dependency. On the Install Common Settings page, fill in the following fields:
User Container: Select the Identity Vault container where ACF2 users will be added if they don’t already exist in the vault. This value becomes the default for all drivers in the driver set.
If you want a unique location for this driver, set the value for all drivers on this page. After the driver is created, change the value on the driver’s Global Configuration Values page.
Group Container: Since the ACF2 driver does not synchronize Group objects, this setting can be ignored.
-
(Conditional) If not already configured, fill in the following fields on the Common Settings Advanced Edition page, then click :
User Application Provisioning Services URL: specify the User Application Identity Manager Provisioning URL.
User Application Provisioning Services Administrator: Specify the DN of the User Application Administrator user. This user should have the rights for creating and assigning resources. For more information, see “Setting Up Administrative Accounts” in the NetIQ Identity Manager 4.7 Common Driver Administration Guide.
-
On the Install ACF2 page, fill in the following field:
Driver Name: Specify a name for the driver that is unique within the driver set.
-
(Conditional) On the Driver Parameters page, review the default Subscriber and Publisher Options. Edit, if necessary, and click .
-
On the Install ACF2 Base page, fill in the following fields to connect to the Remote Loader and click :
Connect to Remote Loader: By default, the driver is configured to connect using the RemoteLoader. You must select for this option.
Host Name: Specify the port number where the Remote Loader is installed and is running for this driver. The default port number is 8090.
Port: Specify the Remote Loader’s password as defined on the Remote Loader. The Metadirectory server (or Remote Loader shim) requires this password to authenticate to the Remote Loader.
Remote Password: Specify the Remote Loader’s password as defined on the Remote Loader. The Metadirectory server (or Remote Loader shim) requires this password to authenticate to the Remote Loader.
Driver Password: Specify the driver object password that is defined in the Remote Loader service. The Remote Loader requires this password to authenticate to the Metadirectory server.
-
(Conditional) On the Account Tracking page, review the default values. Edit, if necessary, and click .
-
(Conditional) On the Entitlements Name to CSV File Mappings page, click the icon to populate the page with the entitlement configuration options. Identity Manager uses the CSV file to map ACF2 entitlements into corresponding resources in the Identity Manager catalog.
NOTE:This page is displayed only if you installed the Entitlements package.
The information that you specify in this page is used for creating the permission catalog. Fill in the following fields, then click :
Entitlement Name: Specify a descriptive name for the entitlement to map it to the CSV file that contains the ACF2 entitlement details.
Entitlement Name is the name of the entitlement. This parameter corresponds to the Entitlement Assignment Attribute in ACF2. For example, you could define an entitlement called ParkingPass.
Entitlement Assignment Attribute: Specify a descriptive name for the assignment attribute for an entitlement.
Entitlement Assignment Attribute holds the entitlement values in ACF2. For example, you could have an attribute called Parking.
You must add this parameter to Field Names in the Driver Parameters page or modify it in driver settings after creating the driver.
CSV File: Specify the location of the CSV file. This file must be located on the same server as the driver. This file contains the values for the application entitlements.
Multi-valued?: Set the value of this parameter to if you want to assign resources and entitlements multiple times with different values to the same user. Otherwise, set it to .
-
(Conditional) On the Entitlements page, review the default values. Edit, if necessary, and click .
-
(Conditional) On the General Information page, fill in the following fields to define your ACF2 system, then click :
Name: Specify a descriptive name for this ACF2 system. The name is displayed in reports.
Description: Specify a brief description for this ACF2 system. The description is displayed in reports.
Location: Specify the physical location for this ACF2 system. The location is displayed in reports.
Vendor: Leave CA as the vendor of ACF2. This information is displayed in reports.
Version: Specify the version of this ACF2 system. The version is displayed in reports.
NOTE:This page is only displayed if you installed the Managed System package.
-
(Conditional) This page is displayed only if you selected to install the Managed System Information packages. On the Install ACF2 Managed System Information page, fill in the following fields, then click .
Classification: Select the classification of the ACF2 system. This information is displayed in the reports. Options include:
If you select , you must specify a custom classification for the ACF2 system.
Environment: Select the type of environment the ACF2 system provides. Options include:
If you select , you must specify a custom classification for the ACF2 system.
-
-
(Conditional) On the System Ownership page, fill in the following fields to define the ownership of the ACF2 system, then click :
Business Owner: Select a user object in the Identity Vault that is the business owner of the ACF2 system. This can only be a user object, not a role, group, or container.
Application Owner: Select a user object in the Identity Vault that is the application owner of the ACF2 system. This can only be a user object, not a role, group, or container.
-
Review the summary of tasks that will be completed to create the driver, then click .
The driver is created. You can modify the configuration settings by continuing with the next section, Section 3.5.3, Configuring the Driver. If you don’t need to configure the driver, skip ahead to Section 3.5.4, Deploying the Driver.
3.5.3 Configuring the Driver
There are many settings that can help you customize and optimize the driver. The settings are divided into categories such as Driver Configuration, Engine Control Values, and Global Configuration Values (GCVs). Although it is important for you to understand all of the settings, your first priority should be to review the Driver Parameters located on the Driver Configuration page and the Global Configuration Values. These settings must be configured properly for the driver to start and function correctly.
To access the Driver Properties page:
-
Open your project.
-
In the Modeler, right-click the driver icon
 or the driver line, then select .
-
Modify the driver settings as necessary.
IMPORTANT:In addition to the driver settings, you should review the set of default policies and rules provided by the basic driver configuration. Although these policies and rules are suitable for synchronizing with ACF2*, your synchronization requirements for the driver might differ from the default policies. If this is the case, you need to change them to carry out the policies you want. The default policies and rules are discussed in Section 1.2, Configuration Overview.
-
Continue with the next section, Section 3.5.4, Deploying the Driver.
3.5.4 Deploying the Driver
After a driver is created in Designer, it must be deployed into the Identity Vault:
-
In Designer, open your project.
-
In the Modeler, right-click the driver icon
or the driver line, then select > .
-
If you are authenticated to the Identity Vault, skip to Step 5; otherwise, specify the following information:
Host: Specify the IP address or DNS name of the server hosting the Identity Vault.
Username: Specify the DN of the user object used to authenticate to the Identity Vault.
Password: Specify the user’s password.
-
Click .
-
Read through the deployment summary, then click .
-
Read the successful message, then click .
-
Click to assign rights to the driver.
The driver requires rights to objects within the Identity Vault. The Admin user object is most often used to supply these rights. However, you might want to create a DriversUser (for example) and assign security equivalence to that user. Whatever rights that the driver needs to have on the server, the DriversUser object must have the same security rights:
-
Click , then browse to and select the object with the correct rights.
-
Click twice.
-
-
Click to exclude users that should not be synchronized.
You should exclude any administrative User objects (for example, Admin and DriversUser) from synchronization:
-
Click .
3.5.5 Starting the Driver
When a driver is created, it is stopped by default. To make the driver work, you must start the driver and cause events to occur. Identity Manager is an event-driven system, so after the driver is started, it won’t do anything until an event occurs.
To start the driver:
-
In Designer, open your project.
-
In the Modeler, right-click the driver icon
or the driver line, then select > .
3.5.6 Creating the Driver in iManager
Drivers are created with packages, and iManager does not support packages. In order to create or modify drivers, you must use Designer. See Section 3.5, Creating the Driver in Designer.
3.6 Installing the Driver Shim on the Connected System
The driver shim and its files are installed into data sets that you specify, and into files created by the installation process in the HFS.
The driver uses an embedded Remote Loader. It is not necessary to install Java on the connected system.
For all procedures in this section that are performed using the target ACF2 system, you must use a privileged user with both TSO and OMVS segments.
Topics in this section include
3.6.1 Setting Up the Libraries on Your z/OS System
The driver shim is packaged as z/OS partitioned data sets (PDS) unloaded with the TRANSMIT command.
-
Driver Samples Library: SAMPLIB.XMT contains sample cataloged procedures, other JCL, and sample configuration-related files.
-
Driver Load Library: IDMLOAD.XMT contains executable programs for the driver shim.
-
Driver REXX Exec Library: ACF2EXEC.XMT contains the REXX execs for the scriptable framework and to perform configuration tasks.
To upload these files to the target system and extract them:
-
Use FTP to upload the files to the target system from the workstation where you placed them in Step 2.
  c:\> ftp Your-z/OS-Host
  User: Your-User-ID
  Password:
  ftp> quote site lrecl=80 recfm=fb
  ftp> binary
  ftp> put samplib.xmt
  ftp> put acf2exec.xmt
  ftp> quote site pri=30 sec=5 cyl
  ftp> put idmload.xmt
  ftp> quit
-
Log on to z/OS using the same user ID that you used for the FTP session.
-
Use the TSO RECEIVE command to extract the data sets. When RECEIVE prompts you for parameters, specify the appropriate data set names and volumes according to your standards.
Place these data sets on a disk volume that is shared by the systems that share the security system database.
READY receive indataset(samplib.xmt) INMR901I Dataset IDM.SAMPLIB from ADMIN on SYSB INMR906A Enter restore parameters or 'DELETE' or 'END' + dsname('sys3.idm.samplib') volume(work0a) . . . many IEBCOPY messages . . . INMR001I Restore successful to dataset 'SYS3.IDM.SAMPLIB' READY receive indataset(idmload.xmt) INMR901I Dataset IDM.LOAD from ADMIN on SYSB INMR906A Enter restore parameters or 'DELETE' or 'END' + dsname('sys3.idm.load') volume(work0a) . . . many IEBCOPY messages . . . INMR001I Restore successful to dataset 'SYS3.IDM.LOAD' READY receive indataset(acf2exec.xmt) INMR901I Dataset IDM.ACF2EXEC from ADMIN on SYSB INMR906A Enter restore parameters or 'DELETE' or 'END' + dsname('sys3.acf2.acf2exec') volume(work0a) . . . many IEBCOPY messages . . . INMR001I Restore successful to dataset 'SYS3.ACF2.ACF2EXEC' READY -
Add the driver load library to the APF list.
Use the PARMLIB IEAAPFxx or PROGxx member as appropriate. If you use the dynamic APF facility, you can use the SET PROG command to activate your changes. Otherwise, you must IPL for the change to take effect.
-
Restrict access to the driver load library.
WARNING:Do not put the driver load library in the linklist unless you use program protection to secure its contents against unauthorized use. Failure to protect the driver load library introduces security exposures.
-
Customize and run the JOB card samples library member SAMPLIB(HFSINST).
This creates the HFS file system structure for the driver.
-
Verify the Unix file structure was created:
  /opt/novell/acf2drv/
  /opt/novell/acf2drv/keys
  /opt/novell/acf2drv/logs
3.6.2 Securing the Driver Shim with SSL
-
Customize the REXX exec member EXEC(SETCERT)to specify the LOAD library and DRVCONF locations for your installation.
-
Run the REXX member EXEC(SETCERT).
-
When prompted, enter the Metadirectory server host name or IP address and secure LDAP port number (default is 636).
-
When prompted, enter Y to accept the certificate authority presented.
You are about to connect to the eDirectory LDAP server to retrieve the eDirectory Tree Trusted Root public certificate. Enter the LDAP Server Host Address [localhost]: sr.digitalairlines.com Enter the LDAP Server Port [636]: Certificate Authority: Subject: ou=Organizational CA,o=TREENAME Not Before: 20060821144845Z Not After: 20160821144845Z Do you accept the Certificate Authority? (Y/N) y -
Verify the following file was created:
/opt/novell/acf2drv/keys/ca/pem
NOTE:If you are unable to contact the LDAP server using these steps, see Section A.2.2, Driver Certificate Setup Failure.
3.6.3 Configuring the Remote Loader and Driver Object Passwords
-
Customize the REXX EXEC(SETPWDS)member to specify the LOAD library and DRVCONF location for your installation.
-
Run the REXX member EXEC(SETPWDS) and respond to the prompts.
-
Verify the following filse were created:
  /opt/novell/acf2drv/keys/lpwd1f40
  /opt/novell/acf2drv/keys/dpwdlf40
3.6.4 Allocating and Initializing the Change Log Data Set
The change log data set is a standard z/OS direct access data set. The change log data set must reside on a shared device unless it is used by only a single system.
Create one change log data set. It is shared by each z/OS system that shares the security system database.Use the log file utility LDXUTIL to initialize the change log data set. The change log data set must be initialized before you start the driver shim started task for the first time.
To allocate and initialize the change log data set:
-
Customize the samples library member LOGINIT.
Update the JCL to conform to your local installation requirements, and specify the following:
-
The name of your driver load library.
-
A name for your change log data set.
-
The shared disk volume where the change log is to be allocated. Specify a different unit name if appropriate.
-
-
Run the LOGINIT job.
An IEC031I D37 message is normal and should be ignored.
-
Ensure that your change log data set is protected appropriately for the sensitive nature of its contents.
WARNING:If you initialize a change log data set that contains data, the data is lost.
3.6.5 Setting Up the Started Tasks
Setting Up the Change Log Started Task
You must install and run the change log started task on each system that shares the security system database.
To install the change log started task:
-
Copy member LDXLOGR from the samples library to your started task procedure library (SYS1.PROCLIB or its equivalent). You can give the change log started task a different name if necessary.
-
Update the JCL to specify the following:
-
The name of your driver load library
-
The name of your change log data set
-
-
Add the change log started task to your system startup and shutdown procedures.
For more information, see Section 7.2, Starting and Stopping the Change Log Started Task.
The change log started task should be started during your system startup procedure before user processing begins. Any events of interest that occur are stored in the memory queue until the change log started task has initialized.
The change log started task should be stopped during your system shutdown procedure after all user processing has ended. Any events of interest that occur after the change log started task shuts down remain in the memory queue and are lost when the system is shut down.
-
Review your Workload Manager definitions to ensure that the change log started task is assigned to a Service Class appropriate for its role.
Setting Up the Driver Shim Started Task
Install and run the driver shim started task on only one system that shares the security system database.
To install the driver shim started task:
-
Copy member ACF2DRV from the samples library to your started task procedure library (SYS1.PROCLIB or its equivalent). You can give the driver shim started task a different name if necessary.
-
Update the JCL to specify the following:
-
The name of your driver load library
-
The name of your driver shim configuration file
You can use your driver samples library member DRVCONF as a model. For details, see Section 5.1, The Driver Shim Configuration File.
-
The name of your connected system schema file
You can use your driver samples library member SCHEMDEF as a model. For details, see Section 6.2, The Connected System Schema File.
-
The name of your include/exclude file
You can use your driver samples library member INCEXC as a model. For details, see Section 6.3, The Connected System Include/Exclude File.
-
The name of your change log data set
-
The name of your driver REXX exec library
-
-
Add the driver shim started task to your system startup and shutdown procedures.
For information about starting and stopping the driver shim started task, see Section 7.3, Starting and Stopping the Driver Shim Started Task.
The driver shim started task should be started during your system startup procedure before user processing begins. The driver shim started task should be stopped during your system shutdown procedure after all user processing has ended.
-
Review your Workload Manager definitions to ensure that the driver shim started task is assigned to a Service Class appropriate for its role.
-
Assign a restricted user ID to the ACF2DRV started task, which has been authorized for OMVS and TSO.
  acf
  set lid
  insert acf2drv account audit job security stc tso group(omvsgrp)
  set profile(user) div(omvs)
  insert acf2drv uid(0) home(/) omvspgm(/bin/sh)
This user ID must have read/write permissions to the /opt/novell/acf2drv/ directory and subdirectories to run properly. In the example above, these permissions are given to ACF2DRV by uid(0) and group(omvsgrp).
3.6.6 Authorizing the Driver TSO Commands
The ACF2 driver uses two TSO commands, LDXSERV and ACFQUERY, to interact with the ACF2 system. These two commands need to be APF-authorized and configured as TSO commands on the ACF2 system:
-
Add LDXSERV and ACFQUERY to the AUTHCMD NAMES(...) statement in member IKJTSOxx of SYS1.PARMLIB or its equivalent.
Example 3-1 Example:
AUTHCMD NAMES( + . . . other commands . . . + LDXSERV ACFQUERY) -
Use the PARMLIB TSO command to activate your changes.
Example 3-2 Example:
  PARMLIB CHECK(00)
  PARMLIB UPDATE(00)
3.6.7 Testing Before Installing the Security System Exit
You can use the LDXSERV command to test your installation before you install the exit.
-
If it is not already running, start the change log started task.
For details about starting the change log started task, see Section 7.2, Starting and Stopping the Change Log Started Task.
-
Issue the following command from a TSO session that has the driver load library included in its STEPLIB concatenation:
LDXSERV STATUS
-
Examine the output of the command. As in the following example, you should see information about the memory queue and the change log started task, as well as a valid, empty change log data set:
READY ldxserv status <ldx> <source> <product build="20171217" instance="ldxserv" version="4.70"> NetIQ IDM ACF2 Driver Version 4.0.4.0 </product> <contact>NetIQ Corporation</contact> </source> <output> <status level="success"> <queue version="4.70" state="active" created-by="" entries="0"/> <logger version="4.70" state="active" taskid="LDXLOGR" logfilename="SYSTEMS.LDXACF.V4540821.LOGFILE"/> <logfile name="SYSTEMS.LDXACF.V4540821.LOGFILE" state="empty"/> </status> </output> </ldx> -
Also in this output, check for the following information:
-
The <logfile> element describes the change log data set created earlier (see Section 3.6.4, Allocating and Initializing the Change Log Data Set). The name attribute describes the data set location and the state attribute describes how full the change log is, expressed either as a percentage or with the keyword empty.
-
The <logger> element displays the status of the change log started task, including attributes for its version, assigned taskid and logfilename if the change log data set is configured for writing.
-
The <queue> element displays the properties of the cross-memory queue, including attributes for version, number of entries currently queued, and created-by (which module created the queue). Before the Exits are installed, the entries attribute will be 0 and the created-by attribute should be empty.
-
3.6.8 Installing the Driver Security System Exits
The ACF2 driver uses three ACF2 exits for capturing changes in ACF2 and publishing them to the Identity Vault.
-
LDXPOST is the ACF2 Logonid exit, invoked by the LIDPOST exit point, which captures and queues changes to the Logonid record database.
-
LDXNPXIT is the ACF2 exit, invoked by the NEWPXIT exit point, which captures and queues password changes from terminal logon.
NOTE:The LDXNPXIT exit does not capture administrative password changes from the ACF2 menus or the interactive ACF command.
-
LDXNPHXT is the ACF2 exit, invoked by the NPWPEXIT exit point, which captures and queues password phrase changes from terminal logon.
All three exits are optional for capturing changes to ACF2. If you do not intend to capture changes to the Logonid records, then you do not need to install LDXPOST. If you do not intend to capture user password changes at logon time, then you do not need to install LDXNPXIT. If you do not intend to capture password phrases at logon time, then you do not need to install LDXNPHXT.
To install LDXPOST, the Logonid database exit:
-
Copy the LOAD library member LDXPOST into a library specified by SYS1.PARMLIB member LPALSTxx. If you add an additional load library to LPA, you will also need to IPL your system to apply these changes.
-
Update the ACF2 GSO option to add the exits. From TSO Ready:
  ACF
  SET CONTROL(GSO) SYSID(NAME)
  INSERT SYSID(NAME) EXITS LIDPOST(LDXPOST)
  QUIT
-
Refresh the GSO record.
MODIFY ACF2,REFESH(EXITS)
-
IPL the system if LPA has been modified.
To install LDXNPXIT, the password change exit:
-
Copy the LOAD library member LDXNPXIT into a library specified by SYS1.PARMLIB member LPALSTxx. If you add an additional load library to LPA, you will also need to IPL your system to apply these changes.
-
Update the ACF2 GSO option to add the exit. From TSO Ready:
  ACF
  SET CONTROL(GSO) SYSID(NAME)
  INSERT SYSID(NAME) EXITS NEWPXIT(LDXNPXIT)
  QUIT
-
Refresh the GSO record.
MODIFY ACF2,REFESH(EXITS)
-
IPL the system if LPA has been modified.
To install LDXNPHXT, the password phrase change exit:
-
Copy the LOAD library member LDXNPHXT into a library specified by SYS1.PARMLIB member LPALSTxx. If you add an additional load library to LPA, you will also need to IPL your system to apply these changes.
-
Update the ACF2 GSO option to add the exit. From TSO Ready:
  ACF
  SET CONTROL(GSO) SYSID(NAME)
  INSERT SYSID(NAME) EXITS NPWPEXIT(LDXNPHXT)
  QUIT
-
Refresh the GSO record.
MODIFY ACF2,REFESH(EXITS)
-
IPL the system if LPA has been modified.
3.6.9 Testing the Completed Connected System Installation
You can, again, use the LDXSERV command to test your installation after installing the ACF2 security exit(s). Issue the following command from a TSO session that has the driver load library included in its STEPLIB concatenation:
LDXSERV STATUS
Examine the output of the command. As in the following example, you should see information about the exits, LDXNPXIT and LDXPOST:
  READY
  ldxserv status

  <ldx>
    <source>
      <product build="20171217" instance="ldxserv" version="4.70">
        Novell IDM ACF2 Driver Version 4.0.4.0
      </product>
      <contact>NetIQ Corporation</contact>
    </source>
    <output>
      <status level="success">
        <exit name="LDXNPXIT" state="enabled" version="4.70"
          build-date="20171217" times-called="0" events-queued="1" info="OK"/>,
        <exit name="LDXPOST " state="enabled" version="4.70"
          build-date="20171217" times-called="0" events-queued="1" info="ok"/>
      </status>
    </output>
  </ldx>
The output will show two <exit> elements that describe the state of each ACF2 exit. Each exit will include:
-
A version attribute to describe the version level
-
A build-date attribute to describe the exact date of assembly
-
A times-called attribute describing how many times the exit has been invoked
-
An events-queued attribute to show how many events this particular exit has queued an event into memory
3.7 Post-Installation Tasks
-
If desired, set on the Driver Configuration page to . This causes the driver to start when the Metadirectory engine starts.
-
Activate the driver.
Identity Manager and Identity Manager drivers must be activated within 90 days of installation or they shut down. At any time during the 90 days, or afterward, you can activate Identity Manager products.
For details about activating NetIQ Identity Manager Products, see the Identity Manager 4.7 Installation Guide on the Identity Manager 4.7 Documentation Web site.
3.8 Uninstalling the Driver
3.8.1 Uninstalling the Security System Exits
The procedure you use for uninstalling the security exits depends on how you set them up.
If you linked the LDXNPXIT exit with exits of your own:
-
Reinstall your original exits, then IPL with CLPA to load the relinked exits in the active LPA.
-
If you change the exit names as you relinked them, be sure to also update the GSO EXITS record with the changed exit names.
-
Delete the exit modules from the LPA library containing them. Then IPL with CLPA at a convenient time.
If you are using LDXNPXIT, LDXNPHXT or LDXPOST alone:
-
Update the GSO EXITS record to remove the exit names.
-
Enter the following TSO commands:
 READY
acf
  ACF
set control(gso) sysid(system)
  CONTROL
insert sysid(system) exits lidpost() newpxit() npwpexit()
-
Install the new values. From an z/OS console, enter:
MODIFY ACF2,REFRESH
-
-
Delete the exit modules from the LPA library containing them. Then IPL with CLPA at a convenient time.
3.8.2 Uninstalling the Driver Shim
-
Remove the change log started task (LDXLOGR) and driver shim (ACF2DRV) started task from your system startup and shutdown procedures.
-
Stop both started tasks (LDXLOGR and ACF2DRV).
For details, see Section 7.2, Starting and Stopping the Change Log Started Task and Section 7.3, Starting and Stopping the Driver Shim Started Task.
-
Remove members LDXLOGR and ACF2DRV from your started task procedure library.
-
Remove the driver load library from your APF list by modifying PARMLIB IEAAPFxx or PROGxx member as appropriate.
NOTE:If you use the dynamic APF facility, you can use the SET PROG command to activate your changes. Otherwise, you must IPL for the change to take affect.
-
Remove the LDXSERV and ACFQUERY TSO commands from IKJTSOxx.
-
Remove the driver files from the HFS:
oshell rm -rf /opt/novell
-
Delete the SAMPLIB, LOAD and EXEC driver data sets.
-
Delete the change log data set that you created in Section 3.6.4, Allocating and Initializing the Change Log Data Set.
3.8.3 Uninstalling the Driver Object from the Identity Vault
-
In iManager, select from the top menu icons.
-
Under tasks, select .
-
Click and navigate to your driver set by clicking on its name.
-
Click , then click on the page.
-
Select the driver object to be deleted, then click .
4.0 Upgrading from the Fan-Out Driver
This section provides information about upgrading the latest Identity Manager driver for ACF2 from the Identity Manager Fan-Out Driver for ACF2.
NOTE:At the time of this document’s initial release, the Fan-Out Driver was commonly leveraged to provide an identity solution for ACF2.
Topics include
The Fan-Out driver provides one-way synchronization to a heterogeneous mix of systems including Linux and UNIX systems, and IBM i5/OS* (OS/400* operating system) and z/OS systems. The Fan-Out driver also provides authentication redirection from those systems.
Moving to the Identity Manager 4.7 driver for ACF2 provides a few advantages:
-
Bidirectional Synchronization: The new driver architecture allows you to synchronize every field from the Logonid record of the connected ACF2 system.
-
Identity Manager Policies and Packages: The Fan-Out driver makes minimal use of the Identity Manager policies.
-
Password Phrases: The new driver supports ACF2 password phrases.
Consider the following before migrating from the Fan-Out driver:
-
Heterogeneity: The Fan-Out driver supports operating system environments besides ACF2. You can continue to use the Fan-Out driver for those systems while using the Identity Manager 4.7 driver for ACF2 on your ACF2 systems.
-
Authentication Redirection: The Fan-Out driver provides authentication redirection using the password exit. The Identity Manager 4.7 driver for ACF2 provides bidirectional password synchronization.
4.1 Preparing for Migration
NetIQ® recommends that you perform the upgrade in a test environment similar to your production environment before upgrading production systems.
Before beginning the upgrade process, review Section 3.0, Installing the ACF2 Driver.
To prepare for installing the upgrade:
-
Verify that you have the required knowledge and skills.
For details, see Section 3.2, Required Knowledge and Skills.
-
Ensure that the prerequisites are met.
For details, see Section 3.3, Prerequisites.
-
Prepare the distribution files for installation.
For details, see Section 3.4, Getting the Installation Files.
4.2 Migrating Fan-Out Driver Platform Services to the ACF2 Driver
To migrate, follow these tasks on your target platform system:
-
Stop the following started tasks:
-
PLATRCVR
-
ASCLIENT
-
-
Remove ASCLIENT and PLATRCVR from your system startup and shutdown procedures.
-
Remove the Fan-Out driver’s ACF2 exits.
For details on uninstalling ACF2 exits, see the Identity Manager 4.7 Fan-Out Driver for Mainframes Administration Guide, which is available at the Identity Manager 4.7 Drivers Documentation Web site
-
Install the driver shim on the connected system.
For details, see Section 3.6, Installing the Driver Shim on the Connected System.
4.3 Configuring the Driver
To configure the driver:
-
Install and set up the Identity Manager driver for ACF2 on the Metadirectory server.
For details, see Section 3.5, Creating the Driver in Designer.
-
Make any required policy modifications.
For more information about policy customization, see the Identity Manager 4.7 Documentation Web site.
-
Start the driver.
Click the upper right corner of the driver icon, then click .
-
Migrate the users to make new associations.
For details, see Section 5.3.1, Migrating Identities from the Identity Vault to the Connected System and Section 5.3.2, Migrating Identities from the Connected System to the Identity Vault.
4.4 Post-Migration Tasks
Perform the tasks listed in Section 3.7, Post-Installation Tasks.
After the new driver is operating properly, you can remove the Fan-Out driver components:
-
Delete the Platform object from the Fan-Out driver configuration.
-
On the connected system, uninstall Platform Services.
-
If this is the last platform being served by the Fan-Out driver, you can uninstall the Fan-Out core driver.
-
Remove the ASAM directory from the file system, by running the fandrv-uninstall script.
-
Remove the ASAM System container object and all of its subordinates from the tree.
-
Uninstall the Fan-Out driver iManager plug-in.
-
5.0 Configuring the ACF2 Driver
After you have installed the Identity Manager 4.7 driver for ACF2, use the information in this section for configuration. Topics include
5.1 The Driver Shim Configuration File
The driver shim configuration file controls operation of the driver shim. You can specify the configuration options listed in Table 5-1, one per line. You can also specify these options on the command line. For details about driver shim command line values, see Section C.1, Driver Shim Command Line Options.
The driver shim configuration file must be a sequential file or a member of a partitioned data set. The DRVCONF DD statement in the driver shim started task JCL identifies the driver shim configuration file. An example driver shim configuration file is provided in the driver samples library member DRVCONF.
Table 5-1 Driver Shim Configuration File Statements
|
Option (Short and Long Forms) |
Description |
|---|---|
|
-conn <connString> -connection <connString> |
A string with connection options. Enclose the string in double quotes ("). If you specify more than one option, separate the options with spaces.
|
|
-hp <httpPort> -httpport <httpPort> |
Specifies the HTTP services port number. The default HTTP services port number is 8091. You can connect to this port to view log files. For details, see Section A.1.2, The Trace File and Section A.1.5, The Status Log. |
|
-path <driverPath> |
Specifies the path for driver files. The default path is /opt/novell/acf2drv. |
|
-sp <RLpassword>,<DOpassword>, -setpassword <RLpassword>,<DOpassword>, |
Sets the Remote Loader and Driver object passwords. |
|
-t <traceLevel> -trace <traceLevel> |
Sets the level of debug tracing. 0 is no tracing, and 10 is all tracing. For details, see Section A.1.2, The Trace File. |
|
-ndl -nodirxmllog |
Disables writing to the driver status log file. Disables writing to dirxml.log. |
|
-nohttpport |
Disables the HTTP service. |
|
-pollinginterval n |
Sets driver shim’s Publisher polling interval in seconds. This overrides the driver parameters. |
|
-heartbeatinterval n |
Sets driver shim’s heartbeat interval in seconds. This overrides the driver parameters. |
Example Driver Shim Configuration File
  -tracefile /opt/novell/acf2drv/logs/trace.log
  -trace 0
  -connection "ca=/opt/novell/acf2drv/keys/ca.pem"
  -path /opt/novell/acf2drv/
5.2 Setting the Remote Loader and Driver Object Passwords
The Remote Loader password is used by the Metadirectory engine to authenticate itself to the driver shim (embedded Remote Loader). The Driver object password is used by the driver shim to authenticate itself to the Metadirectory engine.
These passwords are set during installation. You can set them at any time later using the procedures in the following sections. The corresponding passwords you set on the connected system and in the Identity vault must be identical.
5.2.1 Connected System
The Remote Loader and Driver object passwords are stored on the connected system under /opt/novell/acf2drv/keys in encrypted files dpwdlf40 (Driver object password) and lpwdlf40 (Remote Loader password).
To set the passwords on the connected system:
-
Run the REXX exec in the REXX exec library member SETPWDS and respond to the prompts.
-
Restart the driver shim started task.
5.2.2 Identity Vault
The Remote Loader and Driver object passwords are set for the driver through iManager and are stored in the Identity Vault. Each password on the connected system must exactly match its counterpart in the Identity vault.
To change the passwords in the Identity Vault after driver installation:
-
In iManager, navigate to the for the driver.
-
Click the driver icon.
-
Specify the Driver object password.
-
Specify the Remote Loader password.
The Remote Loader password follows the Authentication heading.
-
Click .
-
Restart the driver.
5.3 Migrating Identities
When you first run the driver, you might have identities in the Identity Vault that you want to provision to the connected system, or vice versa. Identity Manager provides a built-in migration feature to help you accomplish this.
5.3.1 Migrating Identities from the Identity Vault to the Connected System
-
In iManager, open the Identity Manager for the driver.
-
Click . An empty list of objects to migrate is displayed.
-
Click . A browse and search dialog box that allows you to select objects is displayed.
-
Select the objects you want to migrate, then click .
To view the results of the migration, click . For details about the log, see Section A.1.5, The Status Log.
If a user has a Distribution Password, the Distribution Password is migrated to the connected system as the user’s password. Otherwise, no password is migrated. For information about Universal Passwords and Distribution Passwords, see the appropriate version of the Password Management Administration Guide at the NetIQ Documentation Web site.
5.3.2 Migrating Identities from the Connected System to the Identity Vault
-
In iManager, open the Identity Manager for the driver.
-
Click to display the Migrate Data into the Identity Vault window.
-
Specify your search criteria:
-
To view the list of eDirectory™ classes and attributes, click .
-
Select class User.
-
Select the attributes to be used as search criteria for objects of the selected class, then click .
The eDirectory attributes map to ACF2 attributes as specified by the driver schema: CN maps to DirXML-ACF2-LID, etc. For the default mappings, see Table 1-2, Default Schema Mapping and Filter.
-
Specify values for the selected attributes, then click .
-
-
Click .
To view the results of the migration, click . For details about the log, see Section A.1.5, The Status Log.
Because local passwords cannot be retrieved from ACF2, they cannot be submitted to the Metadirectory engine until they are changed. The password change exit routine captures password changes.
5.3.3 Synchronizing the Driver
To generate events for associated objects that have changed since the driver’s last processing, open the Identity Manager Driver Overview page for the driver in iManager, then click .
5.4 International Considerations
The Identity Manager driver for ACF2 assumes the ACF2 system is using the EBCDIC Latin 1 (Open Systems) codepage for translating data to and from the Identity Manager Metadirectory engine. This codepage, IBM-1047, is configured in the SAMPLIB member ACF2DRV, the JCL for starting the ACF2 driver shim. If your system uses a codepage other than IBM-1047, you will need to change the JCL for starting the ACF2 driver to ensure correct character translation.
The following line, specified in the SAMPLIB(CEEOPT) member, illustrates how the environment is configured for the default codepage IBM-1047:
ENVAR("LC_CTYPE=IBM-1047")
You may change this text to reflect the codepage of your ACF2 system. The format is IBM-CCSID, where CCSID is a coded character set identifier, represented in decimal.
For a list of valid codepage identifiers, see the IBM CCSID reference table. The following table lists a subset of sample values:
|
Codepage |
Description |
|---|---|
|
IBM-858 |
IBM-PC |
|
IBM-1047 |
Latin 1 (Open Systems) |
|
IBM-1140 |
US/Canada |
|
IBM-1141 |
Austria/Germany |
|
IBM-1142 |
Denmark/Norway |
|
IBM-1143 |
Finland/Sweden |
|
IBM-1144 |
Italy |
|
IBM-1145 |
Spain/Spanish Latin America |
|
IBM-1146 |
UK |
|
IBM-1147 |
France |
|
IBM-1148 |
International |
|
IBM-1149 |
Iceland |
6.0 Customizing the ACF2 Driver
This section provides information about available resources for customizing the Identity Manager 4.7 driver for ACF2.
Topics include
For details about the filters and policies provided with the driver, see Section 1.2.2, ACF2 Default Configuration and Section 1.2.4, ACF2 Password Synchronization.
6.1 The Scriptable Framework
The driver provides a comprehensive scriptable framework that you can use to add to the built-in support for the security system, and to add support for other applications and security system fields that have been customized for a particular installation.
The driver’s scriptable framework includes components that simplify the job of extending the driver to support new applications and fields.
-
Embedded Remote Loader
-
Full SSL support, and an installer to easily configure the certificates
-
Web access to debugging information from the embedded Remote Loader
-
-
Encrypted change log that stores changes from the application to the Identity Vault if there is a communication problem
-
Loopback detection system to prevent subscribed events from being published back to the Identity Vault
-
z/OS name/token callable services helper programs that provide for securely passing large variables to and from the REXX execs
-
Easily extendable connected system schema file to support any application
-
Include/exclude file for simplified testing and deployment by the platform administrator
-
Event support, both for applications that have exits or callouts, and for applications that must be polled for changes
The names of objects and attributes in the REXX execs are the names specified in the connected system schema file.
The following tables describe the major REXX execs.
Table 6-1 Identity Vault Command Processing Execs
|
REXX Exec |
Identity Vault Event |
|---|---|
|
IDMADDG |
Add Group |
|
IDMADDU |
Add User |
|
IDMDELG |
Delete Group |
|
IDMDELU |
Delete User |
|
IDMMODG |
Modify Group |
|
IDMMODU |
Modify User |
|
IDMMODPW |
Password Change |
|
IDMQUERY |
Query |
|
IDMCHOPW |
Check Password |
Table 6-2 Other Execs
|
REXX Exec |
Purpose |
|---|---|
|
IDMSUB |
Calls the appropriate command processing exec based on the type of event and object. This is executed for every Subscriber event. |
|
IDMPOLL |
Not used for ACF2. You can use this exec as needed to support your own applications if they do not generate events when changes are made. |
|
IDMHRTBT |
Heartbeat exec. |
|
IDMGLBLS |
Holds configurable options that all REXX execs can use during event processing. |
|
IDMSTATS |
Sends a status document to report the health of the application. |
|
IDMTSOEX |
Executes a TSO command and returns the command return code and command output. |
|
SETPWDS |
Sets the Remote Loader and Driver object passwords, which are used to authenticate and authorize the connection between the driver shim started task and the Metadirectory system. |
|
SETCERT |
Retrieves the certificate authority for the Metadirectory engine that uses SSL to communicate with the driver shim started task. |
6.1.1 Modifying a REXX Exec
Each of the REXX execs that come with the driver is designed with a common format, which makes it easy to read, edit, and maintain. Following are functional descriptions of the standard sections included in each exec:
-
Retrieve subscriber shim variables, using IDMGETV sub.
-
Retrieve event data variables, using IDMGETV event.
-
Trace a useful message to be logged to the TSO print file.
-
Provide comments instructing where to insert custom code before the TSO command is executed.
-
Execute the TSO command stored in variable ACF2CMD, which performs the basic action.
-
Provide comments instructing where to insert custom code after the TSO command has been executed.
-
Return of status document, using the IDMSTATS function.
Retrieving and Returning Information with IDMGETV and IDMSETV
The REXX execs use IDMGETV to obtain information about the event and about the properties configured on the ACF2 driver. The REXX execs use IDMSETV to return information to the driver shim or Metadirectory engine for processing. Both IDMGETV and IDMSETV are utilities, found in the distribution LOAD library, which transport information between REXX variables and memory storage. When information is retrieved using IDMGETV, the REXX variables will be created and populated and a special variable, VariableList, will also be created to contain a list of the available REXX variables from the shim.
To check for the existence of a REXX variable, set by IDMGETV, use:
  if wordpos("VariableName", VariableList) > 0; then do;
    /* REXX variable, VariableName exists and was created by IDMGETV */
  end;
Where VariableName is the name of the variable of interest. Event variables will contain the prefix ADD_ or REMOVE_ to indicate that this attribute has been added or removed from the object in question. For example, to check if the REVOKE field has been removed:
  if wordpos("REMOVE_REVOKED", VariableList) > 0; then do;
    /* User had REVOKED value removed */
  end;
For example, if the following XDS document is sent to the ACF2 driver shim:
  <modify class-name="User" event-id="12345">
    <association>IBMUSER</association>
    <modify-attr attr-name="NAME">
      <remove-value>
        <value>IBMUSER</value>
      </remove-value>
      <add-value>
        <value>THE IBMUSER</value>
      </add-value>
    </modify-attr>
  </modify>
The resulting REXX variables would look like:
  COMMAND=modify
  CLASS_NAME=User
  EVENT_ID=12345
  ASSOCIATION=IBMUSER
  REMOVE_NAME=IBMUSER
  ADD_NAME=THE IBMUSER
When attributes are mapped to REXX variables, all invalid REXX variable characters are converted into underscore (“_”) characters. These include “-”, “@” and “...”.
Multivalued (Stem) Variables
When attributes are multivalued, IDMGETV assigns a suffix to the variable name to index its values. The count of the number of values is represented by suffix .0 and the values are represented from .1 to .n, where n is the total count. For example, if the variable CLASSES was multivalued with values: CLS1, CLS2, CLS3, the following variables would be created:
  CLASSES.0=3
  CLASSES.1=CLS1
  CLASSES.2=CLS2
  CLASSES.3=CLS3
To iterate over each value, use a REXX do loop:
  do i = 1 to CLASSES.0
    class = CLASSES.i
  end;
Returning Status Documents Using IDMSTATS
Identity Manager uses status documents, returned by the driver, to investigate whether an event was processed by the driver shim. Therefore, it’s important for the REXX execs to return a status document indicating whether the event was successful or resulted in an error. Use the supplied REXX exec, IDMSTATS, to return a status document:
x = IDMSTATS("success", "Event was processed successfully", EVENT_ID);
The IDMSTATS script takes three parameters: level, message and event id. The level must be one of: success, error, warning, retry or fatal.
  <status level="success" event-id="12345">
    Event was processed successfully
  </status>
Understanding the ACF2CMD Variable
Before an XDS command is sent to the driver shim, the Output Transformation policy converts the XDS document into a ACF2 TSO administrative command and stores the result in the attribute, ACF2CMD. This process avoids adding parsing logic inside the REXX execs to build the command, making the REXX execs cleaner, shorter, and easier to read. Therefore the default action of each REXX exec is to look for the ACF2CMD variable, which may be multivalued, and execute the command by default.
Using IDMTRACE To Print Messages
IDMTRACE is another REXX exec, supplied by the driver distribution, that allows you to simply trace a message to the TSO print file (SYSTSPRT), allocated by the ACF2DRV JCL. It will only trace messages if ENABLE_TRACE is set to true in IDMGLBLS. It will also print the date and time before the message for convenience.
x = IDMTRACE("IDMADDU is running for user <"ADD_LID">.");
Global Settings in member IDMGLBLS
The REXX exec IDMGLBLS is a simple script containing global settings that all scripts may use. It provides a common repository of variables you may change to alter the behavior of the other REXX execs. There are four variables of interest:
-
SUBCOMMAND_SEPARATOR: Defines the character to be recognized as a delimiter between lines of output received from TSO when executing commands that produce output. The default is the EBDIC newline character.
-
MESSAGE_PREFIX: Defines a string that precedes lines in the TSO print file (SYSTSPRT) in which a TSO command is about to be executed. The default is -->TSO:
-
DISPLAY_TSO_OUTPUT: A boolean variable that controls whether TSO output received from a command should be displayed in the TSO print file (SYSTSPRT). The default is true.
-
ENABLE_TRACE: A boolean variable that controls whether IDMTRACE messages should be displayed. The default is true.
NOTE:Enabling trace can be useful for troubleshooting and log collecting; however, disabling trace can reduce the amount of output that is saved in the SYSTSPRT file.
Using IDMTSOEX To Execute A TSO Command
In REXX, a TSO command can be evaluated simply by entering the command on its own line:
  cmd = "ALU IBMUSER NAME(IBMUSER)IDMTRACE");
  cmd;
The IDMTSOEX exec, also supplied by the distribution, will provide a few other options:
x = IDMSOEX(cmd);
-
Log the command (password sanitized) using IDMTRACE
-
Trap the output and return code from the command
-
Return the code and output of the command to the caller
It's convenient to use this output to display a message back to the engine through a status document:
  response = IDMTSOEX("ALU IBMUSER NAME(IBMUSER)");

  /* first word is the return code */
  if word(cmd_response) > 0 then do;
    x = IDMSTATS("error", response, EVENT_ID);
  end;
  else do;
    x = IDMSTATS("success", response, EVENT_ID);
  end;
Putting It All Together
The following code sample illustrates how the IMMADDU exec can be modified to additionally create an OMVS home directory:
  /* retrieve subscriber variables */
  "IDMGETV sub";

  /* retrieve event variables */
  "IDMGETV event";

  /* trace a message to SYSTSPRT */
  x = idmtrace("IDMADDU running for user <"ADD_LID">.");

  /*
     INSERT CUSTOM CODE HERE

     Add any custom code here that needs to be executed before
     creating the user in the ACF2 database.
  */

  /* Add the user to the ACF2 database using a TSO command */
  if wordpos("ADD_ACF2CMD.0", variablelist) <= 0; then do;
    /* we did not get a ACF2CMD from the event document */
    success = IDMSTATS("error", "No ACF2 command found", EVENT_ID);
    exit 0;
  end;

  do i = 1 to ADD_ACF2CMD.0
    tsocmd = ADD_ACF2CMD.i
    /* For an event, multiple TSO commands may be generated */
    cmd_response = IDMTSOEX(tsocmd);
    /* check the return code from our command */
    if word(cmd_response, 1) > 0 then do;
      /* an error occurred, report an error and exit from script */
      success = IDMSTATS("error", cmd_response, EVENT_ID);
      exit 0;
    end;
    else do;
      success = IDMSTATS("success", cmd_response, EVENT_ID);
    end;
  end;

  /*
  INSERT CUSTOM CODE HERE
  Add any custom code here that needs to be executed after
  creating the user in the ACF2 database.
  */

  /* check for the home directory attribute and create it */
  if wordpos("ADD_OMVSHOME", VariableList) > 0; then do
    makeDir = "oshell mkdir '"ADD_OMVS_HOME"'";
    response = IDMTSOEX(makeDir);
    if word(response, 1) > 0 then do;
      x = IDMSTATS("warning", response, EVENT_ID);
    end;
  end;

  /* All is successful, so we need to return an association
   for this user. */

  parse upper var ADD_LID ASSOCIATION;
  "IDMSETV MODIFY NAME(COMMAND) VALUE(ADD_ASSOCIATION)";
  "IDMSETV MODIFY NAME(ASSOCIATION) VALUE("ASSOCIATION")";
  "IDMSETV MODIFY NAME(EVENT_ID) VALUE("EVENT_ID")";

  if SRC_DN <> "SRC_DN"; then
    "IDMSETV MODIFY NAME(DEST_DN) VALUE("SRC_DN")";
  end;

  if SRC_ENTRY_ID <> "SRC_ENTRY_ID"; then
    "IDMSETV MODIFY NAME(DEST_ENTRY_ID) VALUE("SRC_ENTRY_ID")";
  end;

  /* Exit the script with return code 0 (no error) */
  exit 0;
6.2 The Connected System Schema File
The schema file on the connected system is used to specify the classes and attributes that are available on the system.
The schema file is read by the driver shim when the Metadirectory engine requests it. This typically happens at driver startup. The schema file is also used by the Policy Editor to map the schema of the Identity Vault to the schema of the external application.
If you change the schema file, you must restart the driver shim and the driver.
The REXX execs that are provided with the driver depend on the classes and attributes in the schema file that is provided with the driver.
The connected system schema file must be a sequential file or a member of a partitioned data set. The SCHEMDEF DD statement in the driver shim started task JCL identifies the schema file. An example schema file with the required classes and attributes is provided in the driver samples library member SCHEMDEF.
6.2.1 Schema File Syntax
Each line in the schema file represents an element and must begin with the element name: SCHEMA, CLASS, or ATTRIBUTE.
The first element of the schema file is the schema definition. The schema definition is followed by class definitions. Each class definition can contain attribute definitions.
Except for the values of class and attribute names, the contents of the schema file are case insensitive.
Comments
Lines that begin with an octothorpe (#) are comments.
# This is a comment.
Schema Definition
The first line in the schema file that is not a comment must be the schema definition.
SCHEMA [HIERARCHICAL]
HIERARCHICAL specifies that the target application is not a flat set of users and groups, but is organized by hierarchical components, such as a directory-based container object.
Class Definition
CLASS className [CONTAINER]
You must specify a class name. Enclose the class name in double quotes (") if it contains spaces. Add the CONTAINER keyword if objects of this class can contain other objects. End the class definition by another class definition or by the end of the file.
Attribute Definition
Any number of attribute definitions can follow a class definition. Attribute definitions define attributes for the class whose definition they follow.
ATTRIBUTE attributeName [TypeAndProperties]
An attribute name is required. Enclose the attribute name in double quotes (") if it contains spaces.
If no attribute type is specified, the default is STRING. Allowable types are:
-
STRING
-
INTEGER
-
STATE
-
DN
Allowable attribute properties are:
-
REQUIRED
-
NAMING
-
MULTIVALUED
-
CASESENSITIVE
-
READONLY
6.2.2 Example Schema File
For a complete example connected system schema file, see the driver samples library member SCHEMDEF. An excerpt from that file follows.
  SCHEMA
    CLASS Logonid
      ATTRIBUTE LID NAMING REQUIRED
      ATTRIBUTE MAXDAYS INTEGER
      ATTRIBUTE ACCOUNT STATE
6.3 The Connected System Include/Exclude File
You can use an optional include/exclude file on the connected system to control which identities are or are not synchronized from the Identity Vault to the connected system.
To control which objects are synchronized from the connected system to the Identity Vault, use policies. For details about customizing policies, see the Identity Manager 4.7 Documentation Web site.
The connected system include/exclude file must be a sequential file or a member of a partitioned data set. The INCEXC DD statement in the driver shim started task JCL identifies the include/exclude file. An example include/exclude file that excludes many common z/OS users, such as JES, OMVS, and INIT, is provided in the driver samples library member INCEXC.
The file is read when the driver shim starts. If you make changes to it, you must restart the driver shim.
The include/exclude file can contain rules for both including and excluding accounts. To ensure optimal performance, each include/exclude file should contain no more than 50 entries total.
You can use the include/exclude file to phase in your deployment of the driver, excluding most users at first, and then adding more as you gain confidence and experience.
6.3.1 Include/Exclude Processing
Identity Vault events for identities that match an exclude rule are discarded by the Subscriber shim.
Included identities are treated normally by the Subscriber shim.
Identities that do not match an include rule or an exclude rule in the file are included.
Identities are matched in the following priority:
-
Exclude rules
-
Include rules
Within each level of this matching priority, identities are matched against rules in the order that the rules appear in the file. The first rule that matches determines whether the identity is included or excluded.
6.3.2 Include/Exclude File Syntax
Except for class names, attribute names, and the values to match, the contents of the include/exclude file are case insensitive.
The Subscriber Creation policy converts object names to uppercase. Use uppercase names in the include/exclude file to match identities.
The include/exclude file can contain any number of include sections, exclude sections, and single-line rules.
Include sections and exclude sections can contain class matching rules, and class matching rules can contain attribute matching rules. Include sections and exclude sections can also contain association matching rules.
Class and attribute names used in the include/exclude file must correspond to the names specified in the schema file. For details about the schema file, see Section 6.2, The Connected System Schema File.
Comments
Lines that begin with an octothorpe (#) are comments.
# This is a comment.
Include and Exclude Sections
Include and exclude sections provide rules to specify which objects are to be included or excluded from synchronization.
An include section begins with an INCLUDE line and ends with an ENDINCLUDE line.
  INCLUDE
    .
    .
    .
  ENDINCLUDE
An exclude section begins with an EXCLUDE line and ends with an ENDEXCLUDE line.
  EXCLUDE
    .
    .
    .
  ENDEXCLUDE
You can use class matching rules and association matching rules within an include section and an exclude section.
Class Matching Rules
Use a class matching rule within an include section or an exclude section to specify the name of a class of objects to include or exclude.
A class matching rule is defined by a class line that specifies the name of the class and ends with an ENDCLASS line.
  CLASS className
    .
    .
    .
  ENDCLASS
You can use attribute matching rules within a class matching rule.
Attribute Matching Rules
You can use attribute matching rules within a class matching rule to limit the objects that are included or excluded. If no attribute matching rules are specified for a class, all objects of the specified class are included or excluded.
An attribute matching rule comprises an attribute name, an equals sign (=), and an expression. The expression can be an exact value, or it can use limited regular expressions. For details about limited regular expressions, see Limited Regular Expressions.
attributeName=expression
Multiple attribute matching rules can be specified for a given class.
Attribute matching rules within a class matching rule are logically ANDed together. To logically OR attribute matching rules for a class, specify multiple class matching rules. For example, the following include/exclude file excludes both user01 and user02:
  # Exclude the User object if its ACF2 LID is USER01 or USER02.
  EXCLUDE
  CLASS Logonid
      LID=USER01
  ENDCLASS
  CLASS Logonid
      LID=USER02
  ENDCLASS
  ENDEXCLUDE
Association Matching Rules
You can specify association matching rules in an include or exclude section. Association matching rule expressions can specify an exact association or a limited regular expression. For details about limited regular expressions, see Limited Regular Expressions.
By default, an association is the ACF2 user ID. Association formation can be customized in the Subscriber REXX execs.
For example, to exclude the root user, specify
  EXCLUDE
    ACFUSER
  ENDEXCLUDE
Special Considerations
Using the Include/Exclude rules can be a convenient way to control processing decisions from the ACF2 administration point. They can quickly filter events before they reach the Identity Manager Metadirectory engine, thus saving time and resources. However, it is not recommended that you use the Include/Exclude rules for processing if you plan to create more than 50 rules. Each rule adds additional complexity that the driver shim must process for every event.
Single-Line Rules
INCLUDE|EXCLUDE [className] objectSelection
Where objectSelection can be
{associationMatch | attributeName=expression}
You must specify whether the rule is to include or exclude the objects it matches.
You can specify a class name to limit matches to only objects of that class.
You must specify either an association or an attribute matching expression. The syntax of the association and attribute matching expression is the same as that of association matching rules and attribute matching rules previously described. For details, see Association Matching Rules and Attribute Matching Rules.
For example, to ignore events from the Admin user in the Identity Vault:
  # Do not subscribe to events for the Admin user.
  EXCLUDE ADMIN
Limited Regular Expressions
A limited regular expression is a pattern used to match a string of characters.
Character matching is case sensitive.
Any literal character matches that character.
A period (.) matches any single character.
A bracket expression is a set of characters enclosed by left ([) and right (]) brackets that matches any listed character. Within a bracket expression, a range expression is a pair of characters separated by a hyphen, and is equivalent to listing all of the characters that sort between the given characters. For example, [0-9] matches any single digit.
An asterisk (*) indicates that the preceding item is matched zero or more times.
A plus sign (+) indicates that the preceding item is matched one or more times.
A question mark (?) indicates that the preceding item is matched zero or one times.
You can use parentheses to group multiple expressions into a single item. For example, (abc)+ matches abc, abcabc, abcabcabc, etc. Nesting of parentheses is not supported.
6.3.3 Example Include/Exclude Files
Example 6-1 Example 1
  # Exclude users whose names start with TEMP
  EXCLUDE
      CLASS Logonid
          LID=TEMP.*
      ENDCLASS
  ENDEXCLUDE
Example 6-2 Example 2
  # Exclude USERA and USERB
  # Because attribute rules are ANDed, these must be in separate
  # CLASS sections.
  EXCLUDE
      CLASS Logonid
          LID=USERA
      ENDCLASS
      CLASS Logonid
          LID=USERB
      ENDCLASS
  ENDEXCLUDE
6.4 Managing Additional Attributes
You can add additional attributes to the driver for both the Publisher and Subscriber channels. These attributes can be accessed by the REXX execs for all event types.
To publish or subscribe to additional attributes, you must add them to the filter and add support for them into the REXX execs.
6.4.1 Modifying the Filter
-
On the iManager page for the driver, click the icon on either the Publisher or Subscriber channel. It is the same object.
-
In the dialog box, click the class containing the attribute to be added.
-
Click , then select the attribute from the list.
-
Select the flow of this attribute for the Publisher and Subscriber channels.
-
Synchronize: Changes to this object are reported and automatically synchronized.
-
Ignore: Changes to this object are not reported and not automatically synchronized.
-
Notify: Changes to this object are reported, but not automatically synchronized.
-
Reset: Resets the object value to the value specified by the opposite channel. (You can set this value on either the Publisher or Subscriber channel, but not both.)
-
-
Click .
If you want to map this attribute to an existing attribute in the connected system schema file, modify the Schema Mapping policy for the driver.
For complete details about managing filters and Schema Mapping policies, see the Identity Manager 4.7 Documentation Web site.
7.0 Using the ACF2 Driver
This section provides information about operational tasks commonly used with the Identity Manager 4.7 driver for ACF2.
Topics include
7.1 Starting and Stopping the Driver
To start the driver:
-
In iManager, navigate to the Driver Overview for the driver.
-
Click the upper right corner of the driver icon.
-
Click .
To stop the driver:
-
In iManager, navigate to the Driver Overview for the driver.
-
Click the upper right corner of the driver icon.
-
Click .
7.2 Starting and Stopping the Change Log Started Task
The change log started task must be run on each system that shares the security system database.
To start the change log started task, issue the following operator command:
START LDXLOGR
To stop the change log started task, issue the following operator command:
STOP LDXLOGR
7.3 Starting and Stopping the Driver Shim Started Task
The driver shim started task must be run on only one system that shares the security system database.
To start the driver shim started task, issue the following operator command:
START ACF2DRV
To stop the driver shim started task, issue the following operator command:
STOP ACF2DRV
7.4 Displaying Driver Shim Status
To see status, version and statistic information for the driver shim, issue the following operator command:
MODIFY ACF2DRV,APPL=STATUS
You can use the LDXSERV TSO command to display information about the Publisher channel event subsystem. Enter the following TSO command:
LDXSERV STATUS
To use the LDXSERV command, you must include the driver load library in your STEPLIB concatenation.
7.5 Changing the Driver Shim Trace Level
To change the trace level setting for the driver shim, issue the following operator command with the desired trace level:
MODIFY ACF2DRV,APPL='CTL(desired_trace_level)'
Example 7-1 For example
MODIFY ACF2DRV,APPL='CTL(9)'
For details about the trace file and trace levels, see Section A.1.2, The Trace File.
7.6 Monitoring Driver Messages
The driver shim started task writes messages to the system operator console and the driver operational log. The driver operational log data set is defined by the DRVLOG DD statement in the ACF2DRV started task JCL.
Monitor driver activity there in the same way you monitor other key system functions. For details about the messages written by the driver, see Section B.0, System and Error Messages.
8.0 Securing the ACF2 Driver
This section describes best practices for securing the Identity Manager 4.7 driver for ACF2. Topics include
For additional information about Identity Manager security, see the NetIQ® Identity Manager 4.7 Administration Guide on the Identity Manager 4.7 Documentation Web site.
8.1 Using SSL
Enable SSL for communication between the Metadirectory engine and the driver shim on the connected system. This option is enabled by default.
If you don’t enable SSL, you are sending information, including passwords, in the clear.
8.2 Auditing
Track changes to sensitive information. Examine audit logs periodically.
For details about using NetIQ Audit to monitor driver operation, see the NetIQ Audit Documentation Web site.
For details about auditing ACF2, see your ACF2 Auditor Guide.
8.3 Driver Security Certificates
SSL uses security certificates to control, encrypt, and authenticate communications.
Ensure that the security certificate directory /opt/novell/acf2drv/keys is appropriately protected. The installation program sets secure file permissions for this directory.
The Driver Shim and the Identity Manager engine communicate through SSL using a certificate created in the Identity Vault and retrieved by the driver shim during the installation process. For more information on this certificate and how to renew or install third-party certificates, refer to the Identity Manager Administration Guide.
The Embedded Remote Loader web interface uses a dynamically generated, self-signed certificate for SSL communication. The details of this certificate are as follows:
Table 8-1 Security Certificate Details
|
Property Name |
Values / Parameters |
|---|---|
|
Subject |
SSL Server |
|
Issuer |
SSL Server |
|
Validity |
1 year |
|
Serial Number |
0 |
|
Key |
1024-bit RSA |
Renewal of this certificate automatically occurs when the Driver Shim is restarted on the connected platform.
8.4 Driver REXX Execs
The driver uses REXX execs to perform updates on the connected system and to collect changes made there.
Ensure that the driver REXX exec library is appropriately protected.
8.5 The Change Log
The change log data set contains information about events on the connected system, including passwords. It is encrypted, but it should be protected against access by unauthorized users.
Ensure that the change log data set is appropriately protected.
8.6 Driver Passwords
Use strong passwords for the Driver object and Remote Loader passwords, and restrict knowledge of them to authorized personnel. These passwords are stored in encrypted form in the security certificate directory /opt/novell/acf2drv/keys. The installation program sets secure file permissions for this directory. These passwords should be changed periodically.
8.7 Driver Code
Ensure that the driver load library is appropriately protected.
Do not put the driver load library in the linklist unless you use program protection to secure its contents against unauthorized use.
8.8 Administrative Users
Ensure that accounts with elevated rights on the Metadirectory system, Identity Vault systems, and the connected systems are appropriately secure. Protect administrative user IDs with strong passwords.
8.9 Connected Systems
Ensure that connected systems can be trusted with account information, including passwords, for the portion of the tree that is configured as their base containers.
A.0 Troubleshooting
This section provides information about troubleshooting the Identity Manager 4.7 driver for ACF2. Topics include
A.1 Driver Status and Diagnostic Files
There are several log files that you can view to examine driver operation.
A.1.1 The System Log
SYSLOG is used by the driver shim to record urgent, informational, and debug messages. Examining these should be foremost in your troubleshooting efforts. For detailed message documentation, see Section B.0, System and Error Messages.
A.1.2 The Trace File
The default trace file exists on the connected system at /opt/novell/acf2drv/logs/trace.log. A large amount of debug information can be written to this file. Use the trace level setting in the driver shim configuration file to control what is written to the file. For details about the driver shim configuration file, see Section 5.1, The Driver Shim Configuration File.
Table A-1 Driver Shim Trace Levels
|
Trace Level |
Description |
|---|---|
|
0 |
No debugging. |
|
1–3 |
Identity Manager messages. Higher trace levels provide more detail. |
|
4 |
Previous level plus Remote Loader, driver, driver shim, and driver connection messages. |
|
5–7 |
Previous level plus change log and loopback messages. Higher trace levels provide more detail. |
|
8 |
Previous level plus driver status log, driver parameters, driver security, driver Web server, driver schema, driver encryption, and driver include/exclude file messages. |
|
9 |
Previous level plus low-level networking and operating system messages. |
|
10 |
Previous level plus maximum low-level program details (all options). |
The following is an example of the driver shim configuration file line to set the trace level:
-trace 9
To view the trace file:
-
Use a Web browser to access the driver shim at https://driver-address:8091. Substitute the DNS name or IP address of your driver for driver-address.
-
Authenticate by using any user name and the password that you specified as the Remote Loader password.
-
Click .
A.1.3 The REXX Exec Output File
Output from the REXX execs is written to ddname SYSTSPRT of the driver shim started task. This file captures the standard error output from all execs executed by the driver shim.
A.1.4 DSTRACE
You can view Identity Manager information using the DSTRACE facility on the Metadirectory server. Use iManager to set the tracing level. For example, trace level 2 shows Identity Vault events in XML documents, and trace level 5 shows the results of policy execution. Because a high volume of trace output is produced, it is recommended that you capture the trace output to a file. For details about using DSTRACE, see the NetIQ® Identity Manager 4.7 Administration Guide on the Identity Manager 4.7 Documentation Web site.
A.1.5 The Status Log
The status log is a condensed summary of the events that have been recorded on the Subscriber and Publisher channels. This file exists on the connected system at /opt/novell/acf2drv/logs/dirxml.log. You can also view the status log in iManager on the Driver Overview page. You can change the log level to specify what types of events to log. For details about using the status log, see the NetIQ Identity Manager 4.7 Administration Guide on the Identity Manager 4.7 Documentation Web site.
To view the status log:
-
Use a Web browser to access the driver shim at https://driver-address:8091. Substitute the DNS name or IP address of your driver for driver-address.
-
Authenticate by using any user name and the password that you specified as the Remote Loader password.
-
Click .
A.1.6 The Operational Log
The operational log contains both important and informational messages that indicate the operational status of the driver shim. These messages indicate items that are not urgent enough to warrant operator response, but useful for tracking the progress of the driver. The location of the operational log is specified by the DRVLOG DD statement in the driver shim started task JCL.
A.1.7 Change Log Started Task Message Log
The change log started task writes important and informational messages to ddname SYSPRINT.
A.2 Troubleshooting Common Problems
-
Section A.2.5, Users Are Not Provisioned to the Connected System
-
Section A.2.6, Users Are Not Provisioned to the Identity Vault
-
Section A.2.7, Identity Vault User Passwords Are Not Provisioned to the Connected System
-
Section A.2.8, Connected System User Passwords Are Not Provisioned to the Identity Vault
-
Section A.2.9, Users Are Not Modified, Deleted, Renamed, or Moved
A.2.1 Driver Shim Installation Failure
Ensure that you use binary mode to FTP the driver samples library, load library, and REXX exec library XMT files to the target system.
A.2.2 Driver Certificate Setup Failure
To set up certificates, the driver shim communicates with the Metadirectory server using the LDAP secure port (636).
-
Ensure that eDirectory™ is running LDAP with SSL enabled. For details about configuring eDirectory, see the NetIQ eDirectory Administration Guide.
-
Ensure that the connected system has network connectivity to the Metadirectory server.
You can use the driver REXX exec library member SETCERT to configure the certificate at any time.
If you cannot configure SSL using LDAP, you can install the certificate manually.
-
In iManager, browse the Security container to locate your tree’s certificate authority (typically named treeName CA).
-
Click the certificate authority object.
-
Click .
-
Select the tab.
-
Click .
-
Click .
-
Select to export the certificate without the private key, then click .
-
Select , then click .
-
Click , then specify a location to save the file.
-
Use FTP or another method to store the file on the connected system as /opt/novell/acf2drv/keys/ca.pem.
A.2.3 Driver Start Failure
-
Examine the status log and DSTRACE output.
-
The driver must be specified as a Remote Loader driver. You can set this option in the iManager Driver Edit Properties window.
-
You must activate both Identity Manager and the driver within 90 days. The Driver Set Overview page in iManager shows when Identity Manager requires activation. The Driver Overview page shows when the driver requires activation.
For details about activating NetIQ Identity Manager Products, see the Identity Manager 4.7 Installation Guide on the Identity Manager 4.7 Documentation Web site .
-
Ensure that the driver load library is APF-authorized.
You can use the DISPLAY PROG,APF operator command to display your APF-authorized libraries.
-
Ensure that the LDXSERV and SAFQUERY commands are listed as authorized TSO commands in your active IKJTSOxx member.
You can use the DISPLAY IKJTSO,AUTHCMD operator command to display authorized TSO commands.
For more information about troubleshooting Identity Manager engine errors, see the Identity Manager 4.7 Documentation Web site.
A.2.4 Driver Shim Startup or Communication Failure
-
Examine the trace file.
-
Ensure that the connected system’s operating system and security system versions are supported. For a list of supported operating systems, see Connected System Requirements.
-
Apply all maintenance for your operating system and security system.
-
Ensure that the Remote Loader and Driver object passwords that you specified while setting up the driver on the Metadirectory server match the passwords stored with the driver shim.
To update these passwords on the connected system, use the SETPWDS REXX exec. The passwords are stored under /opt/novell/acf2drv/keys in encrypted files dpwdlf40 (Driver object password) and lpwdlf40 (Remote Loader password).
To update these passwords on the Metadirectory server, use iManager to update the driver configuration.
-
Ensure that the correct host name and port number of the connected system are specified in the Driver Configuration Remote Loader connection parameters. You can change the port number (default 8090) in the driver shim configuration file.
-
Ensure that the driver shim started task has been set up properly. For details, see Setting Up the Started Tasks.
-
Ensure that only one system in a complex that shares the security system database is running the driver shim started task.
A.2.5 Users Are Not Provisioned to the Connected System
-
Examine the status log, DSTRACE output, trace file, and REXX exec output file.
-
To be provisioned, users must be in the appropriate base container. You can view and change the base containers in iManager on the Global Configuration Values page of the Driver Edit Properties window.
-
To provision identities from the Identity Vault to the connected system, the driver Data Flow property must be set to Bidirectional or Identity Vault to Application. To change this value, re-import the driver rules file over your existing driver.
-
The user that the driver is security equivalent to must have rights to read information from the base container. For details about the rights required, see Table 2-2, Base Container Rights Required by the Driver Security-Equivalent User.
A.2.6 Users Are Not Provisioned to the Identity Vault
-
Examine the status log, DSTRACE output, and trace file.
-
Examine the GCV values.
-
To provision identities from the connected system to the Identity Vault, the driver Data Flow property must be set to Bidirectional or Application to Identity Vault. To change this value, re-import the driver rules file over your existing driver.
-
The user that the driver is security equivalent to must have rights to update the base container. For details about the rights required, see Table 2-2, Base Container Rights Required by the Driver Security-Equivalent User.
-
Ensure that the security system exit has been installed, that LLA has been refreshed, and that the exit has been activated. For details, see Section 3.6.8, Installing the Driver Security System Exits.
A.2.7 Identity Vault User Passwords Are Not Provisioned to the Connected System
-
Examine the status log, DSTRACE output, and REXX exec output file.
-
Several password management properties are available in iManager on the Global Configuration Values page of the Driver Edit Properties window. Ensure that the connected system accepts passwords from the Identity Vault. To determine the right settings for your environment, view the help for the options, or see the NetIQ Identity Manager 4.7 Administration Guide on the Identity Manager 4.7 Documentation Web site.
-
Ensure that the user’s container has an assigned Universal Password policy and that the option is set for this policy.
A.2.8 Connected System User Passwords Are Not Provisioned to the Identity Vault
-
Examine the status log, DSTRACE output, and the trace file.
-
Several password management properties are available in iManager on the Global Configuration Values page of the Driver Edit Properties window. Ensure that at least one of the following options is set:
To determine the right settings for your environment, view the help for the options, or see the NetIQ Identity Manager 4.7 Administration Guide on the Identity Manager 4.7 Documentation Web site.
-
-
If the GCV is set, the user’s password must satisfy the password rules in the password policy assigned to the user container.
-
Ensure that the change log started task is running on all systems that share the security system database.
-
Ensure that the security system exit has been installed, that LLA has been refreshed, and that the exit has been activated. For details, see Section 3.6.8, Installing the Driver Security System Exits.
A.2.9 Users Are Not Modified, Deleted, Renamed, or Moved
-
Examine the status log, DSTRACE output, trace file, and REXX exec output file.
-
Examine the driver Data Flow setting to verify the authoritative source for identities.
-
Identity Vault and connected system identities must be associated before events are synchronized. To view an identity’s associations, use Modify User/Group in iManager and click the tab. You can migrate identities to establish associations. For details, see Section 5.3, Migrating Identities.
-
Identity Vault move events can remove the identity from the base container monitored by the driver to a container that is not monitored by the driver. This makes the move appear to be a delete.
-
Moving a user is not supported by ACF2.
A.2.10 Change Log Errors
-
Examine the change log started task messages.
-
Ensure that the change log started task is running on all systems that share the security system database.
-
Ensure that the change log started task has been set up properly. For details, see Setting Up the Started Tasks.
-
Ensure that you initialized the change log data set during installation. For details about initializing the change log data set, see Section 3.6.4, Allocating and Initializing the Change Log Data Set.
-
You can use the LDXSERV TSO command to display information about the change log data set. Enter the following TSO command:
LDXSERV STATUS
To use the LDXSERV command, you must include the driver load library in your STEPLIB concatenation.
B.0 System and Error Messages
Components of the Identity Manager 4.7 driver for ACF2 write messages to report operational status and problems. For detailed troubleshooting information, see Section A.0, Troubleshooting.
Each message begins with a code of 3-6 characters associated with the driver component that generated the message. Use this code to find message information quickly as follows:
B.1 CFG Messages
Messages beginning with CFG are issued by configuration file processing.
CFG001E Could not open configuration file filename.
CFG002E Error parsing configuration file line: <configline>.
CFG003W Configuration file line was ignored. No matching statement name found: <configline>.
CFG004E Error parsing configuration file line. No statement name was found: <configLine>.
CFG005E A required statement statement_id is missing from the configuration file.
B.2 DOM Messages
Messages beginning with DOM are issued by driver components as they communicate among themselves.
DOM0001W XML parser error encountered: errorString.
B.3 DRVCOM Messages
Messages beginning with DRVCOM are issued by the include/exclude system.
DRVCOM000I nameversion Copyright 2005 Omnibond Systems, LLC. ID=code_id_string.
DRVCOM001W Invalid include/exclude CLASS statement.
DRVCOM002D An include/exclude Rule was added for class: class.
DRVCOM003D An include/exclude Association Rule was added for association association.
B.4 HES Messages
Messages beginning with HES are issued by driver components as they use HTTP to communicate.
HES001E Unable to initialize the HTTP client.
HES002I Connecting to host host_name on port port_number.
HES003W SSL communications have an incorrect certificate. rc = rc.
B.5 LDX0 Messages
Messages beginning with LDX0 are issued by the driver security system exit modules LIDPOST and LDXNPIXT, the LDXSERV command and the ACF2DRV started task.
LDX0001E There are old events on the LDX queue. Ensure that LDXLOGR is started.
LDX0002I Unexpected RC xxxxxxxx during token processing routine.
LDX0103E Unable to parse command line.
LDX0105E Internal error: description.
LDX0106E Unable to open the log file.
LDX0107E No preallocated log file and no valid environment.
LDX0108E No preallocated log file and logger is not active.
LDX0109E Dynamic allocation failed for log file dsname, s99rc=rc, s99error=err.
Dynamic allocation return codes and reason codes are documented in the IBM publication z/OS Programming: Authorized Assembler Services Guide.
B.6 LDXL Messages
Messages beginning with LDXL are issued by the change log started task.
LDXL000 LOGGING STARTED AT hh:mm:ss ON mm/dd/yyyy.
LDXL001 MESSAGE LOG DISABLED, SYSPRINT DD MISSING.
The change log started task continues processing, but no messages are written to SYSPRINT.
LDXL002 EXECUTE STATEMENT PARAMETERS: parm-values.
LDXL003 START COMMAND PARAMETERS: parameters.
LDXL004 STOP COMMAND RECEIVED.
LDXL005 MODIFY COMMAND PARAMETERS: parameters.
LDXL006 UNRECOGNIZED CIBVERB TYPE: X'hh', COMMAND IGNORED.
LDXL007 OPERATOR CANCEL DETECTED, ATTEMPTING NORMAL SHUTDOWN.
LDXL008 EVENT TRACING ENABLED.
Event tracing is turned on.
LDXL009 EVENT TRACING DISABLED.
Event tracing is turned off.
LDXL010 MODIFY COMMAND IGNORED, INVALID OR MISSING PARAMETERS.
The MODIFY command is ignored.
LDXL011 EVENT RC(rc) DATA: event_data.
The return code from ProcessEvent is rc. The content of the event record is event_data.
Processing continues.
LDXL012 TERMINATING BECAUSE LOGGING ALREADY ACTIVE.
This instance of the change log started task terminates.
To detect this condition, the change log started task enqueues exclusively on qname ldxlogr, rname #LDXENVIRONTOKEN when it initializes. If the ENQ macro fails, this message is issued. The change log started task dequeues this resource on shutdown.
LDXL013 LOGGING TO DATASET: dsname.
LDXL999 LOGGING ENDED AT hh:mm:ss ON mm/dd/yyyy.
B.7 LDXS Messages
Messages beginning with LDXS are issued by the driver shim change log API.
LDXS000I nameversion Copyright 2006 Omnibond Systems, LLC. ID=code_id_string.
LDXS001A Error executing script scriptName. The return code is returnCode, the reason code is reasonCode, the abend code is abendCode.
LDXS002A The change log service startup failed, rc = rc.
LDXS003A Unable to create token, return code from IEANTCR is rc.
B.8 LDXU Messages
Messages beginning with LDXU are issued by the log file utility LDXUTIL.
LDXU000I Log File Utility started on mm/dd/yyyy at hh:mm:ss.
LDXU001W Message log disabled, SYSPRINT DD missing.
LDXU002I Execute statement parameters: parm-values.
LDXU003E Open failed for log file.
LDXU004I Log file blocksize: blksize.
LDXU005I Log file blocks written: block-count.
LDXU006E Open failed for LOADIN file.
LDXU007E Unrecognized or missing execute statement parameter.
Processing ends.
-
INITIALIZE
-
DUMP
-
LOAD
LDXU008I Log file events loaded: event-count.
LDXU009E Add event failed, error code code.
LDXU010E Read header failed, error code code.
LDXU011E Read event failed, error code code.
LDXU990I Open BDAM log succeeded.
LDXU991E Open BDAM log failed.
LDXU999I Log File Utility ended on mm/dd/yyyy at hh:mm:ss.
B.9 LDXV Messages
Messages beginning with LDXV are issued by the IDMGETV and IDMSETV commands.
LDXV001E IDM token not present.
LDXV002E Unable to parse command.
LDXV003E Error from TSO service routine IKJCT441, RC <rc>.
LDXV004W <variablename> contains invalid characters to be a REXX variable.
|
Alphanumeric characters |
A–Z, a–z, 0–9 |
|
“At” sign |
@ |
|
Octothorpe |
# |
|
“Dollar” sign |
$ |
|
Exclamation mark |
! |
|
Question mark |
? |
|
Period |
. |
|
Underscore |
_ |
LDXV005E IDMGETV was not called from a CLIST or REXX exec.
LDXV006E GROUP or USER list required.
LDXV007E GROUP and USER operands are mutually exclusive.
LDXV008E Error returned from <service>: RC <rc>.
B.10 LWS Messages
Messages beginning with LWS are issued by the integrated HTTP server.
LWS0001I Server has been initialized.
LWS0002I All services are now active.
LWS0003I Server shut down successfully.
LWS0004W Server shut down with warnings.
LWS0005E Server shut down with errors.
LWS0006I Starting service.
LWS0007E Failed to start service.
LWS0008I Stopping all services.
LWS0009I Local host is host_name (IP_address).
LWS0010I Local host is IP_address.
LWS0011I Server is now processing client requests.
LWS0012I service is now active on port number.
LWS0013I service is now inactive on port number.
LWS0014E An error was encountered while parsing execution parameters.
LWS0015E service failed to start with error number.
LWS0020I Server version level: level.
LWS0023I Listen port number is already in use.
LWS0024W Too many retries to obtain port number.
LWS0025I Local TCP/IP stack is down.
LWS0026E Unrecoverable TCP/IP error number returned from internal_function_name.
LWS0027W Listen socket was dropped for port number.
LWS0028E Unable to reestablish listen socket on port number.
LWS0029I <id> Client request started from ip_address on port number.
LWS0030I <id> Client request started from host (ip_address) on port number.
LWS0031W Unable to stop task id: reason.
LWS0032I <id> Client request has ended.
LWS0033I <id> Client request: resource.
LWS0034W <id> Write operation for client data has failed.
LWS0035W <id> Read operation for client data has timed out.
LWS0036W <id> Client request error: error_code - error_text.
LWS0037W <id> Client request error: code.
LWS0038I Received command: command_text.
LWS0043E Task id ended abnormally with RC=retcode.
LWS0045I Idle session time-out is number seconds.
LWS0046I Maximum concurrent sessions limited to number.
LWS0047W Unable to delete log file filename.
LWS0048I Log file filename successfully deleted.
LWS0049E Error error authenticating to the directory as fdn.
LWS0050E Server application initialization failure was detected.
LWS0051E Server initialization failure was detected.
LWS0052W This server is terminating because of another instance already running (details).
LWS0053I The parameter keyword is no longer supported.
LWS0054I The execution parameter keyword is in effect.
LWS0055W Invalid execution parameter detected: keyword.
LWS0056I Not accepting new connections because of the MAXCONN limit. There are number active connections now for service.
LWS0057I New connections are now being accepted for service.
LWS0058I Listen socket on port number has been re-established.
LWS0059W Server is terminating because the required service serviceName is ending.
B.11 NET Messages
Messages beginning with NET are issued by driver components during verification of SSL certificates.
NET001W Certificate verification failed. Result is result.
B.12 RDXML Messages
Messages beginning with RDXML are issued by the embedded Remote Loader.
RDXML000I nameversion Copyright 2005 Omnibond Systems, LLC. ID=code_id_string.
RDXML001I Client connection established.
RDXML002I Request issued to start Driver Shim.
RDXML003E An unrecognized command was issued. The driver shim is shutting down.
RDXML004I Client Disconnected.
RDXML005W Unable to establish client connection.
RDXML006E Error in Remote Loader Handshake.
RDXML007I Driver Shim has successfully started and is ready to process events.
RDXML008W Unable to establish client connection from remoteName.
RDXML009I Client connection established from remoteName.
C.0 Technical Details
Topics in this section include
C.1 Driver Shim Command Line Options
The following options can be specified on the driver shim command line. You can also specify driver shim configuration file statements as command line options. For details about the driver shim configuration file, see Section 5.1, The Driver Shim Configuration File.
C.1.1 Options Used to Set Up Driver Shim SSL Certificates
The following command line options are used to set up the driver shim SSL certificates:
Table C-1 Driver Shim Command Line Options for Setting Up SSL Certificates
|
Option (Short and Long Forms) |
Description |
|---|---|
|
-s -secure |
Secures the driver by creating SSL certificates, then exits. |
|
-p -password |
Specifies the Remote Loader password. |
C.1.2 Other Options
Table C-2 Other Driver Shim Command Line Options
|
Option (Short and Long Forms) |
Description |
|---|---|
|
-c <congFile> -config <configFile> |
Instructs the driver shim to read options from the specified configuration file. Options are read from ddname DRVCONF by default. |
|
-? -help |
Displays the command line options, then exits. |
|
-v -version |
Displays the driver shim version and build date, then exits. |
C.2 ACFQUERY Tool
The driver query processor uses the ACF2 API to retrieve information from the security system. Queries are used by the Metadirectory engine for matching and merging. The TSO command, ACFQUERY, is used to extract information from the ACF2 database. ACFQUERY has the following format for read operations:
  ACFQUERY SCOPE(entry) CLASS(class) ASSOCIATION(association)
    [READATTRS(attrs...)|ALLREADATTRS] [PRINT]
The SCOPE tells ACFQUERY that information about a specific profile is being requested. The CLASS operand should always be set 'Logonid'. The ASSOCIATION operand specifies the association of the object to read. For Logonid profiles, simply use the LID field for association values. READATTRS operand specifies a list of attributes to return; optionally, you may specify ALLREADATTRS instead to return everything. The PRINT operand instructs ACFQUERY to print the results to the display. The output is a series of lines, each with a name=value pair. These pairs are interpreted by the driver shim to create an appropriate XDS document that the engine can use for processing. For example:
  ACFQUERY SCOPE(entry) CLASS(Logonid) ASSOCIATION(IBMUSER)
     READATTRS(ACCOUNT)PRINT
  COMMAND=instance
  CLASS_NAME=Logonid
  ASSOCIATION=IBMUSER
  ATTR_ACCOUNT=true
  COMMAND=status
  STATUS_LEVEL=success
For search operations, a search criteria is specified:
  ACFQUERY SCOPE(subtree) SEARCHCLASSES(classes..) SEARCHATTRS('attr=value' ...)
    [READATTRS(attrs...)|ALLREADATTRS] [PRINT]
The subtree SCOPE tells ACFQUERY that information about a specific profile is being requested. The SEARCHCLASSES operand lists the class(es) of interest. The SEARCHATTRS provides a list of values and attributes to search on. For example:
  ACFQUERY SCOPE(subtree) SEARCHCLASSES(Logonid)
    SEARCHATTRS('ACCOUNT=true') PRINT

  COMMAND=instance
  CLASS-NAME=Logonid
  ASSOCIATION=ASCH
  COMMAND=instance
  CLASS_NAME=Logonid
  ASSOCIATION=CICSA
  COMMAND=instance
  CLASS_NAME=Logonid
  ASSOCIATION=CICSTART
  COMMAND=status
  STATUS_LEVEL=success
You will notice that there are multiple results returned. Search operations may return zero or more responses.
C.3 LDXSERV Tool
LDXSERV is a TSO command tool that serves several functions. For the driver shim, it allows the started task to set a loopback token in its address space memory in order to prevent the Exit routines from logging its activity to the change log. From the user's perspective, LDXSERV can be used as a verification tool to investigate whether the Exits are in place correctly. It can also be used to query information from the change log queue and even modify the queue, if necessary.
The syntax for LDXSERV is as follows:
LDXSERV < STATUS | GETNEXT | [MARKDONE <EVENT(event-id)>] >
C.3.1 STATUS
The STATUS operand reports back to the user an XML document describing the installed Event Subsystem. It provides several pieces of information, including the build date and version of each component, the state of each Exit, the number of events queued through each Exit, and the size and location of the log file.
  ldxserv status
  <ldx>
    <source>
      <product build="20171217" instance="ldxserv" version="4.70">
        Novell IDM ACF2 Driver Version 4.0.4.0
      </product>
      <contact>NetIQ Corporation</contact>
    </source>
    <output>
      <status level="success">
        <exit name="LDXNPXIT" state="enabled" version="4.70" build-date="20171217"
          times-called="584" events-queued="2" info="ok"/>
        <exit name="LDXEVX01" state="enabled" version="4.70" build-date="20171217"
          times-called="20" events-queued="7" info="ok"/>
        <queue version="4.70" state="active" created-by="LDXNPXIT" entries="0"/>
        <logger version="4.70" state="active" taskid="LDXLOGRP"
          logfilename="LDX.LOGFILE"/>
        <logfile name="LDX.LOGFILE" state="0% used"/>
      </status>
    </output>
  </ldx>
C.3.2 GETNEXT
The GETNEXT operand reports back to the user an XML document describing the first event in the change log queue. Inside the XML document, you may view the type of event and details about the event, including the user that issued the event, the date and time of the event.
  ldxserv getnext
  <ldx>
    <source>
      <product build="20171217" instance="ldxserv" version="4.70">
        Novell IDM ACF2 Driver Version 4.0.4.0
      </product>
      <contact>NetIQ Corporation</contact>
    </source>
    <output>
      <modify-password date="2012-10-01" time=" 7:18" event-id="7006">
        <association>JAVIER</association>
        <password>********</password>
      </modify-password>
      <status level="success">
        <description>ok</description>
      </status>
    </output>
  </ldx>
C.3.3 MARKDONE
The MARKDONE operand instructs LDXSERV to remove the event in the queue, described by the EVENTID operand. The event-id must match the event-id found by the GETNEXT command. When complete, it reports back an XML document describing the success or error of the instruction.
  ldxserv markdone event(7006)
  <ldx>
    <source>
      <product build="20171217" instance="ldxserv" version="4.70">
        Novell IDM ACF2 Driver Version 4.0.4.0
      </product>
      <contact>NetIQ Corporation</contact>
    </source>
    <output>
      <status level="success">
        <description>ok</description>
      </status>
    </output>
  </ldx>
C.4 Performance Information
This section presents the results of a performance case study of the Identity Manager 4.7 driver for ACF2. The study is based on software and hardware configurations that may vary from your production deployment. Therefore, the results, which include real-time throughput and mainframe resource usage, are offered only as approximations for calculating similar measurements in your environment.
C.4.1 Configuration Information
The system on which Identity Manager was installed was a VMWare virtual machine with the following configuration:
-
Single Intel* Xeon* CPU at 2.5 GHz
-
8 GB RAM
-
SLES 10.2 x86_64
-
64-bit eDirectory 8.8 SP5 (20601.18)
-
64-bit Identity Manager 4.0.1 (4.0.1-0)
-
Single Driver Set with one driver (ACF2)
-
Engine trace level 10
The connected z/OS system running ACF2 consisted of:
-
IBM System z10 Business Class Mainframe 2098-E10 model D02
-
8 MB memory
-
z/OS 1.13
-
ACF2 with 1000 users
C.4.2 Performance Metrics
All tests in the case study used three or more of the following benchmarks:
-
Real-Time Speed
-
CPU-Time
-
EXCP-Cnt
-
Memory Usage
Real-Time Speed
This measurement describes the amount of time for a particular transaction in real seconds or milliseconds. It is useful for ascertaining how long a large migration may take or how many events per day can be processed by a particular channel in real time. Real-time measurements are helpful in previewing what to expect in a production deployment; however, they are dependent on a variety of factors, including speed of the mainframe and vault systems, size of the ACF2 database, size and layout of Identity Vault, operating systems workload, network delays, disk I/O speeds, trace levels, and customized policies.
CPU-Time
On the mainframe, CPU-Time is a measurement of the amount of CPU processing time consumed by a particular job. This figure can be used for capacity planning.
EXCP-Cnt
The EXCP-Cnt is the total number of blocks transferred for I/O requests. I/O utilization may also be used for capacity planning.
Memory Usage
Memory usage is the number of frames allocated by a running task on z/OS. Each frame represents 4096 bytes of memory. In all tests for this study, the memory recorded was the highest observed peak that occurred during transactions.
C.4.3 Idle Performance
Idle performance measures how the Driver Shim started task performs while no event transactions are being processed.
Phase Discussion
Driver Shim idle performance is measured in four phases:
-
Shim Startup
-
Shim Idle (not connected)
-
Shim Connection
-
Shim Idle (connected)
Shim Startup
When the ACF2 Driver Shim (ACF2DRV) is started, various internal tasks are created and executed to create a network listener.
Shim Idle (not connected)
This phase describes the time after the Driver Shim has been started and before the engine has established a network connection.
Shim Connection
The connection between Identity Manager and the Driver Shim uses SSL negotiations and a handshake, which involves the exchange of passwords for the remote loader and driver. Internally, two new tasks are created to read and parse data exchange and to poll the change log data set.
Shim Idle (connected)
Once a connection is established, the Driver Shim periodically polls the change log data set for any new events to publish. In addition, Identity Manager sends keep-alive packets to the Driver Shim to ensure the connection remains intact. For this case study, this phase was tested with a 5-minute publisher polling interval.
Results
Table C-3 ACF2DRV Idle Performance
|
Phase |
CPU-Time |
EXCP-Cnt |
Memory Usage |
|---|---|---|---|
|
Startup |
0.90 seconds |
890 |
1338 (5.5 MB) |
|
Idle (not connected) |
0.12 seconds/hour |
0/hour |
1338 (5.9 MB) |
|
Connection |
1.55 seconds |
40 |
1935 (7.9 MB) |
|
Idle (connected) |
0.6 seconds/hour |
12/hour |
1935 (7.9 MB) |
NOTE:The polling interval will affect the results for the Idle (connected) phase. For this study, the polling interval was set to 300 seconds (or 5 minutes) and the driver heartbeat was disabled.
Table C-4 LDXLOGR (LDXLOGRP) Idle Performance
|
Phase |
CU-Time |
EXCP-Cnt |
Memory Usage |
|---|---|---|---|
|
Startup |
0.03 seconds |
8 |
279 (1.1 MB) |
|
Idle |
0.04 seconds/hour |
0/hour |
283 (1.2 MB) |
C.4.4 Subscriber Performance
The Subscriber channel processes events originating in Identity Manager that need to be replicated in the ACF2 database. In this study, all ACF2 rules and packages were applied with 1000 events were timed for each use case and the results were averaged across all 1000 events. Six event types were included:
-
Add User - A new user in Identity Manager is replicated on the connected system using the minimum required fields
-
Modify User - A change to a user in Identity Manager causes a change to that user’s REVOKE field in ACF2
-
Delete User - A user’s deletion in Identity Manager causes that user’s deletion in ACF2
-
Change Password - A user’s new password in Identity Manager is replicated in ACF2
-
Entry Query User - Identity Manager queries a user in ACF2 and reads its NAME field
-
Search Query User - Identity Manager queries ACF2 with a search on the NAME field
Each test was run both with and without the REXX extensions. When the Driver Shim invokes the REXX scripts to execute commands, additional CPU, Time and I/O are consumed to accomplish the task. However, using REXX allows you to customize the provisioning process with native z/OS policy decisions.
Table C-5 ACF2DRV Performance Per Transaction
|
Event |
CPU-Time |
EXCP-Cnt |
Memory Usage |
Real Time |
|---|---|---|---|---|
|
Add User |
1.16 seconds |
216 |
2900 (11.9 MB) |
2.02 seconds |
|
Modify User |
0.48 seconds |
181 |
2200 (9.0 MB) |
1.11 seconds |
|
Delete User |
0.79 seconds |
287 |
2043 (8.4 MB) |
1.66 seconds |
|
Change Password |
0.74 seconds |
399 |
2008 (8.2 MB) |
0.79 seconds |
|
Entry Query User |
0.27 seconds |
93 |
2008 (8.2 MB) |
1.00 seconds |
|
Search Query User |
1.16 seconds |
3264 |
2023 (8.3 MB) |
3.04 seconds |
C.4.5 Publisher Performance
The Publisher channel processes events originating in the connected system’s ACF2 database that need to be replicated in the Identity Vault. In this study, 1000 events were timed for each use case and the results were averaged across all 1000 events. Five event types were included:
-
Add User - A new user created in ACF2 with minimum required fields is replicated in Identity Manager
-
Add Group - A new group created in ACF2 with minimum required fields is replicated in Identity Manager
-
Modify User - A change to a user’s REVOKE field in ACF2 causes a change to that user’s account in Identity Manager
-
Delete User - A user deleted in ACF2 causes that user’s deletion in Identity Manager
-
Change Password - A user’s new password in ACF2 is replicated in Identity Manager
For each test, a CLIST containing the commands for each event type, was executed against ACF2. To gain accurate samples, measurements were taken in steps:
-
First, LDXLOGR was started to move the events from cross memory to the change log.
-
Then the CLIST was executed to begin queueing commands and changes. This implies that the performance of the LDXLOGR during this phase was in contention with the actual ACF2 commands being executed by ACF2.
-
Finally, the Drive Shim (ACF2DRV) was started to fetch each event and publish to the Identity Vault. Default matching rules and placement policies were used.
When LDXLOGRP (monitored on the mainframe as LDXLOGRP) is not bottlenecked by ACF2 and started after the cross memory queue is populated with events, the CPU-Time and Real Time performance is more efficient. This is demonstrated by the bulk processing results in Table C-7.
Table C-6 LDXLOGR (LDXLOGRP) Performance Per Transaction (Individual Processing)
|
Event |
CPU-Time |
EXCP-Cnt |
Memory Usage |
Real Time |
|---|---|---|---|---|
|
Add User |
0.002 seconds |
5 |
285 (1.2 MB) |
0.18 seconds |
|
Add Group |
0.002 seconds |
5 |
285 (1.2 MB) |
0.18 seconds |
|
Modify User |
0.002 seconds |
5 |
285 (1.2 MB) |
0.18 seconds |
|
Delete User |
0.002 seconds |
5 |
285 (1.2 MB) |
0.18 seconds |
|
Change Password |
0.002 seconds |
5 |
285 (1.2 MB) |
0.18 seconds |
Table C-7 LDXLOGR (LDXLOGRP) Performance Per Transaction (Bulk Processing)
|
Event |
CPU-Time |
EXCP-Cnt |
Memory Usage |
Real Time |
|---|---|---|---|---|
|
Add User |
0.001 seconds |
5 |
285 (1.2 MB) |
0.003 seconds |
|
Add Group |
0.001 seconds |
5 |
285 (1.2 MB) |
0.003 seconds |
|
Modify User |
0.001 seconds |
5 |
285 (1.2 MB) |
0.003 seconds |
|
Delete User |
0.001 seconds |
5 |
285 (1.2 MB) |
0.003 seconds |
|
Change Password |
0.001 seconds |
5 |
285 (1.2 MB) |
0.003 seconds |
Table C-8 ACF2DRV Performance Per Transaction
|
Event |
CPU-Time |
EXCP-Cnt |
Memory Usage |
Real Time |
|---|---|---|---|---|
|
Add User |
0.027 seconds |
7 |
1977 (8.1 MB) |
0.14 seconds |
|
Add Group |
0.023 seconds |
7 |
1976 (8.1 MB) |
0.12 seconds |
|
Modify User |
0.022 seconds |
7 |
1977 (8.1 MB) |
0.10 seconds |
|
Delete User |
0.022 seconds |
7 |
1977 (8.1 MB) |
0.10 seconds |
|
Change Password |
0.027 seconds |
7 |
1975 (8.1 MB) |
0.14 seconds |
C.5 Default ACF2 Schema
The default schema for the ACF2 Driver uses the installation default Logonid record supplied by CA. Table C-9 lists each field and its syntax.
Table C-9 ACF2 Schema
|
eDirectory Attribute |
ACF2 Field |
Syntax |
|---|---|---|
|
DirXML-ACF2-ACC-CNT |
ACC-CNT |
INTEGER |
|
DirXML-ACF2-ACC-DATE |
ACC-DATE |
STRING |
|
DirXML-ACF2-ACC-SRCE |
ACC-SRCE |
STRING |
|
DirXML-ACF2-ACC-TIME |
ACC-TIME |
STRING |
|
DirXML-ACF2-ACCOUNT |
ACCOUNT |
STATE |
|
DirXML-ACF2-ACCTPRIV |
ACCTPRIV |
STATE |
|
DirXML-ACF2-ACF2CICS |
ACF2CICS |
STATE |
|
DirXML-ACF2-ACTIVE |
ACTIVE |
STRING |
|
DirXML-ACF2-ALLCMDS |
ALLCMDS |
STATE |
|
DirXML-ACF2-ATTR2 |
ATTR2 |
STRING |
|
DirXML-ACF2-AUDIT |
AUDIT |
STATE |
|
DirXML-ACF2-AUTHSUP1 |
AUTHSUP1 |
STATE |
|
DirXML-ACF2-AUTHSUP2 |
AUTHSUP2 |
STATE |
|
DirXML-ACF2-AUTHSUP3 |
AUTHSUP3 |
STATE |
|
DirXML-ACF2-AUTHSUP4 |
AUTHSUP4 |
STATE |
|
DirXML-ACF2-AUTHSUP5 |
AUTHSUP5 |
STATE |
|
DirXML-ACF2-AUTHSUP6 |
AUTHSUP6 |
STATE |
|
DirXML-ACF2-AUTHSUP7 |
AUTHSUP7 |
STATE |
|
DirXML-ACF2-AUTHSUP8 |
AUTHSUP8 |
STATE |
|
DirXML-ACF2-AUTOALL |
AUTOALL |
STATE |
|
DirXML-ACF2-AUTODUMP |
AUTODUMP |
STATE |
|
DirXML-ACF2-AUTONOPW |
AUTONOPW |
STATE |
|
DirXML-ACF2-AUTOONLY |
AUTOONLY |
STATE |
|
DirXML-ACF2-BDT |
BDT |
STATE |
|
DirXML-ACF2-CANCEL |
CANCEL |
STATE |
|
DirXML-ACF2-CHAR |
CHAR |
STRING |
|
DirXML-ACF2-CICS |
CICS |
STATE |
|
DirXML-ACF2-CICSCL |
CICSCL |
STRING |
|
DirXML-ACF2-CICSID |
CICSID |
STRING |
|
DirXML-ACF2-CICSOPT |
CICSOPT |
STRING |
|
DirXML-ACF2-CICSPRI |
CICSPRI |
INTEGER |
|
DirXML-ACF2-CICSRSL |
CICSRSL |
STRING |
|
DirXML-ACF2-CMD-LONG |
CMD-LONG |
STATE |
|
DirXML-ACF2-CMD-PROP |
CMD-PROP |
STATE |
|
DirXML-ACF2-CONSOLE |
CONSOLE |
STATE |
|
DirXML-ACF2-CONSULT |
CONSULT |
STATE |
|
DirXML-ACF2-CRE-TOD |
CRE-TOD |
STRING |
|
DirXML-ACF2-CSDATE |
CSDATE |
STRING |
|
DirXML-ACF2-CSWHO |
CSWHO |
STRING |
|
DirXML-ACF2-DFT-DEST |
DFT-DEST |
STRING |
|
DirXML-ACF2-DFT-PFX |
DFT-PFX |
STRING |
|
DirXML-ACF2-DFT-SOUT |
DFT-SOUT |
STRING |
|
DirXML-ACF2-DFT-SUBC |
DFT-SUBC |
STRING |
|
DirXML-ACF2-DFT-SUBH |
DFT-SUBH |
STRING |
|
DirXML-ACF2-DFT-SUBM |
DFT-SUBM |
STRING |
|
DirXML-ACF2-DG84DIR |
DG84DIR |
STATE |
|
DirXML-ACF2-DIALBYP |
DIALBYP |
STATE |
|
DirXML-ACF2-DSNSCOPE |
DSNSCOPE |
STRING |
|
DirXML-ACF2-DUMPAUTH |
DUMPAUTH |
STATE |
|
DirXML-ACF2-EXPIRE |
EXPIRE |
STRING |
|
DirXML-ACF2-GROUP |
GROUP |
STRING |
|
DirXML-ACF2-GRP-OPT |
GRP-OPT |
STATE |
|
DirXML-ACF2-GRP-USER |
GRP-USER |
STRING |
|
DirXML-ACF2-GRPLOGON |
GRPLOGON |
STATE |
|
DirXML-ACF2-HOMENODE |
HOMENODE |
STRING |
|
DirXML-ACF2-IDLE |
IDLE |
INTEGER |
|
DirXML-ACF2-IMS |
IMS |
STATE |
|
DirXML-ACF2-INTERCOM |
INTERCOM |
STATE |
|
DirXML-ACF2-JCL |
JCL |
STATE |
|
DirXML-ACF2-JOB |
JOB |
STATE |
|
DirXML-ACF2-JOBFROM |
JOBFROM |
STATE |
|
DirXML-ACF2-KERB-VIO |
KERB-VIO |
INTEGER |
|
DirXML-ACF2-KERBCUR |
KERBCUR |
STRING |
|
DirXML-ACF2-KERBCURV |
KERBCURV |
STRING |
|
DirXML-ACF2-KERBPRE |
KERBPRE |
STRING |
|
DirXML-ACF2-KERBPREV |
KERBPREV |
STRING |
|
DirXML-ACF2-LDEV |
LDEV |
STATE |
|
DirXML-ACF2-LDS |
LDS |
STATE |
|
DirXML-ACF2-LDSNODES |
LDSNODES |
STRING |
|
DirXML-ACF2-LDSNODEV |
LDSNODEV |
STATE |
|
DirXML-ACF2-LEADER |
LEADER |
STATE |
|
DirXML-ACF2-LGN-ACCT |
LGN-ACCT |
STATE |
|
DirXML-ACF2-LGN-DEST |
LGN-DEST |
STATE |
|
DirXML-ACF2-LGN-MSG |
LGN-MSG |
STATE |
|
DirXML-ACF2-LGN-PERF |
LGN-PERF |
STATE |
|
DirXML-ACF2-LGN-PROC |
LGN-PROC |
STATE |
|
DirXML-ACF2-LGN-RCVR |
LGN-RCVR |
STATE |
|
DirXML-ACF2-LGN-SIZE |
LGN-SIZE |
STATE |
|
DirXML-ACF2-LGN-TIME |
LGN-TIME |
STATE |
|
DirXML-ACF2-LGN-UNIT |
LGN-UNIT |
STATE |
|
DirXML-ACF2-LID |
LID |
STRING |
|
DirXML-ACF2-LIDSCOPE |
LIDSCOPE |
STRING |
|
DirXML-ACF2-LIDTEMP |
LIDTEMP |
STATE |
|
DirXML-ACF2-LIDZMAX |
LIDZMAX |
STATE |
|
DirXML-ACF2-LIDZMIN |
LIDZMIN |
STATE |
|
DirXML-ACF2-LINE |
LINE |
STRING |
|
DirXML-ACF2-LOGSHIFT |
LOGSHIFT |
STATE |
|
DirXML-ACF2-MAIL |
|
STATE |
|
DirXML-ACF2-MAINT |
MAINT |
STATE |
|
DirXML-ACF2-MAXDAYS |
MAXDAYS |
INTEGER |
|
DirXML-ACF2-MINDAYS |
MINDAYS |
INTEGER |
|
DirXML-ACF2-MODE |
MODE |
STATE |
|
DirXML-ACF2-MON-LOG |
MON-LOG |
STATE |
|
DirXML-ACF2-MONITOR |
MONITOR |
STATE |
|
DirXML-ACF2-MOUNT |
MOUNT |
STATE |
|
DirXML-ACF2-MSGID |
MSGID |
STATE |
|
DirXML-ACF2-MULTSIGN |
MULTSIGN |
STATE |
|
DirXML-ACF2-MUSASS |
MUSASS |
STATE |
|
DirXML-ACF2-MUSDLID |
MUSDLID |
STRING |
|
DirXML-ACF2-MUSID |
MUSID |
STRING |
|
DirXML-ACF2-MUSIDINF |
MUSIDINF |
STATE |
|
DirXML-ACF2-MUSUPDT |
MUSUPDT |
STATE |
|
DirXML-ACF2-NAME |
NAME |
STRING |
|
DirXML-ACF2-NO-INH |
NO-INH |
STATE |
|
DirXML-ACF2-NO-OMVS |
NO-OMVS |
STATE |
|
DirXML-ACF2-NO-SMC |
NO-SMC |
STATE |
|
DirXML-ACF2-NO-STATS |
NO-STATS |
STATE |
|
DirXML-ACF2-NO-STORE |
NO-STORE |
STATE |
|
DirXML-ACF2-NOMAXVIO |
NOMAXVIO |
STATE |
|
DirXML-ACF2-NON-CNCL |
NON-CNCL |
STATE |
|
DirXML-ACF2-NOSPOOL |
NOSPOOL |
STRING |
|
DirXML-ACF2-NOTICES |
NOTICES |
STATE |
|
DirXML-ACF2-OPERATOR |
OPERATOR |
STATE |
|
DirXML-ACF2-PASSWORD |
PASSWORD |
STRING |
|
DirXML-ACF2-PAUSE |
PAUSE |
STATE |
|
DirXML-ACF2-PGM |
PGM |
STRING |
|
DirXML-ACF2-PHONE |
PHONE |
STRING |
|
DirXML-ACF2-PMT-ACCT |
PMT-ACCT |
STATE |
|
DirXML-ACF2-PMT-PROC |
PMT-PROC |
STATE |
|
DirXML-ACF2-PP-TRC |
PP-TRC |
STATE |
|
DirXML-ACF2-PP-TRCV |
PP-TRCV |
STATE |
|
DirXML-ACF2-PPGM |
PPGM |
STATE |
|
DirXML-ACF2-PREFIX |
PREFIX |
STRING |
|
DirXML-ACF2-PRIV-CTL |
PRIV-CTL |
STATE |
|
DirXML-ACF2-PROGRAM |
PROGRAM |
STRING |
|
DirXML-ACF2-PROMPT |
PROMPT |
STATE |
|
DirXML-ACF2-PRV-TOD1 |
PRV-TOD1 |
STRING |
|
DirXML-ACF2-PRV-TOD2 |
PRV-TOD2 |
STRING |
|
DirXML-ACF2-PRV-TOD3 |
PRV-TOD3 |
STRING |
|
DirXML-ACF2-PRV-TOD4 |
PRV-TOD4 |
STRING |
|
DirXML-ACF2-PRVPSWD1 |
PRVPSWD1 |
STRING |
|
DirXML-ACF2-PRVPSWD2 |
PRVPSWD2 |
STRING |
|
DirXML-ACF2-PRVPSWD3 |
PRVPSWD3 |
STRING |
|
DirXML-ACF2-PRVPSWD4 |
PRVPSWD4 |
STRING |
|
DirXML-ACF2-PSWA1TOD |
PSWA1TOD |
STRING |
|
DirXML-ACF2-PSWA1VAL |
PSWA1VAL |
STATE |
|
DirXML-ACF2-PSWD-DAT |
PSWD-DAT |
STRING |
|
DirXML-ACF2-PSWD-EXP |
PSWD-EXP |
STATE |
|
DirXML-ACF2-PSWD-INV |
PSWD-INV |
INTEGER |
|
DirXML-ACF2-PSWD-MIX |
PSWD-MIX |
STATE |
|
DirXML-ACF2-PSWD-MX8 |
PSWD-MX8 |
STATE |
|
DirXML-ACF2-PSWD-SRC |
PSWD-SRC |
STRING |
|
DirXML-ACF2-PSWD-TIM |
PSWD-TIM |
STRING |
|
DirXML-ACF2-PSWD-TOD |
PSWD-TOD |
STRING |
|
DirXML-ACF2-PSWD-UPP |
PSWD-UPP |
STATE |
|
DirXML-ACF2-PSWD-VIO |
PSWD-VIO |
INTEGER |
|
DirXML-ACF2-PSWD-XTR |
PSWD-XTR |
STATE |
|
DirXML-ACF2-PSWD-XTV |
PSWD-XTV |
STRING |
|
DirXML-ACF2-PSWDAES1 |
PSWDAES1 |
STRING |
|
DirXML-ACF2-PSWDCVIO |
PSWDCVIO |
INTEGER |
|
DirXML-ACF2-PTICKET |
PTICKET |
STATE |
|
DirXML-ACF2-PWP-DATE |
PWP-DATE |
STRING |
|
DirXML-ACF2-PWP-VIO |
PWP-VIO |
INTEGER |
|
DirXML-ACF2-PWPALLOW |
PWPALLOW |
STATE |
|
DirXML-ACF2-READALL |
READALL |
STATE |
|
DirXML-ACF2-RECOVER |
RECOVER |
STATE |
|
DirXML-ACF2-REFRESH |
REFRESH |
STATE |
|
DirXML-ACF2-RESTRICT |
RESTRICT |
STATE |
|
DirXML-ACF2-RSRCVLD |
RSRCVLD |
STATE |
|
DirXML-ACF2-RSTDACC |
RSTDACC |
STATE |
|
DirXML-ACF2-RULEVLD |
RULEVLD |
STATE |
|
DirXML-ACF2-SCPLIST |
SCPLIST |
STRING |
|
DirXML-ACF2-SEC-VIO |
SEC-VIO |
INTEGER |
|
DirXML-ACF2-SECURITY |
SECURITY |
STATE |
|
DirXML-ACF2-SHIFT |
SHIFT |
STRING |
|
DirXML-ACF2-SMSINFO |
SMSINFO |
STRING |
|
DirXML-ACF2-SOURCE |
SOURCE |
STRING |
|
DirXML-ACF2-SRF |
SRF |
STATE |
|
DirXML-ACF2-STC |
STC |
STATE |
|
DirXML-ACF2-SUBAUTH |
SUBAUTH |
STATE |
|
DirXML-ACF2-SUSPEND |
SUSPEND |
STATE |
|
DirXML-ACF2-SYNCNODE |
SYNCNODE |
STRING |
|
DirXML-ACF2-SYNERR |
SYNERR |
STRING |
|
DirXML-ACF2-SYSPEXCL |
SYSPEXCL |
STATE |
|
DirXML-ACF2-TAPE-BLP |
TAPE-BLP |
STATE |
|
DirXML-ACF2-TAPE-LBL |
TAPE-LBL |
STATE |
|
DirXML-ACF2-TDISKVLD |
TDISKVLD |
STATE |
|
DirXML-ACF2-TRACE |
TRACE |
STATE |
|
DirXML-ACF2-TSO |
TSO |
STATE |
|
DirXML-ACF2-TSO-TRC |
TSO-TRC |
STATE |
|
DirXML-ACF2-TSOACCT |
TSOACCT |
STRING |
|
DirXML-ACF2-TSOCMDS |
TSOCMDS |
STRING |
|
DirXML-ACF2-TSOFSCRN |
TSOFSCRN |
STATE |
|
DirXML-ACF2-TSOPERF |
TSOPERF |
INTEGER |
|
DirXML-ACF2-TSOPROC |
TSOPROC |
STRING |
|
DirXML-ACF2-TSORBA |
TSORBA |
STRING |
|
DirXML-ACF2-TSORGN |
TSORGN |
INTEGER |
|
DirXML-ACF2-TSOSIZE |
TSOSIZE |
INTEGER |
|
DirXML-ACF2-TSOTIME |
TSOTIME |
INTEGER |
|
DirXML-ACF2-TSOUNIT |
TSOUNIT |
STRING |
|
DirXML-ACF2-UID |
UID |
STRING |
|
DirXML-ACF2-UIDSCOPE |
UIDSCOPE |
STRING |
|
DirXML-ACF2-UNICNTR |
UNICNTR |
STATE |
|
DirXML-ACF2-UPD-TOD |
UPD-TOD |
STRING |
|
DirXML-ACF2-USER |
USER |
STATE |
|
DirXML-ACF2-VAR-HIGH |
VAR-HIGH |
STATE |
|
DirXML-ACF2-VLD-ACCT |
VLD-ACCT |
STATE |
|
DirXML-ACF2-VLD-PROC |
VLD-PROC |
STATE |
|
DirXML-ACF2-VLDRSTCT |
VLDRSTCT |
STATE |
|
DirXML-ACF2-VLDVMACT |
VLDVMACT |
STATE |
|
DirXML-ACF2-VM |
VM |
STATE |
|
DirXML-ACF2-VMACCT |
VMACCT |
STRING |
|
DirXML-ACF2-VMD4AUTH |
VMD4AUTH |
STATE |
|
DirXML-ACF2-VMD4FSEC |
VMD4FSEC |
STATE |
|
DirXML-ACF2-VMD4RSET |
VMD4RSET |
STATE |
|
DirXML-ACF2-VMD4TARG |
VMD4TARG |
STATE |
|
DirXML-ACF2-VMESM |
VMESM |
STATE |
|
DirXML-ACF2-VMIDLEMN |
VMIDLEMN |
INTEGER |
|
DirXML-ACF2-VMIDLEOP |
VMIDLEOP |
STRING |
|
DirXML-ACF2-VMSAF |
VMSAF |
STATE |
|
DirXML-ACF2-VMSFS |
VMSFS |
STATE |
|
DirXML-ACF2-VMXA |
VMXA |
STATE |
|
DirXML-ACF2-VSESRF |
VSESRF |
STATE |
|
DirXML-ACF2-WTP |
WTP |
STATE |
|
DirXML-ACF2-ZONE |
ZONE |
STRING |
D.0 Legal Notice
THIS DOCUMENT AND THE SOFTWARE DESCRIBED IN THIS DOCUMENT ARE FURNISHED UNDER AND ARE SUBJECT TO THE TERMS OF A LICENSE AGREEMENT OR A NON-DISCLOSURE AGREEMENT. EXCEPT AS EXPRESSLY SET FORTH IN SUCH LICENSE AGREEMENT OR NON-DISCLOSURE AGREEMENT, NETIQ CORPORATION PROVIDES THIS DOCUMENT AND THE SOFTWARE DESCRIBED IN THIS DOCUMENT "AS IS" WITHOUT WARRANTY OF ANY KIND, EITHER EXPRESS OR IMPLIED, INCLUDING, BUT NOT LIMITED TO, THE IMPLIED WARRANTIES OF MERCHANTABILITY OR FITNESS FOR A PARTICULAR PURPOSE. SOME STATES DO NOT ALLOW DISCLAIMERS OF EXPRESS OR IMPLIED WARRANTIES IN CERTAIN TRANSACTIONS; THEREFORE, THIS STATEMENT MAY NOT APPLY TO YOU.
For purposes of clarity, any module, adapter or other similar material ("Module") is licensed under the terms and conditions of the End User License Agreement for the applicable version of the NetIQ product or software to which it relates or interoperates with, and by accessing, copying or using a Module you agree to be bound by such terms. If you do not agree to the terms of the End User License Agreement you are not authorized to use, access or copy a Module and you must destroy all copies of the Module and contact NetIQ for further instructions.
This document and the software described in this document may not be lent, sold, or given away without the prior written permission of NetIQ Corporation and Omnibond Systems, LLC., except as otherwise permitted by law. Except as expressly set forth in such license agreement or non-disclosure agreement, no part of this document or the software described in this document may be reproduced, stored in a retrieval system, or transmitted in any form or by any means, electronic, mechanical, or otherwise, without the prior written consent of NetIQ Corporation and Omnibond Systems, LLC.. Some companies, names, and data in this document are used for illustration purposes and may not represent real companies, individuals, or data.
This document could include technical inaccuracies or typographical errors. Changes are periodically made to the information herein. These changes may be incorporated in new editions of this document. NetIQ Corporation and Omnibond Systems, LLC. may make improvements in or changes to the software described in this document at any time.
U.S. Government Restricted Rights: If the software and documentation are being acquired by or on behalf of the U.S. Government or by a U.S. Government prime contractor or subcontractor (at any tier), in accordance with 48 C.F.R. 227.7202-4 (for Department of Defense (DOD) acquisitions) and 48 C.F.R. 2.101 and 12.212 (for non-DOD acquisitions), the government’s rights in the software and documentation, including its rights to use, modify, reproduce, release, perform, display or disclose the software or documentation, will be subject in all respects to the commercial license rights and restrictions provided in the license agreement.
© 2018 Omnibond Systems, LLC. All Rights Reserved. Licensed to NetIQ Corporation. Portions copyright © 2018 NetIQ Corporation. All Rights Reserved.
For information about NetIQ trademarks, see https://www.netiq.com/company/legal/.
NetIQ Trademarks
For NetIQ trademarks, see the NetIQ Trademark and Service Mark list.
Third-Party Materials
- All third-party trademarks are the property of their respective owners.