B.3 Configuration Tasks
B.3.1 Setting the Default Naming Context for Your AD LDS/ADAM Instance
-
Start the ADSI Edit application by selecting Start > All Programs > Administrative Tools> ADAM ADSI Edit.
-
In the tree view, select the root item called ADAM ADSI Edit.
-
Under the Action menu, select Connect to.
-
In the Connection name field, type Configuration.
-
Select Well-known naming context. Make sure the value in the drop-down list is set to Configuration.
-
Set the other authentication credentials as appropriate, then click OK.
-
In the tree view, expand the Configuration item and those items underneath it until you can select the following entry:
CN=NTDS Settings,CN=ServerName$InstanceName,CN=Servers,
CN=Default-First-Site-Name, CN=Sites,CN=Configuration,CN={GUID}
Keep in mind that in the above DN, you should replace ServerName, InstanceName, and GUID with those values you specified when you installed your AD LDS/ADAM instance in Step 8 of Installing AD LDS/ADAM.
-
Under the Action menu, select Properties.
-
Select the msDS-DefaultNamingContext attribute, then click Edit.
-
Specify the same value you used in Step 8 of Installing AD LDS/ADAM.
NOTE:If you do not point the Default Naming Context of your AD LDS instance to the application directory partition specified during installation, the driver will not be able to successfully perform Modify operations.
-
Click OK twice.
-
Restart your AD LDS/ADAM instance so the new default naming context takes effect.
B.3.2 Creating a User in AD LDS/ADAM with Sufficient Rights
For the driver to work properly, it is best to create a user object specifically for the driver to use. This user should only have the rights to do the work that is required. For more information, see Creating an Administrative Account.
B.3.3 Creating the AD LDS/ADAM Driver
You can create the AD LDS/ADAM driver through Designer or iManager. The AD LDS/ADAM driver cannot use packages. You must use the driver configuration file to create the driver.
Creating the AD LDS/ADAM Driver in Designer
-
Open a project in Designer. In the Modeler, right-click the driver set and select New > Driver.
-
Click Import Driver Configuration.
-
From the drop-down list, select ADAM, then click Run.
The ADAM driver is not listed alphabetically, so you might have to scroll to find it in the list.
-
Configure the driver by filling in the fields. Specify information for your environment. For information on the settings, see Table B-1.
-
After specifying parameters, click Finish to import the driver.
-
After the driver is imported, customize and test the driver.
-
After the driver is fully tested, deploy the driver into the Identity Vault. See
Deploying a Driver to an Identity Vault
in the NetIQ Designer for Identity Manager Administration Guide.
Creating the AD LDS/ADAM Driver in iManager
-
In iManager, select Identity Manager Utilities > Import Configuration.
-
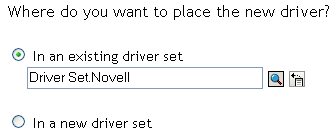
Select a driver set, then click Next.

If you place this driver in a new driver set, you must specify a driver set name, context, and associated server.
-
Import a configuration into the driver set by selecting a configuration from the server (.XML file):
-
All configurations
-
Identity Manager 3.0 configurations
-
Identity Manager 3.5 configurations
-
Identity Manager 3.6 configurations
-
Identity Manager 4.0 configurations
-
Configurations not associated with an Identity Manager version
-
-
Select the ADAM driver, then click Next.

-
Configure the driver by filling in the configuration parameters, then click Next. For information on the settings, see Table B-1.
-
Specify the Remote Loader host name or IP address and port, as well as the Remote Loader authentication information, then click Next.
-
Define security equivalences, using a user object that has the rights that the driver needs to have on the server, then click OK.
Use the user created in Creating a User in AD LDS/ADAM with Sufficient Rights.
-
Identify all objects that represent administrative roles and exclude them from synchronization, then click OK.
Exclude the security-equivalence object (for example, DriversUser) that you specified in Step 7. If you delete the security-equivalence object, you have removed the rights from the driver, and the driver can’t make changes to Identity Manager.
-
Click ADAM to specify additional configuration settings.
-
Under Driver Parameters, specify the authentication and access options you want to use for the ADAM driver. In the LDAP server port field, ensure that you specify the ADAM LDAP port number configured in ADAM.
-
Click OK.
-
Click Finish.
NOTE:The parameters are presented on multiple screens. Some parameters are only displayed if the answer to a previous prompt requires more information to properly configure the policy.
Table B-1 Configuration Parameters for the AD LDS/ADAM Driver
|
Parameter |
Description |
|---|---|
|
Driver name |
Specify the name of the driver object. |
|
Connected System or Driver Name |
Specify the name of the connected system, application, or Identity Manager driver. This value is used by the e-mail notification templates to identify the source of notification messages. |
|
Domain DNS Name |
Specify the DNS name of the AD LDS/ADAM instance managed by this driver. |
|
ADAM User Container |
Specify the container where the objects reside in AD LDS/ADAM. |
|
Driver is Local/Remote |
Configure the driver for use with the Remote Loader service by selecting Remote, or select Local to configure the driver for local use. |
|
Authentication ID |
Specify the name of the user object created in Creating a User in AD LDS/ADAM with Sufficient Rights. The name needs to be specified as a full LDAP DN. For example, CN=IDM,CN=Users,DC=domain,DC=com |
|
Authentication Password |
Specify the password of the user object with sufficient rights. |
|
Authentication Context |
Specify the DNS name or IP address of the AD LDS/ADAM instance server. |