NetIQ Identity Manager Designer (LDAP) 4.6 Release Notes
Designer (LDAP) 4.6 includes all functionality provided by Designer 4.6. This version of Designer uses LDAP calls for communicating with Identity Vault instead of legacy APIs. The LDAP communication significantly improves the import and deploy operation performance in both normal (private network) and virtual private network environments. The LDAP communication uses the ports configured for LDAP servers in the Identity Vault.
NOTE:Identity Manager 4.6 continues to support both Designer 4.6 and Designer (LDAP) 4.6. Designer 4.6 is redundant and it will be deprecated in the future.
The following sections provide information about installing, configuring, and using NetIQ Identity Manager Designer (LDAP) 4.6 for Identity Manager.
4.0 Working with Designer (LDAP) 4.6
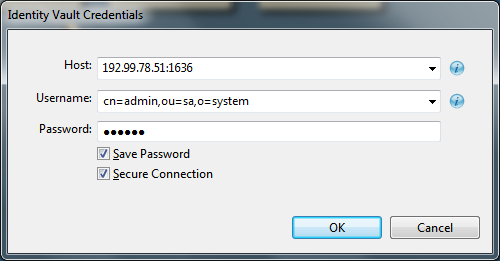
Designer (LDAP) 4.6 includes an LDAP protocol to perform live operations with the Identity Vault. When you authenticate with the Identity Vault, you must provide values in the LDAP format for parameters such as Identity Vault’s Username, Server Context, and Driver set’s Deploy Context.
Designer allows you to establish a secure connection with the Identity Vault by using the Identity Vault’s Certificate Authority certificate. For more information, see Configuring a Connection with the Identity Vault.
If you are connecting to a Suite B enabled Identity Vault, you must enable a Suite B connection between Designer and the Identity Vault. For more information, see Connecting to Suite B Enabled Identity Vault.
There are certain considerations that apply to working with earlier workspaces in this version of Designer. For more information, see Working with Workspaces and Projects.
4.1 Configuring a Connection with the Identity Vault
You can enable a secure or a non-secure connection between Designer (LDAP) 4.6 and the Identity Vault for all live operations.
Configuring a Secure Connection
In a secure connection, the LDAP server listens on port 636 by default. If you configured a different port as a secure port, specify that port number in the field. For example, 192.99.78.51:1636, where 1636 is a secure port.
When you select in the Identity Vault authentication window, Designer (LDAP) 4.6 prompts you to import the Identity Vault’s Certificate Authority certificate into Designer. You must accept this certificate to establish a secure connection with the Identity Vault.
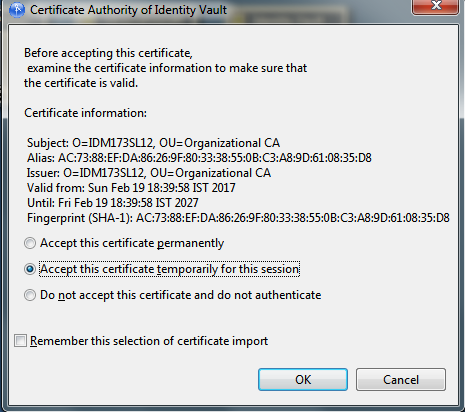
Designer (LDAP) 4.6 provides the following options to accept the certificate:
-
: When this option is selected, Designer (LDAP) permanently stores the certificate in /opt/netiq/tools/Designer/configuration or C:\netiq\idm\apps\Designer\configuration directory. Designer (LDAP) does not prompt you again for accepting the certificate for future authentication with the Identity Vault.
-
: Enable this option if you want to use the certificate for the current connection without storing the certificate in Designer (LDAP).
-
: Instructs Designer (LDAP) to reject the certificate. The connection is not established without a certificate.
-
: Instructs Designer (LDAP) to remember your choice of importing the certificate for future authentication with an Identity Vault.
To change the certificate import settings, go to Preferences and click .
Configuring a Non-Secure Connection
If you do not use a secure connection, all the information you enter, such as user names and passwords, is sent in clear text. By default, the LDAP server listens on port 389 for a non-secure connection.
If you want to use a non-default port, specify the port number of the LDAP server for establishing a connection.
To change the secure and non-secure port numbers, open the Properties view of the Identity Vault and change the default values for and fields respectively.
If you add additional servers to the Identity Vault after the initial connection, Identity Vault automatically assigns secure and non-secure port numbers to these servers.
NOTE:For security reasons, Designer (LDAP) deploys named passwords only in a secure connection.
4.2 Connecting to Suite B Enabled Identity Vault
By default, Identity Manager supports the 128-bit SSL communication between Designer (LDAP) and the Identity Manager engine.
Oracle provides a default cryptographic jurisdiction policy file that limits the strength of cryptographic algorithms. When using stronger ciphers (required for meeting Suite B standard), you must increase the strength of encryption used. Cipher suites using key lengths greater than 128 bits, such as 256-bit AES encryption, require the JCE Unlimited Strength Jurisdiction policy files that enable additional cipher suites for Java in a separate JAR file.
To enable 256-bit or higher ciphers:
-
Download and extract the Java Cryptography Extension (JCE) Unlimited Strength Jurisdiction Policy Files zipped file from Oracle's Java website to a temporary folder on your computer where Designer is installed.
For example, download Java 8 JCE files from Oracle’s download page.
-
Navigate to the JRE path of your Designer (LDAP) installation directory and save the existing local.policy.jar and US_export_policy.jar files to a different directory.
For example: /opt/netiq/tools/Designer/jre/lib/security or C:\netiq\idm\apps\Designer\jre\lib\security
-
Replace these policy jars with the files you extracted in Step 1.
For detailed instructions, see the steps listed in the Readme.txt file included in the zipped file.
4.3 Working with Workspaces and Projects
Designer (LDAP) stores projects and configuration information in a workspace. The following considerations apply when working on projects with different workspaces:
Working with a New Workspace
When you start Designer (LDAP) for the first time, Designer (LDAP) automatically points you to new workspace. You can use this workspace for working on your projects. Alternatively, you can use an existing workspace with Designer (LDAP). For more information, see Working with Earlier Workspaces.
Working with Earlier Workspaces
Workspaces are not compatible between different versions of Designer. You must create a new workspace to use with Designer (LDAP) and import existing projects into the newly created workspace.
If you are using an earlier workspace with Designer (LDAP), you must close all open editors in that version of Designer before pointing Designer (LDAP) to that workspace. Otherwise, the Project Converter does not successfully create a back-up of your project.
NOTE:Projects converted to Designer (LDAP) are not backward compatible. In a teaming environment, all the team members must use the same version of Designer when working on a converted project that is stored in a version control system.
Working with Earlier Projects
When you open an earlier project in Designer (LDAP), Designer (LDAP) creates a back-up of the project before converting the project to an appropriate file format.
After the project is converted, you must modify the values for some parameters to LDAP format and verify that the LDAP connection information is valid for Identity Vault and the associated servers. For more information, see Importing Into Designer.
4.4 Importing Into Designer
You can import Identity Manager objects into Designer from an Identity Vault, from an exported project located in the file system, or a version control server. The following considerations apply for importing a project into Designer (LDAP):
-
While importing from an Identity Vault, perform the following actions:
-
Enter the Identity Vault’s Username in LDAP format to connect to the Identity Vault.
-
Accept the Identity Vault’s Certificate Authority certificate to establish a secure connection with the Identity Vault.
-
Complete the import process as specified in the documentation. For more information, see Importing into Designer in the NetIQ Designer for Identity Manager Administration Guide.
-
-
After importing a project, configure your project and modify the values for the following parameters to LDAP format as appropriate:
-
Deploy Context for Identity Vault and driver set
-
Server context in Identity Vault and driver set
-
Trustee and Approvers DN for provisioning objects
-
-
Verify the values for the following attributes in the properties view and change as appropriate:
-
ldapSecureTextPort, ldapClearTextPort, and ncpPort for the Identity Vault
-
secureHost, securePort, clearTextHost, and clearTextPort for the servers
-
4.5 Deploying To Identity Vault
Perform the following actions:
-
Run the Project Checker to ensure that there are no errors and warnings.
-
Deploy to an Identity Vault by using the following steps:
-
Connect to the Identity Vault.
-
Enter the Identity Vault’s Username in LDAP format to connect to the Identity Vault.
-
(Conditional) Accept the Identity Vault’s Certificate Authority certificate to establish a secure connection with the Identity Vault.
This step is not required if you have already accepted the certificate.
-
(Conditional) If Identity Vault supports only a Suite B connection, increase the strength of encryption used in the connection. For more information, see Section 4.2, Connecting to Suite B Enabled Identity Vault.
-
-
-
Complete the deploy process as specified in the documentation. For more information, see Deploying and Exporting in the NetIQ Designer for Identity Manager Administration Guide.
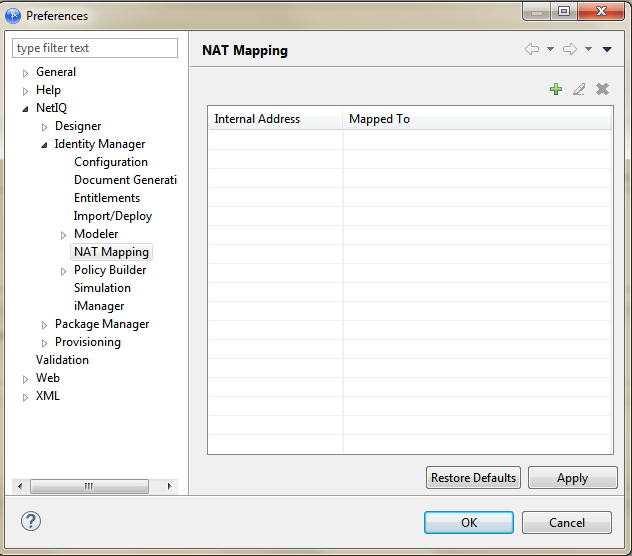
4.6 Configuring Mapping Between Private and Public IP Addresses for the Identity Vault Servers
If the server associated with your driver set is located in a private network, Designer provides an option to map the server’s local IP address to an external IP address in a NAT (Network Address Translation) environment. Designer (LDAP) allows a one-to-one mapping between the local and global IP addresses.
To import or deploy server specific values, Designer (LDAP) creates a separate connection with each server associated with the driver set. When you add a new server to the driver set, Designer (LDAP) obtains the IP address of the server stored in the Identity Vault before connecting to the server. If the server resides in a private network, the connection succeeds only when the IP address of the server is mapped to an external IP address. After NAT mapping is configured for the server, Designer (LDAP) uses the mapped external IP address of the server to establish a connection with the server.
To add a new mapping entry, go to Preferences and click .
-
Click
 icon.
icon.
-
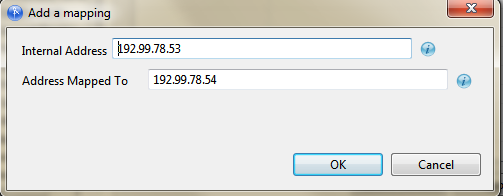
In the window that displays, specify the internal and external IP addresses that you want to map to each other.
-
Click .
-
Click to exit the Preferences page.
Alternatively, add the external IP address in a text file and place it in /opt/netiq/tools/Designer/configuration or C:\netiq\idm\apps\Designer\configuration directory. For the change to take effect, restart Designer.