5.1 Configuring Secure Data Transfers
All eDirectory driver communication is secured through SSL. To configure your eDirectory drivers to handle secure data transfers, run the NDS-to-NDS Driver Certificate Wizard in iManager.
You can also configure your eDirectory drivers through Designer. For information about configuring eDirectory drivers through Designer, see Designer for Identity Manager Administration Guide
5.1.2 Creating Certificates Using Designer
To provide security while transmitting information between two Identity Vaults, you must configure the eDirectory driver to communicate with the destination eDirectory driver through an SSL connection.
In addition, you can provide additional security by requiring the two eDirectory drivers to authenticate to one another. Although this is optional, it is strongly recommended.
The following section explains how to set up SSL and configure driver authentication using designer.
Establishing Secure Connection and Creating Certificates Using Designer
Perform the following actions to configure two eDirectory drivers and communicate with each other over a secure channel.
-
Open your project in Designer.
-
Select two Identity Vaults from the palette between which you wish to secure a connection.
-
The Driver Configuration Wizard appears. The purpose of the Driver Configuration Wizard is to help you install drivers. For more information on creating a driver, see Section 3.0, Creating a New Driver Object.
To create a driver with packages, select the available base package listed. If there are no packages listed, then the packages are not imported into the package catalog. For more information about importing and installing packages, see Installing or Upgrading Packages.
-
Configure the drivers. For more information on configuring the driver, see Section 3.1.3, Configuring the Driver.
To create a driver with a driver configuration file, click Import Driver Configuration. All of the driver configurations files for the version of your Identity Manager server are listed. For more information about importing a driver configuration file, see Importing a Driver Configuration File.
-
Deploy the driver.
-
Configure the driver settings to communicate the two eDirectory drivers. For more information, see Configure TLS for eDir-to-eDir drivers.
To configure the driver settings, navigate to > > > > .
Table 5-1 Preferences: NetIQ > Identity Manager > Configuration > eDir-to-eDir SSL/TLS Tab Settings
Setting
Description
Specifies the preferred key size that is generated when drivers are encrypted and stored in eDirectory: 256, 384, 512, 768, 1024, or 2048 bytes.
Specifies the preferred hash algorithm to use when encrypting drivers: SHA1-RSA, MD2-RSA, MD5-RSA, SHA256-ECDSA, or SHA384-ECDSA.
-
For 256 key size, Designer provides SHA256-ECDSA algorithm.
-
For 384 key size, Designer provides SHA384-ECDSA algorithm.
SHA256-ECDSA and SHA384-ECDSA are Suite B-compliant algorithms. For information about Suite B, see Suite B Cryptography.
Specifies the validity period for a driver certificate, ranging from 6 months to 10 years.
Specifies that existing driver certificates are overwritten with each deployment. If you select this option, Designer deletes existing certificates and creates new ones. The new certificates are then good for another two years (assuming the default value is two years, as defined in the field.) If you select > , Designer deletes old certificates and creates new ones.
Specifies that only expired driver certificates are overwritten with each deployment. This is the default setting. The default expiration length is two years. If a certificate expires, SSL/TLS stops working. If a certificate is expired, Designer deletes it and creates a new one.
Never overwrites driver certificates.
Restarts drivers after certificates have been updated or created.
-
-
Enable TLS.
Perform the following actions to enable TLS:
-
Right-click in the Outline view, then click .
-
Right-click an eDir-to-eDir driver, click > > , then click . The icon displays only on eDir-to-eDir driver pages.
-
Click .

-
Select a direction of trust.
These options apply to certificates that NetIQ creates for eDirectory. The options do not apply to third-party security certificates.
The default is Mutual Trust, which is considered to be the most secure.
Unless you want to use the certificate for authentication, the option that you select doesn’t matter. If only encryption is important, you can select any one of the three options.
If authentication is important, select the option that gives you the appropriate trust.
Scenario: JJ Infrastructure Tree Trusts JT ID Vault. JJ Infrastructure Tree is the organizational certificate authority. JJ Infrastructure Tree signed a certificate and placed it in JT IDVault. JT ID Vault trusts JJ Infrastructure Tree. The two vaults synchronize data through a secure connection.
If the two vaults break their trusted relationship, JJ Infrastructure Tree can prevent sensitive data from being synchronized by revoking its certificate.
Scenario: JT ID Vault Trusts JJ Infrastructure Tree. JJ Infrastructure Tree creates two certificates. One is placed in JJ Infrastructure Tree, and the other is placed in JT ID Vault. The two vaults synchronize data through a secure connection.
If the two vaults break their trusted relationship, JJ Infrastructure Tree can prevent sensitive data from being synchronized by revoking its certificate.
Scenario: Mutual Trust. JT ID Vault and JJ Infrastructure Tree both sign certificates.
-
(Optional) Use the to select key size, hash algorithm, and validity period.
The validity period is important for when a certificate has expired and you need to overwrite or create a new one.
-
-
Click .
You can enable or configure TLS without immediately deploying the drivers. You can turn the settings on. However, you can’t create SSL/TLS certificates unless the drivers have been deployed into their respective Identity Vaults. If you enable SSL/TLS but want to create certificates later, you can do so. When you later deploy the eDir-to-eDir drivers, Designer guides you through steps to automatically create certificates.
-
Perform the following actions to create certificate.
The first time you enable and configure SSL/TLS on driver’s tab, click , then follow the prompts. A Create Certificates dialog box appears. Click .
You can also create certificate by right-clicking the eDir2eDir application.
Click > .
For more information, see Configuration in Designer Administrator guide.
NOTE:If the settings are not configured, the certificate is created using the default settings.
To view the details of the certificate in iManager, navigate to > > . Click the name of the certificate to view the summary of the certificate. Click on top of the screen to view if the certificate is valid or if it has expired.
5.1.3 Establishing Secure Connections Using KMO
To configure your Identity Vault system to handle secure Identity Manager data transfers:
-
Find out the tree name or IP address of the destination server.
-
Launch iManager and authenticate to your first tree.
-
Click
 to display the Identity Manager Administration page.
-
In the list, click to launch the wizard.
-
At the Welcome page, enter the requested information for the first tree.
Default values are provided by using objects in the tree that you authenticated to when you launched iManager. You must enter or confirm the following information:
Driver DN: Specify the distinguished name of the eDirectory driver (for example, eDirectoryDriver.DriverSet1.Services.Novell).
Tree: Verify the name of the current tree; if it is not correct, enter the correct name.
Username: Specify the username for an account with Admin privileges in the current tree (for example, Admin).
Password: Specify the password for the user.
Context: Specify the user’s context (for example Services.Novell).
Enable Suite B: Select this option to enable the driver communication to use Suite B. The driver uses TLS 1.2 as a communication protocol and encrypts the data using the cryptographic algorithms mandated by Suite B. For more information about Suite B, see Suite B Cryptography.
Select one of the following certificates for securing your communication:
-
ECDSA 256: Enables Suite B mode operation by using 128-bit level of security (Suite B Cipher 128-bit only).
-
ECDSA 384: Enables Suite B mode operation by using 192-bit level of security (Suite B Cipher 192-bit).
-
-
Click .
The wizard uses the information you entered to authenticate to the first tree, verify the driver DN, and verify that the driver is associated with a server.
-
Specify the requested information for the second tree:
Driver DN: Specify the distinguished name of the eDirectory driver (for example, eDirectoryDriver.DriverSet2.Novell).
Tree: Specify the name of the second tree.
Alternatively, specify the IP address of the server in the second tree running the eDirectory driver. This server must hold partition replicas of the Username (specified in Step 5), the driver set, and the server object.
Username: Specify the username for an account with Admin privileges in the second tree (for example, Admin).
Password: Specify the password for the user.
Context: Specify the user’s context (for example Users.Novell).
-
Click .
The wizard uses the information you entered to authenticate to the second tree, verify the driver DN, and verify that the driver is associated with a server.
-
Review the information on the Summary Page, then click .
If KMOs already existed for these trees, the wizard deletes them and then does the following:
-
Exports the trusted root of the CA in the first tree.
-
Creates KMO objects.
-
Issues a certificate signing request.
-
Places certificate key pair names in the drivers’ Authentication IDs (see Section A.1.3, Authentication).
-
Creating the Certificate Manually
The eDirectory to eDirectory certificate wizard rarely fails to create the certificate properly. In such scenarios, perform the following actions to manually create the certificate and establish a secure communication between the two eDirectory drivers.
The following example explains how to manually create the certificate.
Prerequisites
-
Two Linux servers
NOTE:1 server is a SLES 12.2 which is the main IDV (vault) tree and the other is a Red Hat 7.2 server.
-
Both servers have eDirectory installed
-
Both servers have Identity Manager 4.6 installed
-
Both servers have eDirectory driver installed
NOTE:Since both eDirectory trees have certificate authority, either of the trees can be used as the source tree. The main tree is used as the vault tree which has iManager certificates as well. This ensures all certificates are on the same server (for convenience).
Perform the following actions to create the certificate using KMO method:
-
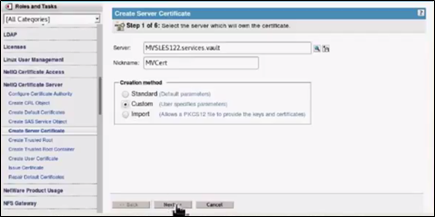
Create a normal server certificate by navigating to > > .
-
Browse for the . Provide a . Choose the as as we would manually make some changes. Click .
-
Select (default) and click .
-
Select as . Select under . Click .
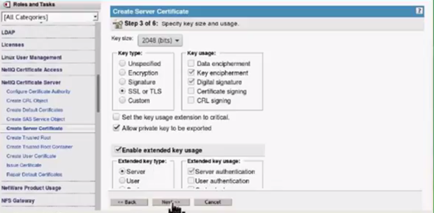
-
Select as the as it is considered more secure. Change the as (as per your choice). Click .
-
Select (default). Click .
-
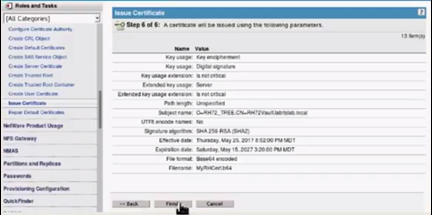
The summary of the certificate information is listed. Click .
-
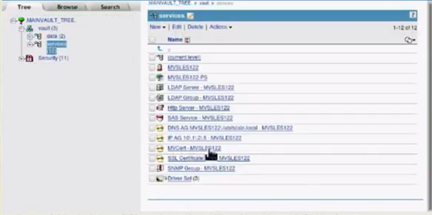
The KMO object is successfully created and listed under >.
Log into the Red Hat server and repeat the above procedure to create the certificate. However, the following changes needs to be made:
-
In step 3, select .
-
After step 7, click and save it in a preferred location.
NOTE:This is a .csr file
Exit the Red Hat server and log into the main server (SLES).
-
Navigate to >>. Browse for the saved .csr file and click .
-
The and remains same as mentioned in step 4. Click . The and remains with default settings. Click . is set to . Click .
-
Save the File in format and click .
-
Click .
-
Save the file to a preferred location. This file is saved in a .b64 format.
-
Navigate to , under . Navigate to container and click the . In the tab, check the box and click .
-
Uncheck the checkbox. Select the format as and click .
Save the exported certificate to a preferred location. The saved file is in .b64 format.
Exit from the main vault.
Login to the Red Hat server and perform the following actions to synchronize data:
-
Navigate to and browse for the KMO object. Click the object. Click the tab > tab and click .
-
Browse and select the self signed certificate. Click .
-
Click on the top left hand corner and browse for the issued certificate. Click .
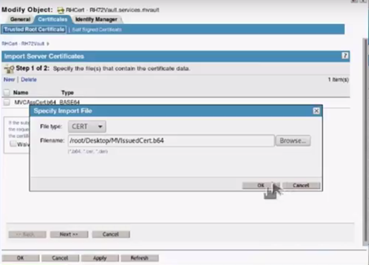
-
Two certificates to import are listed. Click , and .
For KMO method, configure and start the eDirectory driver.
-
Exit from the Red Hat server and login to the main vault server.
Configure and start the driver on the vault. Both the connections are secure.
-
Navigate to and make a change (edit) to an object.
For example: changing the description of a user.
Exit from the main server and login to the Red Hat server. The changes made to the user can be noticed here. The data is successfully synchronized.