14.6 Setting Up SecretStore
The following sections explain how to install and configure iChain so that you can use SecretStore to save Form Fill data:
14.6.1 Installing SecretStore
Before you use SecretStore, you need to upgrade to Novell International Cryptographic Infrastructure (NICI) 2.6 or later, install SecretStore, then enable SecretStore. These procedures are explained in the following sections:
For information about secure login and single sign-on, see the Nsure SecureLogin Administration Guide.
Installing SecretStore On NetWare
Before you install SecretStore, you need to upgrade your version of NICI. The SecretStore procedures include instructions for this upgrade.
-
Insert the iChain Authorization Server CD into your CD drive.
-
Open a remote console prompt and enter CDROM to mount the iChain Authorization Server CD.
-
To upgrade to NICI 2.6, enter nwconfig.
-
Click Product Options, then click Install a Product Not Listed.
-
Press Esc, press F3, then type the path to the NICI upgrade: ichain_auth_sr:/nici/nwserver. Press Enter.
-
-
To install SecretStore, enter nwconfig at a console prompt, click Product Options, then click Install a Product Not Listed.
-
Press Esc, press F3, then specify the path to the SecretStore installation: ichain_auth_sr:/sso/netware
-
Follow the installation prompts.
IMPORTANT:You must have administrator or equivalent rights to change the directory schema.
-
Press Enter to complete the SecretStore installation.
-
From the Novell iChain Authorization Server CD, using the NetWare server as the default server, run /sso/utils/ssinit.exe.
-
Continue with Enabling SecretStore With eDirectory.
Installing SecretStore on Windows
-
Insert the iChain Authorization Server CD into your CD drive.
-
Run nici/wcniciu0.exe.
-
Follow the installation prompts to complete the installation.
-
Run sso/nt.setup.exe.
During the SecretStore installation, you need to log into your tree as an Administrator in order for the schema to be modified.
-
Start the eDirectory Services Console.
-
The following services start automatically:
-
ssldp.dlm
-
ssncp.dlm
-
sss.dlm
If they do not start automatically, you need to manually start them.
-
-
Continue with Enabling SecretStore With eDirectory
Enabling SecretStore With eDirectory
-
Log onto the LDAP server.
-
Export your trusted root for the LDAP server.
-
From ConsoleOne, view the properties of the key material object (usually named SSLCertificate*).
-
Select the Certificates tab, select Trusted Root, then click Export.
-
Save the trusted root to the local drive in Base64 format.
-
-
Click the ISO object.
-
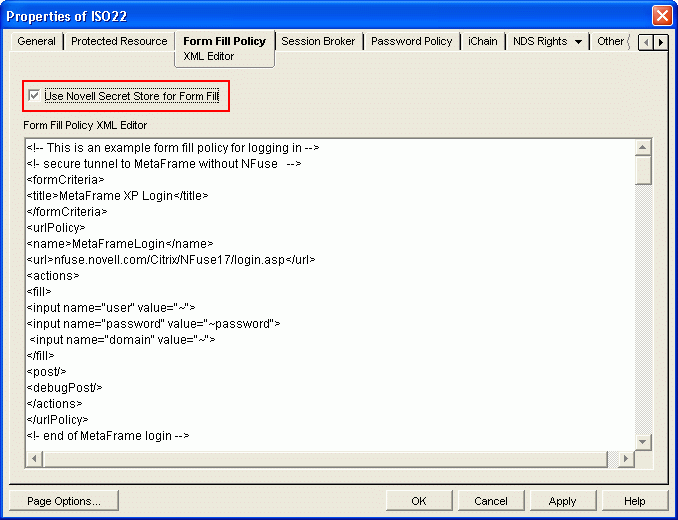
From ConsoleOne, click Form Fill Policy, then paste your Form Fill policy into the Form Fill policy text editor.
Make sure your policy contains the <sharedSecret> tags so that the SecretStore functionality is enabled.
-
Click OK.
-
From the iChain Proxy Services Administration GUI, import the trusted root:
-
Select Configure (this icon is in the bottom left corner), select the Access Control tab, then select Enable Secure Access to LDAP Server.
-
Select Import Trusted Root and specify a name for the imported file.
The filename must adhere to the 8.3 naming conventions.
-
Using a text editor, open the file that was exported from the LDAP server to a local drive, copy all the contents of the file to the text field in the Trusted Root dialog box, then click OK.
-
Select Enable Form Fill Authentication, then click Apply.

If Form Fill was already enabled, refresh Form Fill from the Access Control tab.
-
-
If you use the SecretStore proxy service, or if you plan to use Shared Secrets, continue with Section 14.6.2, Configuring SecretStore to Use Shared Secrets
14.6.2 Configuring SecretStore to Use Shared Secrets
The following information explains the Shared Secrets feature:
-
Shared Secrets uses a secret ID as a key/index to retrieve information. The format is <type>:<name>. There are only two types of secret IDs: SS_App (for application) or SS_CredSet (for login). Currently, Form Fill and OLAC support only the SS_CredSet type. The <name> is the name of the Form Fill policy. Shared Secret data consists of <name><delimiter><value> pairs, where the name and value are the same as in the <fill> section of the Form Fill policy.
-
Form Fill tags for Shared Secrets. Form Fill adds the <sharedSecret> and </sharedSecret> tags for sharing users' credentials with other applications. These tags contain a sub-tag, <migration/>, which means the original credentials are migrated to Shared Secrets. The original credentials are stored in eDirectory or in SecretStore, as specified in the Use Novell SecretStore for Form Fill check box in the Form Fill Policy tag (under the ISO object).
The following are two examples of how the <sharedSecret></sharedSecret> tags are used:
Example one:
<url>www.novell.com/formfill/test/*<url>
 ............
 <sharedSecret>
 </sharedSecret>
 <actions>
 ..............
Example two:
 <sharedSecret>
 <migration/>
 </sharedSecret>
NOTE:After migration, the original credential is transferred to Shared Secrets and is removed from the old storage (eDirectory or SecretStore).
-
Form Fill supports two scenarios for Shared Secrets. There is a reserved field name, ff_shared_name, in the policy for Shared Secrets. Some Shared Secrets applications might use a common name to share the value. This field name is applied to Input and Select tags in the <fill> section of the a policy. This option works only when secure LDAP is enabled.
The policy name, for example, could be:
<input name=“user.id” value=“~”>,
but in Shared Secrets, the field name is not User.id, it is Username.
In this case, the field is
<input name=“user.id” value=“~” ff_shared_name= “Username”>.
NOTE:The value of the ff_shared_name applies to reading and writing to or from Shared Secrets. It has nothing to do with the HTML form. For example, the name in the name=value pair of the POST packet is still User.id, not Username, but the name in the name=value pair in Shared Secrets is Username, not User,id. If ff_shared_name is missing, Form Fill uses the value of name (User.id) as a default value.
-
You set up the error redirect for a policy. As the administrator, you must use a login failure policy to redirect a login failure by using the <redirect> tag. Do not redirect to the original policy or the user can get caught in an infinite loop. The policy should redirect to an error page with an error message similar to the following: “Cannot access Web application. Please report this error to the administrator.”
-
You register all user credentials. For information on how you can register all users' credentials, contact a Novell consultant. You can learn more about contacting a consultant in the Consulting section of the Novell Web site
-
Use <maskedPost/>. This is necessary to protect the secret.
-
Do not use the <deleteRemembered> tag. If there is a login failure, users can see the login form and might attempt to log in themselves.
-
Users might need to know their credentials. If users need to know their credentials, use the regular Form Fill feature. This lets users register their own credentials.
-
Form Fill shares credentials with OLAC and other Novell products. This includes Novell exteNd Director and Novell SecureLogin. For information on setting up the OLAC sharing configuration, see Section 13.0, Using Object-Level Access Control.
-
You can use the <secretName> tag for Shared Secrets. Using Form Fill, you can add a <secretName> tag inside the <sharedSecret></sharedSecret> tag to make the <name> </name> field more logical and transparent to the secretID. If there is no <secretName> </secretName> tag, the default secret name is taken from the <name> field.
Some applications use the secret name, which is a portion of the secretID (shared among Web applications), and which contains a question mark (?) character. This character causes Form Fill to act abnormally if it is found in the <name></name> field. The following are two examples of using the <secretName></secretName> Form Fill tags:
Example One:
<name>FormFillSharedWithNSL</name> <url>www.novell.com./formfill/test/*</url> ......... <sharedSecret> <secretName>https\://novell.com/nps/servlet/ webacc?task\=abc&merg\=def</secretName> </sharedSecret> <actions>NOTE:In the <secretName> field, if there is a colon(:), equal sign (=), and/or a backslash(\) character (these are reserved for the secret ID), they must be preceded with a backslash(\) character.
Example Two:
        <name>FormFillOwnSharedRule</name>
        <url>www.novell.com/formfill/test.*</url>
        ..........
        <sharedSecret>
        </sharedSecret>
        <actions>
        ...........
Example Two does not have a <secretName>, so the secret name is the same as the <name> field. It is equivalent to having the following line:
<secretname>FormFillOwnSharedRule</secretName>
14.6.3 Using the SecretStore Proxy Service
SecretStore is a service of eDirectory that allows applications to securely store sensitive data. This service guarantees protection of application data that is both in storage and being transmitted between the client and SecretStore. SecretStore is useful for storing information that is shared with other applications, such as your users' credentials.
IMPORTANT:You should not select the SecretStore check box for any configuration other than the legacy SecretStore installation that shipped with iChain 2.1. Do not select this box when using the ichainFormFillCrib attribute or Shared Secrets.
The Use Novell SecretStore for Form Fill check box refers to the SecretStore Proxy Store. This proxy store functionality is outdated. It is included only for backward compatibility. We recommend that you migrate to the new Shared Secrets format. For instructions on migrating to the new Shared Secrets format, see Sharing Secrets in the Novell SecretStore Administration Guide. Also, see Enabling SecretStore With eDirectory.