4.1 Synchronization
Synchronization is the transfer of directory information from one replica to another, so the information in each partition is consistent with the other. eDirectory automatically keeps the servers in the replica ring synchronized.
Synchronization consists of inbound and outbound synchronization. For example, if the modifications to data have to be synchronized from server1 and server2, the term outbound refers to the synchronization process that is sent from server1 to server2. The term inbound refers to the synchronization process that is received by server2 from server1.
Figure 4-1 Outbound and Inbound Synchronization
There are two types of synchronization:
The following table gives you a comparison between normal synchronization and priority sync:
Table 4-1 Comparison between Normal or Replica Synchronization and Priority Sync
|
Normal Synchronization or Replica Synchronization |
Priority Sync |
|---|---|
|
Triggered when there are modifications to data in any of the servers in the replica ring. For more information, refer to Normal or Replica Synchronization. |
Triggered when there are modifications only to the data that you identify as critical. For more information, refer to Priority Sync. |
|
After the data is modified, the changes are buffered. Normal synchronization starts after approximately 30 seconds from the time the modifications are saved. |
The changes to the critical data are not buffered. Priority sync starts immediately after the data is modified. |
|
The most important synchronization in eDirectory. It happens irrespective of whether the modifications are synchronized by priority sync or not. |
Complementary to normal synchronization. Though the critical attributes are synchronized through priority sync, they are synchronized again through normal synchronization. |
|
Can happen between eDirectory 8.8 servers or across servers hosting earlier versions of eDirectory. |
Happens only between eDirectory 8.8 and later servers, holding the same partition. |
|
Never fails due to its feature. For more information, refer to Features of Synchronization. |
If priority sync fails, the modifications to the critical data are synchronized through normal synchronization. For more information, refer to When Can Priority Sync Fail?. |
NOTE:The Priority sync information in available in the SYDL or Synchronization Details tags in ndstrace, dstrace, or iMonitor trace screens.
4.1.1 Features of Synchronization
Synchronization in eDirectory
-
Is transitive.
-
Maintains object transaction model.
-
Has timestamps like transitive vector, local received up to and remote received up to.
Transitive Synchronization
Synchronization in eDirectory is transitive. This means that eDirectory synchronizes the changes to the data without requiring the eDirectory agent to directly contact and synchronize those changes with every other agent in the replica ring.
Figure 4-2 Transitive Synchronization
For example, if you make a change to data on Server 1, the change is synchronized from Server 1 to Server 2 and from Server 2 to Server 3. Even if Server 1 could not come into direct contact with Server 3, because of a problem in communication, it still receives the latest change to the data, through Server 2. Server 3 lets Server 2 know that it has received the changes. Server 2 in turn tells Server 1 that Server 3 and itself are synchronized.
Object Transaction Model
Synchronization in eDirectory maintains the object transaction model, a standard for LDAP and X.500-compliant directories. Object transaction model means that all the previous transactions should be synchronized before synchronizing the new ones.
For example, you have modifications D1, D2, and D3 to the data on a server. Due to network failure, these modifications are not synchronized across other servers. If you make another modification D4 on the server, D4 will be synchronized only after D1, D2, and D3 are synchronized across all the servers in the replica ring.
Transitive Vector
A transitive vector is a time stamp for a replica. It is made up of a representation of the number of seconds since a common specific point in history (January 1, 1970), the replica number, and the current event number. Here's an example:s3D35F377 r02 e002
For more information, refer to Transitive Vectors and the Restore Verification Process.
Local Received Up To
Local Received Up To (LRUT) is the time before which the local replica has received the changes.
For more information, refer to Browsing Objects in Your Tree.
Remote Received Up To
Remote Received Up To (RRUT) is the LRUT of the remote replica.
For more information, refer to Browsing Objects in Your Tree.
4.1.3 Priority Sync
Priority Sync is one of the two synchronization processes in eDirectory. You can use priority sync to sync your critical data immediately without waiting for normal synchronization.
Priority sync is complimentary to the normal synchronization process in eDirectory. Unlike normal synchronization, in priority sync, the changes are not buffered before synchronizing them across the servers. This makes priority sync faster than normal synchronization.
You can sync your critical data through Priority Sync when you cannot wait for normal synchronization. The Priority Sync process is faster than the normal synchronization process. Priority Sync is supported only between two or more eDirectory 8.8 or later servers hosting the same partition.
The following table lists the platforms that support the Priority Sync feature:
|
Feature List |
Linux |
Windows |
|---|---|---|
|
Priority Sync |
|
|

This section includes the following information:
Need for Priority Sync
Normal synchronization can take some time, during which the modified data would not be available on other servers. For example, suppose that in your setup you have different applications talking to the directory. You change your password on Server1. With normal synchronization, it is some time before this change is synchronized with Server2. Therefore, a user would still be able to authenticate to the directory through an application talking to Server2, using the old password.
Figure 4-3 Need for Priority Sync
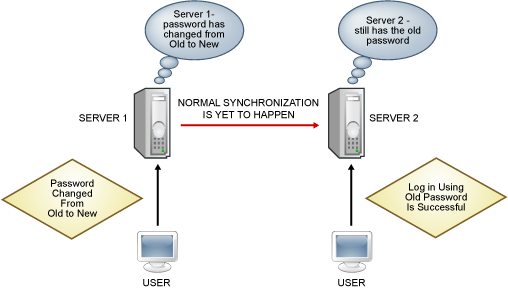
In large deployments, when the critical data of an object is modified, changes need to be synchronized immediately. The Priority Sync process resolves this issue.
Using Priority Sync
To synchronize date modifications through Priority Sync, you need to do the following:
-
Enable Priority Sync, configure the number of threads, and Priority Sync the queue size through iMonitor.
-
Define Priority Sync policies by identifying the attributes that are critical through iManager.
-
Apply the Priority Sync policies to the partitions through iManager.
Priority sync is enabled by default. Refer to Enabling and Disabling Inbound and Outbound Priority Sync for more information.
To sync the modifications to the critical data through priority sync:
-
Specify the number of threads for priority sync.
See Priority Sync Threads for more information.
-
Specify the priority sync queue size.
See Priority Sync Queue Size for more information.
-
Create and define a priority sync policy by identifying the critical attributes that you want to sync as priority.
See Creating and Defining a Priority Sync Policy for more information.
-
Apply the priority sync policy to one or more partitions.
See Applying a Priority Sync Policy for more information.
The priority sync process is to sync only the modifications to the critical attributes. Priority sync maintains the object transaction model. So, if noncritical data is modified and is not yet synchronized, and if the critical data is changed for the same entry, the noncritical data along with critical data is synchronized.
For example, a user has the following attributes: Income, Employee No, Address, and Cube No. You identify Income and Address as critical attributes. Employee No and Cube No are modified but these modifications are not yet synchronized. When the modifications to Income and Address are synchronized through priority sync, Employee No and Cube No also get synchronized, though they are not identified as critical data.
This section provides you the following information:
Enabling and Disabling Inbound and Outbound Priority Sync
You can enable or disable the inbound and outbound priority sync in eDirectory using iMonitor. Refer to Controlling and Configuring the DS Agent for more information.
Inbound priority sync is enabled by default. By disabling the inbound priority sync on a server, the modifications to the critical data on other servers are not synchronized with this server through priority sync. However, the modifications are synchronized by the normal synchronization process.
Outbound priority sync is enabled by default. By disabling this option on a server, the modifications to the critical data on this server are not synchronized with other servers through priority sync. However, the modifications are synchronized by the normal synchronization process.
Priority Sync Threads
You need to configure the number of threads to be used for outbound priority sync. In iMonitor, you can specify the number of priority sync threads using under . For more information, refer to Controlling and Configuring the DS Agent. The supported values are 1 to 32. The default is 4.
Priority Sync Queue Size
This indicates the maximum number of modified critical entries the queue can hold before synchronizing them. As soon as you modify the critical entries, they go into the priority sync queue and are synchronized one after the other. For example, if D1, D2, and D3 are the critical entries that are modified on server1 and these entries have to be synchronized across server2 and server3 through priority sync, then D1 is first synchronized with server2 and server3. Then D2 is synchronized with server2 and server3, and later D3 is synchronized with server2 and server3. If an earlier entry in the queue is not successfully synchronized with one of the servers, it does not affect the synchronization of the rest of the entries.
Figure 4-4 Priority Sync Queue
You can specify the priority sync queue size in iMonitor using under . For more information, refer to Controlling and Configuring the DS Agent.
During a priority sync process, if a number of modifications happen at short intervals, the queue reaches its maximum size then, the queue expires and a new queue is formed. The modifications in the older queue that are not yet synchronized, will be synchronized by normal synchronization.
The queue size for priority sync can vary from 0 to 232 - 1. By default, this value is 232 - 1. If the Priority Sync queue size is set to 0, no modifications are synchronized through priority sync. These modifications are synchronized by normal synchronization.
The value -1 implies unlimited queue size. -1 is 232 - 1. When a negative value is specified, for example, -3, it means -3 = -1-2, which is 232 - 1-2.
Managing Priority Sync Policies
You can manage priority sync by creating and defining policies and applying them to partitions through iManager or LDAP. You define a priority sync policy by identifying the attributes that are critical.
NOTE:Plug-ins are available only in NetIQ iManager 2.6 and later.
Figure 4-5 Priority Sync process
For example, if the attributes Password and Account Number are critical, you can create a priority sync policy PS1 that contains these attributes. You can then apply the policy PS1 to a partition P1. If you change the password or the account number of an entry on a server, the changes are immediately synchronized with other servers having partition P1.
For priority sync to happen, you need to check if outbound and inbound priority sync are enabled in iMonitor. Inbound and outbound priority sync are enabled by default. If you disable inbound and outbound priority sync, the modifications to the data are synchronized by normal synchronization.
For more information, see Controlling and Configuring the DS Agent.
This section provides the following information:
When you create a child partition, the priority sync policy that is applied to the parent is inherited by the child partition. When you merge partitions, the priority sync policy of the parent is retained.
Creating and Defining a Priority Sync Policy
You can define a priority sync policy by selecting the attributes either directly or through an object class. When you select attributes through an object class, all the attributes under the object class are selected for priority sync. You can choose to select the mandatory or optional attributes for priority sync.
The priority sync policy can be created anywhere in the eDirectory tree using either iManager or LDAP.
Using iManager:
-
Click the button
 .
.
-
Click > .
-
In the Priority Sync Policies Management Wizard, select .
-
Click .
-
Follow the instructions in the Create Priority Sync Policy Wizard to create the policy.
Help is available throughout the wizard.
Using LDAP:
To create an empty priority sync policy:
dn:cn=policy1,o=policies
changetype:add
objectclass:prsyncpolicy
To define the priority sync policy by marking the attributes for priority sync:
dn:cn=policy2,o=policies
changetype:add
objectclass:prsyncpolicy
prsyncattributes:description
In the above example, Description is the attribute marked for priority sync.
Editing a Priority Sync Policy
You can edit a Priority Sync Policy object using iManager or LDAP.
Using iManager
-
Click the button
.
-
Click > .
-
In the Priority Sync Policies Management Wizard, select .
-
Click .
-
Follow the instructions in the Edit Priority Sync Policy Wizard to edit the policy.
Help is available throughout the wizard.
Using LDAP
In the following example, the priority sync policy is modified by marking Surname for priority sync instead of Description.
dn:cn=policy2,o=policies
changetype:modify
add:prsyncattributes
prsyncattributes:surname
To remove an attribute that is marked priority sync from the priority sync policy:
dn:cn=policy2,o=policies
changetype:modify
add:prsyncattributes
prsyncattributes:description
In the above example, the attribute Description is removed from the priority sync policy.
Applying a Priority Sync Policy
You can apply one priority sync policy to many partitions, but not more than one policy to a partition.
You can apply a priority sync policy to a partition using either iManager or LDAP.
Using iManager:
-
Click the button
.
-
Click > .
-
In the Priority Sync Policies Management Wizard, select .
-
Follow the instructions in the Apply Priority Sync policy Wizard to apply the policy.
Help is available throughout the wizard.
Using LDAP:
To apply a priority sync policy to a root partition:
dn:
changetype:modify
add:prsyncpolicydn
prsyncpolicydn:cn=policy2,o=policies
In the above example, policy2 is applied to the root partition.
To apply a priority sync policy to a nonroot partition:
dn:o=org
changetype:modify
add:prsyncpolicydn
prsyncpolicydn:cn=policy2,o=policies
In the above example, policy2 is applied to the nonroot partition.
To replace a priority sync policy for a nonroot partition:
dn:o=org
changetype:modify
replace:prsyncpolicydn
prsyncpolicydn:cn=policy1,o=policies
In the above example, policy2 is replaced by policy1.
To disassociate a priority sync policy with a nonroot partition:
dn:o=org
changetype:modify
delete:prsyncpolicydn
In the above example, the priority sync policy is disassociated from the nonroot partition O=Org.
Deleting a Priority Sync Policy
You can delete a priority sync policy using either iManager or LDAP.
Using iManager:
-
Click the button
.
-
Click > .
-
In the Priority Sync Policies Management Wizard, select .
-
Follow the instructions in the Delete Priority Sync policy Wizard to delete the policy.
Help is available throughout the wizard.
Using LDAP:
dn:cn=policy1,o=policies
changetype:delete
NOTE:For more information on creating and managing priority sync policies, see Using LDAP Tools on Linux and NetIQ Import Conversion Export Utility.
When Can Priority Sync Fail?
Priority sync can fail under any of the following circumstances:
-
Network failure: Priority sync will not store modifications if it is unable to send them to the remote server in the case of network failure.
-
Priority sync queue size reaches its maximum: Priority sync will ignore the changes in the priority sync queue if the number of entries exceeds the priority sync queue size.
-
Failure in schema synchronization: If the schema is not synchronized, priority sync process will fail.
-
Object does not exist on other servers: If the creation of the object is itself not synchronized, priority sync fails.
-
Mixed servers in the replica ring: If you have both eDirectory 8.8 and pre-eDirectory 8.8 servers, priority sync fails.
When priority sync fails because of any of the above reasons, the changes to the critical data are synchronized through normal synchronization.