6.2 Configuring the Citrix XenServer Provisioning Adapter
If you manage a Citrix XenServer environment, you can use the NetIQ Cloud Manager XenServer provisioning adapter job to help you manage that environment. The xenserv provisioning adapter job is automatically deployed when you start the Orchestration Server.
For more information about the xenserv provisioning adapter policy, see The Citrix XenServer Provisioning Adapter
in the NetIQ Cloud Manager 2.1.5 VM Orchestration Reference.
This section includes the following information:
6.2.1 Deploying the Citrix XenServer Provisioning Adapter
The Citrix XenServer Provisioning Adapter uses the XenAPI management API to connect to and manage XenServer hosts. Unlike previous versions of the XenServer Provisioning Adapter, this adapter requires no additional software be installed on the XenServer host.
To configure the provisioning adapter, perform the following steps in the Cloud Manager Orchestration Console:
-
Create a XenServer credential for each user ID/password combination used for XenServer pool master hosts:
-
Navigate to the Grid object for the Orchestrator server in the explorer panel
-
Select the tab in the management panel
-
Under “Stored Credentials”, click
-
Fill in the following fields:
Name: The name to refer to this credential as
User: Enter root
Secret: Enter the root account’s password for the XenServer pool master
Type: Select xenserv from the dropdown list
-
-
Create an account for each XenServer pool master host in the xenserv job:
-
Expand the branch of the Grid in the explorer panel
-
Select the tab in the management panel
-
Under “Accounts”, click
-
Fill in the following fields and save the job:
Account Name: The name to use for this account
VM Host IP/DNS Address: The IP or DNS address of the XenServer Pool master server.
Credential Name: The name of the credential entered in Step 1.d
Use SSL: Check this option to encrypt the API calls over the network
NOTE:Using SSL is generally not necessary, and adds significant overhead to the traffic and processing. Only enable this option if encryption is necessary.
-
-
Associate the xenservClient policy with the system that will execute this job:
-
Expand the branch of the Grid in the explorer panel and select the system that will execute the job
-
Select the tab and click the button
-
Select the xenservClient object in the list and click the button
-
Click the button
-
-
Discover the XenServer hosts and repositories by clicking the menu and selecting
-
When the Provision(xenserv) job has completed, discover the VM images in the discovered hosts by clicking the menu and selecting
NOTE:In order for VMs to be properly discovered, they must have the XenServer tools installed and the OS information populated prior to discovery.
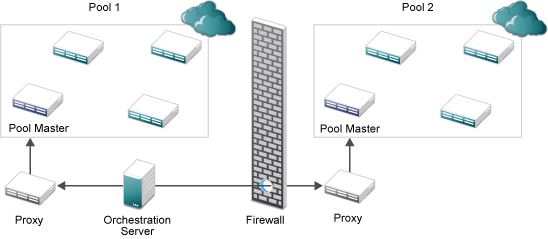
If a single provisioning adapter is deployed within a single directly reachable network, nothing special needs to be done in order for the adapter to work. This applies both with multiple pools on the same network as well as a pool on one side of a firewall, as shown in Figure 6-1.
This type of configuration is typically used when multiple networks are separated by a firewall that limits communication between the networks.
Figure 6-1 Single provisioning adapter per network
If, as shown in Figure 6-2, multiple provisioning adapters are used within a single network, it is also necessary to define restrictions using the policy. These restrictions are used to limit which XenServer pool masters each provisioning adapter connects to.
Figure 6-2 Multiple provisioning adapters per network
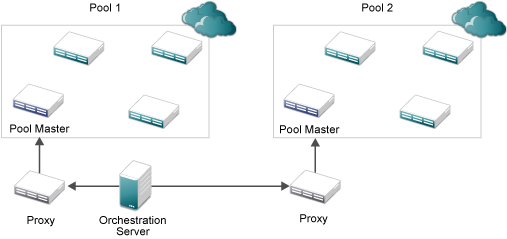
To define these restrictions, perform the following steps:
-
Navigate to the policy in the tree.
-
Create a copy of the policy for the first instance of the provisioning adapter.
-
Modify the copy to list the account name or names that the client has access to, following the instructions in the comments in the policy.
-
Associate the policy with the host the provisioning adapter job is associated with.
-
Repeat Steps 2-4 for each provisioning adapter instance.
6.2.2 Configuring the Citrix XenServer Updater
To keep the discovered facts about VMs hosted on Citrix XenServer updated, you can enable the schedule for the XenServer Updater job. To do this:
-
Open the Scheduler view
-
Select the XenServer Updater schedule
-
Click the button to enable the daemon
-
(Optional) To start the job immediately, click the button
Once the daemon is started, changes to the facts tracked by Orchestrator will be reflected as they are made to the VM.
6.2.3 Configuring Orchestrator for Personalization with XenServer
When using personalization with VMs hosted on Citrix XenServer 6.0 and later, it is necessary to have a shared ISO library configured. Orchestrator will upload a customizer LiveCD image to that library that will handle all the personalization (server name, DHCP/network configuration, autoprep/sysprep and other configuration) using that ISO.
For XenServer 5.6, it is necessary to manually upload the ISO to the ISO library:
-
Copy the CMOS_Customizer_LiveCD.i686-x.y.z.iso file from /opt/novell/zenworks/zos/server/doc/install directory into the shared ISO library
-
Rescan the ISO library in XenCenter to verify the upload has completed.
-
In the Orchestration Console, browse to the ISO library, right click, and select
Once these steps are completed, personalization of VMs on the XenServer host will run as expected.
6.2.4 Using Xen VNC Proxy to Establish a Remote Desktop Connection to XenServer VMs
NetIQ Cloud Manager uses the Xen VNC proxy (xvp) server to provide a password-based connection to the all of the guest VM consoles that are hosted on a single Citrix XenServer that is connected to a single Cloud Manager Orchestration Server.
This section includes information about how to install and configure xvp for use with Cloud Manager.
Installing the Xen VNC Proxy Packages
If you want a supported method of launching a remote console of a VM managed by Citrix XenServer, you need to install the xvp package provided by NetIQ on the Cloud Manager installation ISO.
To install xvp packages:
-
Mount the Cloud Manager installation ISO on a network computer running a supported version of SUSE Linux Enterprise Server (SLES). This computer should not be part of the existing Citrix Xen environment. It must also have the NetIQ Cloud Manager Orchestration Agent installed on it.
-
On the computer where you are installing xvp, start YaST and select .
-
In the YaST view, select the install pattern, then click to install the packages. The pattern includes two xvp packages:
-
libxenserver
-
xvp
-
-
Start the Orchestration Agent on the SLES computer where you installed the xvp proxy.
-
In the Orchestration Console toolbar, select , select the registration icon to open the Resource Registration Monitor dialog box, then click > to register the new resource.
When the resource is registered, it is automatically discovered as an xvp host.
Configuring Xvp Credentials in the Orchestration Server for the Citrix XenServer Environment
After the host discovery, you need to set up the credentials that allow xvp to open ports for the VNC sessions to the Citrix XenServer VMs.
Creating Credentials for Individual Citrix XenServer VMs
VMs are most commonly provisioned and given VNC credentials by Cloud Manager business owners, who own and control those VMs as managed workloads. These are saved in the Orchestration Server credential store.
If you want to create VNC credentials manually for Citrix XenServer VMs you manage with Cloud Manager Orchestration Console, you can use the following steps:
-
In the Explorer tree of the Orchestration Console, select the Grid object for the Orchestration Server that communicates with the Citrix Xen environment, then in the Admin view, select to open the Authentication page.
-
In the Stored Credentials subpanel, select to open the Add Credential dialog box.
-
In the Add Credential dialog box, fill in the fields to create a new VNC credential set for a VM. computer.
-
Name: This is a required field. Provide a name that you want to use to identify this credential set.
-
User: This is a required field. Enter a username you want use in the VNC session for this VM.
-
Secret: This is a required field. Enter a password you want use in the VNC session for this VM.
IMPORTANT:This password must be no more than 10 characters. Passwords with more than 10 characters do not store properly.
-
Type: Select as the credential type.
-
-
Click to save the credential information.
-
In the Explorer tree, select a VM that is hosted by the Citrix XenServer computer “host”.
-
Apply the newly created VNC credential for this VM.
-
Select the Info/Facts tab to open the Info/Groups page for this VM.
-
On the Info/Groups page, scroll to the field in the subpanel.
-
In the VNC Credential field, open the drop-down menu to list the configured credentials, then select the name of the credential that you created in Step 3.
-
Click to commit the change.
-
In the Explorer tree, right-click the VM to which you just added a credential, then click Apply Config or Save config to enable the credential.
This action populates the following facts on the VM:
-
resource.vnc.port
-
resource.vnc.ip
-
-
Understanding How Xen VNC Proxy Works in the Orchestration Environment
When the host discovery runs on the SLES resource where the Orchestrate Agent is running, it checks for the xvp service at /etc/init.d/xvp. If the service is present, four facts are created. The following table lists these facts, their values and purpose.
Table 6-4 Facts for the Xvp Service Listed in the SLES Resource
|
XVP Fact Name |
Default Port Value |
Purpose |
|---|---|---|
|
resource.xvp.beginport |
6901 |
|
|
resource.xvp.freeport |
6901 |
|
|
resource.xvp.vncportrange |
100 |
|
|
resource.xvpHost |
true |
|
Cloud Manager Console Actions on XenServer VMs Configured To Use Xen VNC Proxy
The following table lists some of the actions you can perform on a Citrix XenServer VM that you have configured with xvp credentials for using a remote console session.
|
VM Action |
Result |
|---|---|
|
Apply Config or Save Config |
The Orchestration Server makes an entry in the xvp configuration file for the selected VM. |
|
Migrate or Move |
The Orchestration Server moves the “VM configuration” information in the XVP configuration file to the XVP configuration file of the destination XenServer. |
|
Destroy |
The Orchestration Server deletes the “VM configuration” information in the xvp configuration file. If there are no such entries in the file, the server deletes the entire file, along with the corresponding entry from the main configuration file (/etc/xvp.conf). |
Known Issues with Xen VNC Proxy Remote Console Usage
There are some known issues with Cloud Manager 2.1 remote console connections to Citrix XenServer VMs via xvp:
-
Only one xvp proxy server can be registered on the Orchestration Server. If you determine that network traffic becomes too much for this single proxy to efficiently handle its remote connections, you can deploy another xvp, but you also need to deploy an additional Orchestration Server to manage it.
-
Occasionally, a workload (that is, a Citrix XenServer VM) provisioned from the Cloud Manager Application Server Console fails to properly configure the resource.vnc.ip fact and the resource.vnc.port fact. Use the action on the VM in the Orchestration Console to correct the configuration of these facts.