8.1 Cloning Templates
Templates provide a method for quickly creating a new VM. Information for the new VM is taken from the VM template. You simply personalize the VM with a new name and description.
A clone of a template contains just the differences between the template and the clone. The template’s file contains the bulk of the VM information. Before cloning a template, you should use the Development Client to ensure that the template includes the correct information.
Because clones are so closely related to their parent template, you cannot perform actions against a template without directly affecting its clones. So, in order to edit, delete, or move a template using the VM Client, you must first detach or delete its clones. The detaching process creates a complete VM image for the clone, which is then no longer considered to be a clone in the VM Client.
IMPORTANT:If a CD-ROM or DVD-ROM is configured for the template that you want to clone, it will be included only if its ISO or image is accessible through shared storage. If it is not accessible, the VM cloned from this template cannot start. In that case, you must remove the CD-ROM or DVD-ROM definition from the template’s properties before cloning the template.
The following steps include information for all possible fields and pages. Depending on VM type, the clone might not have all of the fields and pages.
To create a clone:
-
In the VM Client, click the view, then select a template.
-
Do one of the following to clone the template:
-
Click the
 button.
-
Click > .
-
In the view, right-click the selected template, then select .
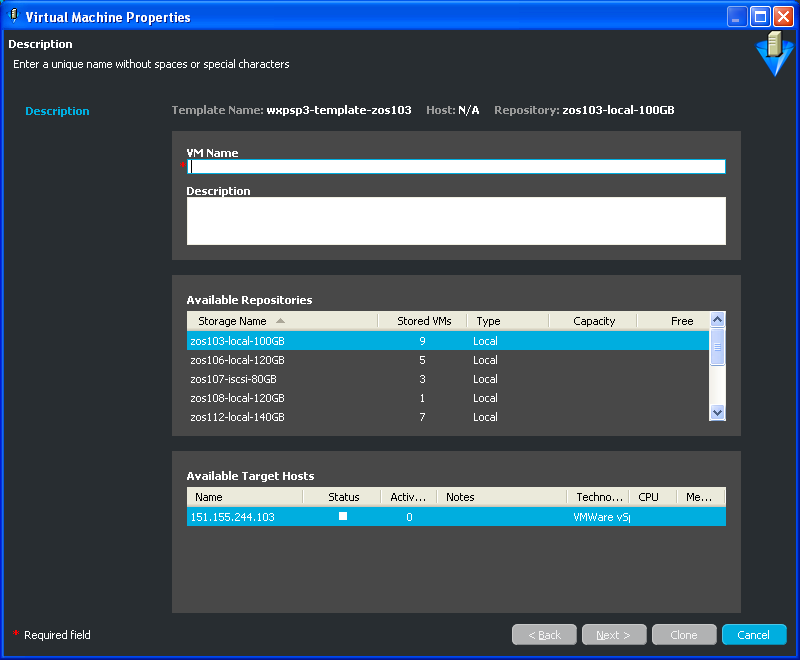
The following wizard opens:

-
-
Configure the following options:
VM Name: Specify a name for the cloned VM. This name must be unique. It cannot already exist in either the or lists. The name cannot be longer than 100 characters and cannot start with the letters “xen.”
Entering a name enables the button. All remaining fields and pages are optional; you can configure them now or after the VM clone is created.
Description: Add any information you want to identify this VM.
Available Repositories: The template’s repository is automatically selected. If you do not want to store the VM clone in this repository, select another one.
Available Target Hosts: This list displays the hosts associated with the selected repository. Select the host that you want to run the VM when it starts.
-
Click .
A cloning job is started. You can view its progress in any of the following ways:
-
Double-click the template being cloned, click the tab, then double-click the entry related to the cloning process that has the
 icon next to it. The Event Log Details dialog box is displayed and is automatically updated as events occur.
-
Observe messages at the bottom of the VM Client interface.
-
Click > to open the Progress window.
-
View its progress in the tab of the Development Client.
When the cloning process is complete, the VM Client’s job status is displayed in a pop-up message, as well as in the Event Log Details dialog box. It is also listed in the Development Client as Completed.
The cloned template is now listed with the other VMs in the view.
-
-
(Optional) Right-click the cloned VM, then select to modify it as necessary.