6.2 Configuring Cloud Manager Server Connections
The Cloud Manager Server communicates with the Cloud Manager Console, the LDAP Server, and all PlateSpin Orchestrate Servers via HTTP connections. The connections can be secure (SSL) or non-secure (no SSL).
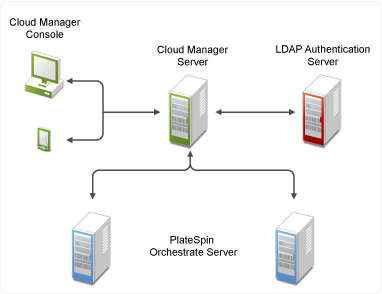
The following sections provide configuration instructions for each of the Cloud Manager Server’s connections:
6.2.1 Configuring the Cloud Manager Console Connection
No configuration is required to use a non-secure connection between the Cloud Manager Server and the Cloud Manager console. If this is the type of connection you want to use, skip to Configuring the PlateSpin Orchestrate Server Connections.
By default, the Cloud Manager Server supports a secure connection with the console. When the server is installed, it creates a self-signed certificate as the server certificate. You can keep the self-signed certificate or replace it with your own trusted certificate so that when users log in the first time, they are prompted to accept your trusted certificate rather than the untrusted, self-signed certificate.
The following sections explain how to replace the self-signed certificate with either an existing or new trusted certificate provided by your Certificate Authority (CA).
Using an Existing Certificate
If you already have a certificate for the server where you installed the Cloud Manager Server and you want to use that certificate, complete the following steps.
-
Make sure that your private key and certificate are in .DER format (key.der and cert.der), that the key is encoded in PKCS#8 format, and that the certificate is encoded in X.509 format.
-
Use the importkey java class (ImportKey.class) to import the private key and certificate into a new java keystore file:
-
If you don’t have the importkey java class, download it from one of the many available sites such as this site.
-
Run the following command:
java ImportKey key.der cert.der s1as
This creates a keystore.ImportKey file that contains the private key and certificate stored under an s1as alias.
Note: The 1 in slas is the number 1 not the letter l.
-
-
Rename the keystore.ImportKey file to keystore.jks and copy it to the following location to replace the old keystore file:
/var/opt/novell/soaframework10/domains/NovellCloudManager/config
-
Reset the keystore password to changeit:
keytool -keystore keystore.jks -storepasswd -new changeit
When prompted for the old password, enter importkey.
-
Reset the private key password (identified by the s1as alias) to changeit:
keytool -keystore keystore.jks -alias s1as -storepass changeit -keypasswd
When prompted for the old password, enter importkey.
-
Restart the Cloud Manager Server:
/etc/init.d/novell-soaframework.NovellCloudManager restart
Generating a New Certificate
The following steps explain how to generate a new certificate for use:
-
On the Cloud Manager Server, change to the directory that contains the keystore.jks file:
/var/opt/novell/soaframework10/domains/NovellCloudManager/config
-
Delete the default self-signed certificate:
keytool -delete -alias s1as -keystore keystore.jks -storepass store_password
where store_password is the keystore password. If you have not changed the default password after installation of the Cloud Manager Server, the password is changeit.
-
Generate a new key pair and self-signed certificate:
keytool -genkey -keyalg keyalg -keystore keystore.jks -validity val_days -alias s1as
where keyalg is the algorithm for generating the key pair (for example, RSA) and val_days is the number of days the certificate is valid (for example, 365).
In addition to generating the key pair, the command wraps the public key into a self-signed certificate and stores the certificate and the private key in a new keystore entry identified by the alias (s1as).
While generating the key pair and certificate, you need to ensure that the certificate matches the fully-qualified name of your Cloud Manager Server.
-
Generate a certificate signing request (CSR):
keytool -certreq -alias s1as -file certreq_file -keystore keystore.jks -storepass store_password
where certreq_file is the CSR file to create (for example, slas.csr) and store_password is the keystore password (the default is changeit).
-
Submit the CSR to a CA to receive a signed server certificate.
-
Store the signed server certificate from the CA including the markers -----BEGIN CERTIFICATE----- and -----END CERTIFICATE----- into s1as.cert file.
-
Copy the slas.cert file to the following Cloud Manager Server directory:
/var/opt/novell/soaframework10/domains/NovellCloudManager/config
-
Replace the original self-signed certificate with the signed certificate from the CA (stored in the s1as.cert file):
keytool -import -v -alias s1as -file s1as.cert -keystore keystore.jks -storepass store_password
where store_password is the keystore password (the default is changeit).
-
Restart the Cloud Manager Server:
/etc/init.d/novell-soaframework.NovellCloudManager restart
NOTE:We strongly recommend that you change the default password (changeit) for the Cloud Manager Server keystore. For instructions, see How to Change the Keystore Password.
6.2.2 Configuring the PlateSpin Orchestrate Server Connections
The Cloud Manager Server requires a connection to each PlateSpin Orchestrate Server that you plan to define as a Cloud Manager zone.
Enabling a Secure Connection
A secure connection requires certificate authentication between the Cloud Manager Server and the PlateSpin Orchestrate Server. To enable a secure connection, you need to generate the public certificate for the PlateSpin Orchestrate Web Server, import the public certificate to the Cloud Manager Server trust store, and configure the secure port for the PlateSpin Orchestrate Web Service. The following sections provide instructions:
Generating the PlateSpin Orchestrate Web Service Public Certificate
The PlateSpin Orchestrate Web Service is started automatically as part of the PlateSpin Orchestrate Server startup. The first time it starts, the Web Service creates a keystore, generates a public/private key pair, and exports the public key to a certificate.
You should check the public certificate to ensure ensure that it includes the correct information. If it does not, you will need to fix the information issues and regenerate the certificate.
-
On the PlateSpin Orchestrate Server, change to the /opt/novell/pso-ws/jetty/etc directory.
-
Verify the certificate:
keytool -printcert -file psoserver.cer
The CN entry in the certificate must match the FQDN of the host. If it does not, resolve the issue in DNS and then regenerate the psoserver.cer file by doing the following:
-
Delete the keystore file from the /opt/novell/pso-ws/jetty/etc directory.
-
Restart the PlateSpin Orchestrate Web Service:
/etc/init.d/novell-pso-ws restart
When it is restarted, the PlateSpin Orchestrate Web Service creates a new keystore, generates a public/private key pair, and exports the public key to a certificate.
-
Importing the Certificate into the Cloud Manager Server Trust Store
-
Copy the psoserver.cer file from the /opt/novell/pso-ws/jetty/etc directory on the PlateSpin Orchestrate Server to the following directory on the Cloud Manager Server:
/var/opt/novell/soaframework10/domains/NovellCloudManager/config
-
Change to the /var/opt/novell/soaframework10/domains/NovellCloudManager/config directory.
-
Import the psoserver.cer file into the trust store:
/opt/novell/soaframework-jdk10/bin/keytool -import -keystore cacerts.jks -alias psoserver -file psoserver.cer
-
Verify the key import:
/opt/novell/soaframework-jdk10/bin/keytool -list -keystore cacerts.jks
-
Restart the Cloud Manager Server:
/etc/init.d/novell-soaframework.NovellCloudManager restart
Configuring the PlateSpin Orchestrate Web Service Secure Port
By default, the PlateSpin Orchestrate Web Service listens on port 8443. If you want to change this port:
-
On the PlateSpin Orchestrate Server, open the jetty-ssl.xml file:
/etc/opt/novell/pso-ws/jetty/jetty-ssl.xml
-
Locate the <Call name =”addConnector”> section. It will look similar to the section shown below:
<Call name="addConnector"> <Arg> <New class="org.mortbay.jetty.security.SslSocketConnector"> <Set name="Port">8443</Set> <Set name="maxIdleTime">30000</Set> <Set name="handshakeTimeout">2000</Set> <Set name="keystore"><SystemProperty name="jetty.home" default="." />/etc/keystore</Set> <Set name="password">OBF:1vny1zlo1x8e1vnw1vn61x8g1zlu1vn4</Set> <Set name="keyPassword">OBF:1u2u1wml1z7s1z7a1wnl1u2g</Set> <Set name="truststore"><SystemProperty name="jetty.home" default="." />/etc/keystore</Set> <Set name="trustPassword">OBF:1vny1zlo1x8e1vnw1vn61x8g1zlu1vn4</Set> <Set name="handshakeTimeout">2000</Set> </New> </Arg> </Call> -
In the <Set name="Port"> directive, change the port number.
When adding the PlateSpin Orchestrate Server as a zone in Cloud Manager, you specify this port as the server port.
-
Save the jetty-ssl.xml file.
-
Restart the PlateSpin Orchestrate Web Service:
/etc/init.d/novell-pso-ws restart
Enabling a Non-Secure Connection
-
On the PlateSpin Orchestrate Server, open the jetty.xml file:
/etc/opt/novell/pso-ws/jetty/jetty.xml
-
Uncomment the <Call name =”addConnector”> section that enables the non-secure port.
-
Change port 8080 to another non-secure port such as 8081, 8082, or 8008.
If port 8080 is not already taken by another service, you can use port 8080. However, more than likely, the port is already taken because both the PlateSpin Orchestrate User Portal and Cloud Manager Server use port 8080 as the default non-secure HTTP port.
When adding the PlateSpin Orchestrate Server as a zone in Cloud Manager, you specify this port as the server port.
-
Save the jetty.xml file.
-
Restart the PlateSpin Orchestrate Web Service:
/etc/init.d/novell-pso-ws restart
6.2.3 Configuring the LDAP Server Connection
No configuration is required to use a non-secure connection between the Cloud Manager Server and the LDAP Server. If this is the type of connection you want to use, skip this section and continue with Section 6.3, Connecting to the LDAP Directory.
If you want to use a secure connection from the Cloud Manager Server to the LDAP Server, you need to export the LDAP Server’s certificate and import it into the Cloud Manager Server’s trust store:
Exporting the LDAP Server Certificate
Using the certificate management tool available for your LDAP Server, export the server certificate from your LDAP Server in X.509 (.cer) format.
Importing the Certificate into the Cloud Manager Server Trust Store
-
Copy the .cer file from the LDAP Server to the following directory on the Cloud Manager Server:
/var/opt/novell/soaframework10/domains/NovellCloudManager/config
-
Change to the /var/opt/novell/soaframework10/domains/NovellCloudManager/config directory.
-
Import the .cer file into the trust store:
/opt/novell/soaframework-jdk10/bin/keytool -import -keystore cacerts.jks -alias alias -file certificate
where alias is whatever name you want assigned to this entry in the keystore and certificate is the name of the LDAP .cer file.
-
Verify the key import:
/opt/novell/soaframework-jdk10/bin/keytool -list -keystore cacerts.jks
-
Restart the Cloud Manager Server:
/etc/init.d/novell-soaframework.NovellCloudManager restart