4.2 Connector for Office 365

The connector for Office 365 provides automated provisioning of accounts from the identity sources to Office 365. The connector also provides single sign-on for users from their identity source account to Office 365.

The connector for Office 365 is included with the CloudAccess appliance. However, the Admin page displays the connector only after you install the connector on the Windows server.

4.2.1 How the Connector for Office 365 Works

Before you install the connector for Office 365, review the following illustrations to help you understand how the connector works with CloudAccess.

Setup and Configuration

The following figure illustrates the basic setup and configuration steps.

  1. Run the connector for Office 365 installation using the .msi file. For more information, see Section 4.2.3, Installing the Connector for Office 365.

  2. Create a trust relationship (SAML federation) between the CloudAccess appliance and Office 365.

  3. Configure user provisioning to Office 365.

User Provisioning

The following figure illustrates the workflow in provisioning users.
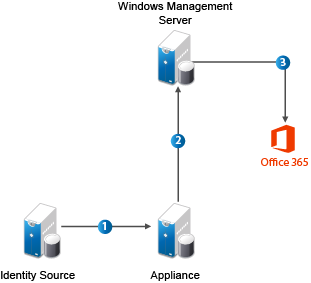
  1. The administrator defines a policy to authorize access to Office 365 applications.

  2. CloudAccess detects new and updated user information from the LDAP directory.

  3. CloudAccess sends user creation, license assignment, update, or deletion requests to the Windows Management Server.

  4. The Windows Management Server forwards requests to Office 365 using the Windows Azure Active Directory Module for Windows PowerShell cmdlets.

User Login to Office 365

The following figure illustrates the workflow for users logging in to Office 365 applications.
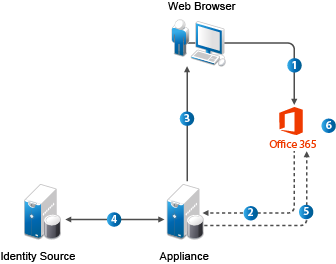
  1. The user attempts to log in to Office 365.

  2. The login is redirected to CloudAccess.

  3. CloudAccess prompts the user for the user name and password. Or, if Kerberos is configured, CloudAccess performs seamless authentication.

  4. CloudAccess verifies the user name and password using the enterprise LDAP server. Or, if Kerberos is configured, CloudAccess validates the Kerberos token.

  5. CloudAccess provides a SAML assertion to Office 365.

  6. Office 365 validates the SAML assertion and allows the user access to assigned Office 365 applications.

4.2.2 Connector Requirements

Complete the following steps before installing the connector for Office 365:

  • Select an existing Office 365 account to use or create a new account.

  • Select a federated domain name for single sign-on with CloudAccess and Office 365.

  • Select a Windows server on which to install the connector. The connector does not need to be installed on a domain controller or even need to be part of the domain where the CloudAccess appliance is installed. The Windows server can be a standalone server, as long as it meets the following requirements:

    • Windows Server 2008 R2 operating system with all available updates installed.

    • Microsoft IIS 7 with the Web Server (IIS) role enabled and the ASP.NET 4.x feature added. The connector uses https between the CloudAccess appliance and the Office 365 web application in IIS.

    • Microsoft .NET Framework 4.x. You can download .NET from the .NET downloads Web page.

    • Microsoft Online Services Sign-In Assistant 7.x. You can download the Microsoft Online Services Sign-In Assistant software from the following location: Microsoft Online Services Sign-In Assistant for IT Professionals BETA. Select the msoidcli_64.msi file.

    • Windows Azure AD Module for Windows Powershell. You can download the module from the following location: Manage Windows Azure AD using Windows PowerShell.

  • (Conditional) If you plan to use ECP (OASIS SAML 2.0 Enhanced Client Profile), also called http proxy authentication in Microsoft Outlook, ensure that your CloudAccess appliance has a publicly resolvable, publicly accessible IP address. In SAML, the browser handles all the redirects and name resolution, so you can manually edit entries in the /etc/hosts files to work around name resolution. For ECP, however, Microsoft Office 365 actually sends a SOAP authentication request directly to the CloudAccess appliance, so it must be publicly accessible. You can use port forwarding to protect your appliance behind your corporate firewall.

    In addition, ensure that the certificate for ECP support on the CloudAccess appliance meets both of the following requirements:

    • Has a common name that matches the appliance hostname

    • Is signed by a trusted certificate authority (CA) such as Verisign, Thawte, Symantec, or Digicert

    NOTE:ECP is also supported for email on mobile devices such as Android and iPhone. Users just add an Exchange account on their phone and enter their Exchange credentials. For more information, see the following Web pages:

4.2.3 Installing the Connector for Office 365

You must install the connector for Office 365 on a Windows server.

To configure the server and install the connector:

  1. Obtain the credentials for an Office 365 account. For more information, see the Office 365 Web site

  2. Add the federated domain name for single sign-on with CloudAccess and Office 365 to Office 365 and validate the ownership. Use the instructions at the following Web page: Add your domain to Office 365.

  3. Verify that the Windows server where you plan to install the connector has the prerequisite software installed. For more information, see Section 4.2.2, Connector Requirements.

  4. As an administrator on the Windows server:

    1. Create a self-signed certificate in IIS Manager.

    2. Add an https binding for the Default Web Site using the certificate you created.

    3. Restart the IIS service.

    For more information, see the IIS Manager help.

    Alternatively, you can use an imported server certificate. For more information, see Importing a Server Certificate.

  5. As an administrator on the Windows server, install the connector for Office 365 by running the Windows netiq-office365-connector-1.0.msi installer. You will need the following information:

    • DNS name of the CloudAccess appliance

    • Administrator name and password of the CloudAccess appliance

    • Administrator name and password of the Office 365 account

    • The federated domain name specified in Step 2

    Alternatively, you can run the connector installer in “silent mode” from the command line as follows:

    msiexec /i netiq-office365-connector-1.0.msi /qb AG4CHOSTNAME="DNS_of_appliance" AG4CADMIN="CloudAccess_Admin_username" AG4CADMINPASS="CloudAccess_Admin_password" O365ADMIN="Office365_Admin_username" O365ADMINPASS="Office365_Admin_password" O365FEDDOMAIN="Office365_Federated_Domain_Name" O365USAGELOCATION="US"
    

    IMPORTANT:The connector for Office 365 installation location is c:\NetIQ\Office365Connector. You cannot change this location.

4.2.4 Validating the Connector for Office 365

Once you have installed the connector, perform the following steps to validate the installation:

  1. Verify that the Admin page displays Connector for Office 365.

  2. Verify that the Policy Mapping page displays Identity Source Groups on the left side and the Connector for Office 365 on the right side.

  3. Map one of your groups to the User Authorizations, then verify that CloudAccess provisioned your users.

  4. Log in to Office 365 at http://www.office365.com as a provisioned user.

  5. Specify the user name of user@domain where the domain is the federated domain name specified in Step 2.

4.2.5 Changing Configuration of the Connector for Office 365

If you change the federated domain name, you must reinstall the connector for Office 365. The installation changes the configuration information in the connector. Delete the existing connector, then run through the installation again using the new federated domain name.

4.2.6 Uninstalling the Connector for Office 365

The connector for Office 365 consists of multiple components. To correctly uninstall the connector, log in to the Windows server as an administrator and use the uninstall function in Windows Control Panel.

Using the Control Panel to uninstall the connector deletes the connector from the CloudAccess Admin page. If you just delete the Connector for Office 365 icon from the Admin page, all of the components on the Windows server still exist and run. This causes issues in CloudAccess if you need to reinstall the connector, unless you run the connector uninstall from the Windows server before attempting to reinstall a new connector.

Alternatively, you can uninstall the connector by running the following command on the Windows server:

msiexec /x netiq-office365-connector-1.0.msi /qb

4.2.7 Installing Multiple Connectors for Office 365

CloudAccess supports multiple connectors for Office 365. However, each connector must connect to a unique Office 365 domain, and you must install each connector on a separate Windows server.