3.4 Configuring Network Options
CloudAccess contains a manual routing table, supports two Network Interface Cards (NICs), and provides a forward proxy only for testing purposes.
3.4.1 Configuring the Forward Proxy
The forward proxy takes requests coming from the internal network and forwards these requests to the Internet.
NOTE:The forward proxy feature has the following limitations:
-
The forward proxy is intended only for testing purposes, and is not supported in a production environment.
-
When forward proxy is enabled, Simple Proxy connectors work only with web servers or resources (as specified in the Connects to field of the connector configuration) that are on the local segment. All simple proxied services must be reachable from the appliance without going through the forward proxy.
To configure the forward proxy:
-
Log in with an appliance administrator account to the Admin page at https://appliance_dns_name/appliance/index.html.
-
Drag and drop the Forward Proxy icon from the Tools palette to the Tools panel.
-
Use the following information to configure the forward proxy:
Forward Proxy Server: Specify the IP address and port number for your proxy server.
Ignore List: Specify any IP addresses with the associated DNS names that you want the forward proxy to ignore. For example, 127.0.0.0|localhost.
-
Click OK to save your changes. Note that clicking OK causes the services to restart and you must log in to the appliance again.
3.4.2 Configuring the Second Network Interface
CloudAccess supports two Network Interface Cards (NICs) for each node in the cluster. You can configure one NIC for the administrative network and a second NIC for the public network. However, whether the nodes in a cluster each have one or two NICs configured, the cluster itself has only two DNS names: one for the Admin NICs and one for the Public NICs.
IMPORTANT:If you configure two NICs on one appliance, you must configure all other nodes in the cluster with two NICs.
To configure the second NIC on a node:
-
Log in with an appliance administrator account to the Admin page at https://appliance_dns_name/appliance/index.html.
-
Click a node icon, then click Configure.
-
Click the Public Interface tab.
-
Select Enable Separate Public Interface.
-
Configure the network settings for your public network and click OK.
-
(Conditional) If this is the first node in the cluster with a Public NIC, enter the DNS name for the public network. Modify the keypairs for SSL and SAML as needed and click OK.
-
Click Apply to save the changes.
-
Click Close.
3.4.3 Configuring the Routing Table
CloudAccess provides a routing table for your use if your network has static routes. The routing table allows you to define the next hop in your network for the node in the cluster to reach the desired destination.
To configure the routing table for each node:
-
Log in with an appliance administrator account to the Admin page at https://appliance_dns_name/appliance/index.html.
-
Click the node icon, then select Configure.
-
Click the Routing tab.
-
Specify the appropriate Reverse Path Filter setting. Reverse path filtering is used to prevent packets that arrived through one interface from leaving through a different interface. If in doubt, leave the default setting of Strict mode, since it prevents users from spoofing IP addresses from local subnets and reduces the likelihood of distributed denial-of-service (DDoS) attacks.
-
Click the plus sign (+) icon to add a route.
-
Define the desired route, then click OK.
-
(Optional) Add additional routes.
-
Click Close.
3.4.4 A Sample Network Configuration
The following graphic depicts a possible network configuration using CloudAccess with both NICs enabled on each node.
Figure 3-1 A Sample Network Diagram
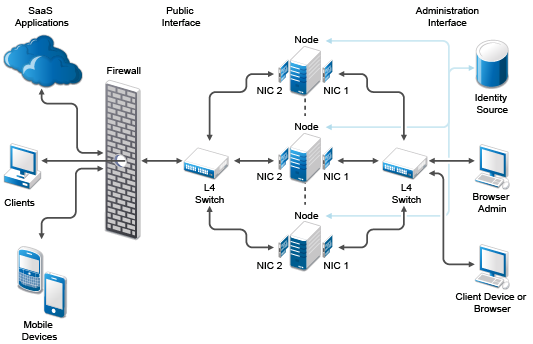
The network diagram shows that each node has both NICs enabled. The first NIC is the administration interface for the node and the second NIC is the public interface of the node. All of the administration and corporate information stays on the administration interface side of the network. All user requests and application requests communicate only on the public interface. This configuration provides a layer of security for your corporate information.