12.1 Understanding the Job Scheduler View
This section includes information to help you understand the functions of the Job Scheduler and how to use it to launch Orchestration Server jobs.
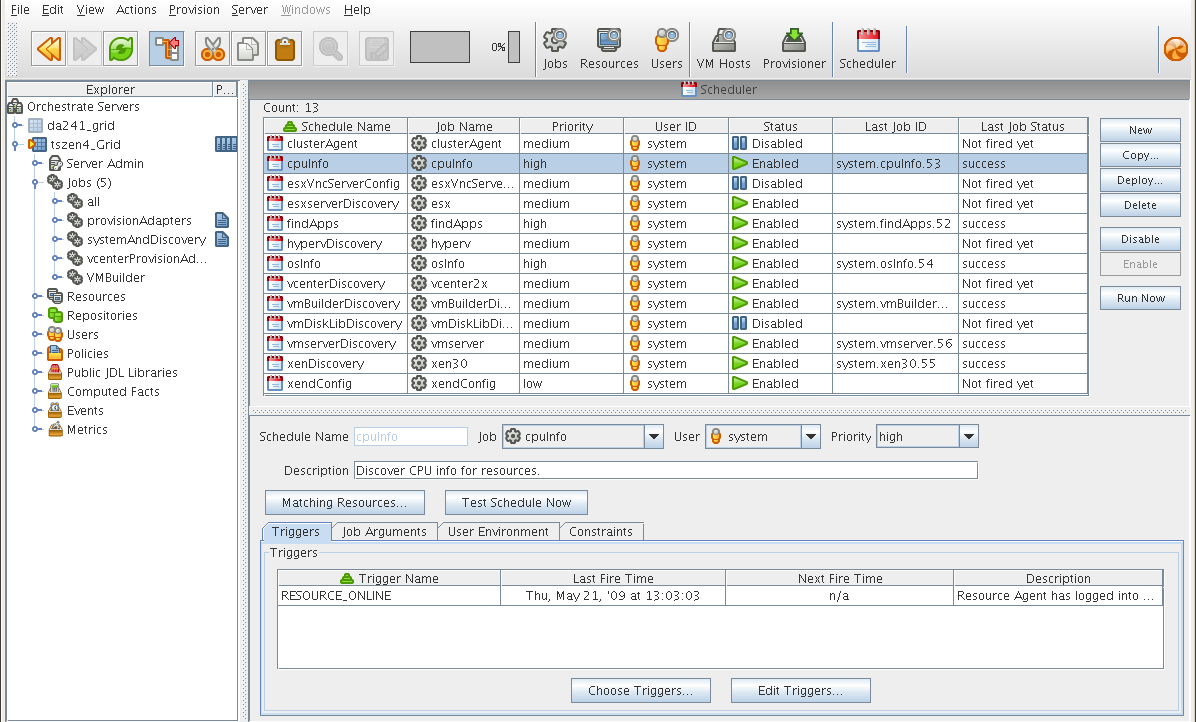
Click on the main toolbar of the Orchestration Console to open the Job Scheduler view.
Figure 12-1 Job Scheduler View of the Orchestration Console
12.1.1 Navigating The Job Schedules Table
The Orchestration Server includes several predefined and predeployed discovery jobs that have predefined launch schedules. Among these jobs are the cpuinfo, findapps, osinfo, and other jobs, depending on the options (that is, the server profile) you chose and the configuration you used during the installation. After installation, these jobs are listed by name in a table in the Job Scheduler view.
Figure 12-2 The Job Schedules Table in the Job Scheduler View

By default, the server uses schedule names that are similar to the job name so that schedules are easy to match (although this is not required). The schedules list shows all of the existing job schedules that accompany predefined jobs, along with the schedules that you create in the Job Scheduler.
NOTE:The Job Scheduler view is not a real-time monitor view of jobs, so if a job attribute (for example, Last Job Status or Last Fire Time) has changed, it might not be displayed until you click .
The Job Schedules Table has functionality that lets you decide how you want to display information about the job schedules:
-
You can drag any column in the table to move it left or right in the table according to your preference.
-
You can mouse over any column heading in the table to view tooltip text about the purpose of the data in that column.
-
You can right-click any column heading in the table to open the Job Scheduler Column Editor dialog.
Figure 12-3 Job Scheduler Column Editor dialog
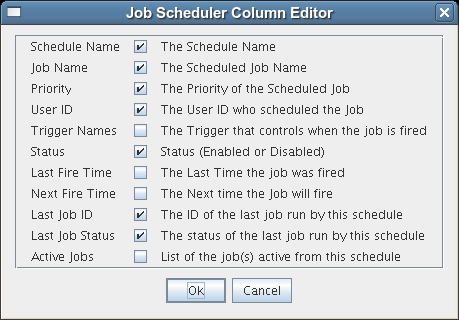
You can select any column heading in this dialog to display it in the Job Schedules Table. The columns display the attributes of a previously configured job schedule. As the figure shows, this dialog also includes text that clarifies the purpose of the data in each column.
In the Job Scheduler view, there are seven function buttons next to the Job Schedules Table (see Figure 12-2) that let you take action on any schedule you select inside the table. (Only one schedule at a time can be selected.)
-
New: Opens a dialog where you can create a new schedule. When you create a new schedule, the Job Scheduler adds a new line to the Job Schedules Table. When the new line is added, you can use the Job Schedule Editor to edit the attributes of the schedule. A new schedule must be given a unique schedule name.
The Job Scheduler forces a new schedule to be created in the state to prevent it from running while it is being defined. You click when a job is ready to be used.
-
Copy: Copies a schedule you have selected in the Job Schedules Table. Clicking this button opens a dialog where you rename the copy. If you want to create a schedule that is similar but not identical to an existing schedule, use this button to save time in adding attributes to a job schedule configuration. A copy of a schedule must be given a unique schedule name.
-
Deploy: Opens a dialog where you can select a schedule (that is, a deployable .sched file) to deploy.
-
Delete: Deletes the selected schedule from the Job Schedules Table. You cannot recover a deleted job schedule.
NOTE:Deleting a schedule that was deployed as part of a .job or .sar displays a confirmation dialog. Deleting the schedule undeploys all contents of the .job or .sar that contains the schedule.
-
Disable: Disables the selected schedule in the Job Schedules Table. The jobs associated with the schedule are not re-run, but any currently running instances of this job continue to run.
-
Enable: Enables a disabled job schedule.
-
Run Now: Forces the specified schedule to run immediately. This updates statistics such as .
Removed Jobs or Users: Scheduler Behavior
If a job or a user is undeployed or removed from the Orchestration Server, the Job Schedules Table continues to list the schedule previously associated to that removed grid object, but the removed grid object no longer displays the icon that represents the object (job or user).
Figure 12-4 User Object and Job Object Icons Are Not Displayed
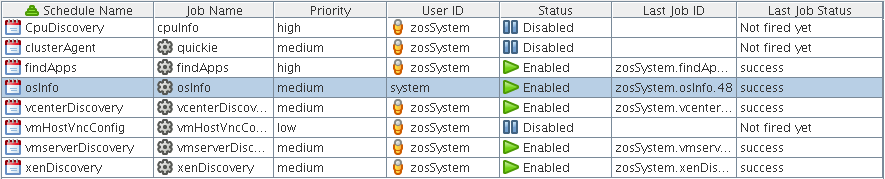
In the preceding figure, the schedule displays no Job icon for the job in the schedules table. Even though the job has been undeployed, the schedule is still listed.
In the schedule, the user has no User icon. That user has been removed from the server.
If you choose a new user or job to be associated with a schedule, a deleted or undeployed user or job is never displayed in the pop-up menu for that schedule again.