5.2 Alternative Installation Methods for the Orchestration Agent
If you install the Cloud Manager Orchestration Server and the Cloud Manager Application Server, you also need to install the Orchestration Agent on a supported virtual or physical machine so that you can discover resources on such machines and then manage them by using the Cloud Manager Web Console. This section includes information about the installation methods you can use that differ from the standard installation on the Orchestration Server or Application Server.
After you install the software on a SLES server, packages for alternative platforms for the Orchestration Agent are available on the server. You can install the agent on most releases of the following operating systems on machines in the same network:
-
SUSE Linux Enterprise Server 11 servers
-
SUSE Linux Enterprise Desktop 11 desktops
-
Red Hat Enterprise Linux 6 servers
-
Microsoft Windows Server 2003, 2008, or 2012 servers
-
Microsoft Windows Vista, 7, or 8.x desktops
The alternative agent installation methods vary depending on the platform you are installing to. For information about additional requirements for the Orchestration Agent, see Section 2.3, Cloud Manager Orchestration Agent Requirements.
Agents can be automatically installed on multiple computing resources or groups of computing resources by using your favorite configuration management software. For Windows installation, you can also build your own silent install script. For details about the installation options available for this kind of installation, see Section 5.2.5, Advanced Agent Installation Methods
Windows Installation Source: The Windows installation program for the agent is located on the install media at \Windows\zosagent_windows_3.5.0_with_jre.exe. For information about installing the clients on a Windows machine, see Section 5.3.2, Installing the Console and Clients on Windows.
You can copy this file from the install media to the network, then copy it again to a supported Windows machine where you can run the installation program, or you can open the Administrator Information .html page in a web browser. On this page, you can either run the program or download it to copy and run elsewhere. For more information about the Administrator Information page, see Section 5.2.1, Obtaining the Agent Installer and Supporting Files from the Administrator Information Page.
NOTE:Installation of the Orchestration Agent on a Windows machine does not install the Cloud Manager Monitoring Agent (gmond).
For Monitoring Agent installation information, see Section 5.4.2, Installing the Cloud Manager Monitoring Agent On Windows Machines.
Linux Installation Source: The manual installation procedure for the agent files on Linux depends on the operating system where you want to install them.
This section includes the following information:
5.2.1 Obtaining the Agent Installer and Supporting Files from the Administrator Information Page
After you install the Orchestration Server on the network, you can launch the Administrator Information page. The page has links to various installer programs that you can use to install required Cloud Manager software on the computing resources that you will be utilizing in the grid system.
The Orchestration Server Administrator’s web page applications support the following web browsers:
-
Microsoft Internet Explorer version 9.0 or later
-
Mozilla Firefox version 7.x or later
-
Google Chrome, version 33 or later
Using a supported browser, enter the following URL to access the Administrator Information from the server:
http://Orchestration_Server_name:8001/
This URL is the DNS name (or IP address) of Orchestration Server. Be sure to use Port 8001 in the address to access and display the page, as shown in the following illustration:
Figure 5-1 Administrator Information Page
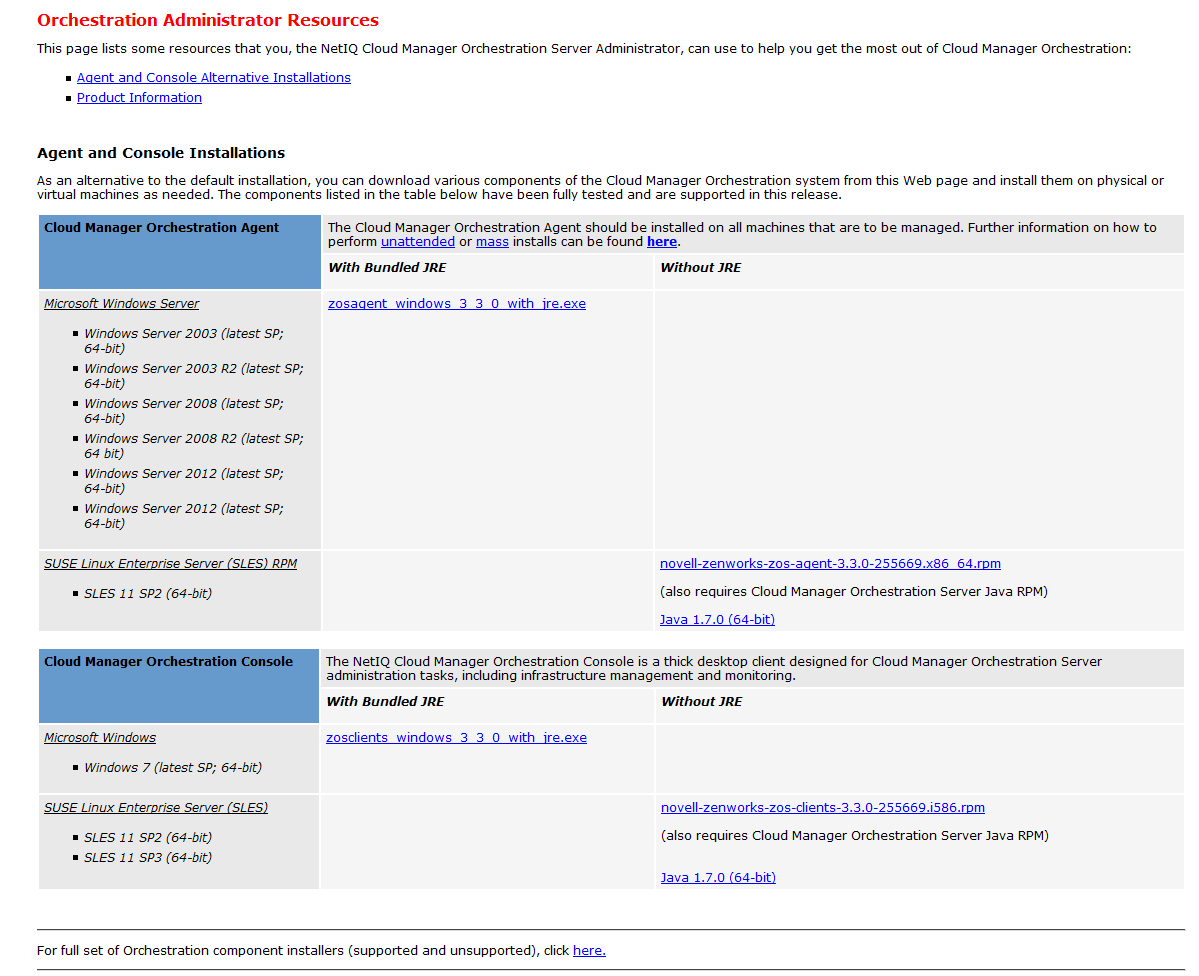
The page includes links to information for Cloud Manager Orchestration Server administrators, including product documentation and the installers for the Orchestration Agent.
5.2.5 Advanced Agent Installation Methods
This section includes information you can use if you find that the standard and manual methods for installing the Orchestration Agent in your datacenter are inadequate.
Silent Installation of the Orchestration Agent
In a large data center, it might not be practical to perform an interactive configuration of the Orchestration Agent on the multiple servers that you intend to use for Cloud Manager resources. The information in this section provides information that can help you perform a silent installation and configuration of the agent.
Silent Install and Configuration of the Orchestration Agent for Windows
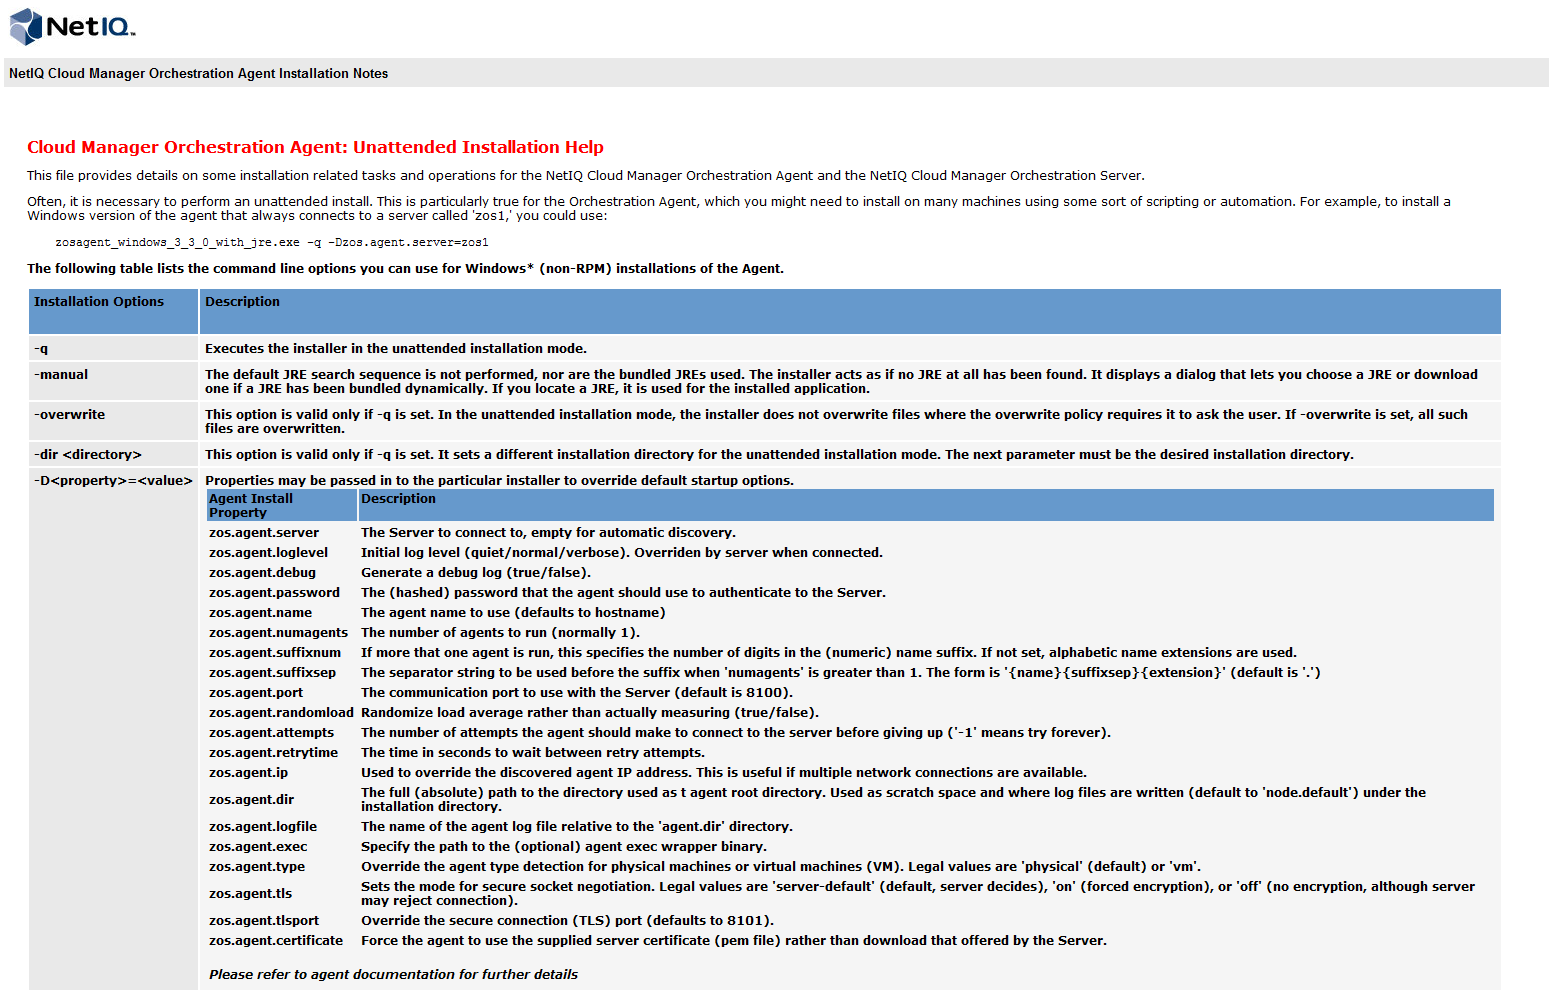
The Cloud Manager Orchestration Server includes an installation help page that provides tips for installing the Windows Orchestration Agent on many machines when you want to use scripting or automation to perform a silent installation.
The page is accessed from the Orchestration Server IP address:
http://IP_address:8001/install.html
Figure 5-2 Orchestration Agent Silent Installation Help
Silent Installation and Configuration of the Orchestration Agent RPM
Use the following process to configure the Orchestration Agent RPM (downloaded from the product ISO) on multiple servers:
-
Perform the product installation and manual configuration of the agent on a “seed” machine. The processes to do this are described in Section 5.1, Installing Orchestration Components on SLES.
-
On the “seed” machine, copy the file found at /etc/opt/novell/novell_zenworks_orch_install.conf to a location where you can modify it locally.
-
Edit the local copy of novell_zenworks_orch_install.conf, updating the fields that require a password (for security purposes, when a configuration program runs, the passwords in the .conf file are deleted).
-
Edit any other fields as necessary for the configuration of the Orchestration Agent.
-
Distribute the modified file to the machines where you want to perform a silent configuration.
-
At a machine where you distributed the .conf file, open YaST and perform the Add-on Installation of the RPM files as described in Section 5.2.3, Manually Installing the Agent Packages on SLES Machines. Ensure that you do not configure the agent manually.
-
From the bash prompt on the machine where you are configuring the agent, run the following command:
/opt/novell/zenworks/orch/bin/config -s -C $CONF_FILEwhere CONF_FILE is the modified configuration file from Step 5.
The silent configuration runs, then the agent is displayed in the Orchestration Console as registered with the server node.
Using an Orchestration Job to Install the Orchestration Agent on a VM Host
The following job code sample shows how you can use a job to install the Orchestration Agent on a VM host.
"""
Search for a VM Grid objects using Constraints and run a VM operation on them.
"""
class test(Job):

   def job_started_event(self):

      # collect all VM Instances whose resource ID
      # starts with the string "apache"

      a = AndConstraint()

      e1 = EqConstraint()
      e1.setFact("resource.type")
      e1.setValue("VM")
      a.add(e1)

      e2 = EqConstraint()
      e2.setValue("apache*")
      e2.setMatchMode(EqConstraint.MATCH_MODE_REGEXP)
      e2.setFact("resource.id")
      a.add(e2)

      vms = getMatrix().getGridObjects(TYPE_RESOURCE,a,None)
      for vm in vms:
         vm.installAgent()
Automatically Installing the Agent on a VM
To automatically install the Orchestration Agent on a VM that you created in the client, right-click a VM that has been shut down, then select . This launches a job that installs the Orchestration Agent on the VM, regardless of its platform. The agent’s service is started the next time you provision the VM.