15.3 Installing the Orchestration Server to a SLE HAE Cluster Environment

This section includes information to help you install Orchestration Server components in a SUSE Linux Enterprise (SLE) High Availability Extension (HAE) environment. The sequence below is the supported method for configuring this environment.

NOTE:Upgrading from earlier versions of Cloud Manager Orchestration to a high availability environment is supported. For more information, see Section 22.0, Upgrading Orchestration Server Components.

15.3.1 Meeting the Prerequisites

The environment where the Orchestration Server is installed must meet the operating system, hardware, and software requirements for high availability. This section includes the following information to help you understand those requirements.

Hardware Requirements for Creating a High Availability Environment

Ensure that the following hardware requirements are met for creating a high availability environment for the Orchestration Server:

  • A minimum of two physical servers configured with the same hardware. NetIQ Corporation recommends a two-node or three-node configuration. These servers are the nodes of the cluster where Orchestration Server is installed and are a key part of the high availability infrastructure.

  • Each server must have dual network interface cards (NICs), supporting a minimum data rate of 100 Mbps Ethernet communications.

  • A Fibre Channel or iSCSI Storage Area Network (SAN) or network storage, with a shared disk connected to each of the servers that you plan to use in the cluster.

  • A STONITH (shoot the other node in the head) device to provide node fencing. A STONITH device is a power switch that the cluster uses to reset nodes that are considered unresponsive. Resetting non-heartbeating nodes is the only reliable way to ensure that no data corruption is caused by nodes that hang and only appear to be dead. For more information about setting up STONITH, see, Fencing and STONITH in the SUSE Linux Enterprise High Availability Administration Guide.

Software Requirements for Creating a High Availability Environment

Ensure that the following software requirements are met for creating a high availability environment for the Cloud Manager Orchestration Server:

  • SUSE Linux Enterprise Server 11 Service Pack 4 (SLES 11 SP 4) with all available online updates installed on each node that will be part of the cluster. Download the appropriate 64-bit version from SUSE Downloads.

  • SUSE Linux Enterprise High Availability Extension 11 Service Pack 4 (SLE HAE 11 SP 4) with all available online updates installed on each node that will be part of the cluster. Download the appropriate 64-bit version from SUSE Downloads.

    The SLE HAE 11 SP 4 source includes Oracle Cluster File System 2 (OCFS2), a parallel cluster file system that offers concurrent access to a shared file system. See Section 15.3.4, Setting Up the OCFS2 File System for High Availability for more information.

    The SLE HAE 11 SP 4 source also includes the Pacemaker Cluster Resource Manager. The Pacemaker software package is a high availability resource manager that supports multinode failover. See Configuring Pacemaker for more information.

    SLE HAE 11 SP 4 integrates these open source storage technologies (OCFS2 and Pacemaker). This combined technology automatically shares cluster configuration and coordinates cluster-wide activities to ensure predictable administration of storage resources for shared-disk-based clusters.

  • DNS installed on the nodes of the cluster for resolving the cluster host name to the cluster IP. See The Domain Name System in the SUSE Linux Enterprise High Availability Administration Guide.

  • The Orchestration Server installed on each node of the cluster. See Section 7.2, Configuring the Monitoring Server and Monitoring Agent.

    NOTE:Ensure that you install Cloud Manager Monitoring Server when you install Orchestration Server. Otherwise, later attempts to set up the server for high availability by running the zos_server_ha_post_config.sh script fail. See Section 3.3, Cloud Manager Monitoring Server Installation Pattern.

Other Requirements

Ensure that the following services requirements are met for creating a high availability environment for the Orchestration Server:

  • Synchronize time for nodes to an NTP server outside the cluster. See Configuring Time Synchronization.

  • NIC names must be identical on all nodes.

  • Use static IP addresses on each node and for the cluster.

  • Include both the fully qualified host name and short host name in the /etc/hosts file.

  • All cluster nodes must be able to access each other via SSH.

15.3.2 Installing the SLE High Availability Extension

After you install the SLES 11 SP 4 operating system, use YaST2 (or the command line, if you prefer) to install the SLE HAE 11 SP 4 package to each physical node that is to participate in the Orchestration Server cluster. See “Installation and Basic Setup” in the SUSE Linux Enterprise High Availability Administration Guide.

15.3.3 Configuring Nodes with Time Synchronization and Installing Pacemaker to Each Node

After you have installed the high availability packages to each node of the cluster, you need to configure the Network Timing Protocol (NTP) and Pacemaker clustering environment on each physical machine that participates in the cluster.

Configuring Time Synchronization

To configure time synchronization, you need to configure the nodes in the cluster to synchronize to a time server outside the cluster. The cluster nodes use the time server as their time synchronization source.

NTP is included as a network service in SLE HAE 11 SP 4. Use the Time Synchronization with NTP instructions in the SUSE Linux Enterprise High Availability Administration Guide. to help you configure each cluster node with NTP.

Configuring Pacemaker

Pacemaker Cluster Resource Manager is an open source server clustering system that ensures high availability and manageability of critical network resources including data, applications, and services. It is a multinode clustering product for Linux that supports failover, failback, and migration (load balancing) of individually managed cluster resources.

Pacemaker packages are installed with the SLE HAE 11 SP 4 install source. For detailed information about configuring Pacemaker, see Configuring and Managing Cluster Resources (GUI) in the SUSE Linux Enterprise High Availability Administration Guide.

Setting timeout values is very important. The Default Action Timeout global cluster option controls how long Pacemaker waits for services to start if a specific timeout value is not configured otherwise in a cluster resource. The default value is 20 seconds.

Setting the value too low will result in unnecessary fencing operations in the cluster. Ensure that you check how long it takes Orchestration Server to start in your environment, and adjust the Default Action Timeout values accordingly.

NOTE:The Orchestration Server requires more time than 20 seconds to start. NetIQ Corporation recommends that you specify the value in this field to a minimum of 120s. More time might be required if your Orchestration Server grid is very large.

To modify the Default Action Timeout value:

  1. In the Pacemaker GUI, click Configuration > CRM Config > Policy Engine.

  2. In the Default Action Timeout field, modify the default value of 20s to 120s.

  3. Click Apply.

Figure 15-2 The Main Settings Page in the Pacemaker Graphical Interface

15.3.4 Setting Up the OCFS2 File System for High Availability

OCFS2 is a general-purpose journaling file system that is fully integrated in the Linux kernel that ships with SLE HAE. OCFS2 allows you to store application binary files, data files, and databases on devices on shared storage. All nodes in a cluster have concurrent read and write access to the file system. A distributed lock manager helps prevent file access conflicts. OCFS2 supports up to 32,000 subdirectories and millions of files in each directory. The O2CB cluster service (a driver) runs on each node to manage the cluster. OCFS2 uses the cluster membership services from the Pacemaker Cluster Resource Manager.

OCFS2 and Pacemaker

SUSE Linux Enterprise (SLE) High Availability Extension (HAE) server automatically installs the OCFS2 kernel module (ocfs2) and the Pacemaker Cluster Resource Manager. For each node, ensure that the ocfs2-tools and ocfs2-kmp-* packages are installed, and then configure the Pacemaker cluster management system.

Shared Storage Requirements for OCFS2

You must provide network storage where you will create the OCFS2 file system. This is where the Orchestration files will be stored. The High Availability Extension supports Fibre Channel or iSCSI storage area networks (SANs).

SAN configuration is beyond the scope of this document. Refer to the following resources:

DLM, O2CB, and STONITH

Before you can create shared OCFS2 volumes, you must configure the following resources as services in the cluster: DLM, O2CB, and a STONITH resource. For more information, see “Configuring OCFS2 Services and a STONITH Resource” in the SLE High Availability Extension Administration Guide.

Shared OCFS2 Volumes

For information about creating and using OCFS2 volumes, see “OCFS2” in the SLE High Availability Extension Administration Guide.

IMPORTANT:The Cloud Manager Orchestration Server requires a specific mount point for file storage on the SAN. Use /zos for this mount point.

15.3.5 Installing the Orchestration Server on the First Cluster Node

NOTE:As you prepare to install the Cloud Manager Orchestration Server and use it in a high availability environment, ensure that the requirements to do so are met. For more information, see Section 2.0, Cloud Manager System Requirements.

To install the Orchestration Server packages on the first node of the cluster:

  1. Log in to the target SLE HAE 11 SP 4 server as root, then open YaST2.

  2. Download the appropriate Cloud Manager ISO to the node.

    or

    Load the Cloud Manager DVD on the node.

  3. Define the Cloud Manager ISO or DVD as an add-on product:

    1. In the YaST Control Center, click Software, then click Add-On Products.

    2. Click Add, select Local ISO Image or DVD, then follow the prompts to add the product.

  4. Read and accept the license agreement, then click Next to display the Software Selection and System Tasks dialog.
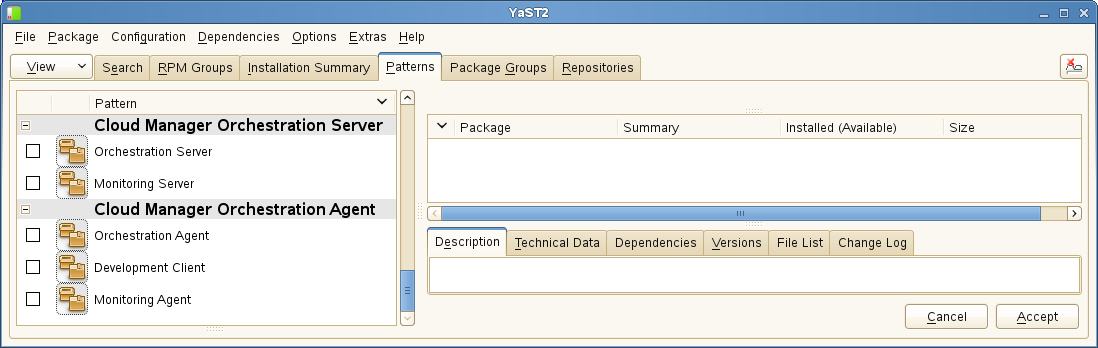
  5. Select the Orchestration Server installation pattern for installation on the first node., then click Accept.

    When you select this pattern, the Monitoring Server installation pattern and the Monitoring Agent pattern are also selected. These patterns are the gateway between enterprise applications and resource servers. The Orchestration Server manages computing nodes (resources) and the jobs that are submitted from applications to run on these resources.

    HINT:If they are not already selected by default, you need to select the packages that are in the Orchestration Server pattern, the Monitoring Server pattern, and the Monitoring Client pattern.

  6. Some additional packages that resolve the Orchestration Server dependencies are listed in an Automatic Changes dialog.

    Packages are written to your server.

  7. When the package installation is complete, click OK.

  8. Configure the Orchestration Server components that you have installed. You can use one of two methods to perform the configuration:

    • The Orchestration components (text-based) configuration script.

    • The Orchestration components GUI Configuration Wizard, which might be more user-friendly.

    HINT:Although the text-based configuration process detects which RPM patterns are installed, the GUI Configuration Wizard requires that you specify which components are to be configured.

  9. Finish the configuration by following the instructions in Checking the Configuration.