5.2 Configuring Microsoft Azure Active Directory Monitoring
Azure Active Directory (Azure AD) is Microsoft’s cloud based directory and identity management service. Change Guardian allows you to monitor Azure AD along with on-premises Active Directory. You can use the Azure AD feature to improve employee productivity, streamline IT processes, improve security, and cut costs.
The Azure AD monitoring capability in Change Guardian is built in conjunction with Microsoft Graph API. You must understand the technical limitations of the reporting APIs that are captured in Azure Active Directory reporting latencies documentation.
Change Guardian supports real-time monitoring, but due to Microsoft Azure’s latency limitations, there is a delay in fetching audit logs. This can be overcome when Microsoft fixes this latency issue.
IMPORTANT:Change Guardian supports monitoring on the Microsoft Azure public cloud. For more information, see Microsoft Graph REST API v1.0 reference.
Change Guardian monitors the following in Azure AD:
-
Administrative units
-
Applications
-
Devices
-
Directories
-
Groups
-
Policies
-
Resources
-
Roles for users and groups
-
User accounts
For more information about Azure AD, see Azure AD documentation.
Figure 5-1 Communication Between Change Guardian Components in an Azure AD environment
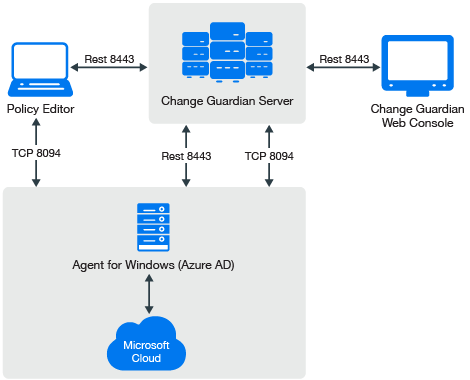
Figure 5-2 Actions Performed by the Change Guardian Components in an Azure AD environment

5.2.1 Implementation Checklist
The following table provides an overview of the tasks required for Change Guardian to start monitoring Azure AD audit events:
|
Task |
See |
|---|---|
|
Complete the prerequisites |
|
|
Ensure that you have created a tenant and its credentials are available for Change Guardian. Required credential details:
|
|
|
Add the license key |
|
|
(Conditional) Configure the default Windows registry keys, if you want to modify the default keys based on your requirements. |
|
|
Configure Change Guardian for monitoring |
|
|
(Conditional) During upgrade, ensure that you reconfigure the Change Guardian Agent for Windows to enable Azure AD monitoring. |
|
|
Triage events |
The following illustration explains the work flow of various components namely: the server, agents, clients, Policy Editor and Microsoft Azure Active Directory.
5.2.2 Prerequisites
Ensure that you have completed the following:
5.2.3 Configuring Default Windows Registry Keys
By default, Change Guardian has defined the default values for the Windows registry keys. If you want to modify the registry key values, perform the following procedures:
Configuring Azure AD Event Fetching Interval
Change Guardian fetches events in given time intervals. The default interval, is set to the recommended 120 minutes, behind the current system time as the start time.
NOTE:If the time interval is set to more than 1440 minutes, the system resets it to 1440 minutes automatically, since that is the maximum value permissible. If the latency from Microsoft is more than this value, you might face data loss.
This recommendation is due to latency issues from the Microsoft Graph API. Also while processing events received from Azure AD, Change Guardian removes duplicate events if any internally. For more information, see Azure Active Directory reporting latencies.
If you observe a different latency time in your environment, you can change this value to the observed value.
To modify the time interval:
-
In Windows registry settings, navigate to the Change Guardian agent installation directory: HKEY_LOCAL_MACHINE\SOFTWARE\Wow6432Node\NetIQ\ChangeGuardianAgent
-
Right click the AzureADEventFetchInterval key.
-
Select Decimal under Base.
-
(Conditional) If you notice a higher latency value in your environment, you can configure this value based on your observed value. The value range is between 120 minutes to 1440 minutes (24 hours) for the Value data field.
-
Click OK.
-
Go to Services > NetIQ Change Guardian Agent.
-
Select theChange Guardian Agent for Windows application, then click Restart.
Configuring Azure AD Access Token Refresh Time Interval
By default, every 30 minutes, Change Guardian refreshes the access token used to connect to the Azure active directory. The maximum limit is 50 minutes. If you configure this value to below 15 minutes, the system will reset it to 15 minutes automatically. If you configure this value to above 50 minutes, the system will reset it to 50 minutes automatically.
To modify this time interval based on your requirement:
-
In Windows registry settings, navigate to the Change Guardian Agent installation directory: HKEY_LOCAL_MACHINE\SOFTWARE\Wow6432Node\NetIQ\ChangeGuardianAgent
-
Right click the AzureADTokenRefreshInterval key.
-
Select Decimal under Base.
-
Specify the time interval to any required value range between 15 minutes to 50 minutes in the Value data field.
-
Click OK.
-
Go to Services > NetIQ Change Guardian Agent.
-
Select the Change Guardian Agent for Windows application, then click Restart.
Configuring Azure AD Event Collection Interval
By default, Change Guardian fetches event logs every 10 minutes from the Azure Active Directory and processes them based on applied policies.
NOTE:The recommended duration for a fetch interval is 10 minutes.
You can configure a event collection interval to be any duration between 5 and 30 minutes. If you configure the duration to be below 5 minutes, the system resets it to 5 minutes automatically. Similarly if you configure the duration to be above 30 minutes, the system again resets it to 30 minutes automatically.
To modify this time interval based on your requirement:
-
In Windows registry settings, navigate to the Change Guardian Agent installation directory: HKEY_LOCAL_MACHINE\SOFTWARE\Wow6432Node\NetIQ\ChangeGuardianAgent
-
Right click the AzureADEventCollectionInterval key.
-
Select Decimal under Base.
-
Specify the time interval to any required value range between 5 minutes to 30 minutes in the Value data field.
-
Click OK.
-
Go to Services > NetIQ Change Guardian Agent.
-
Select the Change Guardian Agent for Windows application, then click Restart.
5.2.4 Configuring Change Guardian
Complete the following tasks on Change Guardian server to monitor Azure AD events:
Enabling Azure AD Monitoring
Reconfigure the Change Guardian Agent for Windows, using Agent Manager, to enable Azure AD monitoring.
Prerequisite: Ensure that you have added Azure AD assets in Agent Manager.
To reconfigure the agent
-
In Agent Manager, select the asset and click Manage Installations > Reconfigure Agents.
-
In the Reconfigure Agents page, edit the configuration to select Enable Azure AD Monitoring.
Configuring Azure AD Tenant
In Azure Active Directory (Azure AD), a tenant is a representative of an organization. You have to configure a tenant and its credentials such as Domain Name, Authentication Key, and Application ID and make it available to Change Guardian. Change Guardian connects with Azure Active Directory using the Microsoft Graph API. It supports a single tenant
NOTE:The Azure AD agent is supported on Windows platforms.
To configure the Azure AD tenant for monitoring using the Policy Editor:
-
In Policy Editor, select Azure Active Directory from the left panel.
-
From the tree, navigate to Azure Tenant Configuration.
-
In the Azure Tenant Configuration window, specify values for the following fields:
-
Domain Name: Specify the name of the Azure Active Directory domain.
-
Application ID: Enter the Application ID that was displayed in the Azure portal during configuration.
-
Authentication Key: Enter the Authentication Key that was displayed in the Azure portal during configuration.
-
Comment: (Optional) Enter a comment.
-
-
Click Save.
-
(Conditional) If you want to modify any particular configuration, you need to make the modifications in the Azure Tenant Configuration window.
Creating Azure AD Policies
You can create policies to monitor the following Azure AD event sources:
Administrative Unit : Policies for adding, deleting or updating administrative units, and modifying administrative unit attributes.
Applications : Policies for adding, deleting and updating applications and application owners.
Devices : Policies for adding, deleting and updating devices, and modifying device attributes.
Directories : Policies for adding verified and unverified domains, and modifying directory attributes.
Groups : Policies for adding, deleting, updating and restoring groups, adding and removing group owner and group member, and so on.
Policy : Policies for adding, deleting and updating policies, and modifying policy attributes.
User Accounts : Policies for adding, deleting, restoring and updating user accounts, disabling and enabling accounts, and changing user license and user password, and so on.
The following section provides information about how to create policies for Azure AD.
For more information about creating fresh policies, see Creating Change Guardian Policies.
After creating policies, you can assign them to assets. For information about assigning policies, see Working with Policies.
NOTE:You cannot assign Azure AD policies by using Asset Groups.
Creating a Policy for Azure AD Groups
Complete the following steps to create the Azure Active Directory policy using the Policy Editor
To add a policy:
-
In the left pane of the Policy Editor window, select Azure Active Directory > Azure Active directory Policies.
-
Expand the Azure Active directory Policies and select Groups.
-
On the Groups Policy window, specify the appropriate information.
NOTE:Specifying the specific group event type from the event list is mandatory.
-
Click Submit.
Creating a Policy For Azure AD User Accounts
Complete the following steps to create the Azure Active Directory policy using Policy Editor
To add a policy:
-
In the left pane of the Policy Editor window, select Azure Active Directory > Azure Active directory Policies.
-
Expand the Azure Active directory Policies and select User Accounts.
-
Click Create Policy.
-
On the User Account Policy window, specify the appropriate information.
NOTE:Specifying the specific user event type from the event list is mandatory.
-
Click Submit.
5.2.5 Troubleshooting
This section contains some of the issues that might occur when you want to monitor Azure AD, using Change Guardian, along with workarounds.
Change Guardian receives an Insufficient Access Permission event
Issue: Change Guardian is unable to receive events because Read directory data permissions are not assigned to the Azure AD web application for both Application and Delegated permission types.
Workaround: Assign Read directory data permission for both Application and Delegated Permission types to Azure AD web application for Change Guardian to receive events.
Change Guardian receives an Invalid Configuration event
Issue: Change Guardian is unable to receive events because of the incorrect Domain Name, Authentication Key, or Application ID used to access Azure AD.
Workaround: Use the correct Domain Name, Authentication Key, or Application ID to access Azure AD.
NOTE:Severity of Insufficient Access Permission and Invalid Configuration events vary based on the severity of the first policy assigned.
Change Guardian Is Unable to Receive Azure AD Events
Issue: Change Guardian is unable to receive events because of the following:
-
Tenant is not reachable
-
Invalid remote web application
Workaround:
-
Enter a valid tenant name in the tenant configuration page.
-
Check if the tenant is accessible from the Change Guardian Agent computer.