7.10 Monitoring Azure Active Directory

Azure Active Directory (Azure AD) is Microsoft’s cloud based directory and identity management service. Change Guardian allows you to monitor Azure AD along with on-premises Active Directory. You can use the Azure AD feature to improve employee productivity, streamline IT processes, improve security, and cut costs.

You can monitor the following:

  • Azure AD users

  • Azure AD groups

  • Azure AD roles for users and groups

For more information about Azure AD, see Azure AD documentation.

Change Guardian connects with Azure Active Directory using the Microsoft Azure AD Reporting API. It supports a single tenant.

NOTE:The Azure AD agent is supported on Windows platforms.

7.10.1 Planning Azure AD Monitoring Using Change Guardian

The following table provides an overview of the tasks required for Change Guardian to start monitoring Azure AD audit events:

Task

See...

Ensure that you have created a tenant and its credentials are available for Change Guardian.

Required credential details:

  • Domain Name

  • Authentication Key

  • Application ID

Microsoft Azure AD portal

Assign the license key for the Azure AD module manually in an upgrade scenario.

Assigning a Module License after Upgrade

Create the Azure AD web application and ensure that you grant Read directory data permissions for both Application and Delegated Permission types.

Microsoft Azure AD portal

Configure the Microsoft Azure tenant.

Configuring Azure AD Tenant

Create policies for users and groups.

Creating a Policy for Azure AD Groups

Creating a Policy For Azure AD User Accounts

Assign policies and view events on the Change Guardian web console.

Assigning a Policy to an Asset

(Conditional) Configure the default Windows registry keys, if you want to modify the default keys based on your requirements.

Configuring Default Windows Registry Keys

(Conditional) During upgrade, ensure that you reconfigure the Windows agent to enable Azure AD monitoring.

Configure Windows Agent to Monitor Azure AD Using Agent Manager

Triage events.

You can triage events in the Change Guardian web console and click the Change Guardian shield to get more information about the events.

The Azure AD monitoring capability in Change Guardian is built in conjunction with Microsoft’s Azure AD reporting API. You must understand the technical limitations of the reporting APIs that are captured in Azure Active Directory reporting latencies documentation.

Change Guardian supports real-time monitoring, but due to Microsoft Azure’s latency limitations, there is a delay in fetching audit logs. This can be overcome when Microsoft fixes this latency issue.

IMPORTANT:Change Guardian supports monitoring on the Microsoft Azure public cloud. For more information, see Azure FAQs.

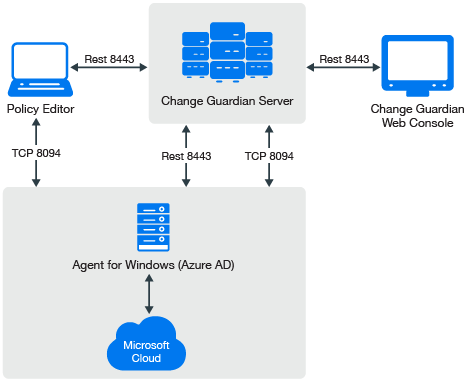
The following illustration explains the work flow of various components namely: the server, agents, clients, Policy Editor and Microsoft Azure Active Directory.

7.10.2 Configuring Azure AD Tenant

In Azure Active Directory (Azure AD), a tenant is a representative of an organization. You have to configure a tenant and its credentials such as Domain Name, Authentication Key, and Application ID and make it available to Change Guardian.

Complete the following steps to configure the Azure AD tenant for monitoring, using the Policy Editor:

  1. Select Azure Active Directory from the left panel of the Policy Editor.

  2. From the tree, navigate to Azure Tenant Configuration.

  3. In the Azure Tenant Configuration window, specify values for the following fields:

    • Domain Name: Specify the name of the Azure Active Directory domain.

    • Application ID: Enter the Application ID that was displayed in the Azure portal during configuration.

    • Authentication Key: Enter the Authentication Key that was displayed in the Azure portal during configuration.

    • Comment: (Optional) Enter a comment.

  4. Click Save.

  5. (Conditional) If you want to modify any particular configuration, you need to make the modifications in the Azure Tenant Configuration window.

7.10.3 Creating a Policy for Azure AD Groups

Complete the following steps to create the Azure Active Directory policy using the Policy Editor:

  1. In the left pane of the Policy Editor window, select Azure Active Directory > Azure Active directory Policies.

  2. Expand the Azure Active directory Policies and select Groups.

  3. On the Groups Policy window, specify the appropriate information.

    NOTE:Specifying the specific group event type from the event list is mandatory.

  4. Click Submit.

7.10.4 Creating a Policy For Azure AD User Accounts

Complete the following steps to create the Azure Active Directory policy using Policy Editor:

  1. In the left pane of the Policy Editor window, select Azure Active Directory > Azure Active directory Policies.

  2. Expand the Azure Active directory Policies and select User Accounts.

  3. Click Create Policy.

  4. On the User Account Policy window, specify the appropriate information.

    NOTE:Specifying the specific user event type from the event list is mandatory.

  5. Click Submit.

7.10.5 Assigning a Policy to an Asset

Complete the following steps to assign a policy:

  1. In the left pane of the Policy Editor window, navigate to Change Guardian.

  2. Click Policy Assignment.

  3. Select an Azure asset group or computer, and click Assign Policies.

  4. Select Assets from the drop-down list.

    NOTE:You cannot assign Azure AD policies via Asset Groups.

  5. Select a policy set or policy and click Apply.

7.10.6 Configuring Default Windows Registry Keys

By default, Change Guardian has defined the default values for the Windows registry keys. If you want to modify the registry key values, perform the following procedures:

Configuring Azure AD Event Fetching Interval

Change Guardian fetches events in given time intervals. The default interval, is set to the recommended 120 minutes, behind the current system time as the start time.

NOTE:If the time interval is set to more than 1440 minutes, the system resets it to 1440 minutes automatically, since that is the maximum value permissible. If the latency from Microsoft is more than this value, you might face data loss.

This recommendation is due to latency issues from the Microsoft Azure AD Reporting API. Also while processing events received from Azure AD, Change Guardian removes duplicate events if any internally. For more information, see Azure Active Directory reporting latencies.

If you observe a different latency time in your environment, you can change this value to the observed value. Complete the following steps to modify the time interval:

  1. In Windows registry settings, navigate to the Change Guardian agent installation directory:

    HKEY_LOCAL_MACHINE\SOFTWARE\Wow6432Node\NetIQ\ChangeGuardianAgent

  2. Right click the AzureADEventFetchInterval key.

  3. Select Decimal under Base.

  4. (Conditional) If you notice a higher latency value in your environment, you can configure this value based on your observed value. The value range is between 120 minutes to 1440 minutes (24 hours) for the Value data field.

  5. Click OK.

  6. Go to Services > NetIQ Change Guardian Agent.

  7. Select the Change Guardian Windows Agent application, then click Restart.

Configuring Azure AD Access Token Refresh Time Interval

By default, every 30 minutes, Change Guardian refreshes the access token used to connect to the Azure active directory. The maximum limit is 50 minutes. If you configure this value to below 15 minutes, the system will reset it to 15 minutes automatically. If you configure this value to above 50 minutes, the system will reset it to 50 minutes automatically.

If you want to modify this time interval based on your requirement, complete the following steps:

  1. In Windows registry settings, navigate to the Change Guardian Agent installation directory:

    HKEY_LOCAL_MACHINE\SOFTWARE\Wow6432Node\NetIQ\ChangeGuardianAgent

  2. Right click the AzureADTokenRefreshInterval key.

  3. Select Decimal under Base.

  4. Specify the time interval to any required value range between 15 minutes to 50 minutes in the Value data field.

  5. Click OK.

  6. Go to Services > NetIQ Change Guardian Agent.

  7. Select the Change Guardian Windows Agent application, then click Restart.

Configuring Azure AD Event Collection Interval

By default, Change Guardian fetches event logs every 10 minutes from the Azure Active Directory and processes them based on applied policies.

NOTE:The recommended duration for a fetch interval is 10 minutes.

You can configure a event collection interval to be any duration between 5 and 30 minutes. If you configure the duration to be below 5 minutes, the system resets it to 5 minutes automatically. Similarly if you configure the duration to be above 30 minutes, the system again resets it to 30 minutes automatically.

If you want to modify this time interval based on your requirement, complete the following steps:

  1. In Windows registry settings, navigate to the Change Guardian Agent installation directory:

    HKEY_LOCAL_MACHINE\SOFTWARE\Wow6432Node\NetIQ\ChangeGuardianAgent

  2. Right click the AzureADEventCollectionInterval key.

  3. Select Decimal under Base.

  4. Specify the time interval to any required value range between 5 minutes to 30 minutes in the Value data field.

  5. Click OK.

  6. Go to Services > NetIQ Change Guardian Agent.

  7. Select the Change Guardian Windows Agent application, then click Restart.

7.10.7 Configure Windows Agent to Monitor Azure AD Using Agent Manager

To monitor Azure AD you must deploy windows agent 5.0 or later and enable Azure AD monitoring using Change Guardian Agent Manager (CG AM).

Perform the following steps to deploy and reconfigure Windows agent to enable Azure AD monitoring:

  1. Login to Change Guardian main, click Integration > Agent Manager.

  2. Do one of the following:

    • (Conditional) If you have not previously added assets, in Agent Manager, under Asset Groups, click All Assets and then click Add Assets.

    • (Conditional) If you previously added assets, in Agent Manager, click All Assets > Manage Assets, and then click Add.

  3. From the assets list, select the computer where you want to deploy an agent. You can select multiple computers if Agent Manager can use the same credentials to connect to the computers.

  4. Provide credentials for an account that can connect to the computer and click Next.

    The account must be the local administrator account or a domain account in the Local Administrators group.

  5. Click Manage Installation, and then select Reconfigure.

  6. Perform the following steps:

    1. For the agent version, select Change Guardian Agent for Windows Agent Version, where Agent Version is the version of the Windows agent you want to deploy.

    2. For the agent configuration, click add a new configuration using the Add option. Fill in all the details.

    3. For Enable Azure AD Monitoring option, select Yes to specify that you want to reconfigure the Windows agent to enable Azure AD monitoring.

    4. Click Start Reconfiguration.

7.10.8 Troubleshooting

This section contains some of the issues that might occur when you want to monitor Azure AD, using Change Guardian, along with workarounds.

Change Guardian receives an Insufficient Access Permission event

Issue: Change Guardian is unable to receive events because Read directory data permissions are not assigned to the Azure AD web application for both Application and Delegated permission types.

Workaround: Assign Read directory data permission for both Application and Delegated Permission types to Azure AD web application for Change Guardian to receive events.

Change Guardian receives an Invalid Configuration event

Issue: Change Guardian is unable to receive events because of the incorrect Domain Name, Authentication Key, or Application ID used to access Azure AD.

Workaround: Use the correct Domain Name, Authentication Key, or Application ID to access Azure AD.

NOTE:Severity of Insufficient Access Permission and Invalid Configuration events vary based on the severity of the first policy assigned.

Change Guardian Is Unable to Receive Azure AD Events

Issue: Change Guardian is unable to receive events because of the following:

  • Tenant is not reachable

  • Invalid remote web application

Workaround:

  • Enter a valid tenant name in the tenant configuration page.

  • Check if the tenant is accessible from the Change Guardian Agent computer.