A.7 Script Variable Rules
Script variables are used to allow command parameters to be changed globally within a script. Variables can be used to control LOOP counts, to define port numbers, to specify the data type for a SEND, and so on.
-
Each variable has a variable type, depending on its usage as a command parameter—the variable type is not exposed, per se.
-
Random variables can be used for sleep times or for send and receive buffer sizes only.
-
Non-zero integer variables can be used for loop count, send size, or buffer size. Variables used for loop count may not be used for any SEND parameter, and vice versa.
-
Integer variables that allow the keyword DEFAULT are used only for buffer size.
-
The name of the variable must be unique within a script, and not contain spaces.
The Default Value field lets you specify the initial value for the variable when the script is installed. The value entered should allow the script to behave as expected without modification. The field will accept numbers to 999999999. On some variable types, such as the buffer size on SEND and RECEIVE, you can use other values, such as the term “DEFAULT.” The DEFAULT value depends on the network protocol and the endpoints you are using. AUTO, when entered for the source or destination_port variables, specifies that the TCP stack should dynamically choose available ports to use in the test.
By contrast, changes to the Current Value apply only to a specific network connection or endpoint pair. Use the Default Value field if you want to specify a value that applies to all endpoint pairs.
The type of variable used for the SLEEP command or for send and receive buffer sizes allows only five values: Constant Value, Exponential, Normal, Poisson, and Uniform Distribution. The Constant Value is a single value, but each distribution is entered as a range. All sleep values are in milliseconds (ms). For more information, see “Section A.7.1, Setting Sleep Times,” below. All buffer sizes are in bytes. For more information, see Section A.7.4, Using Random Buffer Sizes for the SEND Command.
A.7.1 Setting Sleep Times
The time parameter value on the SLEEP command lets you emulate delays caused by users or processing time. Before the next script command is executed, the endpoint sleeps for the number of milliseconds specified here. The sleep does not consume CPU cycles; it only simulates a delay, not the CPU or disk overhead that a real application might use.
The location of the SLEEP command in the script is important. If the SLEEP command occurs before the timing loop, the sleep does not affect the data sent and received. This means that timing records do not reflect the impact of the SLEEP command on the test measurements. If the SLEEP command occurs within the timing loop, the results include the effects that the SLEEP command had on the sending and receiving of data.
The Current Value field in the Script Editor Edit Variable dialog box lets you change the amount of time to sleep. By default, scripts have their delay values set to a Constant value of 0, which means that endpoints execute scripts as quickly as possible.
The script variable initial_delay is different from the other sleep variables. The longest allowable time for initial_delay is 90 minutes—that is, 5,400,000 ms. Longer values cause Endpoint 2 to time out, and the connection fails.
A script can sleep for a constant duration, or the sleep time can be randomly distributed using one of four distributions. When choosing a random distribution, be sure to choose upper and lower limits that are far enough apart for the endpoints to create a range of random sleep times. If the limits are too close together, you will not see the effects of random sleeps. For example, a lower limit of 5 ms and an upper limit of 7 ms will not provide enough variance for interesting random sleeps.
Guidelines for how to determine the values for the upper and lower limits depend on the purpose of the specific SLEEP command.
-
If you are using a SLEEP command for an initial_delay, a lower limit of 0 and an upper limit of 1000 (that is, 1 second) will emulate the random effects of a large network.
-
If you are using a SLEEP command for a delay_before_responding, tailor the values to the activity that you are emulating. If you are using this parameter to control throughput, use a narrow range between the upper and lower limits and relatively small values. The upper limits should not exceed 100, since large values cause measured throughput to reduce rapidly.
Another use of the delay_before_responding is to emulate the delay time on a server or client-server application. In this case, a reasonable lower limit is 5. You should use high upper limits. For example, if you are emulating a three-tiered application, the upper limit should be several thousand milliseconds.
-
If you are using a SLEEP command for a transaction_delay, the values should emulate the rate at which transactions are happening based on the number of users. You should determine the typical delay between a user’s transactions and convert the amount of time to milliseconds (ms).
For example, if you are emulating users transferring files, and the average user transfers a file every 20 minutes, there is a typical delay of 20 minutes. 20 minutes is equal to 1200000 ms. Divide this time by the number of users. If you have 10 users, the 1200000-ms delay time is reduced to 120000 ms. This figure determines the upper and lower limits for SLEEP. For the lower limit, reduce this time by 10%. In this example, use a lower limit of 120000. For the upper limit, increase this time by 10%. In this example, use an upper limit of 12000000.
-
As a general rule, if you are emulating a large number of users, use small values for the upper and lower distributions. If you are emulating a small number of users, you should use large values.
The four possible distributions for random sleep time are Uniform, Normal, Poisson, and Exponential. If you choose one of these random distributions, you also must select the upper and lower limits for the random times that are generated.
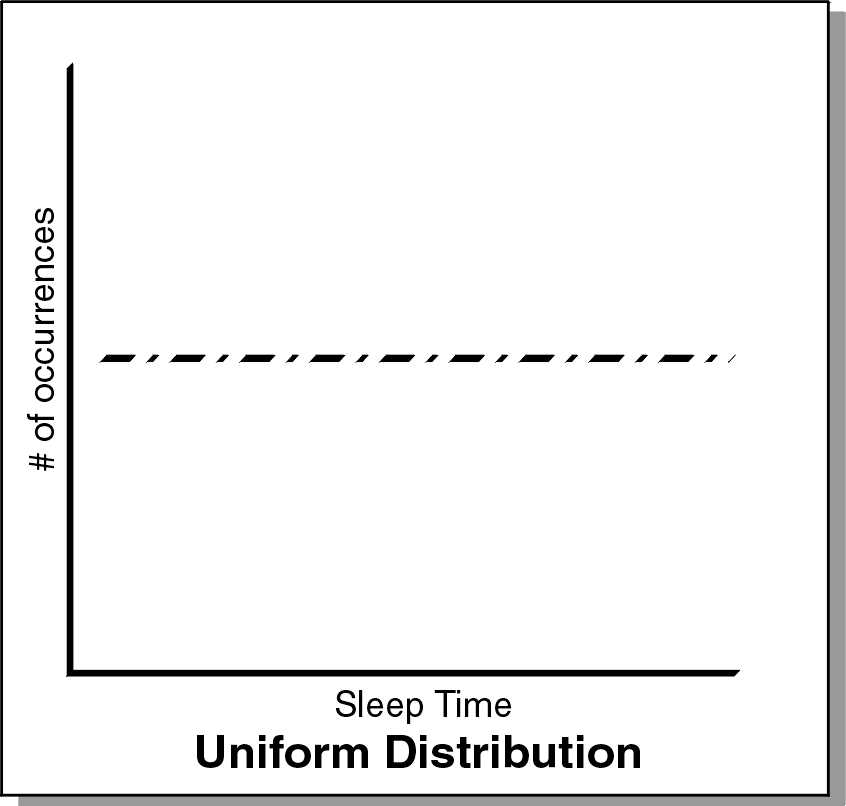
Uniform
In the following graph, the distribution of sleep times between the upper and lower limit is completely uniform. Any number within the upper and lower limits is as likely to be used for the sleep time as any other number. If you plot the sleep times against the number of occurrences, the graph should be a flat horizontal line.
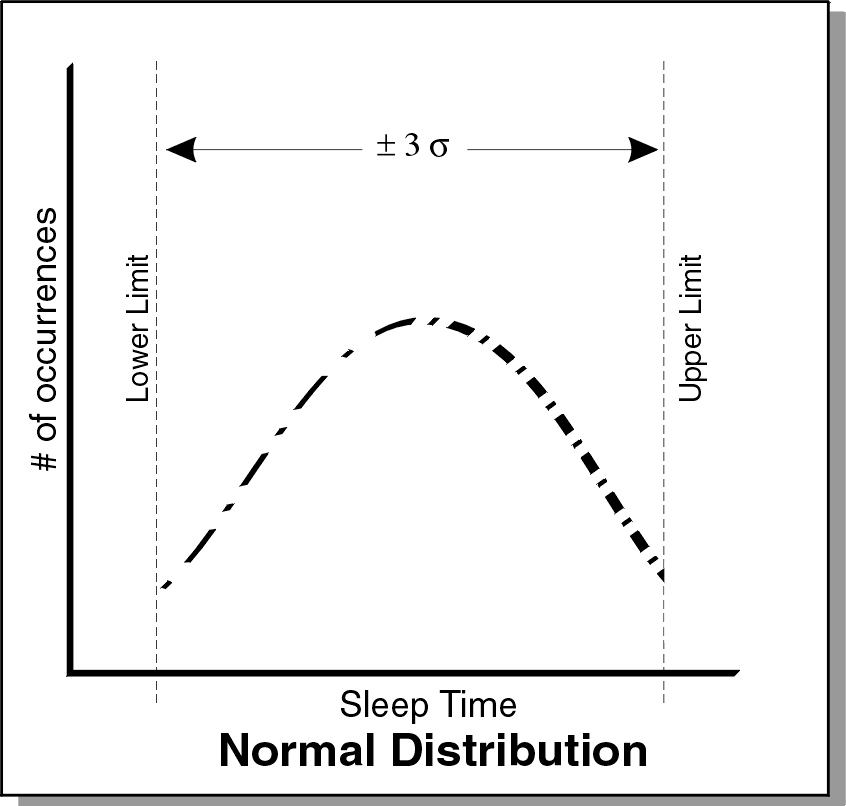
Normal
In the following graph, the distribution of sleep times between the upper and lower limits is a normal, or bell-curved, distribution. If you plot the sleep times against the number of occurrences, the graph should be a bell curve.
The Marsaglia-Bray algorithm is used to generate the normal distribution. The average value of the distribution is determined from the upper and lower limit. In a normal distribution, most values occur within +/-3 standard deviations with respect to the average. The standard deviation is also calculated from the upper and lower limits, as no value exceeds those limits.
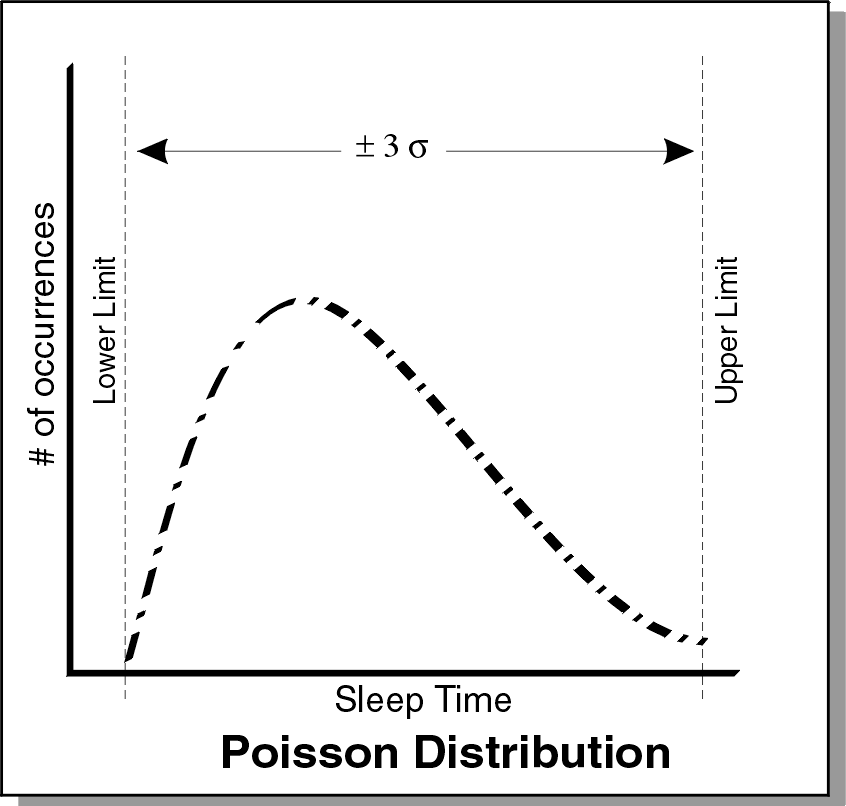
Poisson
In the following graph, the distribution of sleep times between the upper and lower limit is a Poisson distribution. If you plot the sleep times against the number of occurrences, the graph should look like a Poisson distribution. A typical use of a Poisson distribution is to emulate data inter-arrival rates
The incomplete gamma function is used to generate the Poisson distribution. The average value of the distribution is determined from the upper and lower limit. In a Poisson distribution, most values occur within +/-3 standard deviations with respect to the average. The standard deviation is also calculated from the upper and lower limits, as no value will exceed those limits.
This graph is based on an average and standard deviation. This means that 99% of all values on the graph should be within +/-3 times the standard deviation. An endpoint calculates the standard deviation by dividing the difference of the upper and lower limits by three.
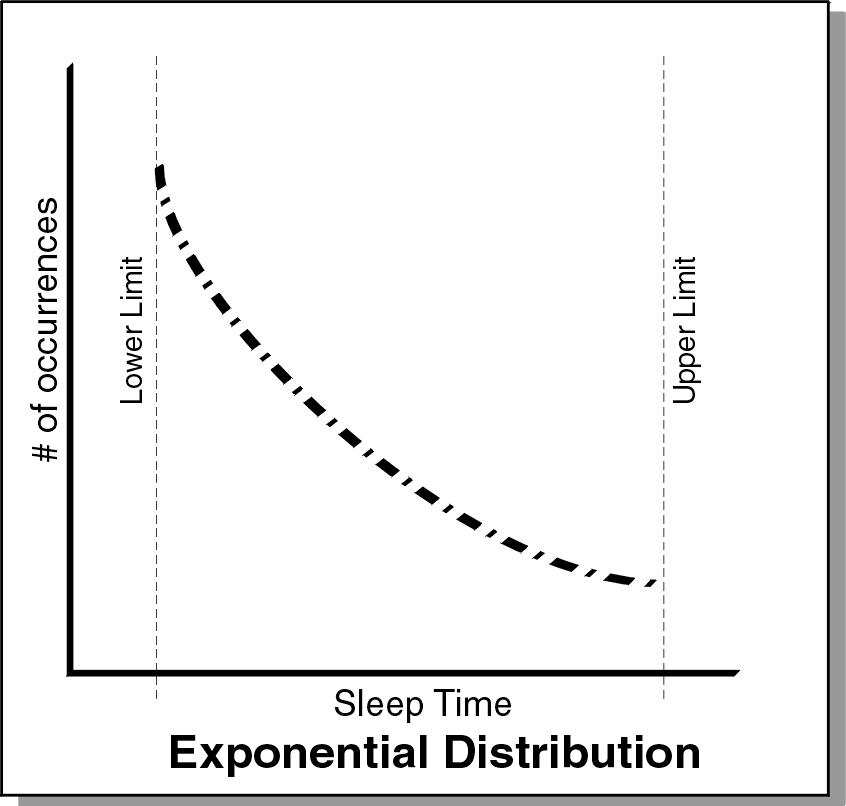
Exponential
In the following graph, the distribution of sleep times between the upper and lower limit is an exponential distribution. In other words, if you plot the sleep times against the number of occurrences, the graph’s maximum should be at the upper limit and minimum should be at the lower limit.
The lower limit is where the asymptote occurs. The exponential distribution centers on the average of the upper and lower limit. This should be the average of the distribution. An endpoint uses the average to calculate the distribution and makes sure that no values exceed the upper limit.