3.44 SNMPTrap_Async

Use this Knowledge Script to check for SNMP traps forwarded from NetIQ SNMP Trap Receiver. This script raises an event when an SNMP trap is received and when Trap Receiver is unavailable or subsequently becomes available. In addition, this script generates datastreams for Trap Receiver availability.

This script checks for SNMP traps in the MIB tree. You can add Management Information Bases (MIBs) to the MIB tree. For more information, see the SNMPTrap_AddMIB Knowledge Script.

In general, a trap receiver is an application that receives traps from SNMP agents. NetIQ SNMP Trap Receiver (Trap Receiver) receives SNMP traps, filters them, and then forwards the traps to AppManager. For more information, see Section 3.44.4, Working with NetIQ SNMP Trap Receiver.

To run this Knowledge Script, you must configure SNMP permissions in Security Manager. For more information, see Section 2.6, Configuring SNMP Permissions.

To run this Knowledge Script, you must configure SNMP permissions in Security Manager. For more information, see Configuring SNMP Permissions section in the Management Guide.

3.44.1 Resource Object

NetworkDevice Trap Receiver

3.44.2 Default Schedule

By default, this script runs on an asynchronous schedule.

3.44.3 Setting Parameter Values

Set the following parameters as needed:

Parameter

How to Set It

Trap Filters

List of trap OIDs

Specify the OIDs (object identifiers) of the traps you want to monitor. You can type one OID or a list of OIDs. If you type a list, separate the OIDs with a comma. For example:

1.3.6.1.2.1.2.2.1.1.1,1.3.6.1.2.1.2.2.1.7.1

Full path to file with list of trap OIDs

If you have many OIDs to monitor, you can provide the full path to a file that contains a list of the OIDs. Each OID in the file should be on a separate line. For example:

1.3.6.1.2.1.2.2.1.1.1
1.3.6.1.2.1.2.2.1.7.1

Because the file must be accessible from the AppManager agent, the path must be a local directory on the agent computer or a UNC path.

Important For a UNC path, the netiqmc service must have permission to access the path.

Event Notification

Raise trap events?

Select Yes to raise an event when a trap message is received from Trap Receiver. The default is Yes.

Event severity when trap is received

Set the severity level, from 1 and 40, to indicate the importance of an event in which a trap is received. The default is 15.

Format trap data according to SNMP version

Select the version of SNMP whose formatting should be used for trap event messages. The data provided by each format is the same; only the layout is different.

An event message in SNMP v1 format looks like this:

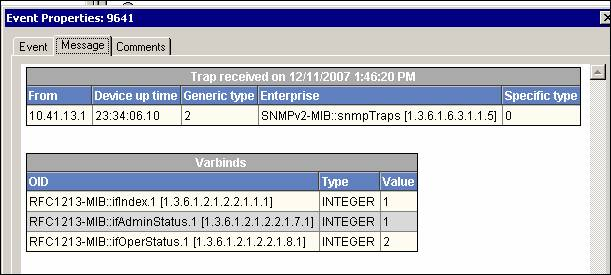
An event message in SNMP v2 format looks like this:

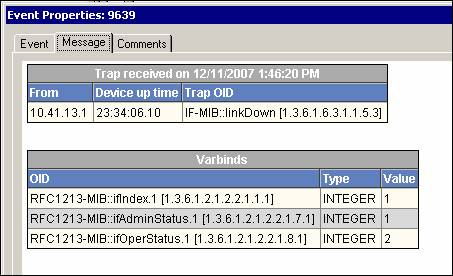
Raise Trap Receiver availability events?

Select Yes to raise an event when Trap Receiver becomes unavailable and when Trap Receiver becomes available once again. The default is Yes.

Event severity when Trap Receiver is unavailable

Set the severity level, from 1 to 40, to indicate the importance of an event in which Trap Receiver becomes unavailable. The default is 5.

Event severity when Trap Receiver becomes available

Set the severity level, from 1 to 40, to indicate the importance of an event in which Trap Receiver becomes available after being unavailable. The default is 25.

Data Collection

Collect data for Trap Receiver availability?

Select Yes to collect data for charts and reports. If enabled, data collection returns a “1” if Trap Receiver is available and a “0” if Trap Receiver is unavailable. The default is unselected.

Interval for collecting Trap Receiver availability data

Specify the frequency with which the script collects Trap Receiver availability data. The default is every 5 minutes.

3.44.4 Working with NetIQ SNMP Trap Receiver

Installation of the AppManager for Network Devices module automatically installs Trap Receiver, which runs as a service: NetIQTrapReceiver.exe. Trap Receiver may compete for port usage with any other trap receiver installed on the same computer.

What is NetIQ SNMP Trap Receiver?

At its most basic, a trap receiver is an application that receives traps from SNMP agents. NetIQ SNMP Trap Receiver (Trap Receiver) receives, filters, and forwards SNMP traps to AppManager. When you use Trap Receiver with AppManager for Network Device, the SNMPTrap_Async Knowledge Script raises events when SNMP traps are received.

What is an SNMP Trap?

Simple Network Management Protocol (SNMP) is a protocol-based system used to manage devices on TCP/IP-based networks. From devices on which an SNMP agent resides, such as routers and switches, SNMP sends unsolicited notifications, called traps, to network administrators when thresholds for certain conditions are exceeded. These conditions are defined by the vendor in a device’s Management Information Base (MIB); the network administrator sets the thresholds.

Traps are composed of Protocol Data Units (PDUs). Each PDU contains the following information, organized in various ways depending on the version of SNMP in use:

  • SNMP version number

  • Community name of the SNMP agent

  • PDU type

  • Enterprise OID (object identifier), a unique number that identifies an enterprise and its system objects in the MIB

  • IP address of the SNMP agent

  • Generic trap type: Cold start, Warm start, Link down, Link up, Authentication failure, and Enterprise

  • Specific trap type. When the Generic trap type is set to “Enterprise,” a specific trap type is included in the PDU. A specific trap is unique or specific to an enterprise.

  • Time the event occurred

  • Varbind (variable binding), a sequence of two fields that contain the OID and a value

Understanding Trap Receiver Architecture

Trap Receiver operates on a Client-Server architecture: the Server—the stand-alone Trap Receiver application—receives, filters, and forwards SNMP traps to the Client—an application that receives traps, such as AppManager. The Server may receive traps from standard UDP port 162 or from any other configured port. The Client and the Server can reside on the same computer or on separate (proxy) computers.

Communication between Client and Server is implemented as XML messages over a TCP connection. Only one Server is allowed per computer, however, several Clients are allowed per computer. Clients that are registered to the same Server share the same TCP connection. The Server TCP port should be known to all potential Clients.

Understanding the Trap Receiver Configuration File

The configuration file for Trap Receiver, NetIQTrapReceiver.conf, identifies the UDP and TCP ports used by Trap Receiver: the UDP port is used for receiving traps; the TCP port is used for communicating with the Client, such as AppManager or another supported NetIQ application. The configuration file also identifies the level of logging you want to use and whether port forwarding is enabled.

By default, the configuration file is installed in [installation directory]\config, and has the following format:

##############################################################
#
# NetIQTrapReceiver.conf
#
# A configuration file for NetIQ SNMP Trap Receiver
#
##############################################################
#########################
# TCP port
# Syntax: tcp_port [port]
# E.g. : tcp_port 2735
#########################
tcp_port 2735
#########################
# UDP port
# Syntax: udp_port [port]
# E.g. : udp_port 162
#########################
udp_port 162
#########################
# Forwarding
# Syntax: forward [address]:[port] [v1]
# E.g. : forward 127.0.0.1:1000 v1
#########################
#########################
# Log level
# Syntax: log_level error|warning|info|debug|xml
# E.g. : log_level info
#########################
log_level debug 

If the configuration file cannot be found, cannot be parsed, or does not contain one of the required values, Trap Receiver is initialized with the default configuration as shown above.

When changing values in the configuration file, take into account the following:

  • If you change the TCP port number, stop all asynchronous Knowledge Script jobs associated with the modules that support Trap Receiver. Run the Discovery Knowledge Script on all monitored devices to enable the devices to recognize the new TCP port number.

  • If you change the UDP port number, also change the UDP port number configured on the devices that send traps to Trap Receiver.

  • If another service uses port 2735 or port 162, Trap Receiver will not start. The Trap Receiver log file will contain different levels of messages, based on the log_level you choose. Either change the port numbers in the configuration file, stop the service that is using the default Trap Receiver port numbers, or forward the traps coming in to UDP port 162.

  • To forward incoming traps to another trap receiver, such as Microsoft SNMP Trap Service, set the Forwarding values as follows: forward [IP address of other trap receiver]:[port number of other trap receiver] [SNMP version]. For example: forward 10.40.40.25:167 v1. By default, incoming traps are not forwarded. For more information, see Coexisting with Microsoft SNMP Trap Service.

  • Restart Trap Receiver after any change to the configuration file. From Control Panel, double-click Administrative Tools and then double-click Services. Right-click NetIQ Trap Receiver and select Restart.

Coexisting with Microsoft SNMP Trap Service

Two trap receivers cannot be in use on the same computer while using the same standard UDP port (162). If NetIQ SNMP Trap Receiver and another trap receiver such as Microsoft SNMP Trap Service are installed on the same computer and both are receiving traps, then configure Trap Receiver to use the standard UDP port and to forward incoming traps (UDP forwarding) to the other trap receiver. For more information, see Understanding the Trap Receiver Configuration File.

Then, configure the other trap receiver to use a different, non-standard, UDP port that is not in use by another application. The following are instructions for configuring Microsoft SNMP Trap Service.

To configure Microsoft SNMP Trap Service to use another port:

  1. Navigate to c:\Windows\system32\drivers\etc.

  2. Open the services file.

  3. In the row for snmptrap, change the value for udp from 162 to another port number that is not in use by any other application. Use the same port number you set as the forwarding port in the Trap Receiver configuration file.

  4. Save and close the services file.

  5. Restart Windows SNMP Trap Service. In Control Panel, double-click Administrative Tools and then double-click Services. Right-click SNMP Trap Service and select Restart.

HINT:To see which ports are in use, run netstat.exe from a command prompt. Then select an available port as the port for the other trap receiver service.