4.1 Configuring the Mandatory Settings
You must perform the following tasks based on different distributions of the Linux operating system:
-
To set up an interaction between Linux Client and the Advanced Authentication server, perform one of the following:
-
Configure Advanced Authentication server lookup in non-DNS mode by manually specifying a custom Advanced Authentication server. For more information, see
Using a Specific Advanced Authentication Server in Non-DNS Mode
.Or
-
Allow Linux Client to interact with the Advanced Authentication servers through the DNS and configure the DNS for Advanced Authentication server lookup. For more information, see
Setting-up a DNS for Advanced Authentication Server Discovery
.
-
-
To prepare Linux for installing the Linux PAM Client, see
Preparing Linux for Installing Linux PAM Client
. -
To prepare Ubuntu 16 for installing the Linux PAM Client, see
Preinstalling the Configuration on Ubuntu 16
.
Prerequisite for Advanced Authentication Server discovery
Ensure that the DNS is configured appropriately for Advanced Authentication server discovery (see Setting-up a DNS for Advanced Authentication Server Discovery) or a specific Advanced Authentication server must be specified in the configuration file.
4.1.2 Setting-up a DNS for Advanced Authentication Server Discovery
You can configure a DNS to allow Linux Client to discover and connect with the Advanced Authentication server through the DNS.
To configure the DNS for server discovery, perform the following tasks:
Adding a Host in DNS
-
Click to open the DNS Manager.
-
Add Host A or AAAA record and PTR record:
-
Right-click your domain name and click under in the console tree.
-
Specify a DNS name of the Advanced Authentication server in .
-
Specify the IP address of the Advanced Authentication server in
You can specify the address in IP version 4 (IPv4) format (to add a host (A) resource record) or IP version 6 (IPv6) format (to add a host (AAAA) resource record).
-
Select to create an additional pointer (PTR) resource record in a reverse zone for this host using the details that you have provided in and
-
Adding an SRV Record
For best load balancing, it is recommended to perform the following actions only for Advanced Authentication web servers. You need not create the records for Global Master, DB Master, and DB servers.
NOTE:Ensure that the LDAP SRV record exists in the DNS server. If the record is not available, you must add it manually.
Adding an SRV Record from a Primary Advanced Authentication Site
To add an SRV record for the Advanced Authentication servers from a primary Advanced Authentication site (a site with Global Master server), perform the following steps:
-
Right-click on a node with the domain name and click in the of the console tree.
-
Select from and click .
-
Specify in of dialog box.
-
Specify in .
-
Specify in .
-
Specify the full qualified domain name (FQDN) of the server that is added in .
For example, authsrv.mycompany.com.
-
Click .
Adding an SRV Record from Other Advanced Authentication Sites
To add an SRV record for the Advanced Authentication servers from other Advanced Authentication sites, perform the following steps:
-
Expand the preferred domain name node and select in the of the console tree.
-
Right-click on the preferred site name and click
-
Select from and click
-
Specify in of dialog box.
-
Specify in .
-
Specify in .
-
Specify the FQDN of the server in .
For example, authsrv.mycompany.com.
-
Click .
You must add a host and SRV records in the DNS for all the authentication servers. The and values for different servers may vary.
DNS Server Entries
The DNS server contains the following elements in an SRV record: SRV entries _service._proto.name TTL class SRV priority weight port target. The following table describes these elements present in an SRV record:
|
Element |
Description |
|---|---|
|
|
Symbolic name of an applicable service. |
|
|
Transport protocol of an applicable service. Typically, TCP or UDP. |
|
|
Domain name for which this record is valid. It ends with a dot. |
|
|
Standard DNS time to live field. |
|
|
Standard DNS class field (set as IN, by default). |
|
|
Priority of the target host. Lower the value, higher the priority. |
|
|
A relative weight for records with the same priority. Higher the value, higher the priority. |
|
|
TCP or UDP port on which the service is located. |
|
|
Canonical hostname of the machine providing the service. It ends with a dot. |
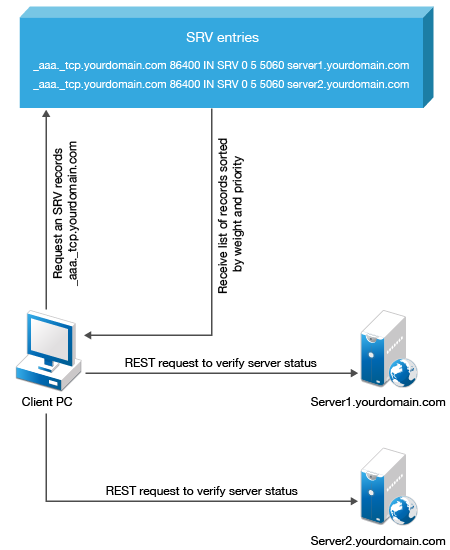
Authentication Server Discovery Flow
The following diagram illustrates the server discovery workflow.
Configuring Authentication Server Discovery in Client
You can configure server discovery in the Linux Client by using the following parameters in the config.properties file:
|
Parameter |
Description |
|---|---|
|
discovery.Domain |
DNS name of the domain. |
|
discovery.host |
Option to specify the DNS name or the IP address of an Advanced Authentication server. |
|
discovery.port |
Option to specify the port number for the client-server interaction. |
|
discovery.subDomains |
Lists additional sub-domains separated by a semicolon. |
|
discovery.useOwnSite |
Set the value to True to use the local site (Windows Client only). |
|
discovery.dnsTimeout |
Set the time out for the DNS queries. The default value is 3 seconds. |
|
discovery.connectTimeout |
Time out for the Advanced Authentication server response. The default value is 2 seconds. |
|
discovery.resolveAddr |
Set the value to False to skip resolving the DNS. By default the value is set to False for Linux Client. |
|
discovery.wakeupTimeout |
Time out after the system starts or resumes from sleep. The default value is 10 seconds. |
|
discovery.skipAlreadyTriedPeriod |
A delay for which the Linux Client stops searching the server after an unsuccessful search attempt. The default value is 5 minutes after which the Client switches to the online mode. During background operations (for example, policy updates) if the cache determines that the server is available, then the set period can be reduced. |
You can find the configuration file pam_aucore.conf in the path /opt/pam_aucore/etc/.