8.3 Adding a Cloud Bridge External Repository
IMPORTANT:The Cloud Bridge external repository is applicable only for Advanced Authentication as a Service (SaaS).
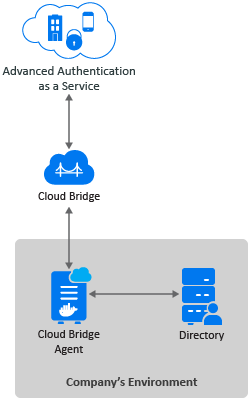
In Advanced Authentication as a Service environments, Cloud Bridge act as an identity transfer bridge between Advanced Authentication in the cloud and data sources in on-premises environments. The Cloud Bridge retrieves the identify information from the on-premises repositories and makes this data available periodically or on-demand requests to Advanced Authentication.
The Cloud Bridge Agent is the entity that responds to the Advanced Authentication collection and fulfillment commands and directs them to the proper data source for execution. Generate the script to install Cloud Bridge Agent from the administration portal and follow the instructions to install and configure Cloud Bridge Agents on your local systems. If you need to collect data from multiple on-premises repositories, you need to install a Cloud Bridge Agent in each on-premises repositories.
To add a Cloud Bridge external repository, perform the following steps:
Before adding a new Cloud Bridge repository, ensure that you have the privilege to use the Cloud Bridge. Once you have the privilege to use Cloud Bridge, the Cloud Bridge Client(s) list will be displayed in the Client as in Step 6b. If you do not have the privilege to use Cloud Bridge, wait for the NetIQ operations team (Center of Excellence or CoE) to entitle you or contact CoE.
-
Click Repositories > New Cloud Bridge External repo.
-
Select an applicable repository type from the LDAP type list. The supported options are:
-
AD for Active Directory Domain Services.
-
eDirectory for NetIQ eDirectory.
-
-
Specify the name of the repository in Name.
NOTE:For AD repositories, the name of the repository must correspond to the domain NetBIOS name.
-
Specify a container for the users in Base DN. When you select the Search full subtree option, Advanced Authentication performs a search for the users in all the child nodes. You can change the search scope by selecting the Search one level only option.
-
You can specify a container for the groups in Group DN (optional). When you select the Search full subtree option, Advanced Authentication performs a search for the groups in all the child nodes. You can change the search scope by selecting the Search one level only option.
-
Add external server configurations:
-
Click Add Server.
-
Select the required client URL from Client.
-
Select the required data center from Data Center.
This list allows to add multiple domains.
For more information about different scenarios, see Possible Scenarios.
-
Specify a local IP address of the LDAP server in LDAP server.
-
Specify the port number of the server in Port. For example, 389.
-
(Optional) Enable SSL to ensure that the LDAP connection to the appliance is secured with a valid self-signed SSL certificate. This helps to prevent any attacks on the LDAP connection and ensures safe authentication.
NOTE:If SSL is enabled, you need to upload the LDAP CA certificate.
-
Click the save
 icon next to the server credentials.
-
-
If SSL is enabled for the external server, click Choose File in LDAP CA certificate, and select the certificate file from the local drive.
-
Open Agents and Clients if you need to view the following details:
-
Agent ID: It lists the available datacenter.json files. You can select the required Agent ID to view the corresponding datacenter.json information.
-
Client URL: Select the required Client URL to view the available Client URL.
-
-
Click Save.
After adding Cloud Bridge repository, you need to install Cloud Bridge Agent as part of your on-premises setup and synchronize the Cloud Bridge repository.
For more information about installing and upgrading the Cloud Bridge Agent, see Cloud Bridge Agent.
You can perform the following to manage the Cloud Bridge external repository:
8.3.1 Advanced Settings
Advanced Settings allow you to customize attributes that Advanced Authentication reads from a repository. Click + to expand the Advanced Settings. The following list describes the different attributes in Advanced Settings:
User Lookup Attributes
Advanced Authentication validates the specified attributes for an entered user name.
For Active Directory (AD), the default attributes are sAMAccountName and userPrincipalName. For other repositories, cn is the default attribute.
User Name Attributes
Advanced Authentication shows a name from the first, non-empty specified field for an entered user name.
For AD, the default attributes are sAMAccountName and userPrincipalName. For other repositories, cn is the default attribute.
User Mail Attributes
Advanced Authentication validates the specified attributes to retrieve a user's email address.
Default attributes are mail and otherMailbox.
User Cell Phone Attributes
Advanced Authentication validates the specified attributes to retrieve a user's phone number. These attributes are used for methods such as SMS OTP, Voice, and Voice OTP. Previously, the first attribute of User cell phone attributes was used as a default attribute for authenticating with SMS OTP, Voice, and Voice OTP methods. Now, users can use different phone numbers for these methods. For example, Bob wants to authenticate with SMS OTP, Voice, and Voice OTP methods. He has a cell phone number, a home phone number, and an IP phone number and wants to use these numbers for each of these methods. He can define these phone numbers in the respective settings of these methods.
Default attributes: mobile, otherMobile.
NOTE:If you have multiple repositories, you must use the same configuration of User cell phone attributes for all the repositories.
Group Lookup Attributes
Advanced Authentication validates the specified attributes for an entered group name.
For Active Directory, the default attribute is sAMAccountName. For other repositories, cn is the default attribute.
Group Name Attributes
Advanced Authentication shows a name from the first, non-empty specified field for an entered group name.
For Active Directory, the default attribute is sAMAccountName. For other repositories, cn is the default attribute.
Advanced Authentication supports the RFC 2037 and RFC 2037 bis. RFC 2037 determines a standard LDAP schema and contains a memberUid attribute (POSIX style). RFC 2037 bis determines an updated LDAP schema and contains a member attribute. Active Directory, LDS, and eDir support RFC 2037 bis. OpenLDAP contains posixAccount and posixGroup that follows RFC 2037.
Advanced Authentication supports the following attributes for the Group Name attributes:
|
Attribute |
Default Value |
Value for the Repository |
|---|---|---|
|
User Object Class |
user |
OpenDJ and OpenLDAP: person |
|
Group Object Class |
group |
OpenDJ: groupOfNames OpenLDAP: posixGroup |
|
Group Member Attribute |
member |
OpenDJ: member OpenLDAP: memberUid. If a required group contains groupOfNames class, disable POSIX style groups. If the group contains posixGroup, enable POSIX style groups.
|
NOTE:For information about the Logon filter settings (Legacy logon tag and MFA logon tag), see Configuring Logon Filter.
Custom Attributes to Fetch
This attribute is applicable for the RADIUS Server event. This attribute displays additional information (for example, pager number) on the RADIUS client.
Custom attributes to return
This list show attributes which should be returned to the REST API clients on successful authentication
Cloud Bridge Attributes
The following table describes the batch attributes that the appliance uses:
|
Attribute |
Description |
|---|---|
|
CB page size limit |
The maximum number of users per groups to fetch from LDAP server. The value should not exceed 1000. |
|
CB chunk request timeout |
The number of seconds of idle time before a batched collection session is terminated. The default value is 600 seconds. |
|
CB ldap read timeout |
The number of minutes the LDAP client will wait for the server response before a connection is terminated (0=no timeout). The default value is 5 minutes. |
|
CB users_page size limit |
The maximum number of users to be processed in one batch. The value should not exceed 1000. |
|
CB groups page size limit |
The maximum number of groups to be processed in one batch. The value should not exceed 1000. |
Used Attributes
The following table describes the attributes that the appliance uses in the supported directories.
|
Attribute Name |
LDAP Name |
Description |
Type |
Supported in Active Directory |
Supported in eDirectory |
|---|---|---|---|---|---|
|
CN (Common Name) |
CN |
An identifier of an object |
String |
✓ |
✓ |
|
Mobile |
Mobile |
A phone number of an object's cellular or mobile phone |
Phone number |
✓ |
✓ |
|
Email Address |
|
An email address of a user |
Email address |
✓ |
✓ |
|
User-Principal-Name (UPN) |
userPrincipalName |
An Internet based format login name for a user |
String |
✓ |
✓ |
|
SAM-Account-Name |
sAMAccountName |
The login name used to support clients and servers running earlier versions of operating systems such as Windows NT 4.0 |
String |
✓ |
× |
|
GUID |
GUID |
An assured unique value for any object |
× |
✓ |
|
|
Object Class |
Object Class |
An unordered list of object classes |
String |
✓ |
✓ |
|
Member |
Member |
A list that indicates the objects associated with a group or list |
String |
✓ |
✓ |
|
User-Account-Control |
userAccountControl |
Flags that control the behavior of a user account |
✓ |
× |
|
|
ms-DS-User-Account-Control-Computed |
msDS-User-Account-Control-Computed |
Flags that are similar to userAccountControl, but the attribute's value can contain additional bits that are not persisted |
✓ |
× |
|
|
Primary-Group-ID |
primaryGroupID |
A relative identifier (RID) for the primary group of a user |
✓ |
× |
|
|
Object-Guid |
objectGUID |
A unique identifier for an object |
✓ |
× |
|
|
object-Sid |
objectSid |
A Binary value that specifies the security identifier (SID) of the user |
✓ |
× |
|
|
Logon-Hours |
logonHours |
Hours that the user is allowed to logon to the domain |
✓ |
× |
|
|
USN-Changed |
uSNChanged |
An update sequence number (USN) assigned by the local directory for the latest change including creation |
✓ |
× |
NOTE:The sAMAccountName and userPrincipalName attributes are supported only for AD DS repository. The Active Directory LDS and eDirectory repositories do not support these attributes.
8.3.2 Health Check Settings
Advanced Authentication server performs a background task to determine its connection with Repositories through the Cloud Bridge Agent. The connection status is indicated in the Current Configuration section of Edit Cloud Bridge External Repository page. You must define the following settings based on which the overall status is measured:
-
Success Threshold (times): Specify the number of consecutive connections that must succeed to recognize the connection as healthy. By default, success threshold is 1.
-
Failure Threshold (times): Specify the number of consecutive connections that must fail to recognize the connection as unhealthy. By default, failure threshold is 3.
For example, the below table details the configured threshold value and equivalent health status:
|
Option with value |
Health Status |
|---|---|
|
Success Threshold is set to 5 |
Five success messages indicates the connection is Healthy. |
|
Failure Threshold is set to 7 |
Seven error messages indicates the connection is Unhealthy. |
8.3.3 Cloud Bridge Agent
Cloud Bridge Agent connects the Cloud Bridge repository added in Advanced Authentication SaaS and the on-premises environment.
Installing Cloud Bridge Agent
You need to install Cloud Bridge Agent on an on-premise Linux server. After adding the Cloud Bridge repository in your Advanced Authentication administration portal, generate a script to install the Cloud Bridge Agent in the Linux system that meets the following pre-requisites:
Pre-requisites
-
Operating System: Any one of the following operating systems:
-
Debian 10
-
SUSE Linux Enterprise Server 12 SP4 or later
-
Ubuntu 18.04 LTS Server Edition or later
-
RHEL 8.3
-
-
Container: Any one of the following:
-
Docker 19.03.x or later
-
Podman 1.6.4 or later
NOTE:Podman is supported only on RHEL.
-
To install a Cloud Bridge Agent, perform the following steps:
-
Click Repositories.
-
Open the added Cloud Bridge repository.
-
Specify the expiration time (in hours) of the generated script in Expiration time (hours).
NOTE:Due to security reasons, the expiry time should not be more than 48 hours.
-
Click Generate Script.
-
Copy the generated script and run the script in an on-premise Linux server.
-
Specify the agent admin and LDAP administrator credentials to initiate the installation of Cloud Bridge Agent.
NOTE:The credentials are case sensitive. You need to use it in a proper registry.
NOTE:If the distinguished name contains a space, you need to specify it within "".
For example, "CN=SaaS Proxy,CN=Users,DC=company,DC=com".
NOTE:Ensure that the password of used service account is not expired to achieve synchronization.
Wait till the Cloud Bridge Agent is deployed.
NOTE:The Cloud Bridge script generates the install.log file for troubleshooting. The administrator can find the install.log in the directory where the curl command was executed.
For more information about getting the logs of the Cloud Bridge Agent, see Collecting the Logs of Cloud Bridge Agent.
Advanced Authentication provides the following scripts within the agent/ folder that can be used irrespective of the Linux distribution:
-
create.sh: This script re-creates the bridge-agent container after the removal of a container.
-
start.sh: This script starts the stopped agent container bridge-agent.
-
stop.sh: This script stops the bridge-agent container that is running.
-
remove.sh: This script removes the bridge-agent container that has been stopped.
NOTE:The agent/ folder is available where you run the generated script.
Upgrading Cloud Bridge Agent
Before upgrading Cloud Bridge Agent, navigate to the agent directory on the Linux system and delete the bridge.tar.gz file. If you are unable to locate the file, then use the following command to find the bridge.tar.gz file:
find / . -name bridge.tar.gz
-
Log in to the Advanced Authentication Administration portal and navigate to Repositories.
-
Click Edit to edit the Cloud Bridge external repository.
-
Click Generate Script.
-
Copy the generated script.
-
Run the command in the directory where Cloud Bridge Agent was installed earlier on the Linux system.
-
Select the option to upgrade.
-
Observe the script execution and any prompt for missing items.
-
Run the following command to view details of the bridge agent container:
docker ps
Check the agent version to confirm the successful upgrade.
Uninstalling Cloud Bridge Agent
You uninstall Cloud Bridge Agent from the following Linux distributions:
Debian, SLES, and Ubuntu
To uninstall a Cloud Bridge Agent on Debian, SLES and Ubuntu, perform the following steps:
-
Run the following command to stop the agent:
docker stop bridge-agent
-
Run the following command to remove the agent:
docker container rm bridge-agent
NOTE:To avoid any conflicts with mounted data from the old database, it is recommended remove the agent directory and the docker volume that contains the data about agent.
-
Run the following command to remove the data in docker volume:
docker volume rm data
RHEL 8.3
To uninstall a Cloud Bridge Agent on RHEL 8.3, perform the following steps:
-
Run the following command to stop the agent:
podman stop bridge-agent
-
Run the following command to remove the agent:
podman container rm bridge-agent
NOTE:To avoid any conflicts with mounted data from the old database, it is recommended remove the agent directory and the docker volume that contains the data about agent.
-
Run the following command to remove the data in podman volume:
podman volume rm data
-
Run the following command to remove the underlying docker image:
docker image rm <name of the image>
NOTE:The name of docker image is available in the last line of the create.sh script.
Example: idgov-docker.svsartifactory.swinfra.net/idmapps/bridge-agent-h2:1.8.1-SNAPSHOT
Cloud Bridge Agent Version 1.6.1 and Prior Versions
To uninstall a Cloud Bridge Agent, perform the following steps:
-
Run the following command to list dockers;
docker ps -a
-
In the output, find the container ID for the agent_agent_1 and agent_db_1.
-
Run the following command to remove the docker:
docker rm -f <container ID>
Collecting the Logs of Cloud Bridge Agent
To view the logs of Cloud Bridge Agent, run the command based on your container:
-
Docker: docker container logs -f --details <name of the container>
For example:
docker container logs -f --details agent_agent_1
docker container logs -f --details bridge-agent
-
Podman: podman logs -f <name of the container>
For example, podman logs -f bridge-agent
8.3.4 Synchronizing Cloud Bridge Repository
To synchronize the Cloud Bridge repository, perform the following steps:
-
Click Repositories and click Edit to edit the Cloud Bridge repository.
-
Click Full Synchronization to perform a full synchronization.
Check the synchronization status after some time.
NOTE:The YOURREPOSITORYNAME (fast): Users processed=0... Groups processes=0 message is acceptable.
NOTE:Fast synchronization occurs every five minutes. Full synchronization occurs every three hours.
8.3.5 Testing Cloud Bridge
Advanced Authentication enables you to test Cloud Bridge configuration while creating, updating, or troubleshooting Cloud Bridge. When you test Cloud Bridge, you either ensure that the Cloud Bridge is properly configured, or you can change the Cloud Bridge configuration and quickly test again to check the results.
Perform the following steps to test Cloud Bridge:
-
Click Repositories and click Edit to edit the Cloud Bridge repository.
-
Click Test Configuration to test the configuration.
A message Your configuration looks OK is displayed.
8.3.6 Force Configuring Cloud Bridge
Advanced Authentication enables you to change the settings in Repository and apply the changes by saving the settings. If you do not want to wait until the background task to apply the changes in Cloud Bridge configuration, you can break the Cloud Bridge operations and enforces the new configuration by using the Force Configuration button.
Perform the following steps to force configure Cloud Bridge:
-
Click Repositories and click Edit to edit the Cloud Bridge repository.
-
Change the configuration.
-
Click Force Configuration.
A message Your configuration has been forced is displayed.
8.3.7 Enabling Fast Synchronization for eDirectory Repository
To enable fast synchronization for the eDirectory repository that is configured as the Cloud Bridge external repository, ensure to install the change-log module on the eDirectory server. The change-log manages to log all the LDAP changes and enables fast sync for the eDirectory server.
Prerequisites
-
The change-log module 4.0.8.1 is supported on eDirectory 9.2.
-
To install the change-log module, you must have full rights to the root of eDirectory container.
-
For synchronizing changes, ensure that you have the following rights to the base container of eDirectory:
-
Entry Rights: The rights to create entries in the connected system.
-
Attributes Rights: The rights to modify the attributes in the connected system.
-
ACL: Supervisor
-
NOTE:If you have Identity Manager (IDM), Advanced Authentication, and a change-log module dedicated for IDM, you cannot point Advanced Authentication to the existing change-log module to achieve fast synchronization for the eDirectory repository. However, it is recommended to install a change-log module specifically for Advanced Authentication.
First, obtain the change-log module installer from here. The required files are available in the IDM_Changelog_4081.zip
Perform the following steps to extend the schema and install the change-log module:
-
Create a remote eDirectory schema file (clschema.sch) with the following content:
NDSSchemaExtensions DEFINITIONS ::= BEGIN "DirXML-ServerKeys" ATTRIBUTE ::= { Operation ADD, Flags {DS_READ_ONLY_ATTR, DS_HIDDEN_ATTR}, SyntaxID SYN_OCTET_STRING, ASN1ObjID {2 16 840 1 113719 1 14 4 1 65} } END -
Extend the connected remote eDirectory schema to introduce a new attribute DirXMLServerKeys. You must perform an eDirectory heath check to ensure that the tree is ready to accept the new schema.
To extend the clschema.sch schema file, use the ice utility.
For example:
ice -S SCH -f clschema.sch -D LDAP -s <remote eDirectory server> -d <Admin DN> -w <password>
-
Stop eDirectory.
-
Navigate to the directory containing the change-log RPM and perform one of the following actions:
-
To install the change-log RPM, run the following command:
rpm -ivh <rpm name>.rpm
Example: rpm -ivh ./novell-DXMLChlgx.rpm
-
To upgrade the change-log RPM, run the following command:
rpm -Uvh --noscripts ./novell-DXMLChlgx.rpm
-
-
Start eDirectory.
8.3.8 Possible Scenarios
This section describes the different key scenarios with Cloud Bridge Agent:
Scenario 1: Configuring two Cloud Bridge Agents with an Active Directory repository
This setup is recommended for fail-over situation, when a Cloud Bridge Agent is down another Agent synchronizes the user details for uninterrupted authentication.
Prerequisite: Before installing the Client Bridge Agent, ensure that you have one of the following based on your Linux distribution:
-
Docker 19.03.x or later with Docker Compose
-
Podman 1.6.4 or later
For more information, see Prerequisites to install Cloud Bridge Agent.
Perform the following procedure to achieve this setup:
-
Add a Cloud Bridge External Repository, specify all valid details.
In the External servers section, the client is selected by default. Ensure, to select the first datacenter.json from the Agent drop-down and provide the address of AD in LDAP server.
-
Edit the Cloud Bridge External Repository that you added and scroll down.
-
Click Generate script and use the script to install the Cloud Bridge Agent 1 on a Linux system 1.
-
Make sure configuration is correct and synchronization happens without any errors.
-
Edit the Cloud Bridge External Repository that you added in Step 1.
In the External servers section, the client is selected by default. Ensure, to select the second entry from the Agent drop-down and provide the same AD address in LDAP server.
-
Generate the script and install the Cloud Bridge Agent 2 on a Linux system 2.
The Cloud Bridge Agent 2 installs with the agent details same as Cloud Bridge Agent 1. To verify navigate to the path agents/config/ in the Linux system 2 to find the datacenter.json file. Compare the content in the datacenter.json with the corresponding file details in Agents and Clients. This results in invalid configuration and failed synchronization.
-
Copy the content of second entry from Agents and Clients and replace the content of the datacenter.json in the Linux system 2 then manually restart the docker.
-
Perform Force configuration. It might take about 4 minutes to initiate synchronization successfully.
Scenario 2: Configuring two Cloud Bridge Agents with two Active Directory repositories
Prerequisite: Before installing the Client Bridge Agent, ensure that you have one of the following based on your Linux distribution:
-
Docker 19.03.x or later with Docker Compose
-
Podman 1.6.4 or later
For more information, see Prerequisites to install Cloud Bridge Agent.
Perform the following procedure to achieve this setup:
-
Add a Cloud Bridge External Repository, specify all valid details.
In the External servers section, the client is selected by default. Ensure, that there are two entries available in the Agent drop-down, select the first entry and provide the AD 1 address in LDAP server.
-
Click Save.
-
Edit the Cloud Bridge External Repository that you added and scroll down.
-
Click Generate script and use the script to install the Cloud Bridge Agent 1 on a Linux system 1.
-
Make sure configuration is correct and synchronization happens without any errors.
-
Add one more Cloud Bridge External Repository.
In the External servers section, the client is selected by default. Ensure, to select the second entry from the Agent drop-down and provide the AD 2 address in LDAP server.
-
Click Save.
-
Edit the Cloud Bridge External Repository that you added in step 6 and scroll down.
-
Click Generate script and use the script to install the Cloud Bridge Agent 2 on a Linux system 2.
The Cloud Bridge Agent 2 installs with the agent details same as Cloud Bridge Agent 1. To verify navigate to the path agents/config/ in the Linux system 2 to find the datacenter.json file. Compare the content in the datacenter.json with the corresponding file details in Agents and Clients. This results in invalid configuration and failed synchronization.
-
Copy the content of second entry from Agents and Clients and replace the content of the datacenter.json in the Linux system 2 then manually restart the docker.
-
Perform Force configuration. It might take about 4 minutes to initiate synchronization successfully.
With the above setup, you can achieve full sync, fast sync, and auto-fast sync of user attribute changes, user disabled or enabled scenarios, user creation, password change, user deletion and other processes on both the Active Directory repositories seamlessly.
Similarly, you can configure two Cloud Bridge Agents with one of the following repository combinations:
-
An eDirectory repository and an Active Directory repository.
-
Two eDirectory repositories.