27.2 Configuring Integration with Citrix NetScaler
This section provides the configuration information on integrating Advanced Authentication with Citrix NetScaler VPX. This integration secures the Citrix NetScaler VPX connection.
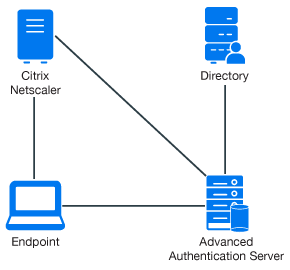
The following diagram represents Advanced Authentication in Citrix NetScaler.

To configure the Advanced Authentication integration with Citrix NetScaler VPX, perform the following configuration tasks:
Ensure that the following requirements are met:
-
Citrix NetScaler VPX (version NS11.0 has been used to prepare these instructions) is installed.
-
Advanced Authentication 5 appliance is installed.
27.2.1 Configuring the Advanced Authentication RADIUS Server
-
Open the Advanced Authentication Administration portal.
-
Click Events > RADIUS Server.
-
Set Is enabled to ON.
-
Move one or more chains from Available to Used list. Ensure that the chains are assigned to the appropriate group of users in Roles & Groups of the Chains section.
-
Click Save in Edit Event.
-
Click Policies > Radius Options.
-
Click Add in Clients.
-
Specify an IP address of the Citrix NetScaler appliance.
-
Specify Name of the Client.
-
Specify a secret and confirm it.
-
Set Enabled to ON.
-
Click
 icon to save the Client details.
 -
Click Save in Radius Options.
27.2.2 Configuring the Citrix NetScaler Appliance
-
Sign-in to the Citrix NetScaler configuration portal as nsroot.
-
Click Configuration > Authentication > Dashboard.
-
Click Add.
-
Select RADIUS for Choose Server Type.
-
Specify Name of the Advanced Authentication server, IP Address, Secret Key, and Confirm Secret Key.
-
Change Time-out (seconds) to 120-180 seconds if you are using the Smartphone, SMS, Email or Voice methods.
-
Click More and ensure that PAP is selected in Password Encoding.
-
Click Create.
If the connection to the RADIUS server is valid, the Up status is displayed.
-
Click Configuration > System > Authentication > RADIUS > Policy.
-
Click Add.
-
Specify Name of the Authentication RADIUS Policy.
-
Select the created RADIUS server from Server and select ns_true from the Saved Policy Expressions list.
-
Click Create.
-
Select the created policy and click Global Bindings.
-
Click Select Policy.
-
Select the created policy.
-
Click Bind.
-
Click Done.
A check mark is displayed in the Globally Bound column.
27.2.3 Authenticating on the Citrix NetScaler Using Advanced Authentication
-
Specify the user’s credentials then click Login.
-
Accept the authentication on your smartphone.
NOTE:Advanced Authentication can be configured with other authentication chains.