27.3 Configuring Integration With Dell SonicWall SRA EX-Virtual Appliance
This section provides the configuration information on integrating Advanced Authentication with Dell SonicWall SRA EX-virtual appliance. This integration secures the Dell SonicWall SRA connection.
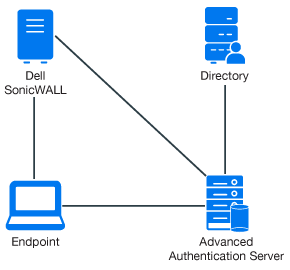
The following diagram represents Advanced Authentication in Dell SonicWall.
To configure the Advanced Authentication integration with Dell SonicWall SRA, perform the following configuration tasks:
Ensure that the following requirements are met:
-
Dell SonicWall SRA EX-Virtual appliance v11.2.0-258 is installed.
-
Advanced Authentication v5 appliance is installed.
27.3.1 Configuring the Advanced Authentication RADIUS Server
-
Open the Advanced Authentication Administration portal.
-
Click .
-
Set to .
-
Move one or more chains from to list. Ensure that the chains are assigned to the appropriate group of users in of the section.
-
Click in .
-
Click > .
-
Click in .
-
Specify an of the Dell SonicWall appliance.
-
Specify of the Client.
-
Specify a secret and confirm it.
-
Set to .
-
Click
 icon to save the Client details.
 -
Click in .