4.2 Configuring Optional Settings

The following table describes the optional settings that you can configure for Linux Client:

Setting

Description

tenant_name

If you use Multitenancy, you must point Linux Client to a specific tenant. For more information, see Configuration Settings for Multitenancy.

event_name: <CustomEventName>

If you want to use both domain-joined and non-domain machines, you can use a custom event for the specific machines. For more information, see Selecting an Event.

card.timeout: X

To change a default Card waiting timeout. For more information, see Configuring Timeout for Card Waiting.

u2f.timeout: X

To configure the timeout for authentication with the U2F token, see Configuring Timeout for the U2F Authentication.

logEnabled: true

Enable the logs of Linux Client for debugging. For more information, see Enabling Logs on Linux Client.

verifyServerCertificate

To configure the verification of server certificates for LDAP connection. For more information, see Configuring Verification of Server Certificates.

authentication_agent_enabled

Enables the Authentication Agent chain in Linux Client. For more information, see Enabling the Authentication Agent Chain.

forceCachedLogon

To enforce the cached login for unlocking the Client. For more information, see Configuring the Enforced Cached Login.

less_verbose_services

To hide the verbose services in the PAM Client. For more information, see Configuring Less Verbose Services.

default_repo

To configure a repository as default in Linux Client for authentication. For more information, see Configuring a Default Repository on Linux PAM Client.

enableLinkedChainsOffline:false

To disable linked chains for offline login. For more information, see Disabling Linked Chains for Offline Login.

rest_profiling: true

To enable the profiling tool that helps in analyzing the performance and CPU utilization of different programs. For more information, see Enabling the Profiling Tool.

locale:xx

To change the client locale to a language other than the operating system’s default language. For more information, see Changing the Locale of Linux PAM Client without Changing the Locale of the Operating System.

tlsVersion: value

To configure the TLS version that the network library of the Linux PAM Client uses for establishing HTTPS connection with the Advanced Authentication server. For more information, see Configuring the TLS Version.

NOTE:A separator between the setting and its value can be either equal (=) or colon (:) as per your requirement.

You can localize the Advanced Authentication resources for your language with the instructions, Localizing the Messages for Clients

4.2.1 Configuration Settings for Multitenancy

If the Multitenancy option is enabled, you must add the parameter tenant_name with a tenant name as the value in the pam_aucore.conf file.

To configure a specific tenant name, perform the following steps:

  1. Navigate to /opt/pam_aucore/etc/ and open the pam_aucore.conf file.

  2. Specify tenant_name: <name of tenant>

    For example, tenant_name: TOP for the TOP tenant.

    If the configuration file does not exist, create a new file.

  3. Save the changes.

  4. Restart the system.

NOTE:If you do not add the parameter tenant_name, an error message Tenant not found might be displayed.

Creating a Linux Endpoint When the Tenant Name Matches the Domain

In the Multitenancy mode, by default a new endpoint gets mapped to the tenant name that has the same name as the domain name. You can also add an endpoint to a preferred tenant that does not have the same name as the domain.

To add an endpoint to specific tenant in the Multitenancy mode, perform the following steps:

  1. Install the PAM Client.

  2. Edit the configuration file pam_aucore.conf, set the tenant_name parameter with the preferred tenant name.

    For example, TOP.

  3. Run an activation script for the domain mode.

  4. Save the changes.

  5. Restart the system.

4.2.2 Selecting an Event

By default, Linux Client uses the Linux logon event for authentication. However, in some scenarios you must create a separate custom event.

For example, when the predefined event is used for domain joined workstations, you can create a custom event with the type as Generic for the nondomain joined workstations.

To configure custom event for Linux Client, perform the following steps:

  1. Navigate to /opt/pam_aucore/etc/ and open the pam_aucore.conf file.

  2. Specify event_name: <CustomEventName>

    If the configuration file does not exist, create a new file.

  3. Save the changes.

  4. Restart the system.

4.2.3 Configuring Timeout for Card Waiting

You can configure the time for which the card waiting dialog is displayed, when the user authenticates using the Card method. If the user does not present the card for the specified timeout period, the Hardware timeout message is displayed and the card waiting dialog is closed. Subsequently, the user login selection screen is displayed.

To configure the timeout for card waiting, perform the following steps:

  1. Navigate to /opt/pam_aucore/etc/ and open the pam_aucore.conf file.

  2. Specify card.timeout: X.

    x is the timeout value in seconds. The card timeout value is set to 60 seconds, by default.

    If the configuration file does not exist, create a new file.

  3. Save the changes.

  4. Restart the system.

4.2.4 Configuring Timeout for the U2F Authentication

You can configure the timeout for which the authentication fails when the U2F token is not touched for authentication. The default value for the timeout is 60 seconds after which the authentication fails.

To configure the timeout for U2F authentication, perform the following steps:

  1. Open the configuration file opt/pam_aucore/etc/pam_aucore.conf.

    If the file does not exist, create a new file.

  2. Specify u2f.timeout: X in the aucore.conf file. X is the timeout value in seconds.

  3. Save the configuration file.

  4. Restart the operating system.

4.2.5 Enabling Logs on Linux Client

You can enable the logs of Linux Client to view the logs for debugging.

To enable the logs of Linux Client, perform the following steps:

  1. Run the following command to edit the configuration file:

    sudo vi /opt/pam_aucore/etc/pam_aucore.conf

  2. Specify logEnabled:true.

    If the configuration file does not exist, create a new file.

  3. Save the changes.

  4. Restart the system.

The logs are generated in the path /opt/pam_aucore/var/log/.

4.2.6 Enabling the Profiling Tool

You can configure the Linux PAM Client to enable the profiling for Web server logs of the Advanced Authentication server. Profiling tool helps in tracking the performance, memory allocation, and CPU utilization of each REST API calls that are processed including the background programs that are initiated by the call. In case of an issue, it facilitates in identifying the cause.

Enabling the profiling tool appends &profiling=true parameter to API calls sent to the server. Before enabling profiling, ensure to set Debugging Logs to ON in the Administration portal. After enabling the Profiling tool, you can track the detailed logs in Logs > Web server in the Administration portal.

To enable the Profiling tool, perform the following steps:

  1. Navigate to /opt/pam_aucore/etc/ and open the pam_aucore.conf file.

  2. Specify rest_profiling: true (default value is false).

    If the configuration file does not exist, create a new file.

  3. Save the changes.

  4. Restart the system.

4.2.7 Configuring Verification of Server Certificates

You can secure the connection between Linux Client and the Advanced Authentication servers with a valid SSL certificate. This prevents any attacks on the connection and ensures safe authentication.

You can enable verification of a server certificate on Linux platforms in the following ways:

NOTE:You must upload the SSL certificate in the Administration portal > Server Options. The SSL certificate provides high level of encryption, security, and trust. For more information about how to upload the SSL certificate, see Uploading the SSL Certificate.

Using PAM Certificate Path

To enable verification of a server certificate in the PAM certificate path on any Linux platform, perform the following steps:

  1. Navigate to /opt/pam_aucore/etc/ and open the pam_aucore.conf file.

  2. Specify verifyServerCertificate:true.

    If the configuration file does not exist, create a new file.

  3. Place the trusted certificates in the path /opt/pam_aucore/certs.

    If the certificates are not available in /opt/pam_aucore/certs, the PAM module searches for an OS specific certificate directory.

    NOTE:Ensure that the server certificates are in .cert or .crt format.

  4. Run the command sudo chmod 644 to set permission for certificates.

  5. Restart the system.

Using Operating System Specific Certificate Paths

To enable verification of a server certificate in the operating system (OS) specific certificate path, perform the following steps:

  1. Navigate to /opt/pam_aucore/etc and open the pam_aucore.conf file.

  2. Specify verifyServerCertificate:true.

    If the configuration file does not exist, create a new file.

  3. Place the trusted certificates in the OS specific path of the respective Linux platform. Following are the OS specific paths of the Linux platforms:

    • CentOS 7.x, Red Hat - /etc/pki/ca-trust/source/anchors

    • SUSE 11.x - /etc/ssl/certs

    • SUSE 12.x - /etc/pki/trust/anchors

    • Ubuntu 16.x, Debian 8.x - usr/local/share/ca-certificates

  4. Run the command sudo chmod 644 to set the permission for the certificates.

  5. Run the command specific to the platform to update the certificates:

    • CentOS 7.x, Red Hat - sudo update-ca-trust

    • SUSE 11.x - sudo c_rehash /etc/ssl/certs

    • SUSE 12.x - sudo update-ca-certificates

    • Ubuntu 16.x, Debian 8.x - sudo update-ca-certificates

  6. Restart the system.

4.2.8 Enabling the Authentication Agent Chain

NOTE:The authentication_agent_enabled parameter is valid for Advanced Authentication 6.3 SP4 and prior versions. This parameter is not required from Advanced Authentication 6.3 SP5.

You can enable the Authentication Agent chain in the Linux Client to allow users to authenticate with the Authentication Agent on a Windows system and get seamless access to the Linux Client that does not support the external devices. To perform such authentication, users must select the Authentication Agent chain from the Chains list of Linux Client to initiate the authentication process on the Windows system where the Authentication Agent is installed.

To enable the Authentication Agent chain in the Linux Client, perform the following steps:

  1. Navigate to /opt/pam_aucore/etc/ and open the pam_aucore.conf file.

  2. Specify authentication_agent_enabled: true.

    If the configuration file does not exist, create a new file.

  3. Save the changes.

  4. Restart the system.

4.2.9 Configuring the Enforced Cached Login

When the network connection is slow or unstable, the Client logon or unlock process might take several minutes. A solution to this is to enforce the cached logon. The Client connects to the Advanced Authentication server to validate the credentials in the background after the cached login. By default, the enforced cached logon is disabled and the Client will always try to connect to Advanced Authentication Server to validate the credentials.

To enforce cached login for Linux Client, perform the following steps:

  1. Navigate to /opt/pam_aucore/etc/ and open the pam_aucore.conf file.

  2. Specify forceCachedLogon: true.

    If the configuration file does not exist, create a new file.

  3. Save the changes.

  4. Restart the system.

When you set the forceCachedLogon parameter to true. Following are different behavior of the Cache Service in Linux PAM Client:

  • If a user account is marked as disabled, expired, or locked in the local cache, the Cache Service tries to switch online and based on the server status one of the following occurs:

    • Advanced Authentication server is available

      A user cannot log in during the first attempt. During the subsequent login, after selecting a chain and before providing credentials, an error message that states one of the following based on the account status:

      • The user account is locked

      • The user account is expired

      • The user account is disabled

    • Advanced Authentication server is unavailable

      A user cannot log in during the first attempt. During the subsequent login, an error message that states unable to find the server is displayed.

  • If a user account is not marked as disabled, expired, or locked in the local cache, the Cache Service processes the login request and updates the user data in background.

4.2.10 Configuring Less Verbose Services

Sometimes, multiple messages that are repeated are displayed when you are log in to SSH. For example, multiple Please wait messages or Enter password messages are displayed. You can hide these verbose messages in the PAM Client by including the less_verbose_services parameter in the configuration file pam_aucore.conf. The setting supports PAM services names list or a single service name.

For example, you can disable messages that are displayed multiple times for a gnome-screensaver service on SUSE 12 by adding less_verbose_services = gnome-screensaver in the /opt/pam_aucore/etc/pam_aucore.conf file.

You can also include multiple names in the list. This list must be divided with semicolons (;) or commas (,).

NOTE:By default, the services sshd, sudo, su, lightdm, unity, gnome-screensaver are included in this list.

4.2.11 Configuring a Default Repository on Linux PAM Client

In multiple repositories environment, you can configure a repository as default in the Linux PAM Client irrespective of the order of repositories configured in the Login Options policy on the Administration portal. With a default repository, users can log in to the Linux Client without prefixing the repository name before the user name. However, the Linux Client prefixes the defined default repository with the user details in the background for validating the credentials and authenticating the user.

For example, a company has three repositories in the following order:

  1. repoX

  2. repoY

  3. repoZ

An administrator wants to configure the repoZ as default repository on the Linux Client for authentication. Using the default_repo parameter, the administrator can configure a default repository in the Linux Client.

To configure a repository as default on Linux Client, perform the following steps:

  1. Navigate to /opt/pam_aucore/etc/ and open the pam_aucore.conf file.

    If the configuration file does not exist, create a new file.

  2. Specify default_repo: <NameOfRepository>.

  3. Save the changes.

  4. Restart the system.

4.2.12 Disabling Linked Chains for Offline Login

With a linked chain, users can authenticate to the Linux client within the grace period after successful authentication with the required chain.

For example, LDAP Password+Card is a required chain, and Card is a linked chain. The users must use the LDAP Password+Card chain once in every 8 hours and within this period, they can only provide card without the LDAP Password to authenticate.

By default the linked chains are available in both online and offline mode.

NOTE:An administrator must ensure that the Enable linked chains option is set to ON in the Linked chains policy of the Administration portal to allow users to login with the linked chain.

To disable linked chains for offline login, perform the following steps:

  1. Navigate to /opt/pam_aucore/etc/ and open the pam_aucore.conf file.

    If the configuration file does not exist, create a new file.

  2. Specify enableLinkedChainsOffline:false. The default value is true.

  3. Save the changes.

  4. Restart the system.

4.2.13 Localizing the Messages for Clients

You can localize error messages, method message, and prompt message displayed on endpoints to an unsupported language.

To localize the client messages to an unsupported language, perform the following steps:

  1. Navigate to /opt/pam_aucore/locale/.

  2. Create a new folder for preferred language and name the folder as per ISO nomenclature standards.

    To know more about ISO nomenclature standard, see http://www.loc.gov/standards/iso639-2/php/langcodes-search.php.

    For example, if you need to create a new folder for Latin, name the folder la.

    NOTE:While naming the folder, keep the following points in mind:

    • The name of the language folder should be in lower case.

    • If the ISO standard name of a language contains any special character such as hyphen or period, replace the special character with an underscore.

      For example, if the ISO code of a language is fr.ca, name the language folder fr_ca.

  3. Inside the preferred language folder, create a new folder and name it LC_MESSAGES.

  4. Copy aaacachesrv.pot, aucore.pot and linux_pam.pot files, and paste it in /opt/pam_aucore/locale/<language>\LC_MESSAGES.

  5. Open the aaacachesrv.pot, aucore.pot and linux_pam.pot files in a text editor. For example, PoEditor.

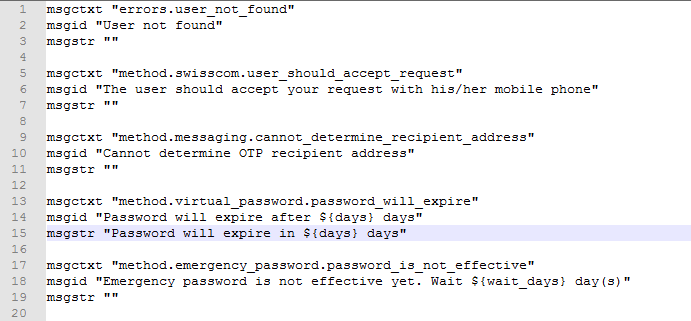
  6. Specify the preferred language message in the msgstr "".

    For example, if you need to localize password will expire in $(days) days message to Latin, specify in password erit exspirare $ (dies) dierum in msgstr "" as in the following image.

  7. Save the changes.

  8. Convert the aaacachesrv.pot, aucore.pot and linux_pam.pot files to.mo format using Po editing tools. For example, PoEditor.

  9. Change the Administrative language of the operating system to the preferred language.

  10. Restart the operating system.

4.2.14 Changing the Locale of Linux PAM Client without Changing the Locale of the Operating System

This option allows you to change the locale of Linux PAM Client without changing the locale of the operating system.

For example, if the default language of your operating system is English, you can configure Linux PAM Client to display the messages and warnings in German.

To change the locale, perform the following steps:

  1. Navigate to /opt/pam_aucore/etc/ and open the pam_aucore.conf file.

  2. Specify the following parameter:

    locale: ISO code of the preferred language.

    NOTE:While changing the locale, keep the following points in mind:

    • The code of the language should be in lower case.

    • If the ISO standard name contains any special character such as hyphen or period, replace the special character with an underscore.

      For example, if the ISO code is fr.ca, then the value should be fr_ca.

    NOTE:By default, no value is specified. If no parameter is specified in the configuration file, operating system’s default locale will be picked.

  3. Save the pam_aucore.conf file.

  4. Restart the operating system.

4.2.15 Configuring the TLS Version

You can configure the TLS version that the network library of the Linux PAM Client uses for establishing HTTPS connection with the Advanced Authentication server. The default version is TLSv1.3.

To configure the TLS version, perform the following steps:

  1. Navigate to /opt/pam_aucore/etc/ and open the pam_aucore.conf file.

  2. Specify tlsVersion: value. The values are defined as follows:

    • TLSv1.3

      NOTE:TLSv1.3 is applicable only for Advanced Authentication 6.3 Service Pack 7 and later versions.

    • TLSv1.2

    • TLSv1.1

    • TLSv1

    • All: Network library will choose the TLS version automatically.

      NOTE:If you set invalid or unknown value for the tlsVersion parameter, then the default value TLSv1.3 is set automatically.

  3. Save the changes.

  4. Restart the system.