5.8 Configuring Policies
Policies contain configuration settings for the Advanced Authentication methods, events, and so on. For example, to use the method, you must configure the server and port settings in the policy and to use the Multitenancy mode, you must enable the policy.
Advanced Authentication provides the following policies:
To configure a policy, perform the following steps:
-
Click in the Administration portal.
-
Click the icon
 against the policy you want to configure.
You can also double-click on the policy to edit the configuration.
-
Make the required changes for a specific policy.
A top administrator can enforce the configurations of a policy on secondary tenants. After configuring a policy, you can lock the settings for that specific tenant. The tenant cannot edit the locked settings in the tenant administrator console.
To enforce the configurations for a specific tenant, perform the following steps:
-
In , click .
-
Move the tenant to whom you want to enforce the configurations from the to the list in the section.
-
After you add a tenant, the option is displayed. You can turn this option to if you want to hide the configurations that you have enforced on the tenant.
NOTE: The are not supported for the following policies: CEF log forwarding, Event categories, HTTPS Options, Logo, and Multitenancy options.
A tenant administrator cannot access the and policies.
-
-
Click .
IMPORTANT:The configured policies are applied for all the Advanced Authentication servers.
5.8.5 Custom Messages
In this policy, you can customize the error messages, method message and prompt message of a specific language.
For example, you can customize the default logon error message in English to Your login failed. In the Self-Service portal, when the user specifies wrong user name, the customized error message is displayed.
To customize the messages, perform the following tasks:
NOTE:The customized messages are cached in the Advanced Authentication server. The refresh interval for custom messages is one hour. Therefore, when you customize a message or upload a custom localization file, the respective message is displayed on the corresponding Advanced Authentication portals after an hour.
To customize the authentication request message, see Customizing Authentication Request Message For Smartphone Method.
Customizing Messages in the Custom Localization File
To customize preferred messages using the file, perform the following steps:
-
Click .
-
Perform one of the following action to download the custom localization file on your local drive:
-
Click to save the custom_messages.tar.gz file that contains the default messages.
-
If you have customized the messages, click to save the current_custom_messages.tar.gz file that contains the latest messages.
-
-
Extract the files from the custom_messages.tar.gz file.
-
Navigate to the preferred language folder.
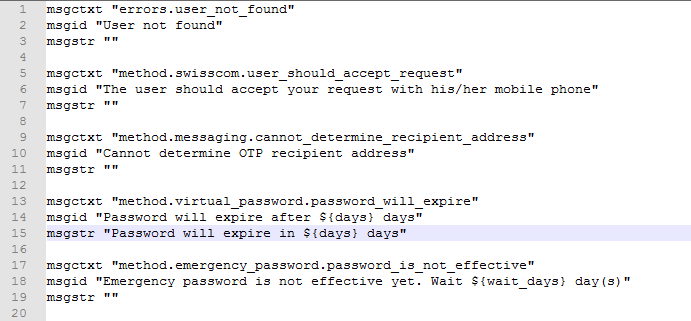
To customize English messages, use the custom_messages.pot file and for other languages use the custom_messages.po file.
-
Open the custom_messages.pot file in the text format.
-
Specify the message in the msgstr "".
-
Save the changes.
-
Compress the custom_messages folder to .tar.gz or .zip format.
-
Click and select the compressed custom_messages file from the local drive.
-
Click .
Customizing a Specific Message on the Portal
To customize a specific message on the portal, perform the following steps:
-
Click .
-
Use the to search for a specific message or you can find the preferred message manually.
-
Use the to search a specific message by group. Options available are , , , and .
-
Click the
icon next to the preferred message. You can also double-click on the message to edit the content.
-
Specify the message in the preferred language.
-
Click .
Customizing Authentication Request Message For Smartphone Method
You can customize the authentication request message that is displayed on the NetIQ Auth app when user initiates Smartphone authentication. The authentication can be either to the endpoint or to the Advanced Authentication portals.
To customize the message for smartphone method, perform the following steps:
-
Click .
-
Search for one of the following keys:
-
method.smartphone.authentication_hint to edit the request message specific to endpoint authentication.
-
method.smartphone.authentication_hint_no_endpoint to edit the request message for any authentication that does not use endpoint such as Advanced Authentication portals login.
-
-
Click
 for the preferred key.
-
Specify any of the following parameters in the preferred language message as per your requirement:
-
{user} to fetch the user name.
-
{client_ip} to fetch the client IP address.
-
{event} to fetch the event name.
-
{tenant} to fetch the tenant name.
-
{endpoint} to fetch the endpoint name.
-
-
Click .
NOTE:The customized authentication request message will reflect on the NetIQ smartphone app after an approximate delay of one hour.
For example, to customize the endpoint specific authentication message for the smartphone method you must search the key method.smartphone.authentication_hint and specify the message {user} requested for authentication request from the client {client_ip} for the {event} to access the {endpoint} in the field corresponding to English language. When the user tries to authenticate to Windows Client using the smartphone method then the customized message is displayed on the NetIQ smartphone app as:
Bob requested for authentication request from the client 10.3.10.5 for the Windows logon to access the Windows-machine-589.
5.8.14 Kerberos SSO Options
In this policy, you can select an Active Directory repository that points to a domain for which you want to configure the single sign-on (SSO). Kerberos SSO is supported for the , , , and events.
The Figure 5-1 displays the architecture of Kerberos SSO.
Figure 5-1 Kerberos SSO Architecture
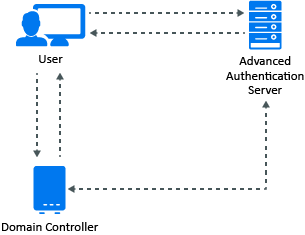
By default, the basic authentication window is displayed in your browser while accessing an Advanced Authentication portal. Advanced Authentication servers’ sites must be added to the local intranet in the browser on the domain-joined workstations to avoid it. Perform the following steps to do it for Internet Explorer:
-
From the menu, navigate to > >
-
In the window, click the tab and select
-
Click
-
In the window, click
-
Add the Advanced Authentication Servers’ sites to the zone. For example: https://v5.netiq.loc or v5.netiq.loc.
-
Click .
Perform the following steps to configure Advanced Authentication to perform an SSO authentication:
-
Ensure that the Multitenancy options policy is disabled.
-
Go to
-
Select Active Directory as repository in .
NOTE:This feature works only for a single Active Directory repository at a time.
-
Click .
-
Log in to a Domain Controller.
-
Generate the keytab files for the Kerberos authentication for each Advanced Authentication server.
A Sample command to create the keytab file is:
ktpass /princ HTTP/aas1.netiq.loc@NETIQ.LOC /mapuser aas1srv@authasas.local /crypto ALL /ptype KRB5_NT_PRINCIPAL /mapop set /pass Q1w2e3r4 /out C:\Temp\keytab_aas1srv
where
-
aas1 is a server name (according to the record in DNS), the domain name is .
-
aas1srv is a service account created in the Active Directory for the Advanced Authentication server. The password of this account is Q1w2e3r4.The keytab file keytab_aas1srv is created in the C:\Temp folder.
-
-
Go to the Advanced Authentication Administration portal.
-
Click .
-
Scroll down to the section.
-
Click and select a keytab file for the Advanced Authentication server.
-
Click .
-
Repeat Step 8 to Step 11 for the other Advanced Authentication servers.
-
Click on the Global Master server.
-
Open the properties of any supported event: , , or .
-
Scroll down and set to .
IMPORTANT:You must add the Advanced Authentication server sites to the local intranet in the browser of the domain-joined workstations. To know how to do this for the Internet Explorer, see the above procedure.
By default, Firefox browser does not support SSO. If you use the Firefox browser, you can enable SSO by performing the steps defined on the Single Sign-On in Firefox page.
NOTE:The basic authentication window is displayed while accessing a configured Advanced Authentication portal, if the option is enabled for event and security is set to High for in the Internet Explorer.
5.8.20 Mail Sender
In the policy, you can configure settings for the Email OTP method to facilitate sending email messages with one-time passwords to users.
To configure the settings, perform the following steps:
-
Specify the following details:
-
: The outgoing mail server name. For example, smtp.company.com.
-
: The port number. For example, 465.
-
: The username of an account that is used to send the authentication email messages. For example, noreply or noreply@company.com.
-
: The password for the specified account.
-
: The email address of the sender.
-
and : The cryptographic protocol used by the mail server.
-
-
You can test the configurations for the Mail sender policy in the section.
-
Specify the email address in to which you want to send the Email OTP.
-
Specify a message to be sent to the phone in .
-
Click .
-
-
Click .
Real messaging uses async sender. Ensure that you have configured a chain with the method and assigned it to an event. Login to the Self-Service portal and test the Email authenticator. If it does not work, click .
Authentication Flow
The authentication flow for the Mail sender is described in the following image.
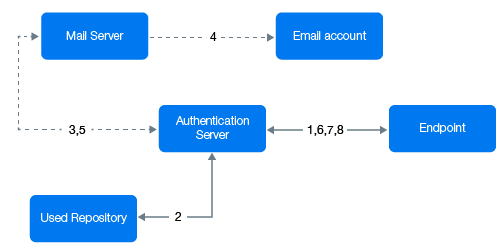
A user wants to authenticate on an endpoint such as a laptop or a website with the method. The following steps describe the authentication flow:
-
When the authentication request is initiated, the endpoint contacts the Advanced Authentication server.
-
The Advanced Authentication server validates the user’s credentials and gets an email address of the user from a repository.
-
Advanced Authentication server sends the request to a configured mail server to send an email message with the content that includes a one-time password (OTP) for authentication.
-
Mail server sends the message to the user's email address.
-
Mail server sends the sent signal to the Advanced Authentication server.
-
Advanced Authentication server sends a request to the user to specify an OTP on the endpoint.
-
The user specifies the OTP from the email message. The Advanced Authentication server gets the OTP.
-
Advanced Authentication server validates the authentication. The authentication is done or denied.
HTTPS protocol is used for the internal communication.
Access configuration
Advanced Authentication server - Mail Server (SMTP, outbound).
5.8.26 SMS Sender
In this policy, you can configure the settings for the SMS OTP method. The method sends SMS messages with one-time passwords to the users. Advanced Authentication contains predefined settings for Twilio and MessageBird services.
The consists of the following three options:
To configure SMS sender manually perform the following steps:
-
Select in .
-
Specify a value. For example, Clickatell http://api.clickatell.com/http/sendmsg?.
-
Leave and blank.
-
Select from .
-
Click and create the following parameters in .
-
name:
value: name of your account
-
name:
value: {phone}
-
name:
value: {message}
-
name: , this is a parameter that is issued after addition of an HTTP sub-product to your Clickatell account. A single account may have multiple API IDs associated with it.
-
name:
value: sender’s phone number
-
-
Click and create the following parameter in .
-
Name:
Value: current password that is set on the account
For more information about the additional parameters for Clickatell, see the Clickatell documentation.
NOTE:The parameters may differ for different SMS service providers. But the {phone} and {message} variables are mandatory.
-
To configure SMS sender settings for service, perform the following steps:
-
Select in .
-
Specify the following details:
-
and : In Twilio, the Account SID acts as a username and the Authentication Token acts as a password.
-
: The copilot option is used to send SMS from a Twilio’s phone number of your location. This is helpful when SMS messages have to be sent across the geographical locations. For example, with copilot, SMS will be sent from Indian phone number to the Indian users. Without copilot, SMS will be sent from US phone number to the Indian users.
For more information on Copilot option and its features, see https://www.twilio.com/copilot#phone-number-intelligence and https://www.twilio.com/docs/api/rest/sending-messages-copilot#features.
-
: Service SID.
-
-
: Sender’s phone number.
-
For more information, see the Twilio website.
To configure SMS sender settings for service, perform the following steps:
-
Select in .
-
Specify the , , and .
For more information, see the MessageBird website.
IMPORTANT:MessageBird API v2 is not supported. To activate MessageBird API v1, perform the following steps:
-
Go to the MessageBird account.
-
Click in the left navigation bar and open the API access tab.
-
Click .
You can test the configurations for the SMS sender policy in the section.
-
Specify the phone number in to which you want to send the SMS OTP.
-
Specify a message to be sent to the phone in .
-
Click .
-
Click .
Real messaging uses async sender. Ensure that you have configured a chain with the method and assigned it to an event. Then sign-in to the Self-Service portal and test the SMS authenticator. If it does not work, see the logs.
Authentication Flow
The authentication flow for the SMS sender in Advanced Authentication is described in the following image.
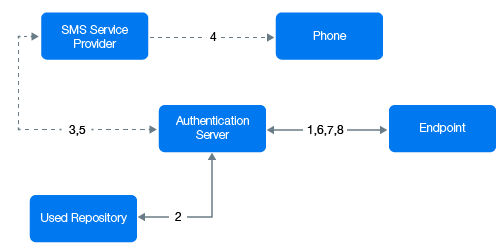
A user wants to authenticate on an endpoint such as a laptop or a website with the SMS method. The following steps describe the authentication flow:
-
When the authentication request is initiated, the endpoint contacts the Advanced Authentication server.
-
The Advanced Authentication server validates the user’s credentials and gets a phone number of the user from a Repository.
-
Advanced Authentication server sends the request to a configured SMS Service Provider to send an SMS message with the content that includes a one-time password (OTP) for authentication.
-
SMS Service Provider sends the SMS message to the user's phone.
-
SMS Service Provider sends the 'sent' signal to the Advanced Authentication server.
-
Advanced Authentication server sends a request to the user to specify an OTP on the endpoint.
-
The user specifies the OTP from the SMS message. The Advanced Authentication server gets the OTP.
-
Advanced Authentication server then validates the authentication. The authentication is done or denied.
HTTP/HTTPS protocol is used for the communication.
Access configuration
Advanced Authentication server - SMS Service Provider (HTTP/HTTPS, outbound).
5.8.28 Voice Sender
In this policy, you can configure the settings for the Voice and Voice OTP methods. Advanced Authentication supports the Twilio service for the Voice methods.
To configure Voice Sender settings for service, perform the following steps.
-
Specify the following details in the policy:
-
and : In Twilio, the Account SID acts as a username, and the Authentication Token acts as a password.
-
: The phone number of the sender.
-
: The public URL to which the Twilio service connects for authentication. This URL points to the Public External URLs (Load Balancers) policy. You can use http protocol for testing purpose, but for production environment you must use https protocol. You must have a valid certificate when you use https.
-
-
You can test the configurations for the Voice sender policy in the section.
-
Specify the phone number in to which you want to send the Voice OTP.
-
Specify a message to be sent to the phone in .
-
Click .
-
-
Click .
Real messaging uses async sender. Ensure that you have configured a chain with the method and assigned it to an event. Then sign-in to the Self-Service portal and test the Voice authenticator. If it does not work, see the logs.
IMPORTANT:The users may receive calls with the voice Application error. This happens because of incorrect settings or invalid certificates. Ensure that the certificate is valid and is not expired. Invalid certificates cannot be applied by Twilio.
Authentication Flow
The authentication flow for the Voice sender in Advanced Authentication is described in the following image.

A user wants to authenticate on an endpoint such as a laptop or a website with the Voice Call method. The following steps describe the authentication flow:
-
When the authentication request is initiated, the endpoint contacts the Advanced Authentication server.
-
The Advanced Authentication server validates the user’s credentials and gets a phone number of the user from a repository.
-
Advanced Authentication server sends the request to a configured voice call service provider (Twilio) to call the user.
-
The voice call service provider calls the user.
-
The user picks up the phone, listens to the call, and specifies the PIN followed by the hash (#) sign.
-
Voice call provider sends the specified PIN to the Advanced Authentication server.
-
Advanced Authentication server then validates the authentication. The authentication is done or denied.
HTTP/HTTPS protocol is used for the communication.
Access configuration
Advanced Authentication server - Voice Call Service Provider (HTTP/HTTPS, inbound/ outbound).