8.7 Configuring Policies
To configure an applicable policy for Advanced Authentication, follow the steps:
-
Open the section. The list of available authentication methods will be displayed.
-
Click the button next to an applicable policy.
-
Edit configuration settings for a specific policy.
-
Click at the bottom of the view to save changes.
In the section you can find the following settings:
-
Admin UI Whitelist: security settings which allows to limit using of Advanced Authentication Administrative Portal only for permitted IP addresses.
-
Authenticator management options: setting that allows a helpdesk (security officer) to link authenticators of a user to help authenticate to another user’s account. This policy also allows you to disable re-enrollment of authenticators by users in the Self-Service portal.
-
Cache options: security settings which allows to disable local caching of authenticators.
-
CEF log forwarding: settings to configure an external syslog server.
-
Delete me options: Enable/Disable delete me option.
-
Endpoint management options: an option to require authentication data for Endpoint creation. It must be disabled when installing Advanced Authentication Access Manager Advanced Authentication plug-in.
-
Event categories: Allows you to add categories, which can be used in an event to support multiple enrollments for a method.
-
Geo fencing options: setting that helps to create authentication zones by drawing boundaries for a geographical location.
-
HTTPS Options: setting that allows administrators to configure policies to ensure that appliance is safe from security vulnerabilities.
-
Helpdesk Options: a security option which allows to disable asking for user's credential when a security officer is managing the user's authenticators.
-
Kerberos SSO Options: Allows you to select a repository for Kerberos single sign-on.
-
Last Logon Tracking Options: allows to enable tracking for last logon to configure and use simple chain corresponding to a high-security chain.
-
Lockout Options: security settings which allows to lock user after some authentication failures.
-
Login Options: allows to specify the default repositories, to avoid of necessity to enter a repository name in username field.
-
Logo: setting that allows you to set an image or alternate text as a logo for the Administration and Self-Service portal.
-
Logon Filter for AD: Enable/Disable logon filter for Active Directory.
-
Mail sender: SMTP server settings.
-
Multitenancy Options: Enable/Disable multitenancy mode in the appliance.
-
Password Filter for AD: Enable/Disable password filter for Active Directory.
-
SAML 2.0 options: settings that allows you to add external URL and to download identity provider’s SAML 2.0 Metadata.
-
SMS sender: settings for external SMS service provider, contains predefined settings for Twilio, MessageBird.
-
Services Director Options: setting to enable the integration with Services Directory.
-
Voice sender: Twilio settings for Voice and Voice OTP method; an option to allow enrollment for users without telephone number.
IMPORTANT:The configured policies will be applied for all servers.
NOTE:A tenant administrator will not have access to CEF log forwarding and Multitenancy Options.
8.7.15 Mail Sender
The settings are located in the section.
The section contains the mail server settings. It's used by Email OTP to send the email messages with one-time passwords to users.
It's required to configure the following settings:
-
, the outgoing mail server name (e.g. smtp.company.com)
-
, the used port number (e.g. 465)
-
, username of an account which will be used to send the authentication email messages (e.g. noreply or noreply@company.com)
-
, password for the specified account
-
and is used to specify a cryptographic protocol used by the mail server.
Click to apply the changes.
Authentication flow
The following chart demonstrates the authentication flow:
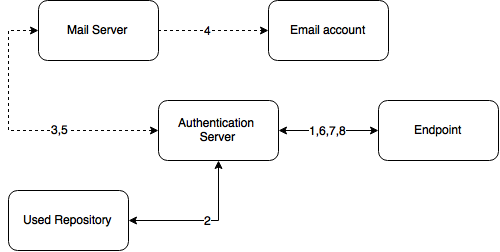
A user is authenticating on endpoint (which can be the user's laptop with Advanced Authentication Windows Client installed or a website etc.) by Email method.
-
The endpoint calls the Advanced Authentication Server.
-
It validates the provided user's credentials and gets an email address of the user from a used Repository.
-
Advanced Authentication Server sends the request to a configured Mail Server to send an Email message with generated content which includes a one-time password (OTP) for authentication.
-
Mail Server sends the message to the user's email address.
-
Mail Server sends the 'sent' signal to the Advanced Authentication Server.
-
Advanced Authentication Server sends a request to enter an OTP on the endpoint side.
-
The user enters an OTP from the email message. The Advanced Authentication Server gets the OTP.
-
Advanced Authentication Server validates the authentication. The authentication is done/ forbidden.
HTTPS protocol is used for the internal communication.
Access configuration
Advanced Authentication Server - Mail Server (SMTP, outbound).
8.7.18 SMS Sender
The settings are available in the section.
This section contains the SMS service provider settings. It is used by SMS OTP to send the SMS messages with one-time passwords to users. Advanced Authentication contains the predefined settings for Twilio and MessageBird services.
To configure SMS sender settings for service select Twilio in drop down list and fill or set the following fields:
-
Account sid
-
Auth token
-
Use Copilot
-
Sender phone
-
Messaging Service SID
NOTE: option is enabled only when option is set to
You can find more information on the Twilio website.
For more information on Copilot and its features, visit the following websites:
https://www.twilio.com/copilot#phone-number-intelligence
https://www.twilio.com/docs/api/rest/sending-messages-copilot#features
To configure SMS sender settings for service, select Messagebird in drop down list and fill the following fields:
-
Username
-
Password
-
Sender name
You can find more information on the MessageBird website.
IMPORTANT:MessageBird API v2 is not supported. To activate MessageBird API v1, go to the MessageBird account, click from the left navigation bar and open the API access tab. Click .
To configure SMS sender manually, select in drop down list and perform the following steps:
-
Specify a value. For example: Clickatell http://api.clickatell.com/http/sendmsg?.
-
Leave the and text boxes blank.
-
Select from the drop down list.
-
Click and create the following parameters in section.
-
name:
value: name of your account
-
name:
value: {phone}
-
name:
value: {message}
-
name: , this is a parameter issued upon addition of an HTTP sub-product to your Clickatell account. A single account may have multiple API IDs associated with it.
-
name:
value: sender’s phone number
-
-
Click and create the following parameter in HTTP request body section.
-
name:
value: current password that is set on the account
For more information on additional parameters for Clickatell, refer to the Clickatell documentation.
NOTE:The parameters may differ for different SMS service providers. But the {phone} and {message} variables are obligatory.
-
-
Click at the bottom of the view to save changes.
Authentication flow
The following chart demonstrates the authentication flow:
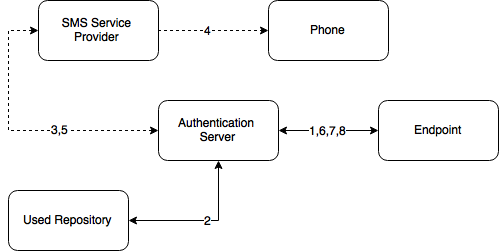
A user is authenticating on endpoint (which can be the user's laptop with Advanced Authentication Windows Client installed or a website etc.) by SMS method.
-
The endpoint calls the Advanced Authentication Server.
-
It validates the provided user's credentials and gets a phone number of the user from a used Repository.
-
Advanced Authentication Server sends the request to a configured SMS Service Provider to send an SMS message with generated content which includes a one-time password (OTP) for authentication.
-
SMS Service Provider sends the SMS message to the user's phone.
-
SMS Service Provider sends the 'sent' signal to the Advanced Authentication Server.
-
Advanced Authentication Server sends a request to enter an OTP on the endpoint side.
-
The user enters an OTP from the SMS message. The Advanced Authentication Server gets the OTP.
-
Advanced Authentication Server validates the authentication. The authentication is done/ forbidden.
HTTP/HTTPS protocol is used for the communication.
Access configuration
Advanced Authentication Server - SMS Service Provider (HTTP/HTTPS, outbound).
8.7.20 Voice Sender
The settings are located in the section.
The section contains the Voice and Voice OTP method settings. It is used by Voice and Voice OTP. Advanced Authentication supports the Twilio service.
The following fields must be filled in section:
-
Account sid
-
Auth token
-
Sender phone
-
Public server url
The information regarding fields 1-3 you may get on the Twilio website. The must contain a public URL to where the Twilio service will connect for authentication. It's possible to use http protocol for testing purposes, but for production environment it's recommended to use https protocol. You need to have a valid certificate when using https.
The section allows to configure behavior when a user is trying to enroll the Voice authenticator, but the user's repository data doesn't contain a phone number. If option is set to OFF such user will not be able to enroll the Voice authenticator and the user will get an error message, which can be specified in field.
Click to apply the changes.
IMPORTANT:The users may get the calls with voice speaking Application error. It may happen because of not correct settings or invalid certificate. Ensure that the certificate is valid and not expired. Invalid certificate cannot be applied by Twilio.
Authentication flow
The following chart demonstrates the authentication flow:
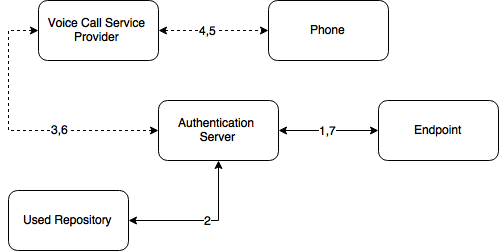
A user is authenticating on endpoint (which can be the user's laptop with Advanced Authentication Windows Client installed or a website etc.) by SMS method.
-
The endpoint calls the Advanced Authentication Server.
-
It validates the provided user's credentials and gets a phone number of the user from a used Repository.
-
Advanced Authentication Server sends the request to a configured Voice Call Service Provider (Twilio) to call the user.
-
Voice Call Service Provider calls the user.
-
The user picks up the phone, listens to the answerphone and enters the PIN code followed by hash sign.
-
Voice Call Provider sends the entered PIN code to the Advanced Authentication Server.
-
Advanced Authentication Server validates the authentication. The authentication is done/ forbidden.
HTTP/HTTPS protocol is used for the communication.
Access configuration
Advanced Authentication Server - Voice Call Service Provider (HTTP/HTTPS, inbound/ outbound).