2.7.10 Using the Intersite Transfer Service

Understanding the Intersite Transfer Service URL

The Intersite Transfer Service is used by an identity provider to provide authentication to occur at a service provider that it trusts. The URLs for accessing the Intersite Transfer Service differ for each supported protocol (Liberty, SAML 1.1, and SAML 2.0). The NetIQ Access Manager identity and service provider components use the following format of the Intersite Transfer Service URL:

<identity provider URL>?PID=<entityID>&TARGET=<final_destination_URL>

The <identity provider URL> is the location where the authentication request can be processed. For an Access Manager Identity Server, the URL is the Base URL of the server that provides authentication, followed by the path to the protocol application being used for federation.

For example:

SAML 1.1: https://idp.sitea.novell.com:8443/nidp/saml/idpsend

SAML 2.0: https://idp.sitea.novell.com:8443/nidp/saml2/idpsend

Liberty: https://idp.sitea.novell.com:8443/nidp/idff/idpsend

If a third-party server provides the authentication, refer the documentation for the format of this URL.

The <entityID> is the URL to the location of the metadata of the service provider. The scheme (http or https) in the <entityID> must match what is configured for the <identity provider URL>.

For SAML 1.1 and SAML 2.0, search the metadata for its entityID value. For Liberty, search the metadata for the providerID value. Access Manager Identity Servers acting as service providers have the following types of values:

SAML 1.1: https://idp.siteb.novell.com:8443/nidp/saml/metadata

SAML 2.0: https://idp.siteb.novell.com:8443/nidp/saml2/metadata

Liberty: https://idp.siteb.novell.com:8443/nidp/idff/metadata

If you are setting up federations with a third-party service provider, refer the documentation for the URL or location of its metadata.

The <final_destination_URL> is the URL to which the browser is redirected following a successful authentication at the identity provider. If this target URL contains parameters (for example, TARGET=https://login.provo.novell.com:8443/nidp/app?function_id=22166& amp;Resp_Id=55321 &amp;Resp_App_Id=810&amp;security_id=0), the URL must be encoded to prevent it from being truncated.

For example:

  • SAML 1.1: https://idp.sitea.novell.com:8443/nidp/saml/idpsend?PID=https://idp.siteb.novell.com:8443/nidp/saml/metadata&TARGET=https://eng.provo.novell.com/saml1/myapp

  • SAML 2.0: https://idp.sitea.novell.com:8443/nidp/saml2/idpsend?PID=https://idp.siteb.novell.com:8443/nidp/saml2/metadata&TARGET=https://eng.provo.novell.com/saml2/myapp

  • Liberty: https://idp.sitea.novell.com:8443/nidp/idff/idpsend?PID=https://idp.siteb.novell.com:8443/nidp/idff/metadata&TARGET=https://eng.provo.novell.com/liberty/myapp

To read more about configuring an intersite URL, see Configuring an Intersite Transfer Service Target for a Service Provider.

If you configure an Intersite Transfer Service URL for an Identity Server that is the Access Manager Identity Server and the service provider is either another Identity Server or a third-party server, you can simplify the Intersite Transfer Service URL to the following format:

<identity provider URL>?id=<user_definedID>

For example:

  • SAML 2.0: https://test.blr.novell.com:8443/nidp/saml2/idpsend?id=testsaml2&TARGET=https://eng.provo.novell.com

  • SAML 1.1: https://testsb.blr.novell.com:8443/nidp/saml/idpsend?id=testsaml&TARGET=https://eng.provo.novell.com

  • Liberty: https://testsb.blr.novell.com:8443/nidp/idff/idpsend?id=libertytest&TARGET=https://eng.provo.novell.com

If the Allow any target option is enabled and if the Intersite Transfer Service URL has a target value, then the user is redirected to target URL.

The Intersite Transfer Service URL for SAML 2.0 will be https://testsb.blr.novell.com:8443/nidp/saml2/idpsend?id=testsaml2&TARGET=http://www.google.com where http://www.google.com is the target URL.

NOTE:Depending on the usage, the target parameter serves different purpose. It is case-sensitive.

  • target: Specifies the idpsend URL with a contract id.

  • TARGET: Specifies URL of the final destination.

Use case: If authentication with a particular contract is enabled in Intersite URL, you are redirected to the default target URL. Use the following format: http(s)://<$idp_host_name>/nidp/app?id=<$contract_to_be_executed>&target=http(s)://<$idp_host_name>/nidp/saml2/idpsend?id=<$saml_sp_identifier>.

For more information, see How to access an Identity Server Intersite Transfer URL with a specific contract.

NOTE:The contract_to_be_executed is executed by Identity Server and is case sensitive.

For example, https://www.idp.com:8443/nidp/app?id=npbasic&target=https://www.idp.com:8443/nidp/saml2/idpsend?id=serviceprovider1.

How it works?

In the above example, identity provider authentication is done with the contract id npbasic. You are now redirected to the service provider by using the saml_sp_identifier id (serviceprovider1). After authentication (if configured with persistent federation), the page redirects you to the available default target, or to the nidp login page of the service provider.

For configuration and ID information, see Configuring an Intersite Transfer Service Target for a Service Provider.

In the Intersite Transfer Service URL, id can be used for the following purposes:

  1. To simplify the intersite URL.<identity provider URL>?id=<user_definedID>

  2. To execute a particular contract in Identity Server login service with intersite URL.

    http(s)://<$idp_host_name>/nidp/app?id=<$contract_to_be_executed>&target=http(s)://<$idp_host_name>/nidp/saml2/idpsend?id=<$saml_sp_identifier>

Specifying the Intersite Transfer Service URL for the Login URL Option

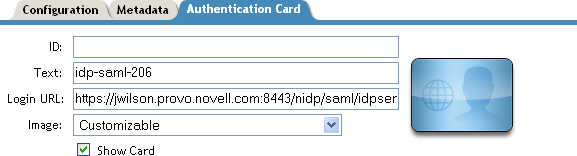
Liberty and SAML 2.0 support a single sign-on URL. Because SAML 1.1 does not support a single sign-on URL, you need to specify the Intersite Transfer Service URL in the Login URL option on the authentication card for the SAML 1.1 identity provider:

Figure 2-21 SAML 1.1 Authentication Card

For a card to appear as a login option, you must specify a Login URL and select the Show Card option. Figure 2-22 illustrates a possible configuration that requires the Intersite Transfer Service for the SAML 1.1 protocol.

Figure 2-22 Federated Identity Configuration

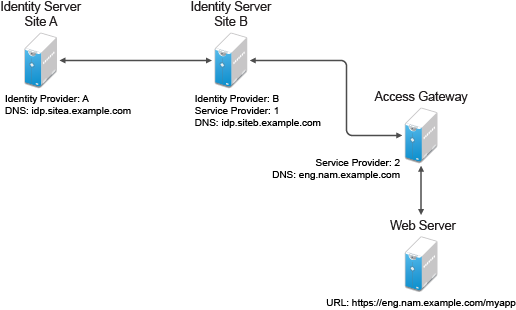
If you want a card to appear that allows the user to log in to Site A (as shown in Figure 2-21), you need to specify a value for the Login URL option.

Using the DNS names from Figure 2-22, the complete value for the Login URL option is as follows:

https://idp.sitea.example.com:8443/nidp/saml/idpsend?PID=https://idp.siteb.example.com:8443/nidp/saml/metadata&TARGET=https://idp.siteb.example.com:8443/nidp/app

The following actions occur when this link is invoked:

  1. The browser performs a Get to the identity provider (Site A).

  2. If the identity provider (Site A) trusts the service provider (Site B), the identity provider prompts the user for authentication information and builds an assertion.

  3. The identity provider (Site A) sends the user to the service provider (Site B), using the POST or Artifact method.

  4. The service provider (Site B) consumes the assertion and sends the user to the TARGET URL (the user portal on Site B).

To configure the settings for the intersite transfer service, see Modifying the Authentication Card for SAML 1.1.

Using Intersite Transfer Service Links on Web Pages

The Intersite Transfer Service URL can be used on a web page that provides links to various protected resources requiring authentication with a specific identity provider and a specific protocol. Links on this web page are configured with the URL of the Intersite Transfer Service of the identity provider to be used for authentication. Clicking these links directs the user to the appropriate identity provider for authentication. Following successful authentication, the identity provider sends a SAML assertion to the service provider. The service provider uses the SAML assertion to verify authentication, and then redirects the user to the destination URL as specified in the TARGET portion of the Intersite Transfer Service URL.

The following are sample links. These links demonstrate the use of SAML 1.1, SAML 2.0, and Liberty formats for the Intersite Transfer Service URL:

SAML 1.1: <a href="https://idp.sitea.example.com:8443/nidp/saml/idpsend?PID=https://idp.siteb.example.com:8443/nidp/saml/metadata&TARGET=https://eng.nam.example.com/saml1/myapp">SAML 1.1 example</a>

SAML 2.0: <a href="https://idp.sitea.example.com:8443/nidp/saml2/idpsend?PID=https://idp.siteb.example.com:8443/nidp/saml2/metadata&TARGET=https://eng.nam.example.com/saml2/myapp">SAML 2.0 example</a>

Liberty: <a href="https://idp.sitea.cit.example.com:8443/nidp/idff/idpsend?PID=https://idp.siteb.example.com:8443/nidp/idff/metadata&TARGET=https://eng.nam.example.com/liberty/myapp">Liberty example</a>

Figure 2-23 illustrates a network configuration:

Figure 2-23 Using the Intersite Transfer Service URL

In this example, Site Z places links on its web page, using the Intersite Transfer Service URL of Site A. These links trigger authentication at Site A. If authentication is successful, Site A sends an assertion to Site B. Site B verifies the authentication and redirects the user to the myapp application that it is protecting.

When defining the intersite transfer URL within Administration Console, you can define an id and target for the SAML service provider (SP) you are accessing. For more information about accessing an Identity Server intersite transfer URL with a specific contract, see TID 7005810.

Configuring an Intersite Transfer Service Target for a Service Provider

If you have created web pages containing links that specify an Intersite Transfer Service URL (see Using Intersite Transfer Service Links on Web Pages), you can configure Identity Server to control the TARGET parameter.

  1. Click Devices > Identity Servers > Edit > [Liberty, SAML1.1, or SAML 2.0] > [Service Provider] > Intersite Transfer Service.

  2. Specify the following details:

    ID: (Optional) Specify an alphanumeric value that identifies the target.

    If you specified an ID for the target, you can use this value to simplify the Intersite Transfer URL that must be configured at the service provider. This is the <user_definedID> value in the following format for the Intersite Transfer URL.

    <identity provider URL>?id=<user_definedID>

    The ID specified here allows Identity Server to find the service provider’s metadata.

    NOTE:If you have defined Unique Id for a specific trusted service provider, you cannot simplify the Intersite Transfer URL on the Intersite Transfer Service page in Administration Console. You must specify the complete idpsend URL.

    When a trusted service provider is configured with a unique id, the idpsend URL will be in the following format:

    https://idp.sitea.example.com:8443/nidp/saml2/idpsend?PID=https://idp.siteb.example.com:8443/nidp/saml2/metadata&uniqueId=<unique id configured in admin console>&TARGET=https://idp.siteb.example.com/saml2/app

    Target: Specify the URL of the page that you want to display to users when they authenticate with an Intersite Transfer URL.The behavior of this option is influenced by the Allow any target option. NetIQ recommends you to specify a default target URL, for example, https://www.serviceprovider1.com.

    Allow any target: You can either select or not select this option.

    • When you select this option,

      • if the Intersite Transfer URL has a target value, then the user is sent to target URL.

      • if the Intersite Transfer URL does not have a target value, then the user is sent to the configured target, that is, www.serviceprovider1.com.

    • When you do not select this option,

      • if the Intersite Transfer URL has a target value, then the user is sent to the target www.serviceprovider1.com irrespective of the target mentioned in the Intersite Transfer URL.

      • if the Intersite Transfer URL does not have a target value, the user is sent to www.serviceprovider1.com.

  3. Click OK > OK.

  4. Update Identity Server.

Configuring Whitelist of Target URLs

Redirection, which is required by many applications and services, inherently brings in a security risk. Redirects are dangerous because unsuspecting users who are visiting trusted sites can be redirected to malicious sites that exploit the users' trust. A new featured, called whitelist, has been added that restricts target URLs to specific domains.

The whitelist feature allows you to restrict target URLs to URLs which match the domains in the whitelist.

Any target URLs that use a domain that is not in the list are blocked and the user receives the following error message:

The request to provide authentication to a service provider has failed (outsidedomain.com-89F57BF823DFE551).

  1. Click Devices > Identity Servers > Edit > [Liberty, SAML1.1, or SAML 2.0] > [Service Provider] > Intersite Transfer Service.

  2. In the Domain List, click New.

  3. Specify the domain name, then click OK.

    The domain name must be a full domain name, such as www.example.com. Wildcard domain names, such as www.example.*.com, do not work.

  4. To edit an existing domain name, click the name, modify the name, then click OK.

  5. To delete an existing domain name, select the check box by the domain, click Delete, then click OK to delete or Cancel to close the window.

  6. Click OK.

  7. Update Identity Server.

Validating Incoming Authentication Request for Assertion Consumer Service URL

When an authentication request from a service provider is not signed, Identity Provider cannot validate the authenticity and integrity of the request. So, any malicious user who can intercept the request can change the Assertion Consumer Service URL in the request and make the Identity Provider to send the assertion to malicious sites.

To secure and validate the authentication request from the service provider, you can use the following options in the service provider configuration of Identity provider:

NOTE:These options must be defined to avoid security issues during an unsigned SAML Authentication Request.

SAML2_ACS_URL_RESTRICT: This option ensures Identity Provider will validate the Assertion Consumer Service URL in the request against the trusted metadata URL before sending the assertion. So if the Assertion Consumer URL in the Authentication Request is tampered by any malicious user, Identity Provider terminates the request and assertion will not be sent.

SAML2_ACS_DOMAIN_WHITELIST: This option ensures Identity Provider will validate the Assertion Consumer URL in the request against a white list of domains. If the Assertion Consumer Service URL is not matching with any of the domain URLs in the white list, request is terminated by the Identity Provider.

You must define SAML2_ACS_DOMAIN_WHITELIST along with SAML2_ACS_URL_RESTRICT for a service provider in Identity Provider because this option does not work if SAML2_ACS_URL_RESTRICT is not enabled.

To define these options, perform the following steps in Administration Console:

  1. Click Devices > Identity Servers > IdP Cluster > SAML2.

  2. Select the required service provider from the Service Providers list.

  3. Click Options.

  4. Click New, then select OTHER from the drop down list.

    1. If you want Identity Provider to allow authentication only to the trusted ACS URLs, specify the following:

      Property Name: SAML2_ACS_URL_RESTRICT

      Property Value: true

    2. If you want Identity Provider to perform additional validation of the authentication request with the ACS domain whitelist, specify the following:

      Property Name: SAML2_ACS_DOMAIN_WHITELIST

      Property Value: Domain names separated with semi-colon(;) and no space. For example, www.airlines.com;www.example.com.

Federation Entries Management

Identity federation is the association of accounts between an identity provider and a service provider.

Step up Authentication Example for an Identity Provider Initiated Single Sign-On Request

Setup: Let us assume that:

  • NetIQ Access Manager is acting as an identity provider.

  • The following three contracts in the identity provider are configured:

    • name password basic contract with Authentication level as 10

    • name password form contract with Authentication level as 20

    • secure name password contract with Authentication level as 30

      NOTE:Enable the Satisfiable by a contract of equal or higher level option for contracts with authentication level 10 or 20 to avoid prompting for authentication when a user is already authenticated against the contract with level 30.

  • The name password form contract for a service provider named SP_A is configured in the identity provider.

    For more information about creating and configuring the contracts, see Section 4.1.4, Configuring Authentication Contracts.

Configuration: Complete the following steps:

  1. In the NetIQ Identity Server, configure the service provider as a trusted provider.

    For more information, see Section 2.7.3, Managing Trusted Providers.

  2. In the service provider, configure the NetIQ Identity Server as a trusted provider.

    For more information, see Section 2.7.3, Managing Trusted Providers.

  3. In the NetIQ Identity Server, configure the service provider with the required authentication contracts.

For information about how to configure a service provider, see Defining Options for SAML 2.0, To Define Options for Liberty Service Provider andDefining Options for SAML 1.1 Service Provider.

Results: The following are the four possible scenarios:

  • If the user was authenticated with the name password basic contract before making an Intersite Transfer Service request to SP_A, the identity provider will step up to the name password form authentication.

  • If the user was authenticated with the name password form contract before making an Intersite Transfer Service request to SP_A, the identity provider will not ask for the authentication.

  • If the user was authenticated with the secure name password contract before making an Intersite Transfer Service request to SP_A, the identity provider will not ask for the authentication.

  • If the user is not authenticated while making an Intersite Transfer Service request to SP_A, the identity provider will step up to the name password form authentication.

The following diagram illustrates the workflow:
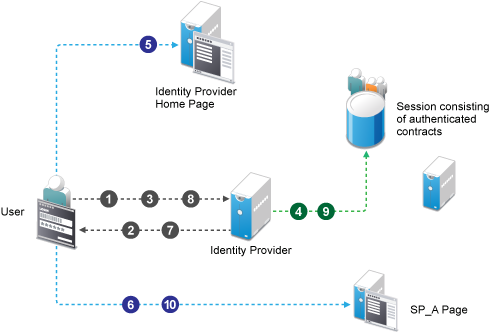
Workflow:

  1. User tries to authenticate in the identity provider.

  2. User is prompted to authentication using the Name Password Basic contract.

  3. User enters the credentials.

  4. The Name Password Basic contract is authenticated in the identity provider and added to the user session.

    The Name Password Basic contract is the default contract in the identity provider.

  5. User logs into the identity provider.

  6. User makes an Intersite Transfer Service request to SP_A.

  7. The identity provider prompts for the authentication using the Name Password Form contract.

  8. User enters the credentials.

  9. The Name Password Form contract is authenticated in the identity provider and added to the user session.

  10. User is redirected to SP_A.

NOTE:For information about service provider initiated single sign-on and its example, see Contracts Assigned to a SAML 2.0 Service Provider.

URL Query String Parameters

The following table lists query string parameters and their descriptions:

Parameter

Description

id

While defining the Intersite Transfer Service URL, you can define an id and target for the SAML service provider being accessed.

For example, if you defined the id as testsaml and TARGET as URL of service provider, the login URL is https:// <identity provider server >:<port>/nidp/saml/idpsend?id=testsaml&TARGET=<URL of service provider>.

If TARGET is not specified, the login URL is https:// <identity provider server >:<port>/nidp/saml/idpsend?id=testsaml.

PID

You can use this parameter when another provider is added and an Intersite Transfer Service id is not defined.

For example, the login URL in this case can be https:// <identity provider server >:<port>/nidp/saml/idpsend?PID=<https://identity provider server>:8443/nidp/saml/metadata&TARGET=<URL of service provider>.

target

Specifies the idpsend URL with a contract ID.

If authentication with a particular contract is enabled in the Intersite Transfer Service URL, you are redirected to the default target URL.

Use the following format: http(s)://<$idp_host_name>/nidp/app?id=<$contract_to_be_executed>&target=http(s)://<$idp_host_name>/nidp/saml2/idpsend?id=<$saml_sp_identifier>.

For example, https://www.idp.com:8443/nidp/app?id=npbasic&target=https://www.idp.com:8443/nidp/saml2/idpsend?id=serviceprovider1.

TARGET

Specifies URL of the final destination. Format of the URL: <identity provider URL>?PID=<entityID>&TARGET=<final_destination_URL>

For example, https://<identity provider url/nidp/saml2/idpsend?id=testsaml2&TARGET=http://www.google.com. Here http://www.google.com is the destination.