10.3.1 Designing an Authorization Policy
When you create an Authorization policy, you need to configure one or more rules. Each rule consists of two parts: (1) one or more conditions the user must meet and (2) the action to perform when the user meets the conditions or does not meet the conditions. The action can be allow or deny access to the resource. This section describes how to use the following elements when creating a policy:
Controlling Access with a Deny Rule and a Negative Condition
To deny access to the correct set of users, you need to know the characteristics of the users you do not want to access the resource and the characteristics of the users you want to access the resource.
You can create simple policies by using a Deny action. For example, suppose you have an application that you want only managers to access. If you have set up a role that assigns all managers to the Manager role, you can use this characteristic for an Authorization policy.
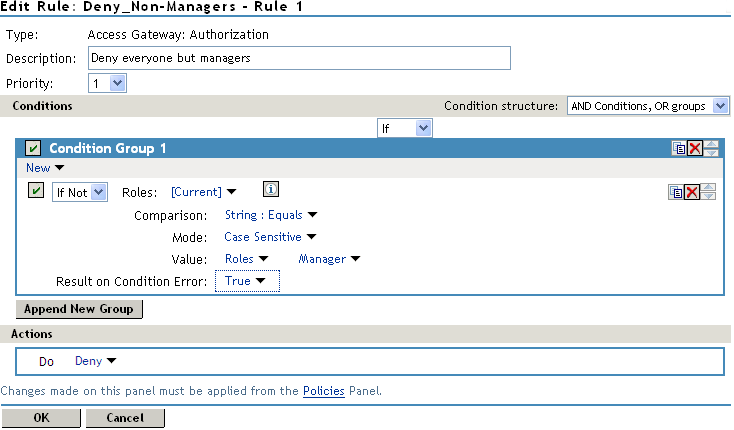
This rule evaluates the user, and if the user does not belong to the Manager role, the user matches the condition. The action for matching the condition is to deny access. Managers, who belong to the Manager role, do not match the condition and the Deny action is not applied to them.
The option is set to True. You do not want an error to cause the policy to assume that the user is a manager. If an error occurs, you want the policy to assume that the user is not a manager, so he or she matches the condition and the Deny action is applied.
Using Multiple Conditions
The option controls how conditions within a condition group interact with each other and how condition groups interact with each other. Select one of the following:
-
AND Conditions, OR groups: If the conditions are ANDed, the user must meet all the conditions in a condition group to match the profile. If the condition groups are ORed, the user must meet all of the conditions of one group to match the profile. This option allows you to set up two or more profiles into which a user could fit and be considered a match. For example, suppose you create the following Permit rule:
The first condition group contains the following conditions:
-
The user’s department must be Engineering.
-
The request must come on a weekday.
The second condition group contains the following conditions:
-
The user’s department must be Information Services and Technology (IS&T).
-
The request must come on a weekend.
With this rule, the engineers who match the first condition group have access to the resource during the week, and the IS&T users who match the second condition group have access to the resource on the weekend.
-
-
OR Conditions, AND groups: If the conditions are ORed, the user must meet at least one condition in the condition group to match the profile. If the conditions groups are ANDed, the user must meet at least one condition in each condition group to match the profile. For example, suppose you create the following allow rule:
The first condition group contains the following conditions:
-
The user’s department is Engineering.
-
The user’s department is Sales.
The second condition group contains the following conditions:
-
The user has been assigned the Party Planning role.
-
The user has been assigned the Vice President role.
With this rule, the Vice Presidents of both the Engineering and Sales departments can access the resource, and the users from the Engineering and Sales department who have been assigned to the Party Planning role can access the resource.
-
At the top of each condition group, there is an option that allows you to control whether the user must match the conditions to match the profile or whether the user matches the profile if the user does not match any of the conditions. Depending upon your selection for the Condition structure, you can select from the following:
-
If/If Not
-
Or/Or Not
-
And/And Not
Conditions also have similar Not options, so that a user can match a condition by not matching the specified value.
Adding Multiple Conditions
To add another condition to a condition group, click , then select a condition. To copy an existing condition, click the icon  . New conditions are always added to the end of the condition group. Use the
  buttons to order the conditions in the condition group.
Adding New Condition Groups
To add another condition group to the rule, click . To copy the existing condition group, click the icon . New condition groups are always added to the end to the Conditions section. Use the buttons to order the condition groups.
Disabling or Moving Conditions and Condition Groups
Condition groups and conditions within them can be disabled by clicking the Enabled check mark  , which changes the icon to the icon
  .
.
You usually disable a condition or condition group when testing a new rule, and if you decide that the condition or condition group is not needed, you can then use the  button to delete the condition or condition group from the rule. Use the buttons next to the button to move a condition up or down within its group. Condition groups also have buttons.
Controlling Access with Multiple Conditions
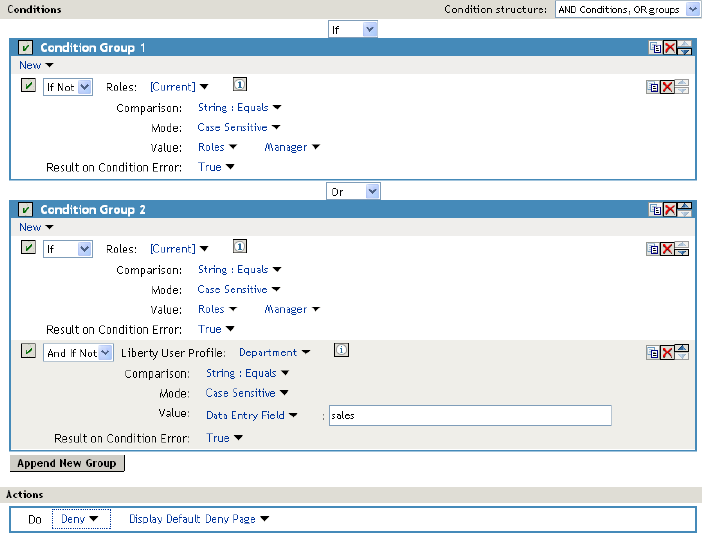
A policy requires multiple conditions when you have more than one condition for granting access. For example, you can identity your managers because they have been assigned the role of Manager, and you have a resource that only the sales managers must access. Such a policy requires two conditions for granting access: the Manager role and membership in the sales department. For a Deny rule, the rule needs two condition groups:
-
The first condition group matches all users who are not managers. This causes the Deny action to be applied.
-
The second condition group matches the users who are managers but don’t belong to the sales department. Because they match both conditions, the Deny action is applied. For these two condition groups to work with this logic, the is set to .
The users who are managers and who belong to the sales department do not match either condition group. The Deny action is not applied, and they are allowed access.
Such a rule would look similar to the following:
This second condition group could be implemented as the second rule of the policy. If so, it must be set as a lower priority than the first rule. Because most systems would have more users than managers, the user rule would be used more frequently, so it must come first.
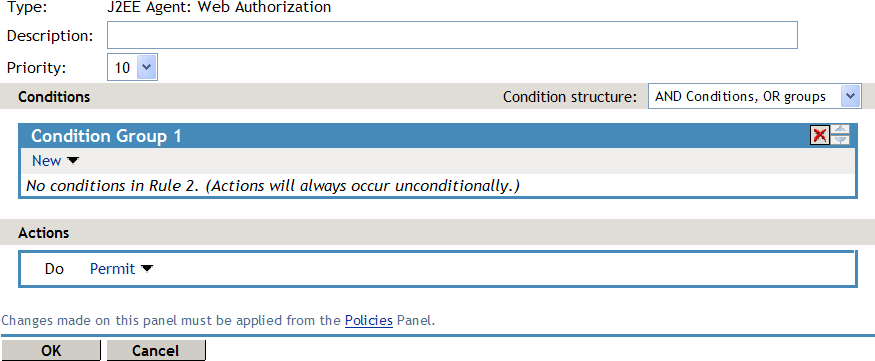
Using Permit Rules with a Deny Rule
You can create policies containing one or more Permit rules and then create the lowest priority rule in the policy as a Deny rule with no conditions. When an allow condition is matched, other rules are not processed and the user is granted access to the resource. The Deny rule is only processed if the user does not match one of the allow rules. Because all users match a rule with no conditions, the user is denied access to the resource.
The first rule in such a policy for the sales application would look similar to the following:
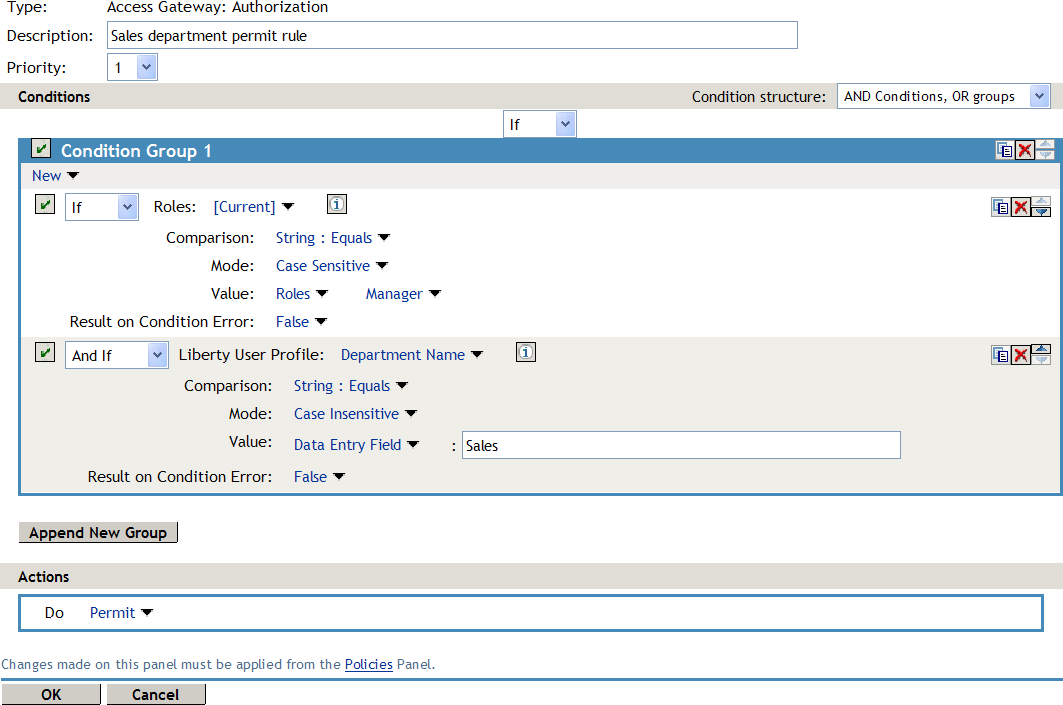
Conditions in Rule 1 are ANDed. It requires the user to match both conditions to access the resource. The priority is set to 1, so this rule is the first rule that Access Gateway processes.
The second rule would look similar to the following:
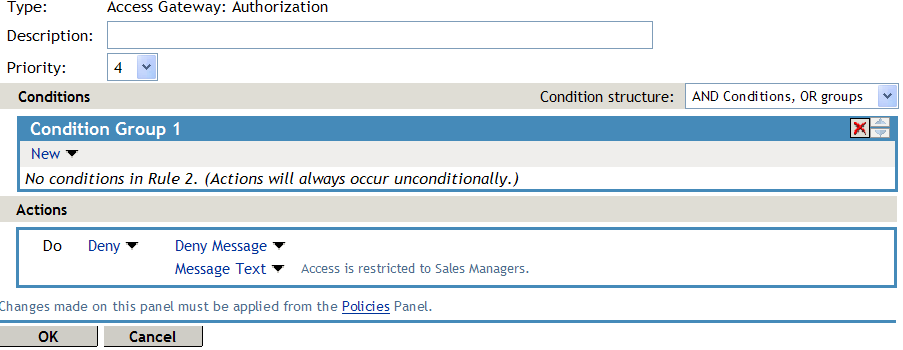
Because this rule has no conditions, any user who does not match the first rule does match this rule and access is denied. The priority of this rule is set lower than the Permit rule so that the Permit rule is processed first.
Using Deny Rules with a General Permit Rule
You can also create policies that contain one or more Deny rules and then create the lowest priority rule in the policy as a Permit rule with no conditions. In such a policy, as soon as a Deny rule matches a user, the rest of the rules are not processed and the user is denied access to the resource. The Permit rule is only processed if the user does not match one of the Deny rules. Because all users match a rule with no conditions, the user is allowed access to the resource.
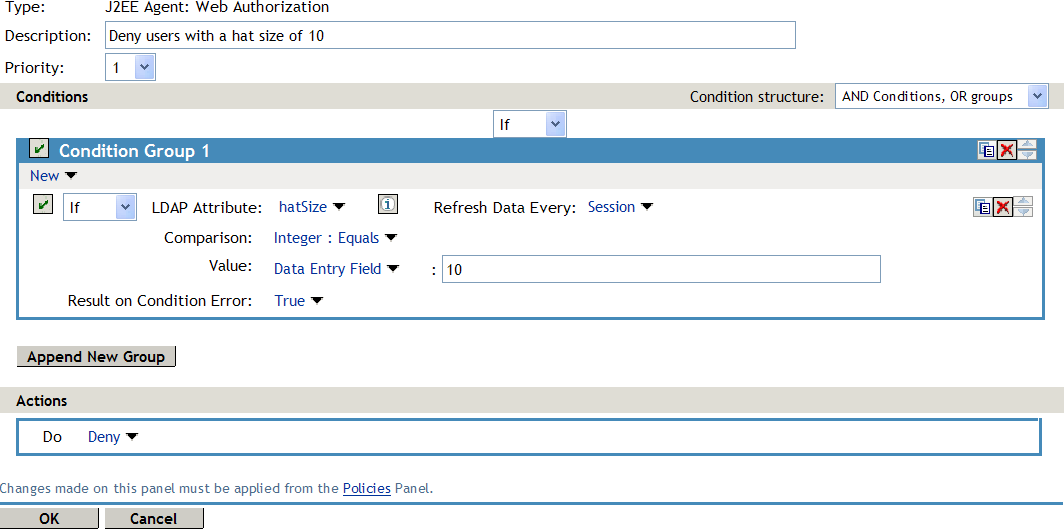
The key to creating this type of policy is making sure all the Deny rules match the users you do not want accessing the resource and making sure that the option is set correctly.
For example, suppose one of the Deny rules uses an LDAP attribute for the condition and that the attribute is a hatSize attribute. Some of your users do not have a hatSize attribute, so when they access the resource, the comparison generates an error. If option is set to False, the action (Deny) is not applied, and the next rule in the policy is processed. If that rule is the general Permit rule, then they are allowed access to the resource because they experienced an error. To prevent this behavior, you need to set the option to True, so that the Deny action is applied. Your rule then denies access to everyone whose hatSize attribute matches the specified value and everyone who does not have the attribute.
The Deny rule for such a policy would look similar to the following:
Figure 10-6 Deny Rule Configured for Error Conditions
For most people, Deny rules are harder to write than Permit rules. You not only need to carefully configure the option, you must also carefully consider the consequences of the condition not matching a user. When a user does not’ match the condition, the Action is not applied and the next rule in the policy is evaluated. For example, suppose the URL condition is set to the compare the following value:
http://sales.provo.novell.com/meetings/?
If the URL in the request is http://sales.provo.novell.com/meetings/january, the user does not match the condition, because the ? applies only to the files in the meetings directory and not to the subdirectories. The Action is not applied, and the next rule or policy is evaluated. Consider the following possibilities:
-
If you want the condition to match all files and subdirectories, you need to change the ? wildcard to the wildcard.
-
If you want the condition to allow access to the files in the /meetings directory but deny access to the subdirectories, you need to negate the condition so it evaluates as follows: if the URL is not a request for the /meetings/? directory, deny access. If you select this type of condition, you need to set the option to True. If the comparison returns an error and there is the possibility that the request is for a subdirectory, you want the user to be denied access.
The general Permit rule for a Deny policy would look similar to the following:
Figure 10-7 General Permit Rule