4.2.7 Configuring Liberty Web Services
A web service uses Internet protocols to provide a service. It is an XML-based protocol transported over SOAP, or a service whose instances and data objects are addressable via URIs.
Access Manager consists of several elements that comprise web services:
-
Web Service Framework: Manages all web services. The framework defines SOAP header blocks and processing rules that enable identity services to be invoked via SOAP requests and responses.
-
Web Service Provider: An entity that provides data via a web service. In Access Manager, web service providers host web service profiles, such as the Employee Profile, Credential Profile, Personal Profile, and so on.
-
Web Service Consumer: An entity that uses a web service to access data. Web service consumers discover resources at the web service provider, and then retrieve or update information about a user, or on behalf of a user. Resource discovery among trusted partners is necessary because a user might have many kinds of identities (employee, spouse, parent, member of a group), as well as several identity providers (employers or other commercial websites).
-
Discovery Service: The service assigned to an identity provider that enables a web service consumer to determine which web service provider provides the required resource.
-
LDAP Attribute Mapping: Access Manager’s solution for mapping Liberty attributes with established LDAP attributes.
This section describes the following topics:
For additional resources about the Liberty Alliance specifications, visit the Liberty Alliance Specification page.
Managing Web Services and Profiles
After a service has been discovered and data has been received from a trusted identity provider, the web service consumer can invoke the service at the web service provider. A web service provider is the hosting or relying entity on the server side that can make access control decisions based on this data and upon its business practices and preferences.
-
In Administration Console Dashboard click > Edit > .
-
Select one of the following actions
New: To create a new web service, click . This activates the Create Web Service Wizard. You can create a new profile only if you have deleted one.
Delete: To delete an existing profile, select the profile, then click .
Enable: To enable a profile, select the profile, then click .
Disable: To disable a profile, select the profile, then click .
Edit a Policy: To edit the policy associated with a profile, click the link. For configuration information, see Editing Web Service Policies.
Edit a profile: To edit a profile, click the name of a profile. For information about configuring the details, see Modifying Service and Profile Details for Employee, Custom, and Personal Profiles and Modifying Details for Authentication, Discovery, LDAP, and User Interaction Profiles.
For information about modifying the description, see Editing Web Service Descriptions.
Identity Server comes with the following web service profile types:
Authentication Profile: Allows the system to access the roles and authentication contracts in use by current authentications. This profile is enabled by default so that Embedded Service Providers can evaluate roles in policies. This profile can be disabled. When it is disabled, all devices assigned to use this Identity Server cluster configuration cannot determine which roles a user has been assigned, and the devices evaluate policies as if the user has no roles.
WARNING:Do not delete this profile. In normal circumstances, this profile is used only by the system.
Credential Profile: Allows users to define information to keep secret. It uses encryption to store the data in the directory the user profile resides in.
Custom Profile: Used to create custom attributes for general use.
Discovery: Allows requesters to discover where the resources they need are located. Entities can place resource offerings in a discovery resource, allowing other entities to discover them. Resources might be a personal profile, a calendar, travel preferences, and so on.
Employee Profile: Allows you to manage employment-related information and how the information is shared with others. A company address book that provides names, phones, office locations, and so on, is an example of an employee profile.
LDAP Profile: Allows you to use LDAP attributes for and general use.
Personal Profile: Allows you to manage personal information and to determine how to share that information with others. A shopping portal that manages the user’s account number is an example of a personal profile.
User Interaction: Allows you to set up a trusted user interaction service, used for identity services that must interact with the resource owner to get information or permission to share data with another web service consumer. This profile enables a web service consumer and web service provider to cooperate in redirecting the resource owner to the web service provider and back to the web service consumer.
-
Click .
-
On the Servers page, update Identity Server.
Modifying Service and Profile Details for Employee, Custom, and Personal Profiles
The settings on the Details page are identical for the Employee, Custom, and Personal Profiles. This page allows you to specify the display name, resource ID encryption, and how the system reads and writes data.
-
Click > > Edit > .
-
Click , , or , depending on which profile you want to edit.
-
Click the tab (it is displayed by default).
-
Specify the general settings, as necessary:
Display Name: The web service name. This specifies how the profile is displayed in Administration Console.
Have Discovery Encrypt This Service’s Resource Ids: Specifies whether the Discovery Service encrypts resource IDs. A resource ID is an identifier used by web services to identify a user. The Discovery Service returns a list of resource IDs when a trusted service provider queries for the services owned by a given user. The Discovery Service has the option of encrypting the resource ID or sending it unencrypted.
-
Specify data location settings:
Selected Read Locations: The list of selected locations from which the system reads attributes containing profile data. If you add multiple entries to this list, the system searches attributes in each location in the order you specify. When a match is found for an attribute, the other locations are not searched. Use the up/down and left/right arrows to control which locations are selected and the order in which to read them. Read locations can include:
-
Configuration Datastore: Liberty attribute values can be stored in the configuration store of Administration Console. If your users have access to the User Portal, they can add values to a number of Liberty attributes.
-
LDAP Data Mappings: If you have mapped a Liberty attribute to an LDAP attribute in your user store, the values can be read from the LDAP user store. To create LDAP attribute maps, see Mapping LDAP and Liberty Attributes.
-
Remote Attributes: If you set up federation, Identity Server can read attributes from these remote service providers. Sometimes, the service provider is set up to push a set of attribute values when the user logs in. These pushed attributes are cached, and Identity Server can quickly read them. If a requested attribute has not been pushed, a request for the Liberty attribute is sent to remote service provider. This can be time consuming, especially if the user has federated with more than one remote service provider. must always be the last item in this list.
Available Read Locations: The list of available locations from which the system can read attributes containing profile data. Locations in this list are currently not being used.
Selected Write Locations: The list of selected locations to write attribute data to. If you add multiple entries to this list, the system searches attributes in each location in the order you specify. When a match is found for an attribute, the other locations are not searched. Use the up/down and left/right arrows to control which locations are selected and the order in which they are selected.
-
Configuration Datastore: Liberty attribute values can be stored in the configuration store of Administration Console. Identity Server can write values to these attributes. If this location appears first in the list of , all Liberty attribute values are written to this location. If you want values written to the LDAP user store, the location must appear first in the list.
-
LDAP Data Mappings: If you have mapped a Liberty attribute to an LDAP attribute in your user store, Identity Server can write values to the attribute in the LDAP user store. To create LDAP attribute maps, see Mapping LDAP and Liberty Attributes.
Available Write Locations: The list of available locations to write attributes containing profile data. Locations in this list are currently not being used.
-
-
(Optional) Specify data model extensions.
Data Model Extension XML: The data model for some web services is extensible. You can enter XML definitions of data model extensions in this field. Data model extensions hook into the existing web service data model at predefined locations.
All schema model extensions reside inside of a schema model extension group. The group exists to bind model data items together under a single localized group name and description. Schema model extension groups can reside inside of a schema model extension root or inside of a schema model extension. There can only be one group per root or extension. Each root is hooked into the existing web service data model. Multiple roots can be hooked into the same location in the existing web service data model. This conceptual model applies to the structure of the XML that is required to define data model extensions.
See Section A.0, Data Model Extension XML for more information.
-
Click > .
-
Update Identity Server.
Modifying Details for Authentication, Discovery, LDAP, and User Interaction Profiles
This page allows you to specify information for Discovery, LDAP, and User Interaction web service profiles. If you are creating a web service type, this is Step 2 of the Create Web Service Wizard.
For conceptual information about profiles, see Managing Web Services and Profiles.
-
Click > > Edit > > .
-
Click or , depending on which profile you want to edit.
-
Configure the following fields:
Display name: The web service name. This specifies how the profile is displayed in Administration Console.
Have Discovery Encrypt This Service’s Resource Ids: (Not applicable for the Discovery profile) Specifies whether the Discovery Service encrypts resource IDs. A resource ID is an identifier used by web services to identify a user. The Discovery Service returns a list of resource IDs when a trusted service provider queries for the services owned by a given user. The Discovery Service has the option of encrypting the resource ID or sending it unencrypted. This ID is encrypted with the public key of the resource provider generated at installation. Encrypting resource IDs is turned off by default.
-
Click .
Editing Web Service Descriptions
The Description pages on each profile are identical. You can define how a service provider gains access to portions of the user’s identity information that can be distributed across multiple providers. The service provider uses the Discovery Service to ascertain the location of a specific identity service for a user. The Discovery Service enables various entities to dynamically and securely discover a user’s identity service, and it responds, on a permission basis, with a service description of the desired identity service.
-
Click > > Edit > .
-
Click the profile or service.
-
Click .
-
Click the description name, or click .
-
Specify the following details:
Name: The Web Service Description name.
Security Mechanism: (Required) Liberty uses channel security (TLS 1.0) and message security in conjunction with the security mechanism. Channel security addresses how communication between identity providers, service providers, and user agents is protected. For authentication, service providers are required to authenticate identity providers by using identity provider server-side certificates. Identity providers have the option to require authentication of service providers by using service provider client-side certificates.
Message security addresses security mechanisms applied to the discrete Liberty protocol messages passed between identity providers, service providers, and user agents.
Select the mechanism for message security. Message authentication mechanisms indicate which profile is used to ensure the authenticity of a message.
-
X.509: Used for message exchanges that generally rely upon message authentication as the principal factor in making decisions.
-
SAML: Used for message exchanges that generally rely upon message authentication as well as the conveyance and attestation of information.
-
Bearer: Based on the presence of the security header of a message. In this case, the bearer token is verified for authenticity rather than proving the authenticity of the message.
-
-
Under , select either or .
Brief Service Access Method: Provides the information necessary to invoke basic SOAP-over-HTTP-based service instances without using WSDL.
-
EndPoint URL: This is the SOAP endpoint location at the service provider to which Liberty SOAP messages are sent. An example of this for the Employee Profile is [BASEURL]/services/IDSISEmployeeProfile. If the service instance exposes an endpoint that is different from the logically generated concrete WSDL, you must use the WSDL URI instead.
A WSF service description endpoint cannot contain double-byte characters.
-
SOAP Action: The SOAP action HTTP header required on HTTP-bound SOAP messages. This header can be used to indicate the intent of a SOAP message to the recipient.
WSDL Service Access Method: Specify the method used to access the WSDL service. WSDL (Web Service Description Language) describes the interface of a web service.
-
Service Name Reference: A reference name for the service.
-
WSDL URI: Provides a URI to an external concrete WSDL resource containing the service description. URIs need to be constant across all implementations of a service to enable interoperability.
-
-
Click .
-
Update Identity Server configuration.
Editing Web Service Policies
Web Service policies are permission policies (query and modify) that govern how identity providers share end-user data with service providers. Administrators and policy owners (users) can control whether private information is always allowed to be given, never allowed, or must be requested.
As an administrator, you can configure this information for the policy owner, for specific service providers, or globally for all service providers. You can also specify what policies are displayed for the end user in the User Portal, and whether users are allowed to edit them.
-
Click > > Edit >
-
Click the link next to the service name.
-
Click the category you want to edit.
All Trusted Providers: Policies that are defined by the service provider’s ability to query and modify the particular Liberty attributes or groups of attributes for the web service. When All Trusted Providers permissions are established, and a service provider needs data, the system first looks here to determine whether user data is allowed, never allowed, or must be asked for. If no solution is found in All Trusted Providers, the system examines the permissions established within the specific service provider.
Owners: Policies that limit the end user’s ability to modify or query data from his or her own profile. The settings you specify in the group are reflected on the My Profile page in the User Portal. Portal users have the authority to modify the data items in their profiles. The data items include Liberty and LDAP attributes for personal identity, employment, and any customized attributes defined in Identity Server configuration. Any settings you specify in Administration Console override what is displayed in the User Portal. Overrides are displayed in the column.
If you want the user to have Write permission for a given data item, and that data item is used in an LDAP Attribute Map, then you must configure the LDAP Attribute Map with Write permission.
-
On the All Service Policy page, select the policy’s check box, then click .
This lets you modify the parent service policy attribute. Any selections you specify on this page are inherited by child policies.
Query Policy: Allows the service provider to query for the data on a particular attribute. This is similar to read access to a particular piece of data.
Modify Policy: Allows the service provider to modify a particular attribute. This is similar to write access to a particular piece of data.
Query and Modify: Allows you to set both options at once.
-
To edit child attributes of the parent, click the policy.
In the following example, child attributes are inheriting Ask Me permission from the parent attribute. The attribute, however, is modified to never allow permission for sharing.
If you click the attribute, you can see that all of its child attributes have inherited the setting. You can specify different permission attributes for (for example), but the inherited policy still overrides changes made at the child level, as shown below.
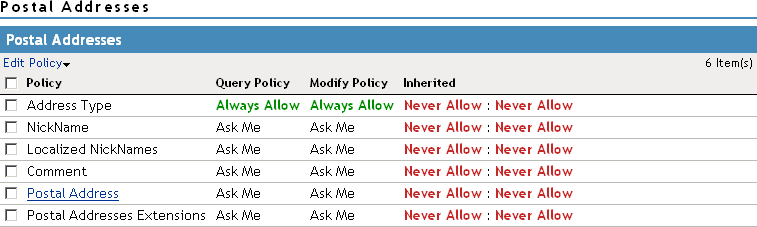
The interface allows these changes to simplify switching between configurations if, for example, you want to remove an inherited policy.
Inherited: Specifies the settings inherited from the parent attribute policy, when you view a child attribute. In the User Portal, settings displayed under are not modifiable by the user. At the top-level policy in the User Portal, the values are inherited from the settings in Administration Console. Thereafter, inheritance can come from the service policy or the parent data item’s policy.
Ask Me: Specifies that the service provider requests from the user what action to take.
Always Allow: Specifies that the identity provider always allows the attribute data to be sent to the service provider.
Never Allow: Specifies that the identity provider never allows the attribute data to be sent to the service provider.
When a request for data is received, Identity Server examines policies to determine what action to take. For example, if a service provider requires a postal address for the user, Identity Server performs the following actions:
-
Checks the settings specified in .
-
If no solution is found, checks for the policy settings configured for the service provider.
-
-
Click until the Web Service Provider page is displayed.
-
Click , then update Identity Server as prompted.
Create Web Service Type
This page allows you to create a web service profile type. This is Step 1 of the Create Web Service Wizard. Access Manager comes with several web service profiles. If you delete a profile type, you can create it again.
-
Click > Edit > >
-
Select the web service type from the list.
-
Click .
-
Continue with one of the following:
Mapping LDAP and Liberty Attributes
You can create an LDAP attribute map or edit an existing one. To create an attribute map, you specify how single-value and multi-value data items map to single-value and multi-value LDAP attributes. A single-value attribute can contain no more than one value, and a multi-value attribute can contain more than one. An example of a single-value attribute might be a person’s gender, and an example of a multi-value attribute might be a person’s various e-mail addresses, phone numbers, or titles.
-
Click > > > >.
-
Select one of the following actions:
New: Allows you create an LDAP attribute mapping. Select from the following types:
-
One to One: Maps a single Liberty attribute to a single LDAP attribute. See Configuring One-to-One Attribute Maps.
-
Employee Type: Maps the Employee Type attribute to an LDAP attribute, then maps the possible Liberty values to LDAP values. See Configuring Employee Type Attribute Maps.
-
Employee Status: Maps the Employee Status attribute to an LDAP attribute, then maps the possible Liberty values to LDAP values. See Configuring Employee Status Attribute Maps.
-
Postal Address: Maps the Postal Address attribute to either multiple LDAP attributes or a delimited LDAP attribute. See Configuring Postal Address Attribute Maps.
-
Contact Method: Maps the Contact Method attribute to multiple LDAP attributes. See Configuring Contact Method Attribute Maps.
-
Gender: Maps the Gender attribute to an LDAP attribute, then maps the possible Liberty values to LDAP values. See Configuring Gender Attribute Maps.
-
Marital Status: Maps the Marital Status attribute to an LDAP attribute, then maps the possible Liberty values to LDAP values. See Configuring Marital Status Attribute Maps.
Delete: Deletes the selected mapping.
Enable: Enables the selected mapping.
Disable: Disables the selected mapping. When the mapping is disabled, the server does not load the definition. However, the definition is not deleted.
-
-
Click , then update Identity Server.
Configuring One-to-One Attribute Maps
A one-to-one map enables you to map single-value and multiple-value LDAP attribute names to standard Liberty attributes. A default one-to-one attribute map is provided with Access Manager, but you can also define your own.
An example of a one-to-one attribute map might be the single-valued Liberty attribute Common Name (CommonName) used by the Personal Profile that is mapped to the LDAP attribute givenName. You can further configure the various Liberty values to map to any LDAP attribute names that you use.
-
Click > > > > > > .
-
Configure the following fields:
Type: Displays the type of mapping you are modifying or creating:
Name: The name you want to give the map.
Description: A description of the map.
Access Rights: A drop-down menu that provides the broadest control for the page. If you set this to , you can specify rights for individual data items.
For user provisioning to succeed, you must select from the drop-down menu for any maps that use an attribute during user provisioning.
User Stores: The user store that a map applies to. If a user logs into a user store that is not in the map’s user store list, that map is not used to read or write attributes for that user.
-
Use the following guidelines to configure the map:
-
Mapping Personal Profile Single-Value Data Items to LDAP Attributes
-
Mapping Personal Profile Multiple-Value Data Items to LDAP Attributes
-
Mapping Employee Profile Single-Value Data Items to LDAP Attributes
-
Mapping Employee Profile Multiple-Value Data Items to LDAP Attributes
-
Mapping Custom Profile Single-Value Data Items to LDAP Attributes
-
Mapping Custom Profile Multiple-Value Data Items to LDAP Attributes
-
-
After you create the mapping, click .
-
On the LDAP Attribute Mapping page, click .
-
Update Identity Server.
Mapping Personal Profile Single-Value Data Items to LDAP Attributes
The data items displayed are single-value Liberty Personal Profile attributes that you can map to the single-valued LDAP attributes that you have defined for your directory.

Mapping Personal Profile Multiple-Value Data Items to LDAP Attributes
Use the fields on this page to map multiple-value attributes from the Liberty Personal Profile to the multiple-value LDAP attributes you have defined for your directory. For example, you can map the Liberty attribute Alternate Every Day Name (AltCN) to the LDAP attribute you have defined for this purpose in your directory.

Mapping Employee Profile Single-Value Data Items to LDAP Attributes
Map the Liberty Employee Profile single-value attributes to the LDAP attributes you have defined in your directory for entries such as ID, Date of Hire, Job Start Date, Department, and so on.
Mapping Employee Profile Multiple-Value Data Items to LDAP Attributes
Map the Liberty Employee Profile multiple-value attributes to the LDAP attributes you have defined in your directory.
Mapping Custom Profile Single-Value Data Items to LDAP Attributes
Map custom Liberty profile single-value attributes to LDAP attributes you have defined in your directory. These attributes are customizable strings associated with the Custom Profile.

Customizable String (1 - 10): The Custom Profile allows custom single-value and multiple-value attributes to be defined without using the Data Model Extension XML to extend a service’s schema. To use a customizable attribute, navigate to the tab on the Custom Profile Details page (see Customizing Attribute Names). Use the page to customize the name of any of the predefined single-value or multiple-value customizable attributes in the Custom Profile. After you customize a name, you can use that attribute in the same way you use any other profile attribute.
Mapping Custom Profile Multiple-Value Data Items to LDAP Attributes
Customizable Multi-Valued Strings (1 - 5): Similar to customizable strings for single-value attributes, except these attributes can have multiple values. Use this list of fields to map directory attributes that can have multiple values to multiple-value strings from the Custom Profile.
Configuring Employee Type Attribute Maps
You can map the LDAP attribute name and values to the Liberty profile values for Employee Type. This is an Employee Profile attribute. Examples of Liberty values appended to this attribute include Contractor Part Time, Contractor Full Time, Full Time Regular, and so on.
-
Click > > > > > > .
-
Configure the following fields:
Name: The name you want to give the map.
Description: A description of the map.
Access Rights: A drop-down menu that provide the broadest control for the page. If you set this to , you can specify rights for individual data items.
For user provisioning to succeed, you must select from the drop-down menu for any maps that use an attribute during user provisioning.
User Stores: The user store that a map applies to. If a user logs into a user store that is not in the map’s user store list, that map is not used to read or write attributes for that user.
-
In the field, type the LDAP attribute name that you want to map to the Liberty Employee Type attribute.
-
In the fields, type the predefined LDAP attribute values that you want to map to the values.
These are the values that you want to store in the LDAP attribute for each given Liberty attribute value. The LDAP attribute map then maps the actual Liberty URI value, back and forth, to this supplied value.
-
Click .
-
On the LDAP Attribute Mapping page, click .
-
Update Identity Server.
Configuring Employee Status Attribute Maps
You can map the LDAP attribute name and values to the Liberty profile values for Employee Status. This is an Employee Profile attribute. Examples of the values appended to this Liberty attribute include Active, Trial, Retired, Terminated, and so on.
-
Click > > > > > > .
-
Configure the following fields:
Name: The name you want to give the map.
Description: A description of the map.
Access Rights: A drop-down menu that provide the broadest control for the page. If you set this to , you can specify rights for individual data items.
For user provisioning to succeed, you must select from the drop-down menu for any maps that use an attribute during user provisioning.
User Stores: The user store that a map applies to. If a user logs into a user store that is not in the map’s user store list, that map is not used to read or write attributes for that user.
-
In the field, type the LDAP attribute name that you want to map to the element.
-
In the fields, type the predefined LDAP attribute values that you want to map to the values.
These are the values that you want to store in the LDAP attribute for each given Liberty attribute value. The LDAP attribute map then maps the actual Liberty URI value, back and forth, to this supplied value.
-
Click .
-
On the LDAP Attribute Mapping page, click .
-
Update Identity Server.
Configuring Postal Address Attribute Maps
You can map the LDAP attribute name and values to the Liberty profile values for Postal Address. The PostalAddress element refers to the local address, including street or block with a house number, and so on. This is a Personal Profile attribute.
-
Click > > > > > > .
-
Configure the following fields:
Name: The name you want to give the map.
Description: A description of the map.
Access Rights: A drop-down menu that provide the broadest control for the page. If you set this to , you can specify rights for individual data items.
For user provisioning to succeed, you must select from the drop-down menu for any maps that use an attribute during user provisioning.
User Stores: The user store that a map applies to. If a user logs into a user store that is not in the map’s user store list, that map is not used to read or write attributes for that user.
-
In the drop-down menu, select either or .
Multiple LDAP Attributes: Allows you to map multiple LDAP attributes to multiple Liberty Postal Address elements. When you select this option, the following Liberty Postal Address elements are displayed under the group. Type the LDAP attributes that you want to map to the Liberty elements.
-
Postal Address
-
Postal Code
-
City
-
State
-
Country
Single Delimited LDAP Attributes: Allows you to specify one LDAP attribute that is used to hold multiple elements of a Liberty Postal Address in a single delimited value. When you select this option, the page displays the following fields:
-
Delimited LDAP Attribute Name: The delimited LDAP attribute name you have defined for the LDAP postal address that you want to map to the Liberty Postal Address attribute.
-
Delimiter: The character to use to delimit single-value entries. A $ sign is the default delimiter.
-
-
(Single Delimited LDAP Attributes mode) Under , specify the order in which the information is contained in the string. Select 1 for the value that comes first in the string, 2 for the value that follows the first delimiter, etc.
-
(Multiple LDAP Attributes mode) Under , fill in the following options:
Nickname: (Required) A Liberty element name used to identify the Postal Address object.
Contact Method Type: Select the contact method type, such as , , , and so on.
-
Click .
-
On the LDAP Attribute Mapping page, click .
-
Update Identity Server.
Configuring Contact Method Attribute Maps
You can map the LDAP attribute you have defined for contact methods to the Liberty attribute Contact Method (MsgContact).
-
Click > > > > > > .
-
Configure the following fields:
Name: The name you want to give the map.
Description: A description of the map.
Access Rights: A drop-down menu that provide the broadest control for the page. If you set this to , you can specify rights for individual data items.
For user provisioning to succeed, you must select from the drop-down menu for any maps that use an attribute during user provisioning.
User Stores: The user store that a map applies to. If a user logs into a user store that is not in the map’s user store list, that map is not used to read or write attributes for that user.
-
Under , fill in the following fields to map to the Liberty Contact Method attribute:
Provider LDAP Attribute: Maps to the Liberty attribute MsgProvider, which is the service provider or domain that provides the messaging service.
Account LDAP Attribute: Maps to the Liberty attribute MsgAccount, which is the account or address information within the messaging provider.
SubAccount LDAP Attribute: Maps to the Liberty MsgSubaccount, which is the subaccount within a messaging account, such as the voice mail box associated with a phone number.
-
Under , specify the settings for the following Liberty attribute values:
Nickname: Maps to the Liberty attribute Nick, which is an informal name for the contact.
Type: Maps to the Liberty attribute MsgType (such as Mobile, Personal, or Work).
Method: Maps to the Liberty MsgMethod (such as Voice, Fax, or E-mail).
Technology: Maps to the Liberty attribute MsgTechnology (such as Pager, VOIP, and so on).
-
Click .
-
On the LDAP Attribute Mapping page, click .
-
Update Identity Server.
Configuring Gender Attribute Maps
You can map the LDAP attribute name and values to the Liberty profile values for the Gender attribute. You can use gender to differentiate between people with the same name, especially in countries where national ID numbers cannot be collected. This is a Personal Profile attribute.
-
Click > > > > > > .
-
Configure the following fields:
Name: The name you want to give the map.
Description: A description of the map.
Access Rights: A drop-down menu that provide the broadest control for the page. If you set this to , you can specify rights for individual data items.
For user provisioning to succeed, you must select from the drop-down menu for any maps that use an attribute during user provisioning.
User Stores: The user store that a map applies to. If a user logs into a user store that is not in the map’s user store list, that map is not used to read or write attributes for that user.
-
In the field, type the LDAP attribute name that you want to map to the Liberty element Gender.
-
In the fields, type the predefined LDAP attribute values that you want to map to the Gender values.
These are the values that you want to store in the LDAP attribute for each given Liberty attribute value. The LDAP attribute map then maps the actual Liberty URI value, back and forth, to this supplied value.
-
Click .
-
On the LDAP Attribute Mapping page, click .
-
Update Identity Server.
Configuring Marital Status Attribute Maps
You can map the LDAP marital status attribute to the Liberty attribute. The Liberty Marital Status (MaritalStatus) element includes appended values such as single, married, divorced, and so on. For example, urn:liberty:id-sis-pp:maritalstatus:single. This is a Personal Profile attribute.
-
Click > > > > > > .
-
Configure the following fields:
Name: The name you want to give the map.
Description: A description of the map.
Access Rights: A drop-down menu that provide the broadest control for the page. If you set this to , you can specify rights for individual data items.
For user provisioning to succeed, you must select from the drop-down menu for any maps that use an attribute during user provisioning.
User Stores: The user store that a map applies to. If a user logs into a user store that is not in the map’s user store list, that map is not used to read or write attributes for that user.
-
In the field, type the LDAP attribute name that you want to map to the Liberty element Marital Status (MaritalStatus).
-
In the fields, type the predefined LDAP attribute values that you want to map to the MaritalStatus values.
These are the values that you want to store in the LDAP attribute for each given Liberty attribute value. The LDAP attribute map then maps the actual Liberty URI value, back and forth, to this supplied value.
-
Click .
-
On the LDAP Attribute Mapping page, click .
-
Update Identity Server.