4.1.1 Configuring Identity User Stores
User stores are LDAP directory servers to which end users authenticate. You must specify an initial user store when configuring Identity Server. The procedure for setting up the initial user store, adding a user store, or modifying an existing user store is same.
-
Click > > > > .
-
Select from the following actions:
New: To add a user store, click . For more information, see Configuring the User Store.
Delete: Select the user store, then click .The user store list needs to contain at least one configured user store for Identity Server to be functional.
Modify: To modify the configuration of an existing user store, click the name of a user store. For configuration information, see Configuring the User Store.
-
Click , then update Identity Server if you have modified the configuration.
See the following sections for specific configuration tasks:
Using More Than One LDAP User Store
You can configure Identity Server to search for more than one user store during authentication. Figure 4-2 illustrates this type of configuration.
Figure 4-2 Multiple LDAP Directories
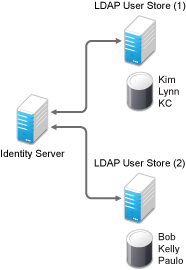
It is assumed that each LDAP directory contains different users. Ensure that the users have unique names across all LDAP directories. If both directories contain a user with an identical name, the name and password information discovered in the search of the first directory is always used for authentication. You can specify the search order when configuring the authentication method.
When users are added to the configuration store, objects are created for Access Manager profiles. If you delete a user from the LDAP directory, orphaned objects for that user remain in the configuration store.
If you add a secondary Administration Console and you have added replicas to the user store of the primary Administration Console, ensure to add the replicas to the secondary Administration Console.
All user stores that you add are included in health checks. If health problems occur, the system displays the user store on the Health page and in the trace log file.
Configuring a User Store for Secrets
Access Manager allows you to securely store user secrets. Secrets are a way to capture user input, such as Login ID and password credentials. These input data can later be reused or injected using Form Fill and Identity Injection policies. This feature is helpful when your Access Manager Credential Profile does not contain credentials for an application protected by Access Manager yet a single sign-on experience is required. Where and how the secrets can be stored is configurable and depends upon your user store:
For troubleshooting tips, see Troubleshooting Secrets Storage.
Configuring the Configuration Datastore to Store Secrets
If you want to do minimal configuration, use the configuration datastore on Administration Console to store the secrets. You can use this option without changes, but is recommended only for use in small Access Manager environments. To increase the security of the secrets, NetIQ recommends that you change the default security options. When you use the configuration datastore of Administration Console as the secret store, the nidswsfss attribute of the nidsLibertyUserProfile object is used to store the secrets.
IMPORTANT:Using this option adds additional load on Administration Console and introduces login delays compared to other options. Therefore, it is recommended that this option is used wisely.
-
Click > > Edit > .
-
Click .
-
Scroll to the section and configure the following security options:
Encryption Password Hash Key: (Required) Specify the password that you want to use as a seed to create the encryption algorithm. To increase the security of the secrets, we recommend that you change the default password to a unique alphanumeric value.
IMPORTANT:Before using Access Manager to store and encrypt secrets, ensure that you choose your and change the default value. If any of these options is changed after secrets are stored, Access Manager cannot retrieve the secrets.
Preferred Encryption Method: Specify the preferred encryption method. Select the method that complies with your security model:
-
Password Based Encryption With MD5 and DES: MD5 is an algorithm that is used to verify data integrity. Data Encryption Standard (DES) is a widely used method of data encryption that uses a private key.
-
DES: Data Encryption Standard (DES) is a widely used method of data encryption that uses a private key. Like other private key cryptographic methods, both the sender and the receiver must know and use the same private key.
-
Triple DES: A variant of DES in which data is encrypted three times with standard DES, using two different keys.
Extended Schema User Store References: Do not specify a user store reference. When this option contains no values, the configuration datastore is used to store the secrets.
-
-
Click .
-
Update Identity Server.
-
To use the secret store to store policy secrets, see Creating and Managing Shared Secrets.
Configuring an LDAP Directory to Store the Secrets
This is the recommended option. You can use it with any LDAP directory. To use this option, extend the schema to add an attribute to your user object on the LDAP directory that will encrypt and store the secrets.
When you use an LDAP directory to store the secrets, you need to enable the user store for the secrets. You select the LDAP directory, then specify an attribute. The attribute you specify is used to store an XML document that contains encrypted secret values. This attribute must be a single-valued case ignore string that you have defined and assigned to the user object in the schema.
To use an LDAP directory to store secrets, your network environment must conform to the following requirements:
-
The user class object must contain an attribute that can be used to store the secrets. This attribute must be a string attribute that is single valued and case ignore.
-
The user store must be configured to use secure connections (click > > > > > . In the section, ensure that the is 636 and that is enabled. If not, click the name of the replica and reconfigure it.
To configure the LDAP directory, perform the following steps:
-
Click > > Edit > .
-
Click .
-
Scroll to the section and configure the following options:
Encryption Password Hash Key: (Required) Specifies the password that you want to use as a seed to create the encryption algorithm. To increase the security of the secrets, we recommend that you change the default password to a unique alphanumeric value.
Preferred Encryption Method: Specifies the preferred encryption method. Select the method that complies with your security model:
-
Password Based Encryption With MD5 and DES: MD5 is an algorithm that is used to verify data integrity. Data Encryption Standard (DES) is a widely used method of data encryption that uses a private key.
-
DES: Data Encryption Standard (DES) is a widely used method of data encryption that uses a private key. Like other private key cryptographic methods, both the sender and the receiver must know and use the same private key.
-
Triple DES: A variant of DES in which data is encrypted three times with standard DES, using two different keys.
IMPORTANT:Before using Access Manager to store and encrypt secrets, ensure that you choose your and change the default value. If either of these options are changed after any secrets are stored, Access Manager will not be able to retrieve the secrets.
-
-
To specify where to store secret data, click under and fill in the following:
User Store: Select the user store where you want secret store enabled.
Attribute Name: Specify the LDAP attribute that you have created to store the secrets on the selected user store.
-
Click twice.
-
On Identity Servers page, update Identity Server.
-
To create policies that use the stored secrets, see Creating and Managing Shared Secrets.
For troubleshooting information, see Troubleshooting Secrets Storage.
Configuring an eDirectory User Store to Use SecretStore
If your user store is eDirectory and you have installed Novell SecretStore, you can choose to use the SecretStore on your eDirectory server to store the secrets. This differs from the schema extension method as Novell SecretStore can also be accessed and managed by NetIQ SecureLogin. This allows secrets to be shared with SecureLogin to provide a thick client single sign-on while Access Manager can provide a web single sign-on experience without credential collisions.
For Access Manager to use Novell SecretStore, the user store must be eDirectory and Novell SecretStore must be installed there. When configuring this user store for secrets, Access Manager extends the eDirectory schema for an NMAS method. This method converts authentication credentials to a form understood by eDirectory. For example, Access Manager supports smart card and token authentications, and these authentication credentials must be converted into the username and password credentials that eDirectory requires. This allows Identity Server to authenticate as that user and access the user’s secrets. Without this NMAS method, Identity Server is denied access to the user’s secrets.
To use a remote SecretStore, your network environment must conform to the following requirements:
-
The eDirectory server must have Novell SecretStore installed.
-
When you configure a user store to use Novell SecretStore, the admin user that you have configured for the user store must have sufficient rights to extend the schema on the eDirectory server, to install the SAML NMAS method, and set up the required certificates and objects. For more information about the rights required, see Configuring an Admin User for the User Store.
-
The user store must be configured to use secure connections (click > > > > > . In the section, ensure that the is 636 and that is enabled. If they aren’t, click the name of the replica and reconfigure it.
NOTE:While configuring new replicas for the same user store, by default the option will be selected and the default port will be 636. The option will be non-editable.
-
If you have enabled a firewall between Administration Console and the user store, and between Identity Server and the user store, ensure that both LDAP ports (389 and 636) and the NCP port (524) are opened.
-
If you are going to configure Access Manager to use secrets that are used by other applications, you need to plan a configuration that allows the user to unlock a locked SecretStore. See Determining a Strategy for Unlocking SecretStore.
To configure the user store:
-
Click > > Edit > Local.
-
Click the name of your user store.
-
Select , then click .
This installs a required NMAS method in the eDirectory schema and adds required objects to the tree.
IMPORTANT:If your eDirectory user store is running on SLES 11 SP1 64-bit operating system (or a later version), the eDirectory server is missing some support libraries that this SAML method requires. For information about installing these libraries, see TID 7006437.
-
Click > .
-
Click .
-
Scroll to the section.
-
Click under .
This adds a reference to a user store where SecretStore has been installed.
-
Click the user store that you configured for SecretStore.
-
Click twice.
-
On Identity Servers page, update Identity Server.
-
Continue with one of the following:
-
If other applications are using the secret store, you need to determine whether Access Manager users need the option to unlock the secret store. See Determining a Strategy for Unlocking SecretStore.
-
To create policies that use the stored secrets, see Section 10.5.4, Creating and Managing Shared Secrets.
-
For troubleshooting information, see Troubleshooting Secrets Storage.
-
Determining a Strategy for Unlocking SecretStore
When an administrator resets a user's password, secrets written to SecretStore with an enhanced security flag become locked. Identity Server does not write the secrets that it creates with this flag, but other applications might:
-
If Access Manager is not sharing secrets with other applications, the secrets it is using are never locked, and you do not need to configure Access Manager to unlock secrets.
-
If Access Manager is sharing secrets with other applications and these application are using the security flag that locks secrets when a user’s password is reset, you need to configure Access Manager so that users can unlock their secrets.
If you want users to receive a prompt for a passphrase when secrets are locked, perform the following steps:
-
Require all users to set up a passphrase (also called the Master Password).
Access Manager uses the SecretStore Master Password as the passphrase to unlock the secrets. If the user has not set a passphrase before SecretStore is locked, this feature of Access Manager cannot unlock SecretStore. If it is necessary to unlock SecretStore by using the user’s prior password, another tool must be used. See the SecretStore documentation.
-
Configure Identity Server to perform the check:
-
Click > > > > .
-
Select the option.
-
Click > , then update Identity Server.
-
-
Ensure that Web Services Framework is enabled:
-
Click > > > > .
-
In the section, ensure that is selected.
-
Click . If you made any changes, update Identity Server.
-
-
Continue with Section 10.5.4, Creating and Managing Shared Secrets.
When SecretStore is locked and users log in, the users are first prompted for their login credentials, then prompted for the passphrase that is used to unlock SecretStore.
Troubleshooting Secrets Storage
Secrets Are Not Stored in Novell SecretStore
When you use Novell SecretStore to store the secrets, the schema on the eDirectory server must be extended, and specific SAML objects and certificates must be created.
To verify that the schema was extended and the objects were created on the eDirectory server:
-
Open an LDAP browser and connect to the LDAP server.
-
Browse to the Security container.
-
Look for objects similar to the following:
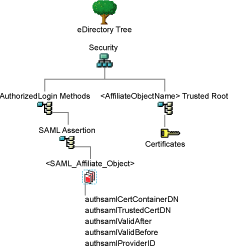
If the schema has been extended correctly, you can find a SAML Assertion object in the Authorized Login Methods container. The SAML_Assertion object contains an alphanumeric generated name for a SAML affiliate object. This object has four attributes.
The SAML affiliate object name is used to generate another container in the Security container. This new container is the <AffiliateObjectName> Trusted Root container that contains public key signing certificate.
-
Complete one of the following:
-
If these objects do not exist, verify the following, then continue with Step 5:
-
The admin user for the user store has sufficient rights to extend the schema and add these objects to the Security container.
-
Any configured firewalls must allow NCP and LDAP traffic for Administration Console, Identity Server, and the LDAP user store.
-
-
If the objects exist, check for time synchronization problems. For more information, see Users Are Receiving Invalid Credential Messages.
-
-
In Administration Console, modify the secret store configuration so that it is resent to the user store:
-
Click > > Edit > > .
-
In the section, remove the user store, then add it again.
-
Click .
-
-
Update Identity Server.
Users Are Receiving Invalid Credential Messages
The <SAML_Affiliate_Object>.SAML-Assertion.AuthorizedLoginMethods.Security object contains two attributes that determine how long credentials are valid. If your Identity Server and eDirectory server are not time synchronized, the credentials can become invalid before a user has time to use them.
Ensure that the time of your Identity Server and eDirectory server are synchronized, or increase the value of the authsamlValidAfter and authsamlValidBefore attributes of the SAML affiliate object.
Secrets Are Not Stored in the LDAP Directory
-
Open an LDAP browser and connect to the eDirectory server.
-
Browse to the user object.
-
Verify that the user object contains the LDAP attribute that you have specified as the attribute to store the secrets.
-
If the attribute exists, browse to the schema and verify that the attribute has the following characteristics:
-
Single valued
-
Case ignore
-
String
-