The WebSocket protocol is an extension to the HTTP 1.1 protocol to enable two-way communication between a client and a server. It is an independent TCP-based protocol. The protocol has two parts - handshake and data transfer. HTTP servers interpret its handshake as an upgrade request. By default, the WebSocket protocol uses port 80 for regular WebSocket connections and port 443 for WebSocket connections tunneled over Transport Layer Security (TLS).
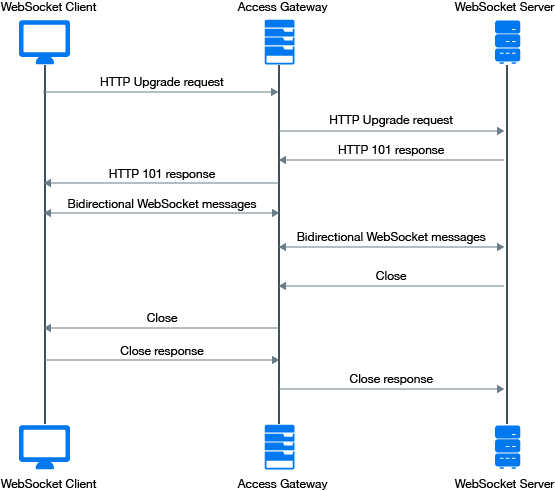
The protocol works in the following sequence:
-
The client sends an HTTP upgrade request to the server through Access Gateway to establish a communication channel between the client and the server. (WebSocket protocol handshake)
-
The server sends an HTTP 101 response to the requesting client through Access Gateway. When the client receives the response, the HTTP connection is upgraded to WebSocket.
-
Bidirectional data exchange happens between the server and the client over the WebSocket connection.
-
Either of the participant in the data exchange requests to terminate the WebSocket connection. One participant sends a Close request to the other participant and the connection is terminated.
WebSocket enables Access Gateway to accept an HTTP upgrade request from a client.
The following diagram illustrates the flow of messages among the client, Access Gateway, and the server in a WebSocket communication:
Scaling WebSocket
When you deploy Access Gateway for a large scale WebSocket environment and the expected concurrent users accessing the WebSocket application is more than normal, it is recommended to tune Access Gateway to handle large scale requests.
To tune Access Gateway, edit the following files:
-
-
To set a temporary value, run the command using a terminal window. To set a permanent value, make the changes in the /etc/init.d/novell-apache2 file. If the server uses systemd, then you need to make changes in /etc/systemd/system/novell-apache2.service.
For example, you can scale WebSocket connections up to 25000 connections by performing the following steps:
-
In the httpd-mpm.conf file, make the following changes to mpm_worker_module:
<IfModule mpm_worker_module>
    ThreadLimit        3000
    StartServers          9
    ServerLimit          10
    MaxClients         30000
    MinSpareThreads    9000
    MaxSpareThreads    9000
    ThreadsPerChild    3000
    MaxRequestsPerChild   0
</IfModule>
-
In the /etc/init.d/novell-apache2 file, set the ulimit value to 8192 by using the command ulimit -n 8192.
NOTE:If the server uses systemd, make the required changes under the Service section in the /etc/systemd/system/novell-apache2.service file.
The following is an example snippet:
[Service]
LimitNOFILE=20000
Type=oneshot
EnvironmentFile=/etc/opt/novell/apache2/conf/.arg_file
Environment="LD_LIBRARY_PATH=/opt/novell/ssllib:/opt/novell/openssl/lib"
ExecStart=/opt/novell/apache2/sbin/httpd $ARGL
ExecStop=/opt/novell/apache2/sbin/httpd -k stop
ExecReload=/opt/novell/apache2/sbin/httpd -k graceful
RemainAfterExit=yes
TasksMax=28000
-
Restart Apache.
If you have modified the /etc/init.d/novell-apache2 file, run the following command:
/etc/init.d/novell-apache2 restart OR rcnovell-apache2 restart
If you have modified the /etc/systemd/system/novell-apache2.service file, run the following commands:
Verifying a WebSocket Connection
You can verify if a WebSocket connection between a client and its resources is protected through Access Gateway by verifying the following information in the Developer Tools.
Headers: Displays the initial WebSocket protocol upgrade and the 101 Switching protocols response.
Frames: After upgrading to the WebSocket protocol, Access Gateway establishes a WebSocket connection. After establishing the connection, data transmission between a client and resources happens through Frames.