You can create custom login pages that are displayed when the user authenticates to Identity Server. There are a multitude of reasons for customizing the login page. You might want to remove the NetIQ branding and replace it with your company’s brands. You might need to authenticate users with non-default attributes (such as an e-mail address rather than a username). You also might be fronting several protected resources with an Access Gateway, and you need to create a unique login page for each resource.
Selecting the Login Page and Modifying It
You must be familiar with customizing JSP files to create a customized login page. You can use any of the following methods to produce the page:
-
If you want to customize the page title of the User Portal, see Customizing the Page Title.
-
If you only need to customize the credentials (for example, prompt the user for an e-mail address rather than a name), you can make most of the modifications in Administration Console. You need to add some properties to a method, create a contract from that method, and modify the prompt in the login_latest.jsp file. For configuration information, see Customizing the Default Login Page to Prompt for Different Credentials.
-
If you want to maintain the features of the default web page and use its authentication cards but you want to remove the NetIQ branding, use on the Administration Console dashboard. By using the page you can modify the colors, images, and the text. For configuration information, see Customizing the nidp_latest.jsp file.
-
If you want to modify the layout or content of the default Web page you must customize the nidp_latest.jsp file. For more information about customizing the file, see Customizing JSP Files.
NOTE:After you have created customized login pages, you need to back them up before doing an upgrade. The upgrade process overrides any custom changes made to JSP files that use the same filename as those included with the product.
During an upgrade, you can select to restore custom login pages, but NetIQ recommends that you have your own backup of any customized files that can be used for copying the customized content to the upgraded file.
Customizing the Page Title
Perform the following steps to customize the page title of the User Portal:
-
Copy the nidp.jar file to a working area. This file is located in the following location:
-
Unzip the copied nidp.jar file by using the following command:
jar -xvf nidp.jar
-
Open the jsp_resources_en_US.properties file located at com/novell/nidp/resource/jsp.
-
Edit the JSP.1 property and modify the page title.
-
Create the JAR file by using the following command:
jar -cvf nidp.jar *
-
Replace the old nidp.jar file with the new one.
-
Restart Tomcat.
/etc/init.d/novell-idp restart Or
rcnovell-idp restart
Customizing the Default Login Page to Prompt for Different Credentials
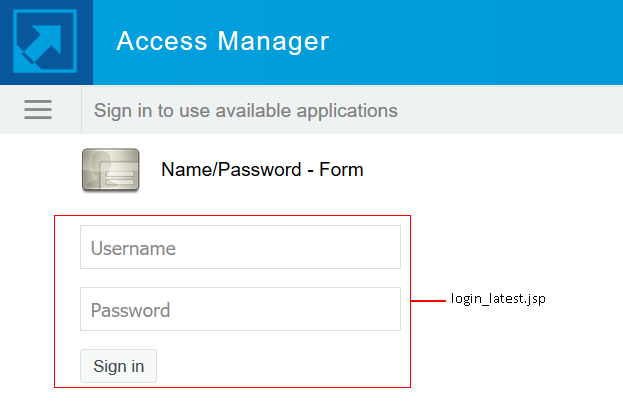
This section explains how to prompt the users for an identifier other than the user’s name. Figure 3-1 displays the default login page with the username prompt.
This section explains only how to modify the content of the login_latest.jsp file. If you want to modify other aspects of this page, you need to select one of the other methods.
The instructions explain how to create a method that sets up the appropriate query so that the user can be found in the user store with an identifier other than the username (the cn attribute). The instructions also explain how to create a contract that uses this method and how to modify the login_latest.jsp page so that it prompts for the appropriate identifier such as an email address instead of a username.
-
Create a method with the appropriate query:
-
Click > > > > .
-
Click , and then specify a .
-
In , select a username/password class.
-
Keep the option selected, and configure the user store option according to your needs.
-
In the section, click , and then specify the following values:
This property is defined so that it queries the user store for the attribute you want to use rather than the cn attribute (in this case, the mail attribute of the person class). The %Ecom_User_ID% variable is the default variable name on the login page. You can change this to %EMail_Address% if you also change the value in your custom login page.
For more information about how to use this property, see Query Property.
-
Click .
-
In the section, click , and specify the following values:
Replace <filename> with the name of the custom login_latest.jsp page you are going to create so that the page prompts the user for an email address rather than a username. This must be the filename without the JSP extension. For example, if you name your file email_login.jsp, then you would specify email_login for the property value.
-
Click .
-
Click .
-
Create a contract that uses this method:
-
Update Identity Server.
-
Copy the login_latest.jsp file and rename it to match the value of the JSP property configured in Step 1. For example, email_login.jsp.
The JSP files are located on Identity Server in the following directory:
/opt/novell/nids/lib/webapp/jsp
-
(Conditional) If you modified the %Ecom_User_ID% variable, find the string in the file and replace it with your variable.
-
(Conditional) If you need to support only one language, modify the prompt in the login_latest.jsp file.
-
Find the following string in the file:
placeholder="<%=handler.getResource(JSPResDesc.USERNAME_UNDER_LABEL)%>"
-
Replace it with the string you want. For example:
placeholder="Email Address"
-
Copy the modified file to each Identity Server in the cluster.
-
Back up your customized file.
-
(Conditional) If you need to localize the prompt for multiple languages, create a custom message properties file for the login prompt.
For more information about how to create a custom message properties file, see Customizing Messages.
The following steps assume you want to change the username prompt to an email address prompt.
-
Find the following definition in the com/novell/nidp/resource/jsp directory of the unzipped nidp.jar file.
JSP.50=Username:
-
Add this definition to your custom properties file and modify it so that it prompts the user for an email address.
JSP.50=Email Address:
-
Translate the value and add this entry to your localized custom properties files.
-
Copy the customized properties files to the WEB-INF/classes directory of each Identity Server in the cluster.
-
Restart Tomcat on each Identity Server using one of the following commands:
/etc/init.d/novell-idp restart OR
rcnovell-idp restart
Modifying the login.jsp File
The login.jsp file gives you the credential frame with the login prompts in an iframe. It has no branding header. If you use this page, you need to write the HTML code for the header and the branding.
-
Copy the login.jsp file and rename it. The JSP files are located on Identity Server in the following directory:
/opt/novell/nids/lib/webapp/jsp
-
Add the custom branding and any other content you require to the file.
-
Modify the credentials. See Customizing the Credential Frame.
-
Repeat Step 1 through Step 3 for each resource that requires unique branding.
-
Copy the files to each Identity Server in the cluster.
-
Back up your customized files.
-
Continue with Using Properties to Specify the Login Page.
Customizing JSP Files
Three general types of customizable UI files are associated with Identity Server: JSP files, CSS files, and JavaScript (JS) files. To obtain an initial working set of these files for customization, perform the following steps:
NOTE:If the /opt/novell/nids/lib/webapp/WEB-INF/legacy folder exists, Access Manager uses the legacy UI. To use the latest UI, you must remove the legacy folder.
-
Identify the Identity Server cluster where the customization is required.
You can view the cluster configuration from Administration Console.
-
Copy the IP address of one of the Identity Server devices in the cluster.
The section lists the cluster names and each cluster includes IP addresses of the Identity Server devices in the cluster. You can choose any one of the Identity Server IP addresses. It is recommended to choose the IP address of Identity Server that is up.
-
Connect to the Identity Server device by using the IP address that you have copied in the previous step.
You can use SSH, Remote Desktop Connection, and so on.
-
Locate the customizable Identity Server files on the hard drive of the connected device, then edit them in the same location or copy them to a preferred editing location.
For JSP files:
For CSS file:
For JS file:
-
(Conditional) If you have copied the customizable files to a different location for editing, ensure to update the files at the original location with the edited version of the file.
Customizing the nidp_latest.jsp file
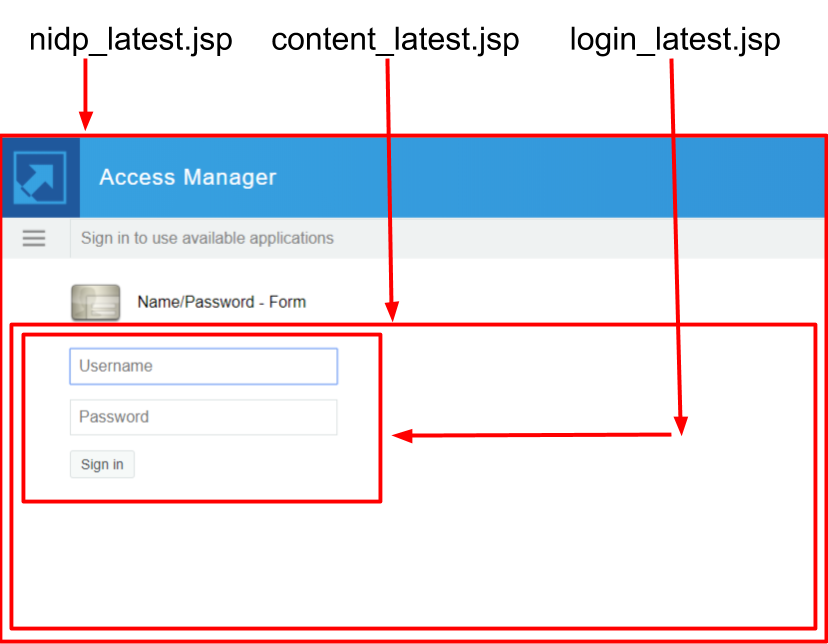
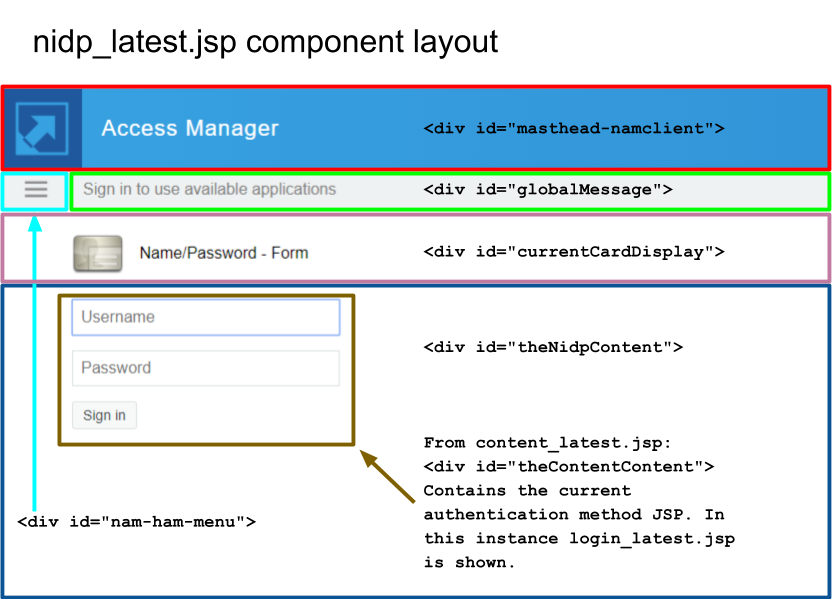
nidp_latest.jsp provides the default layout for Identity Server authentication pages. This section provides the details of the concepts that the implementation addresses to populate the different layout components on the page. With this understanding, a developer can identify sections of the implementation that address each concept.
The following are main concepts throughout the nidp_latest.jsp implementation:
-
Authentication methods (cards) to be displayed
-
URL to be used for populating the Content Area (<div id="theNidpContent">)
-
The end user messages to be displayed
You can query Identity Server to get the required data. The access point into Identity Server internal data structures is the ContentHandler Java class.
The following line, found at the top of nidp_latest.jsp, represents a new ContentHandler and initializes it for the current HTTP request and response:
ContentHandler handler = new ContentHandler(request,response);
NOTE:The handler variable is used throughout the Identity Server code.
Authentication Method (cards) to be Displayed
The term card refers to in Administration Console. When editing Identity Server in Administration Console, an authentication is comprised of an that contains one or more authentication methods and each references to an .
To make an visible in the user interface, an is associated with . displays an icon and a name to the end user for a defined .
The nidp_latest.jsp implementation queries Identity Server to gather the following Authentication Card information:
-
The set of all available Authentication Cards.
This query is used for populating the drop-down hamburger menu where the user can choose from the available authentications.
-
The set of authentications already completed by the current user.
This query is used for placing a check mark next to the completed authentications in the drop-down hamburger menu.
-
The authentication that is currently executing.
This query is required to display the current authentication in the content section of the UI.
The Java variable showCards is used for indicating if the drop-down hamburger menu should be shown. It is initialized to true and the situations that would make it false are tested.
The drop-down hamburger menu is not shown in the following scenarios:
-
No .
-
Only one , and that card is the current .
-
An error message is displayed.
-
The logout confirmation page is displayed.
-
The page is being rendered for a Mobile application.
The drop-down hamburger menu is divided into local, remote, and federated authentication sections.
A local login is an authentication that Identity Server can use without involving an external identity provider. LDAP and JDBC logins are examples of local logins. In these cases, Identity Server locally logs into a local directory or a database to authenticate an end user.
A social media authentication, such as Facebook or Twitter login, is a remote authentication.
A login at a federated external identity provider (often using a protocol, such as SAML) is an example of federated login.
The implementation examines each and sorts them into these three categories. The drop-down hamburger menu is populated with federated cards, followed by remote cards, and then local cards.
The URL to be Used for Populating the Content Area
The goal of the nidp_latest.jsp implementation is to display the current activity to the end user. The current activity can be an authentication, a confirmation, or a user message. This activity is loaded into the <div id="<%=NIDP_JSP_CONTENT_DIV_ID%>">…</div> area using a JQuery AJAX HTTP call to Identity Server. The HTML returned from this request is “set” into the content div.
To go to the correct activity, nidp_latest.jsp must build the correct URL for the call to getToContent(strUrl, strTargetDivId) JavaScript Function.
NOTE:The nidp_latest.jsp implementation includes a JavaScript function with signature getToContent(strUrl, strTargetDivId) that makes a JQuery AJAX HTTP Get request to the URL supplied in the parameter strUrl, and then writes the returned HTML to the <div> element identified by the parameter strTargetDivId.
The content_latest.jsp implementation also uses this JavaScript function for the same purpose.
GenericURI builderContentDivUrl =
new GenericURI(handler.getJSP(handler.isJSPMsg() ?
handler.getJSPMessage().getJSP() :
NIDPConstants.JSP_CONTENT));
A GenericURI Java object wraps a standard URI allowing easier creation and editing of URLs.
If Identity Server specifically indicates that a particular JSP must be displayed by returning true from handler.isJSPMsg(), then that JSP name is used to build the URL. Otherwise, the system JSP content_latest.jsp is used.
The handler.getJSP() method creates a URL formatted similar to the following:
[IDP domain]:[IDP port]/nidp/jsp/[JSP Name].jsp?sid=[session data id]
The query string parameters from the current HTTP request (the request that invoked nidp_latest.jsp) are copied to the content <div> url, then the current Authentication Card identifier is added to the query string.
builderContentDivUrl.setQueryItem(ContentHandler.CARD_PARM,
currentAuthCard.getID(true));
This ensures that the identity provider is executing the correct authentication method.
Lastly, the JavaScript getToContent() function is called to invoke the JQuery AJAX HTTP call:
getToContent('<%=strContentDivUrl%>', '<%=NIDP_JSP_CONTENT_DIV_ID%>');
The Message to be Displayed
All user messages are displayed in the Global Message Area.
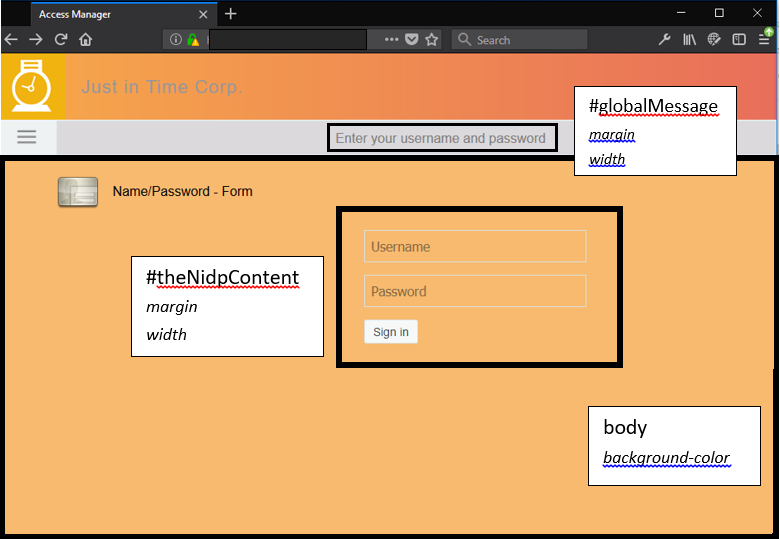
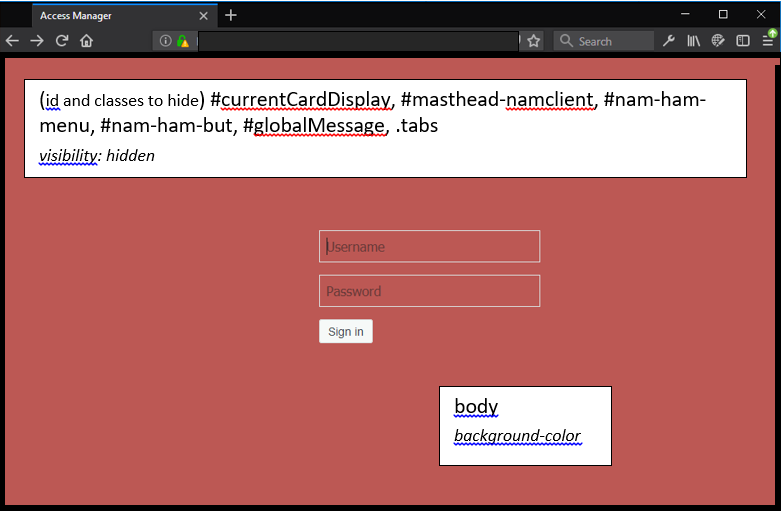
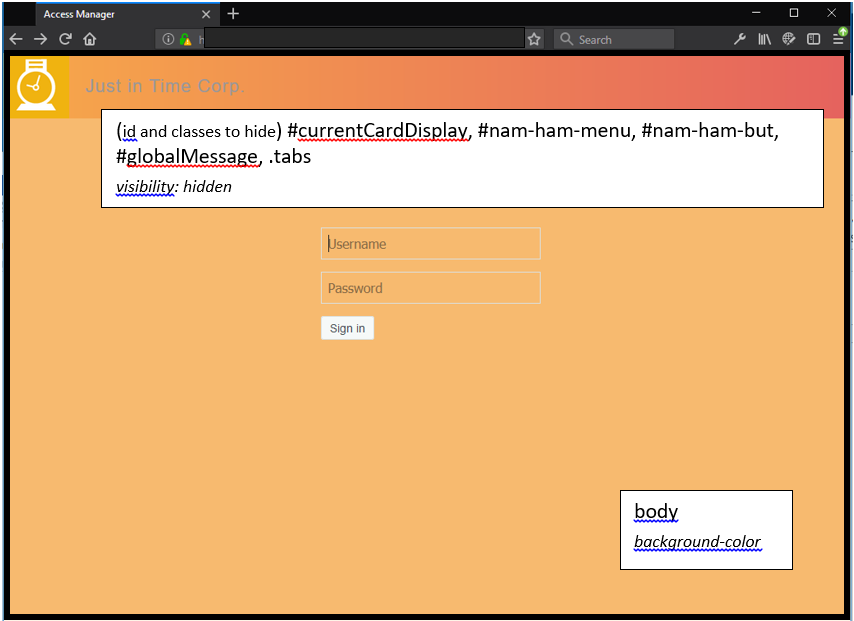
The Global Message Area is the layout section of nidp_latest.jsp that gets data from the <divid="globalMessage"> element.
A user message can be displayed as a prompt that correlates with the current activity that is executing in the content div area. For example, Authentication Failed: Invalid Credentials can be displayed during a login while the content <div> refreshes the login form.
A user message can also be displayed when the Content Area is empty. This situation arises when the user message is terminal in nature to the previously executed Content Area activity. For example, when an error occurs during an X509 Mutual Certificate Authentication, the message, Error occurred during User Certificate Authentication. Please contact Administrator is displayed in the Global Message Area and the Content Area will be empty.
In the nidp_latest.jsp implementation, many Identity Server conditions are verified that can lead to setting a value for the Global Message Area. The value is set using code similar to the following:
strGlobalMessageText =
    handler.getResource(JSPResDesc.LOGOUT_SUCCESS_MSG);
The messages that cause the Content Area to be empty are those that are queried from Identity Server.
NIDPMessage msg = handler.getMessage(true);
If the message is an error message, then it is displayed in the Global Message Area and the getToContent() JavaScript function is not called to populate the Content Area. This mechanism uses the message_latest.jsp file to set the Global Message Area value.
The following sections explain how to modify the login page that the JSP files create:
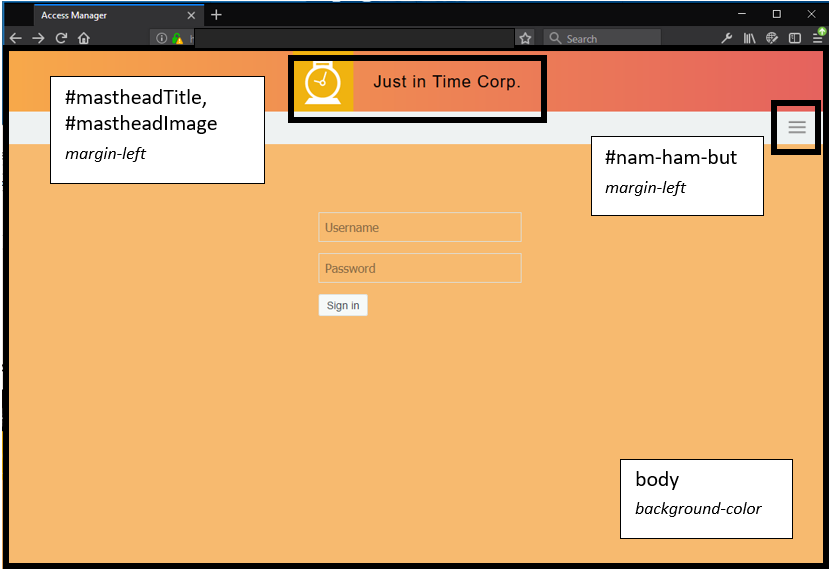
Rebranding the Header
-
Navigate to Administration Console .
-
Click .
-
Select the required Identity Server cluster.
-
Modify as per requirement.
-
Modify the background color using and .
-
Click to replace the NetIQ logo on the right of the header.
-
Continue with one of the following tasks:
Customizing the Card Display
To control what appears in the section, use the option that appears on the definition of each card. If this option is not selected, the card does not appear in the section. Each contract has an associated card. For information about modifying the card options, see Section 4.1.4, Configuring Authentication Contracts.
Perform one of the following tasks:
Customizing the Credential Frame
You can modify login.jsp to prompt users for an identifier other than the username. To do this, you need to create a method that sets up the appropriate query to find the user in the user store with an identifier other than the username. Then create a contract that uses this method. You also need to modify the prompt in login.jsp to match the identifier you are prompting for.
-
Create a method with the appropriate query:
-
Click > > > > .
-
Click , and then specify a .
-
Select a class that is a username/password class from the list.
-
Keep selected, and configure the user store option according to your needs.
-
In the section, click , and then set the following properties:
-
Click .
-
Create a contract that uses this method:
-
Click > .
-
Select the method you just created.
-
Configure the other options to fit your requirements.
If you are creating multiple custom login pages with customized credentials, you might want to use the URI to hint at which custom login.jsp file is used with which custom nidp_latest.jsp file. For example, the following URI values have the filename of the login page followed by the name of the custom nidp_latest.jsp page:
login1/custom1
login2/custom2
login3/custom3
For information about configuring the other options for a contract, see Section 4.1.4, Configuring Authentication Contracts.
-
Update Identity Server.
-
Copy the login.jsp file and rename it.
The JSP files are located on Identity Server in the following directory:
/opt/novell/nids/lib/webapp/jsp
-
(Conditional) If you modified the %Ecom_User_ID% variable, find the string in the file and replace it with your variable.
-
(Conditional) If you need to support only one language, modify the prompt in the login.jsp file:
-
Late the following string in the file:
<label><%=handler.getResource(JSPResDesc.USERNAME)%></label>
-
Replace it with the string you want. For example, <label>Email Address:</label>
-
Copy the modified file to each Identity Server in the cluster.
-
Back up your customized file.
-
(Conditional) If you need to localize the prompt for multiple languages, create a custom message properties file for the login prompt.
For more information about how to create a custom message properties file, see Customizing Messages.
The following steps assume you want to change the username prompt to an e-mail address prompt:
-
Find the following definition in the com/novell/nidp/resource/jsp directory of the unzipped nidp.jar file.
JSP.50=Username:
-
Add this definition to your custom properties file and modify it so that it prompts the user for an e-mail address:
JSP.50=Email Address:
-
Translate the value and add this entry to your localized custom properties files.
-
Copy the customized properties files to the WEB-INF/classes directory of each Identity Server in the cluster.
-
Restart each Identity Server using one of the following commands:
/etc/init.d/novell-idp restart
rcnovell-idp restart
-
To specify which customized nidp_latest.jsp to display with the contract, you must modify the main.jsp file. Continue with Adding Logic to the main.jsp File.
Customizing the nidp.jsp File to Customize Error Message
Identity Server publishes a generic error message for the error code during SAML failure, such as request denied or Invalid Name ID Policy. You can customize the NIDP jsp file available at /opt/novell/nids/lib/webapp/jsp and write an appropriate error message for redirection or to inform the user about the issue.
In the following example, the specified code snippet is for simulating InvalidNameIDPolicy error for SAML 2.0.
Perform the following steps to customize error message:
-
Generate an error condition with, for example, Invalid Name ID Policy.
-
Customized the nidp_latest.jsp file and add the following code for redirection:
com.novell.nidp.ui.MenuHandler redirectMenuHandler;
        com.novell.nidp.NIDPMessage redirectMessage;
    String redirectCause;

        redirectMenuHandler = new MenuHandler(request, response);
        redirectMessage = redirectMenuHandler.getMessage(true);
        if (redirectMessage != null && redirectMessage instanceof
com.novell.nidp.NIDPError) {
        redirectCause = ((com.novell.nidp.NIDPError)
redirectMessage).getNIDPExceptionMsg();
        System.out.println("************** redirectCause" + redirectCause);
        if (redirectCause != null &&
redirectCause.indexOf("InvalidNameIDPolicy") != -1) {
        response.sendRedirect("http://www.novell.com");
            return;
       }
    }
-
Restart Identity Server by using the rcnovell-idp restart command.
-
Verify that when failure occurs, SAML shows the following message in the authentication response:
<samlp:Status><samlp:StatusCode
Value="urn:oasis:names:tc:SAML:2.0:status:Responder"><samlp:StatusCode
Value="urn:oasis:names:tc:SAML:2.0:status:InvalidNameIDPolicy"/></samlp:StatusCode>
Due to the customized nidp_latest.jsp file, SAML redirects to the specified location.
-
Rerun the failure and verify that instead of displaying 300101008, the nidp page redirects to the specified www.novell.com location.