3.9.2 Configuring General Provider Settings
The following settings are global. These affect any identity providers or identity consumers (service providers) that Identity Server has been configured to trust:
Configuring the General Identity Provider Settings
The following settings affect all identity providers that Identity Server has been configured to trust.
-
Click Devices > Identity Servers > Edit > Identity Providers.
-
To specify identity provider settings, fill in the following fields:
Show logged out providers: Displays logged-out providers on the identity provider’s logout confirmation page.
Require Signed Authentication Requests: Specifies that for the Liberty 1.2 and SAML 2.0 protocols, authentication requests from service providers must be signed. When you enable this option for the identity provider, you must also enable the Sign Authentication Requests option under the Identity Consumer heading on this page for the external trusted service provider.
Use Introductions (Publish Authentications): Enables single sign-on from the service provider to the identity provider. The service provider determines the identity providers that users are already logged into, and then selectively and automatically asks for authentication from one of the identity providers. Introductions are enabled only between service and identity providers that have agreed to a circle of trust, which means that they have agreed upon a common domain name for this purpose.
After authenticating a user, the identity provider accesses a service at the service domain and writes a cookie to the common part of the service domain, publishing that the authentication has occurred.
Service Domain (Local and Common): Enables a service provider to access a service at the service domain prior to authenticating a user. This service reads cookies obtained at this domain and discovers if any identity providers have provided authentication to the user. The service provider determines whether any of these identity providers can authenticate a user without credentials. The service domain must resolve to the same IP address as the base URL domain.
For example, if an agreed-upon common domain is xyz.com, the service provider can specify a service domain of sp.xyz.com, and the identity provider can specify a service domain of idp.xyz.com. For the identity provider, xyz.com is the common value entered, and idp is the local value.
Port: The port to use for identity provider introductions. Port 8445 for HTTPS is the default and must be opened on your firewall. If you specify a different port, you must edit the Tomcat server.xml file.
SSL Certificate: Displays the Keystore page that you use to locate and replace the test-provider SSL certificate for this configuration.
Identity Server comes with a test-provider certificate that you must replace for your production environment. This certificate is used for identity provider introductions. You can replace the test certificate now or after you have configured Identity Server. If you create the certificate and replace the test-connector now, you can save some time by restarting Tomcat only once. Tomcat must be restarted whenever you assign an Identity Server to a configuration and whenever you update a certificate key store. See Managing the Keys, Certificates, and Trust Stores.
-
Click OK, then update Identity Server.
Configuring a Global White List of Target URLs
Many applications and services require URL redirection, which can cause security risks. While redirecting, the request can be tampered to redirect users to an external, malicious site. To prevent such issues, you can configure a list of permissible domains. Redirection is allowed only to these configured domains.
-
Click Devices > Identity Servers > Edit > Identity Providers.
-
Under Redirection White List, click New.
-
Specify Domain.
You can specify a domain name with an asterisk wildcard character (*) that represents the entire DNS subtree. For example, specifying *.example.com as a domain allows redirection to all children domain under examle.com including example.com. The WWW prefix is not required. You can specify the asterisk (*) wildcard only at the lowest level of the subtree.
For example:
Valid domain name: *.example.com
Invalid domain name: innerweb.*.com.
You must configure at least one domain to prevent open redirection.
-
Liberty: The target parameter is filtered. If the requested target is not the white list, Identity Server does not login.
-
WS-Fed: The wreply parameter is filtered. If the requested wreply is not in the white list, Identity Server does not login. However, if wreply is same as the provider's single logout or single sign-on URL domain, the request is accepted.
-
SAML2: For idpsend, the target parameter is filtered using this list. This list is not applicable for spsend.
-
Configuring the General Identity Consumer Settings
The following settings affect all identity consumers (service providers) that Identity Server has been configured to trust.
-
Click Devices > Identity Servers > Edit > Identity Consumer.
-
Specify whether Identity Server can run as an identity consumer.
When Identity Server is configured to run as an identity consumer, Identity Server can receive (consume) authentication assertions from other identity providers.
Enable: Enables this site to function as service provider. This setting is enabled by default.
If this option is disabled, Identity Server cannot trust or consume authentication assertions from other identity providers. You can create and enable identity providers for the various protocols, but they are not loaded or used until this option is enabled.
Require Signed Assertions: Specifies that all SAML assertions received by the service provider are signed by the issuing SAML authority. The signing authority uses a key pair to sign SAML data sent to this trusted provider.
Sign Authentication Requests: Specifies that the service provider signs authentication requests sent to an identity provider when using the Liberty 1.2 and SAML 2.0 protocols.
Use Introductions (Discover IDP Authentications): Enables a service provider to discover whether a user has authenticated to a trusted identity provider, so the user can use single sign-on without requiring authentication credentials.
-
Service domain: The shared, common domain for all providers in the circle of trust. This domain must resolve to the same IP address as the base URL domain. You must enable the Identity Consumer option to enable this field.
-
Port: The port to use for identity consumer introductions. Port 8446 for HTTPS is the default and must be opened on your firewall. If you specify a different port, you must edit the Tomcat server.xml file.
IMPORTANT:If you enable the Use Introductions option and you want to allow your users to select which identity provider to use for authentication rather than use single sign-on, you need to configure the Introductions class. See Configuring the Introductions Class.
SSL Certificate: Displays the Keystore page that you use to locate and replace the test-consumer SSL certificate for this configuration.
Identity Server comes with a test-consumer certificate that you must replace for your production environment. This certificate is used for identity consumer introductions. You can replace the test certificate now or after you have configured Identity Server. If you create the certificate and replace the test-connector now, you can save some time by restarting Tomcat only once. Tomcat must be restarted whenever you assign an Identity Server to a configuration and whenever you update a certificate key store. See Managing the Keys, Certificates, and Trust Stores.
-
-
Click OK, then update Identity Server.
Configuring the Introductions Class
The Introduction class determines whether the user can select an identity provider to trust when Identity Server is acting as a service provider. The default behavior is for introductions to happen automatically, thus allowing single sign-on. Identity Server passively checks with the identity providers, one at time, to see if they can authenticate the service provider. If the identity provider can authenticate the user and the Introductions class is enabled, the user is presented with one or more cards that look similar to the following:
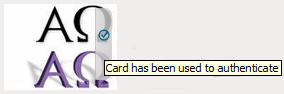
The small check mark indicates to the user that this is a possible card. When the user hovers over the card, the description appears. If the user selects one of these cards, the user is automatically authenticated.
To configure the Introductions class:
-
Click Devices > Identity Server > Servers > Edit > Local > Classes > Introductions.
-
Click Properties > New, then specify the following values.
Property Name: Specify ShowUser.
Property Value: Specify true.
-
Click OK.
-
Return to the Servers page, then update the Identity Server.
-
When you configure this class, you need to also enable the Use Introductions option. Continue with Configuring the General Identity Consumer Settings.
Configuring IDP Select Class
Access Manager helps your service provider in selecting the identity provider for authenticating a user. You can accomplish this by configuring the Introductions class. This configuration enables users to select an identity provider from a list of available identity providers. However, when a common domain is not available, the Introductions class might not authenticate. In such cases, you can configure the IDP Select Class. When this class is configured, a user can authenticate by using an identity provider contract from a list of identity providers and save this selection. To save this selection, select the Remember Me option. Next time onwards, when the user logs in, the user is automatically redirected to the specific identity provider for authentication. The contract selection is stored in the browser cookie until the cookie expires or someone clears the cookie.
IMPORTANT:The Remember Me option does not work when running the application in the incognito or private mode.
Perform the following steps to configure IDP Select Class:
-
Click Devices > Identity Servers > Edit > Local > Classes.
-
Click New, then specify the following details:
Display name: Specify a name for the class.
Java class: Select IDP Select Class.
The Java class path is configured automatically.
-
Click Next.
-
(Optional) Click New to add properties.
Property Name: Specify COOKIE_NAME.
Property Value: Specify a cookie name. If you do not specify any value, a cookie name _idp_select_ is created by default.
-
Click OK.
-
(Optional) Click New to add another property.
Property Name: Specify COOKIE_EXPIRY_TIME_IN_DAYS.
Property Value: Specify a numerical value. This property will decide the cookie lifetime. Default value is 365 days.
-
Click OK > Finish.
-
Continue with creating a method for this class. For configuration information, see Section 5.1.3, Configuring Authentication Methods.
IMPORTANT:Do not select the Identifies User option.
-
Create a contract for this class. For configuration information, see Section 5.1.4, Configuring Authentication Contracts.
-
After the contract is configured, it appears in the list of contracts on the login page.
IMPORTANT:Do not assign this contract as the default identity provider contract.
Configuring the Trust Levels Class
The Trust Levels class allows you to specify an authentication level or rank for class types that do not appear on the Defaults page and for which you have not defined a contract. The level is used to rank the requested type. Using the authentication level and the comparison context, Identity Server can determine whether any contracts meet the requirements of the request. If one or more contracts match the request, the user is presented with the appropriate authentication prompts. For more information and other configuration options, see Section 5.1.5, Specifying Authentication Defaults and Specifying Authentication Types
-
Click Devices > Identity Server > Servers > Edit > Local > Classes > Trust Levels.
-
Click Properties > New, then specify the following values.
Property Name: Specify SetClassTrustLevels.
Property Value: Specify true.
-
For each class type for which you want to set a level, create a property for that class.
-
Set the Property Name to the name of the class. For example, use one of the following:
urn:oasis:names:tc:SAML:2.0:ac:classes:PreviousSession
urn:oasis:names:tc:SAML:2.0:ac:classes:InternetProtocol
For additional values, refer to the SAML2 and Liberty Authentication Context Specifications.
-
Set the Property Value to the security level or rank you want for the class. A level of 2 is higher than a level of 1.
-
-
Click OK, then update the Identity Server.