2.3 Administration API Use Cases
2.3.1 Get Device Health
This API returns the health of Access Manager devices (Identity Servers and Access Gateways). The API returns the health for the following levels:
-
Entire Access Manager
-
Each cluster
-
Each device
-
Each service and component (remote web servers, data stores, and so forth)
You can use this API for integration with external systems, such as NOC to view the status of Access Manager devices and the remote web servers.
Sample Request
Invoke a URL similar to https://192.168.0.0:8443/amsvc/v1/health?expand=4
The expand parameter specifies the level of detail that is returned. Accepted values are 1,2,3, and 4. 4 returns the maximum detail for all devices.
Sample Response
<amService xmlns="urn:novell:schema:am:service">
<health status="noReport" uri="https://192.168.0.0:8443/amsvc/v1/health">
<idpClusterHealthList status="Green" total="1">
<clusterHealth status="Green" uri="https://192.168.0.0:8443/amsvc/v1/idpclusters/SCC7c9nsp/health">
<instanceID>SCC7c9nsp</instanceID>
<displayName>IDPCluster</displayName>
<deviceHealthList total="1">
<deviceHealth status="Green"
uri="https://192.168.0.0:8443/amsvc/v1/idpclusters/SCC7c9nsp/devices/idp-CC1B3FFB0BC40AD8/health">
<instanceID>idp-CC1B3FFB0BC40AD8</instanceID>
<displayName>192.168.0.6</displayName>
<serviceHealthList total="5">
<serviceHealth status="Passed">
<serviceName>Config Datastore</serviceName>
<message>Operating properly</message>
</serviceHealth>
...
NOTE:This API returns the health information saved in Administration Console. This data is refreshed every five minutes. Therefore, it is sufficient to invoke this API every 5 minutes to get the latest health.
2.3.2 Get Device Statistics
This API returns the statistics for all Identity Servers and Access Gateways in Access Manager.
Sample Request
Send a GET request to a URL. For example, https://192.168.0.0:8443/amsvc/v1/statistics.
Sample Response
<amService xmlns="urn:novell:schema:am:service">
<response code="SUCCESS"/>
<statistics uri="https://192.168.0.0:8443/amsvc/v1/statistics">
<idpClusterStatisticsList total="1">
<clusterStatistics uri="https:// 192.168.0.0:8443/amsvc/v1/idpclusters/SCC7c9nsp/statistics">
<instanceID>SCC7c9nsp</instanceID>
<displayName>IDPCluster</displayName>
<deviceStatistics uri="https:// 192.168.0.0:8443/amsvc/v1/idpclusters/SCC7c9nsp/devices/idp-CC1B3FFB0BC40AD8/statistics">
<instanceID>idp-CC1B3FFB0BC40AD8</instanceID>
<displayName>192.168.0.6</displayName>
<statisticList total="90">
<statistic displayName="Cached Sessions">100</statistic>
<statistic displayName="Historical Maximum Logins Served">890</statistic> ...
NOTE:This API returns the statistics information saved in Administration Console. It is refreshed every 10 minutes. Therefore, it is sufficient to invoke this API every 10 minutes to get the latest statistics.
2.3.3 Refresh Metadata of SAML 2.0 Trusted Providers
Trusted providers periodically refresh their metadata. Some metadata repositories, such as InCommon.org, publish an updated metadata everyday. Therefore, an automated approach for refreshing the metadata of all service providers and updating the associated trusted root certificates helps relieve the administrator of this frequent chore and ensures that the system is up to date for security reasons.
Perform the following steps:
-
Invoke the API to get the Identity Server clusters. Parse the response to get the cluster URL.
Sample URL: https://192.168.0.0:8443/amsvc/v1/idpclusters
Response:
...
idpCluster uri="https://192.168.0.0:8443/amsvc/v1/idpclusters/SCC7c9nsp"> ...
-
For each cluster URL, invoke the API to get the list of service providers or identity providers, depending on the provider that needs to be refreshed.
https://192.168.0.0:8443/amsvc/v1/idpclusters/SCC7c9nsp/serviceproviders OR
https://192.168.0.0:8443/amsvc/v1/idpclusters/SCC7c9nsp/identityproviders
-
Parse the response to get the URL of the trusted provider to be updated.
Response Snippet:
<serviceProvider uri="https://192.168.0.0:8443/amsvc/v1/idpclusters/SCC7c9nsp/serviceproviders/STSPr9spkh">
<displayName>of365</displayName>
<protocol>saml2</protocol>
...
-
Invoke the metadata refresh API to apply the updated metadata as follows.
-
Invoke the trusted roots API to add the root CA of the signing certificate specified in the metadata. This step is needed if the certificate has changed. For more information, see Section 2.3.4, Import Trusted Root Certificates.
-
Invoke the Apply changes API to send these changes to Identity Servers in that cluster.
-
Send PUT request to the cluster URL https://192.168.0.0:8443/amsvc/v1/idpclusters/SCC7c9nsp/ with input
{ "update" : "all" }Sample Script: A sample script that implements all the steps listed above is available on the NetIQ Cool Solutions website.
Sample Request:
URL format: <trusted provider URL in step 3>/metadata
Send a PUT request to https://192.168.0.0:8443/amsvc/v1/idpclusters/SCC7c9nsp/serviceproviders/STSPr9spkh/metadata with metadata as input. Metadata can be specified as a text or a URL.
Sample text input:
NOTE:The metadata text must be URL encoded.
{
"metadata" :
"%3C%3Fxml%20version%3D%221.0%22%20encoding%
3D%22UTF-8%22%20%3F%3E%3Cmd%3AEntityDescriptor%20xmlns%3
Amd%3D%22urn%3Aoasis%3Anames%3Atc%3ASAML%3A2.0%3Ametadata%
22%20ID%3D%22idXMuLnBrALGXkMAMUXd9WXvS0aEI%22%20entityID%
3D%22https%3A%2F%2Fpriyankasb.blr.novell.com%2Fnidp%2Fsaml
2%2Fmetadata%22%3E%3Cds%3ASignature%20xmlns%3Ads%3D%22http
%3A%2F%2Fwww.w3.org%2F2000%2F09%2Fxmldsig%23%22%3E%0A%3Cds
...............
%3C%2Fmd%3AEntityDescriptor%3E"
}
Sample metadata URL input:
{
"metadata" : "https://164.99.87.129:8443/nidp/saml2/metadata"
}
Response: 200 OK
2.3.4 Import Trusted Root Certificates
You can use this API to import a trusted root certificate. This is usually used in conjunction with the metadata refresh API.
Sample Request:
Send a PUT request to https://192.168.0.0:8443/amsvc/v1/security/trustedroots/myProviderCA where "myProviderCA" is the trusted root name displayed on Administration Console.
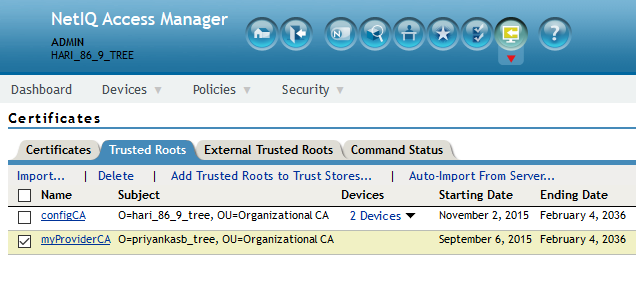
The URL encoded public CA certificate must be specified as input.
{
"certificate" : "----BEGIN%20CERTIFICATE----
%0AMIIFNDCCBBygAwIBAgIkAhwR%......
----END%20CERTIFICATE----"
}
Response: 200 OK
IMPORTANT:
-
The certificate must be URL encoded.
-
Apply changes to all devices that might use this certificate.
2.3.5 Renew Certificates
You can use this API to renew the certificates that are available through Administration Console. Specify the certificate name and the certificate content as input to the API.
Sample Request:
Send a PUT request to https://192.168.0.0:8443/amsvc/v1/security/certificates/test-signing with the following input, where the intermediate certificates are optional:
{
"entityCertificate" :"----BEGIN%20CERTIFICATE----%0AMIIFDjCCA%2FagAwIBAg
IkAhwR%2F6b94LzCZy%2BK8kSqu----END%20CERTIFICATE----",
"rootCertificate" :"----BEGIN%20CERTIFICATE----%0AMIIFDjCCA%2FagAwIBAg
IkAhwR%2F6b94LzCZy%2BK8kSqu----END%20CERTIFICATE----",
"intermediateCertificate1" :"----BEGIN%20CERTIFICATE----
%0AMIIFDjCCA%2FagAwIBAgb94LzCZy%2BK8kSqu----END%20CERTIFICATE----",
"intermediateCertificate2" :"----BEGIN%20CERTIFICATE----
%0AMIIFDjCCA%2FagAwIBAgzCZy%2BK8kSqu----END%20CERTIFICATE----"
}
IMPORTANT:
-
An update is required for all devices using that certificate. Updating the connector certificate requires tomcat restart.
-
The certificate specified must be the PEM formatted public certificate and must be URL encoded.
-
Entire chain must be specified. Entity Cert > Intermediate 1 > Intermediate 2 > Root CA, where > indicates that the Entity certificate was signed by Intermediate 1 and so on.
2.3.6 Manage User Sessions
These APIs allow fetching and terminating all active sessions of a given user.
Perform the following steps:
-
Invoke the API to get all Identity Server clusters.
Sample URL: https://192.168.0.0:8443/amsvc/v1/idpclusters
-
Parse the response to get the URL for each Identity Server cluster.
…<idpCluster uri="https://192.168.0.0:8443/amsvc/v1/idpclusters/SCC7c9nsp">…
-
Invoke the URL of a cluster to get the sessions for a user.
URL Format: <IDP cluster URL>/sessions?userid=<user name>
-
Repeat Step 3 for other clusters so that the sessions of the same user across all clusters are handled.
Sample Request
https://192.168.0.0:8443/amsvc/v1/idpclusters/SCC7c9nsp/sessions?userid=admin
Use HTTP GET to retrieve all active sessions for the user 'admin'.
Use HTTP DELETE method to terminate all sessions for the user 'admin'.
Sample Response
{
   "userDN" : "cn=admin, o=novell",

   "sessionDetails": { ["identityServer":"192.168.0.6", "sessionCount":"1"],

["identityServer":"192.168.0.7", "sessionCount":"2"]

}
}
2.3.7 Purge Access Gateway Cache
You can use this API to purge the Access Gateway server cache. Periodic purging of the cache frees up storage. You can select to purge the content of the purge list that has already been configured on Administration Console or purge all content cached on the server.
Perform the following steps:
-
Get the list of Access Gateway clusters.
Sample URL: https://164.99.86.7:8443/amsvc/v1/agclusters
-
Parse the response to get the URL of the cluster you want to purge.
Sample Response:
<agCluster uri="https://164.99.86.7:8443/amsvc/v1/agclusters/ce035b033e6c7f29">
-
Invoke the URL to get the devices in that cluster.
URL format: <cluster uri from above>/devices
Sample URL: https://164.99.86.7:8443/amsvc/v1/agclusters/ce035b033e6c7f29 devices
-
Parse the response to get the URL of the device you want to purge
Sample Response:
<agDevice uri="https://164.99.86.7:8443/amsvc/v1/agclusters/ce035b033e6c7f29/devices/ag-6459CF981F6FD178">
-
Send a PUT request to the device URL with parameters to purge cache.
Sample Request
PUT request to https://164.99.86.7:8443/amsvc/v1/agclusters/ce035b033e6c7f29/devices/ag-6459CF981F6FD178
With input { "purge" : "list" }
Specify "list" to purge the content configured in the Purge List on the UI.
Use "all" to purge the entire cache.
Response: 200 OK
NOTE:Clearing the cache decreases the responsiveness of a device, as every page will need to be retrieved. Therefore, it is recommended to execute this command for one device at a time.