10.6.3 Configuring SSO to Advanced Authentication Through Access Gateway
To configure SSO to the Advanced Authentication enrollment page, you must configure several settings in Access Gateway and in Advanced Authentication.
Advanced Authentication must be enabled for basic authentication to achieve SSO using Access Gateway. Advanced Authentication processes only the HTTP Authorization header for incoming requests that include /basic in the path, for example: https://aa.b2c.com/account/basic. To enable basic authentication, perform the following steps:
Configuring Advanced Authentication
-
Log in to Advanced Authentication Administration Console and ensure that an Authentication chain exists with the LDAP Password method.
-
Edit the Authentication chain mentioned in Step 1 to assign the chain to all users.
-
Set the option to for the event.
Basic authentication is supported for one event type (Authentication Management event) and three methods: Password (PIN), LDAP Password, and HOTP.
-
Create an authentication chain using any of these supported methods. For example, select the LDAP Password method while creating the chain.
For more information, see Authenticators Management in the Advanced Authentication - Administration guide.
-
Go to , select the event, and add the chain created in the previous step.
Configuring Access Gateway
You can configure Access Gateway to accelerate a back-end web server and inject users’ credentials into the Authorization HTTP header. This enables SSO to any web server that supports basic authentication. This Authorization HTTP header is a standard header that can include a Base64 encoded version of username:password. In the case where Advanced Authentication is the back-end web server, it expects a special formatting of the Authorization header. For example, <username>:<password>:1. A virtual attribute will be used to provide this formatting.
-
Set up Access Manager to inject the non-standard Authorization HTTP header.
To do this, create a virtual attribute based on the users’ cn and manipulate the data with JavaScript.
Perform the following steps to create and configure the virtual attribute:
-
Click > > > > > .
-
Specify a name such as va-adv-auth and description for the virtual attribute.
-
Under , specify a name for the attribute and select as .
-
Under , select .
-
Specify the following JavaScript:
function main (P1){ return P1+":LDAP_PASSWORD:1" } -
Click .
-
Update Identity Server.
For more information about virtual attributes, see Section 3.5.8, User Attribute Retrieval and Transformation.
-
-
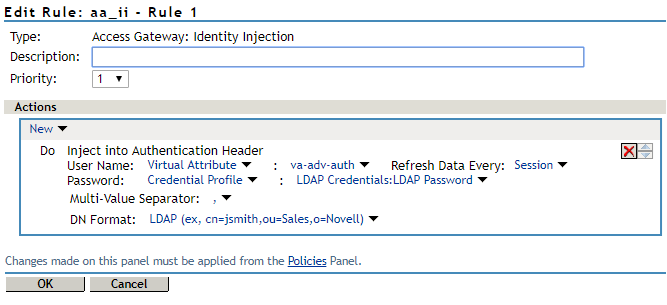
Create an Identity Injection policy that injects the above virtual attribute value as part of the username, with the users’ password as password. This policy will later be applied to the protected resources associated with the Advanced Authentication enrollment portal page.
-
In Administration Console Dashboard, click > .
-
Select the policy container and click .
-
Specify a name for the policy, select for the type of policy, then click .
-
Select in .
-
In , click , then select .
-
In , select and the attribute created in Step 1.
-
In , select and in , select .
-
Click .
For more information about Identity Injection policies, see Section 8.4, Identity Injection Policies.
The following diagram shows how the identity injection appears in Access Gateway after configuration:
-
-
Accelerate the Advanced Authentication enrollment server by using Access Gateway.
For example, set up a domain based multi-homed proxy for the Advanced Authentication enrollment server.
-
When you configure this proxy, specify and Advanced Authentication server IP address in .
-
Create a protected resource for the path (can be /* or specifically /account/basic) and assign the Secure Name/Password - Form contract to this protected resource, so that only authenticated users can access this protected resource. Assign the Identity Injection policy created in Step 2 to this protected resource.
-
Update Access Gateway after applying these changes.
For more information, see Section 3.8.5, Configuring Protected Resources.
The following diagram shows how the protected resource is displayed in Access Gateway after configuration:

-
-
Now, users can access Advanced Authentication proxy URL (https://aa.b2c.com/account/basic). Also, users can see their Advanced Authentication enrollment page after logging into Identity Portal.