5.2.10 Understanding How Access Manager Uses OAuth and OpenID Connect
Access Manager Identity Server acts as the authorization server to issue access token to a client application based on user’s grant. A registered third-party client application uses API calls to retrieve the access token for accessing OAuth protected resources. For information about API calls, see NetIQ Access Manager 4.4 Administration API Guide.
OpenID Connect implements a single sign-on protocol on top of the OAuth authorization process. It allows client applications to verify the identity of a user based on the authentication performed by Identity Server (authorization server). It also allows client applications to obtain a user’s basic profile information.
This section explains how to use the OAuth 2.0 and OpenID Connect protocol to set up Identity Server as the authorization server. The following are the topics included in this section:
Implementing OAuth in Access Manager
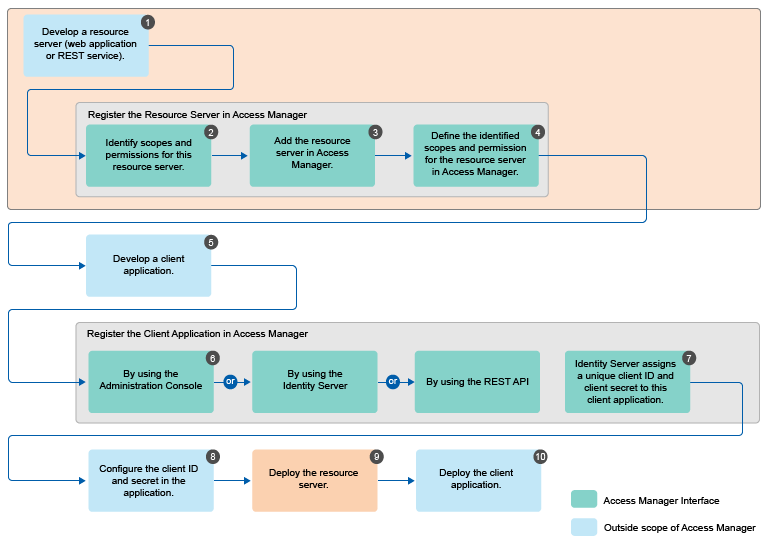
The following diagram depicts the implementation flow of OAuth in Access Manager:
NOTE:Access Manager uses variable length Access tokens and authorization codes. The client applications and web servers must not assume any fixed size of tokens and codes and must allocate necessary memory to handle the token. Token size depends on the size of scope names. Some servers may have size limitations on query string and HTTP headers. Ensure that an application uses only necessary scopes to avoid any issue.
OAuth Implementation
-
Develop a resource server (web application or REST service). (Application Developer)
-
Identify scopes and permissions for this resource server. (Application Developer or Administrator)
-
Add the resource server in Access Manager. See Adding a Resource Server. (Application Developer or Administrator)
-
Define the identified scopes and permissions for the resource server in Access Manager. See Defining Scopes for a Resource Server. (Application Developer or Administrator)
-
Develop a client application. (Application Developer)
-
Register the client application in Access Manager. You can register a client by using Administration Console (Administrator), Identity Server (Application Developer or Administrator), or REST API (Application Developer or Administrator). For information about registering client application by using Administration Console, see Registering OAuth Client Applications.
-
Identity Server assigns a unique client ID and client secret to this client application.
-
Configure the client ID and secret in the client application. (Application Developer or Administrator)
-
Deploy the resource server. (Application Developer)
-
Deploy the client application. (Application Developer)
For information about basic scenarios where you can implement this configuration, see OAuth Scenarios.
For more information about how to enable and configure OAuth in Access Manager for this implementation flow, see Configuring OAuth and OpenID Connect.
Using Access Gateway in the OAuth Flow
The following diagram depicts the OAuth flow when using Access Gateway for protecting the APIs, injecting scopes, and retrieving the access token:
OAuth Implementation using Access Gateway
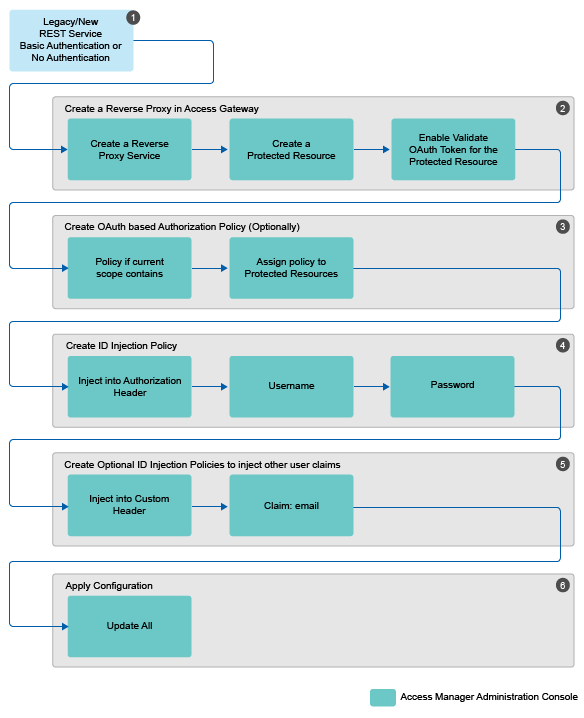
-
Determine the web application or REST service for which you want to implement this configuration.
-
Create a reverse proxy in Access Gateway and enable OAuth in Access Gateway for this reverse proxy. See Enabling OAuth in Access Gateway.
-
Configure an authorization policy based on OAuth Scopes. See Configuring an Authorization Policy based on OAuth Scopes.
-
Configure an Identity Injection policy to inject user name and password. See Configuring an Identity Injection Policy for OAuth Claims.
-
Configure optional Identity Injection policies to inject other user claims, if required. You can define the additional roles in the same policy also that you configured for injecting user name and password. See Configuring an Identity Injection Policy for OAuth Claims.
-
Apply the changes.
For information about how to configure OAuth in Access Manager for this implementation flow, see Configuring Access Gateway for OAuth.
OAuth Scenarios
Web applications (Resource Server) validate an Access token before allowing a client application to access resources
Identity Server (authorization server) issues an Access token and web applications (hosted on resource server) validate the token before granting a client application to access the resources. This configuration is suitable in the following scenarios:
-
Web server authentication: In a typical web authentication model, a client application uses the resource owner’s credentials to access the resource owner’s information that is hosted on a server.
For example, a user (resource owner) can allow a printing service (client application) to access private photos stored at a photo sharing service (server), without sharing credentials with the printing service. Instead, the user authenticates directly with the photo sharing service that issues the printing service delegation-specific credentials.
For example, a user named Alice accesses an application running on a web server at www.printphotos.example and instructs it to print her photographs that are stored on a server at www.storephotos.example. The application at www.printphotos.example receives Alice's authorization consent for accessing her photographs without learning her authentication credentials of www.storephotos.example.
The following diagram illustrates the workflow of the web server authentication:
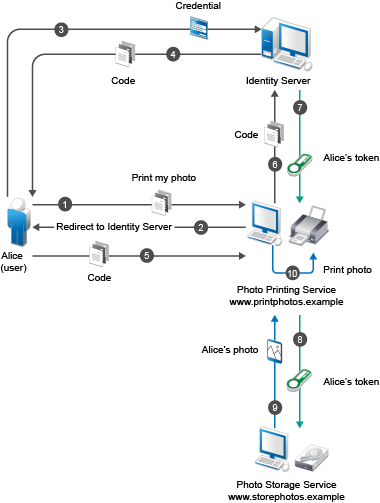
NOTE:This example is derived from the OAuth RFC document.
-
Accessing resources without using owner’s credentials: OAuth allows a client application to access resources that are controlled by the resource owner and provides a method to obtain permission from the resource owners to access their resources. The resource owners provide this permission in the form of a token and a matching shared-secret. The resource owner does not need to share credentials with the client application. Tokens are issued with a restricted scope and limited life.
For example, a user named Alice has installed a gaming application that runs in her browser and uses OAuth for accessing a social site at www.example.com. The gaming application updates scores in a database at www.example.com. The gaming application is registered with the social site and has an identifier. Alice has registered with the social site for identification and authentication. To upload Alice's scores, the gaming application accesses the score database when Alice authorizes it. When Alice accesses the page from the redirect URI in the game application, the authorization server sends the client ID, password, and authentication code received in the redirect request parameters to www.example.com, which in turn returns an Access token to the game application. The gaming application sends the token to www.example.com to access Alice’s resources. www.example verifies the token and grants the gaming application access to Alice’s account for updating the scores.
NOTE:This example is derived from the OAuth RFC document.
-
RESTful applications security: OAuth provides a way to secure REST APIs. For example, an enterprise acme.com exposes REST APIs that provide various functions. Using OAuth, acme.com can provide secure authorization control on APIs to ensure that the right people have access to these APIs. In addition, they can also enable applications to call APIs on behalf of a user. acme.com can also revoke access to an API even if an application uses it.
Figure 5-17 OAuth Flow

-
The client application requests authorization from the user (resource owner). Client applications can make the authorization request directly to the resource owner or through the authorization server (Identity Server) as an intermediary.
-
The client application receives an authorization grant from the authorization server. An authorization grant represents the resource owner's authorization. The user communicates the authorization by using one of four grants types (see OAuth Authorization Grant) or by using an extension grant.
-
The client application authenticates itself at the authorization server, sends the authorization grant, and requests an Access token.
-
The authorization server authenticates the client application and validates the authorization grant. The authorization server issues an Access token for a valid grant.
-
The client application requests the resource server to provide access to the protected resource and authenticates this by presenting the Access token.
-
The resource server accepts the request for a valid token.
Access Gateway validates the Access token on behalf of web applications
This configuration is suitable when client applications want to access resources on legacy web applications.
For example, an enterprise acme.com has a multi-tier application: a front-end web application utilizing services from web service layers. The enterprise wants to protect these services and applications using OAuth and thereby need to place the RESTful API endpoints behind Access Gateway. The applications need to be modified to fetch OAuth token from Identity server. To minimize this change, Access Manager has the ability to enable Access Gateway to fetch OAuth tokens on behalf of the application and pass it over to the application via HTTP header. Now, the application can simply take the token from the header and use it to invoke the web service.
Figure 5-18 Work flow
-
A client application requests access to a web resource and provides authentication details to Identity Server.
-
Identity Server authenticates the client application, gets the user’s consent, generates an OAuth token, and sends the token to the client application.
-
The client application provides the token to Access Gateway.
-
Access Gateway sends the token to Identity Server for validation.
-
If the token is not valid, Access Gateway returns a 401 error.
-
If the token is valid, Access Gateway performs the following tasks:
-
Executes the authorization policy, if configured, based on OAuth scopes or claims.
-
Sends user attributes and grants details provided to the client application to the web application by using the Identity Injection policy, if configured.
-
-
The resource server returns a response to Access Gateway and Access Gateway sends this response to the client application.
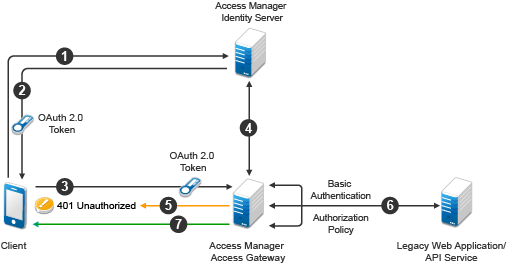
Access Gateway injects the Access token on behalf of web applications
This configuration is used when Access Gateway injects the Access tokens into the authorization header.
Figure 5-19 The following diagram illustrates the workflow:
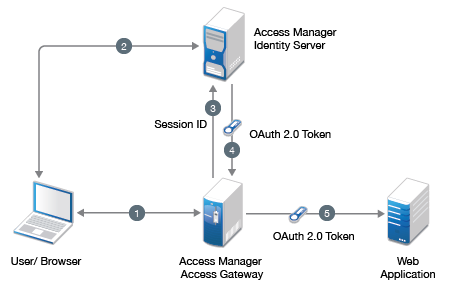
-
The user sends request to access a web application protected by Access Gateway.
-
Access Gateway redirects the user to Identity Server, which prompts for user authentication.
-
On successful authentication, Access Gateway shares the session details with Identity server to fetch the OAuth token.
-
Identity server authenticates the session details and issues an Access token to Access Gateway.
-
Access Gateway injects the Access token into the authorization header.
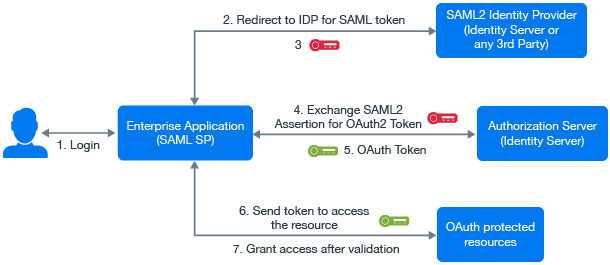
Exchanging SAML 2 Assertions with Access Token
Access Manager supports SAML 2 bearer grant. Access Manager supports only the authorization grant flow for assertion and the assertion is used for authenticating the user.
You can use SAML 2 assertions to request an access token. Access Manager validates the assertion and generates the access token for accessing OAuth protected resources.
Consider a scenario where a user requires to access an OAuth protected resource and the user is already authenticated using SAML assertion. To access the resource, the user requires to re-authenticate and give consent.
To avoid re-authentication and getting consent from user again, the application can use Access Manager to exchange the SAML 2 assertion with access token.
To use assertions for requesting an access token, you must configure the settings required for the assertion issuer. The assertion issuer is the identity provider that issues the SAML assertion. You can either import the settings of a SAML identity provider that is configured in the same Identity Server or use any other 3rd party identity provider as an assertion issuer.
NOTE:
-
The access token received after exchanging with assertion includes the scopes based on the previous user consent that can be from using the authorization code flow.
-
The token time-out is based on the assertion time-out. For example, if the assertion is issued for 10 minutes and after 2 minutes the token is requested, the token will be valid for the remaining 8 minutes.
If an assertion is valid for longer duration, you can exchange the assertion with access token multiple times.
-
The assertion must be encoded with Base64 URL.
Configuring Assertion Issuers
An assertion issuer is an identity provider that issues an assertion. In this section you can add the assertion issuers and specify the details.
-
Click > > > .
-
Click the icon.
-
(Conditional) If you want to add assertion issuer that is existing as a trusted identity provider under , , or , click .
Some of the values of the fields specified in Step 5 get auto-populated. You can modify the values if required and specify the values for the remaining fields.
NOTE:In an assertion, a user is identified based on the SAML 2 name identifier and not the SAML 2 attributes. Hence, you must configure the name identifier for the required .
-
(Conditional) To use a self-issued assertion (an assertion generated by a client application), click .
-
Specify the values for the following fields:
-
Issuer Name: The name of the identity provider that generates the assertion.
-
Entity ID: The entity ID that identifies the identity provider.
-
Audience Alias: This is used for identifying the intended audience. Authorization server’s token endpoint is the intended audience by default. If the assertion does not contain the Identity Server’s token endpoint as the audience, you can configure an audience alias. The default value is https://<DNS name>:8443/nidp/oauth/nam/token.
-
Issuer Signing Certificate: This gets auto-populated if you have imported an existing trusted identity provider’s configuration. If you are creating an assertion issuer, click to upload the signing certificate used by the identity provider.
NOTE:If there are multiple certificates available for the trusted Identity provider, the first certificate is imported.
-
Selected UserStores: This is used for identifying the users in an assertion. You can choose a list of user stores from the available list.
-
-
Select the required name identifiers in the assertion
-
Persistent: Select this option if the assertion includes the name identifier in the persistent format. You can choose the required LDAP attribute that is used as the persistent value in the assertion.
NOTE:Access Manager supports only the LDAP attribute as persistent value.
-
Email: Select this option if the assertion includes the name identifier in email format. You can choose the required LDAP attribute that is used as the email value in the assertion.
-
Unspecified: Select this option if the assertion includes the name identifier in unspecified format. You can choose the required LDAP attribute that can be used as the unspecified value in the assertion.
-
For information about requesting the token, see the NetIQ Access Manager 4.4 Administration API Guide.
Encrypting Access Token
Access Manager generates OAuth 2 access token in the JWT format. You can choose to encrypt this token or use it without encryption. You can also choose who can validate the access token.
Access Manager generates an access token, then encrypts the access token by using a random symmetric key. This encrypted token includes the key in plain text and can be encrypted by using either the Access Manager or the resource server key. The Access Manager signing public key information is displayed in , which you can view on the page of Administration Console.
The access token can include user attribute or custom claims based on the resource server’s requirement. This helps when you encrypt an access token by using the resource server key. The resource server can decrypt and validate the token without the need to request for user attribute information from Access Manager.
NOTE:The size of the token is variable. You must ensure that the token size does not increase when you are using multiple user attributes or claims along with a specific algorithm.
Access Manager can encrypt the access token by using any of the following methods.
NOTE:By default, Access Manager encrypts the access token with Access Manager key. To use resource server key to encrypt the access token, the OAuth request must contain the resourceServer parameter. If a request is sent without the resourceServer parameter, then Access Manager uses its key to encrypt the token.
Encrypting the Token with Access Manager Key
If you want the resource server to contact the authorization server for validating an OAuth token, you can encrypt the token by using Access Manager keys. This is the default encryption method.
Access Manager encrypts the token by using a random symmetric key, then the encrypted token is signed by using an Access Manager private key. When resource server consumes the access token, it requests Identity Server to validate the token.
Encrypting the Token with Resource server Key
If you want the resource server to decrypt and validate the OAuth token, you can encrypt the token by using resource server key.
You can encrypt an OAuth token by using the resource server’s key available on resource server’s JWKS (JSON Web Key Set) or a specific URL. To use resource server key, you must specify the resource server key or key set in Identity Server. When the access token is consumed, the resource server validates the token by decrypting the token. This gives the resource server the ability to decrypt the token without having to go to the authorization server (Identity Server) to decrypt or validate the token.
The following diagram illustrates how Access Manager leverages the resource server the facility to decrypt the token.
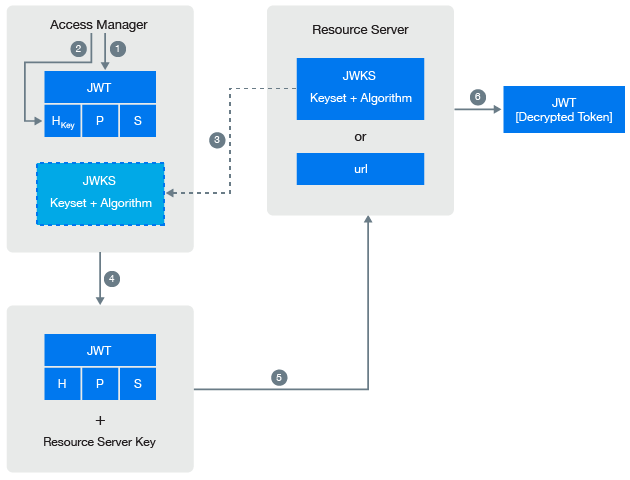
-
Access Manager generates an unencrypted JWT token that includes Header, Payload, and Signature.
-
The token encryption algorithm specified in the resource server’s JSON Web Key Set is used for generating random symmetric key to encrypt this token.
This encrypted token contains the random key information in plain text.
-
Retrieve the JWKS information from the resource server.
-
Access Manager uses resource server public key that is defined in resource server’s JSON Web Key Set to encrypt the random key information that is in plain text.
To view the Access Manager signing public key details in Administration Console, click > .
-
The resource server consumes the encrypted token.
-
Resource server uses its corresponding private key to decrypt the random key information.
The resource server uses the random key to decrypt the token. For more information about sample Java code to decrypt the token and validating token signature, see the Access Manager API guide.