4.1 Tuning Identity Server for Performance

4.1.1 Basic Tuning Options

The following Access Manager components and features can affect the performance of Identity Server cluster.

LDAP User Stores: This critical component can be a major cause for slowness, depending upon configuration, hardware, and the layout of the directory. Configure search contexts to avoid LDAP searches that traverse the entire tree.

L4 Switch: If the switch is slow or mis-configured, it can severely impact performance. You need to make sure the switch has ample capacity to handle the traffic. If possible, clustered Identity Servers should be plugged directly into the switch or segmented accordingly. It is also critical that you enable sticky bit/persistence on the L4 switch. When this feature is not enabled, the product may not handle the traffic correctly.

For tips on how to set up the L4 switch, see Configuration Tips for the L4 Switch in the NetIQ Access Manager 4.3 Administration Guide.

Enabled Protocols: On the General Configuration page (click Devices > Identity Servers > Edit), you can select which protocols to enable. The Liberty protocol needs to be enabled, but each additional protocol adds a little processing overhead. Do not enable protocols unless you are using them.

Session Failover: On the Cluster Details page (click Devices > [Name of Cluster]), you can set up session failover so that if an Identity Server in the cluster goes down, the user does not lose any session data. This feature adds some overhead, because Identity Servers need to share some authentication information. You need to balance the need to preserve user session data with the increase in authentication traffic. For best performance, you should specify the minimum number of peers.

Limit User Sessions: On the General Configuration page (click Devices > Identity Servers > Edit), you can select to limit the number of sessions a user can have. When a user is limited to a specific number of sessions, Identity Servers must check with the other servers in the cluster before establishing a new session. This check adds a little overhead to each new authentication request.

Authentication Timeouts: For each contract (click Devices > Identity Servers > Edit > > Local > Contracts > [Name of Contract]), you need to specify an authentication time-out. Short time-outs generate more authentication traffic. Carefully consider the security requirements for your resources and set limits that meet the requirements. If you need to verify only users those are actively using a session, have all these protected resources use the same contract, or have them share the same activity realm.

Logging: You need to manage the size and number of log files as well as the logging level. You should increase the log level to Debug only when you are troubleshooting a problem. As soon as the problem is resolved, you should reduce the log level. You should also have a schedule to check the number and size of the log files and to remove the older log files.

Auditing: You need to carefully select the events that you audit. Selecting all events that are available for the Access Manager components can impact performance. For example, the Login Provided event generates an event every time a user authenticates. If you have many users, this one event could impact performance. You need to analyze your needs. Are you really interested in who logged in, or are you more interested in who failed to log in?

4.1.2 Disabling User Profile Objects

If you are not using the default configuration for storing Form Fill secrets and you have not enabled persistent federation between identity and service providers, you can disable the creation of objects under the LibertyUserProfile container in the configuration data store. The default behavior is to create an object in this container for every user accessing the system, and the login process checks for a matching user in this container.

If you have thousands of users, the following symptoms might indicate that the user profile objects are slowing down the login process:

  • On Administration Console, the ndsd process (Linux) or the NDS Server (Windows) is running at 100%.

  • Running the backup utility is very slow.

  • Logging in to Administration Console is very slow.

To discover whether profile objects are causing a slowdown, open an LDAP browser (or in Administration Console, select the View Objects task in the menu bar). Expand the following objects: novell > accessManagerContainer > nids > cluster. Expand the SCC objects, and look for objects stored in LibertyUserProfile objects.

  • If you have only a few hundred of these objects, user profile objects are not slowing the authentication process.

  • If you have thousands of these objects, user profile objects are probably causing a slowdown. You can speed up authentication by disabling the use of these objects. When you do this, Identity Server no longer creates objects in the LibertyUserProfile container, and it does not try to match an authenticating user with a profile object.

To prevent the creation and use of user profile objects, make the following modifications to your Identity Server configuration:

  1. In Administration Console, click Devices > Identity Servers > Edit > Liberty > Web Service Provider.

  2. Disable the following profiles:

    • Personal Profile

    • Employee Profile

    • Custom Profile

  3. Either disable the Credential Profile (which also disables using Form Fill or Identity Injection with credentials) or enable the Credential Profile and modify its default configuration:

    1. Click Credential Profile.

    2. Select to store secrets either with the Extended Schema User References option or with the Novell Secret Store User Store References option.

      When the Credential Profile is enabled, the default behavior is to create user profile objects and store the secrets there. You must configure one of these other options to store the secrets. For more information about these options, seeConfiguring a User Store for Secrets in the NetIQ Access Manager 4.3 Administration Guide.

  4. Click OK > OK, then update Identity Server.

  5. Disable the use of the user profile objects:

    1. Log in to the Identity Server machine as the root user.

    2. Open the web.xml file.

      Linux: /opt/novell/nam/idp/webapps/nidp/WEB-INF/

      Windows Server 2008: \Program Files (x86)\Novell\Tomcat\webapps\nidp\WEB-INF/

    3. Add the following lines to the file:

      <context-param>
        <param-name>cpAuthorityType</param-name>
        <param-value>memory</param-value>
      </context-param>
    4. Restart Tomcat.

      Linux: Enter the following command:

      /etc/init.d/novell-idp restart Or

      rcnovell-idp restart

      Windows: Enter the following commands:

      net stop Tomcat7

      net start Tomcat7

    5. Make this change on each Identity Server in the cluster.

4.1.3 Configuring a Specific IP Address for Proxied Requests

The default behavior for Identity Server is to use the same IP address for incoming client requests, for proxied requests, and for management tasks. You can improve performance by separating this traffic into separate pools via IP addresses. You can also use the IP addresses to route the traffic so that it remains behind the firewall.

You can specify the IP address that an Identity Server uses for proxied requests to other members of the cluster. A proxied request is sent to another member of a cluster when the request is not sent to the authoritative server.

An authoritative server is the cluster member that holds the authentication information for a given user session. For a request associated with a given session to be processed, it must be routed or proxied to the authoritative cluster member. If an L4 switch sends a request to a non-authoritative cluster member, that cluster member proxies that request to the authoritative cluster member.

You can also specify the IP address for the communication that takes place between Identity Server and Administration Console for management tasks. This includes configuration updates, health checks, and statistics. To configure this IP address, log in to Administration Console, then click Devices > Identity Servers > [Name of Identity Server].

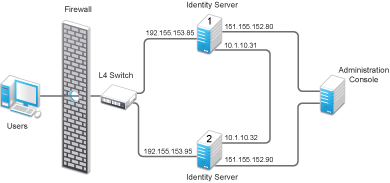
Figure 4-1 illustrates a configuration with a two-member cluster. The L4 switch sends client traffic to Identity Servers by using the IP addresses that start with 192. The IP addresses that start with 10 are used to route proxied requests to the cluster members. The IP addresses starting with 151 are used for the management traffic with Administration Console.

Figure 4-1 Two-Member Identity Server Cluster

To specify the IP address for the proxied requests on the SOAP channel:

  1. Gather the required information. For each Identity Server in the cluster, you need the following information:

    • Management IP address. (To get this value or modify the value, click Devices > Identity Servers > Name of Identity Server.)

    • IP address or IP address with port that is available to use for proxied requests.

  2. Log in to Identity Server as the root user.

  3. Change to the WEB-INF directory:

    Linux: /opt/novell/nam/idp/webapps/nidp/WEB-INF/

    Windows Server 2008: \Program Files (x86)\Novell\Tomcat\webapps\nps\WEB-INF/

  4. Open the web.xml file for editing.

  5. Add a proxyAddessMap parameter entry to the file.

    <context-param>
        <param-name>proxyAddressMap</param-name>
        <param-value>Managament_IP, unused, Proxied_Request_IP
            </param-value>
    </context-param>
  6. Adjust the <param-value> element as necessary.

    The <param-value> element specifies the IP addresses that are used by the other members of the cluster. It is a comma-separated list of IP addresses. You need a value entry for each member of the cluster, except the cluster member you configure. A member does not send proxied requests to itself, so you do not need to add it. Each value entry must contain three IP addresses:

    • Replace Management_IP with the management IP address of Identity Server. You cannot specify a port with this entry.

    • Replace unused with just a space. If you configure this feature for Access Gateway, this IP address entry is used for the reverse proxy IP address. Identity Server does not have a reverse proxy.

    • Replace Proxied_Request_IP with the address to use for the proxied requests (also called the SOAP back channel). You can specify a port with entries, such as 151.155.152.90:445.

    For Identity Server 1 in Figure 4-1, the entry should look similar to the following lines:

     <context-param>
        <param-name>proxyAddressMap</param-name>
        <param-value>151.155.152.90,10.1.10.32</param-value>
     </context-param>

    If your cluster has three or more members, you need to add addresses for the other members. The following example shows an entry for Identity Server 1 in Figure 4-1 if the cluster contains a third member.

     <context-param>
        <param-name>proxyAddressMap</param-name>
        <param-value>151.155.152.90,10.1.10.32,
            151.155.152.100,10.1.10.33</param-value>
     </context-param>
  7. Save the file.

  8. Restart Tomcat:

    Linux: /etc/init.d/novell-idp restart Or

    rcnovell-idp restart

    Windows: Enter the following commands:

    net stop Tomcat7
    net start Tomcat7
  9. Repeat Step 2 through Step 7 for each cluster member, modify the <param-value> element to contain the addresses for other members of the cluster.

4.1.4 Configuring Java Memory Allocations

The Tomcat configuration file controls the amount of memory that Tomcat can allocate for Java. If you have installed your Identity Server on a machine with the recommended 4 GB of memory, you can modify two parameters in this file to improve performance under heavy load:

Modifying Java Parameters on Linux

  1. Log in to Identity Server as the root user.

  2. Open the Tomcat configuration file for editing.

    /opt/novell/nam/idp/conf/tomcat7.conf

  3. For Access Gateway Service, find the following line in the file:

    JAVA_OPTS="-server -Xmx2048m -Xms512m -Xss128k

    This -Xmx value is ideal for a system with 4 GB of memory. If the system has more physical memory, increase the -Xmx value. For example, if the system has 8 GB of memory, increase -Xmx to 4096.

  4. Find the following line in the file:

    JAVA_OPTS="${JAVA_OPTS} -Dnids.freemem.threshold=10" 
  5. Change the -Dnids.freemem.threshold value to a value between 5 and 15 based on your requirement. The default value is 10.

    This prevents user sessions from using up all the memory and ensures that there is free memory available so that the other internal Java processes can continue to function. When this threshold is reached, the user receives a 503 Server Busy message and a threshold error message is logged to the catalina.out file.

    For example, the threshold value is 10. When the  memory goes above 90% used,  the user receives a 503 Server Busy message.

  6. Save your changes, then restart Tomcat.

  7. Repeat these steps for each Identity Server in your cluster.

Modifying Java Parameters on Windows

  1. Log in to Identity Server as the administrator.

  2. Open the Tomcat configuration utility from /Program Files (x86)/Novell/Tomcat/bin/tomcat7w.exe.

  3. Click the Java tab.

  4. In the Java options section, find the following line:

    -Dnids.freemem.threshold=10 

    If the line does not exist, you need to add it.

  5. Change the -Dnids.freemem.threshold value to a value between 5 and 15 based on your requirement. The default value is 10.

    This prevents user sessions from using up all the memory and ensures that there is free memory available so that the other internal Java processes can continue to function. When this threshold is reached, the user receives a 503 server busy message and a threshold error message is logged to the stdout.log file.

    For example, the threshold value is 10. When the  memory goes above 90% used,  the user receives a 503 Server Busy message.

  6. Change the Maximum memory pool size to 2048.

    This allows Java to use 2 GB of memory.

  7. Save your changes, then restart Tomcat.

  8. Repeat these steps for each Identity Server in your cluster.