8.6 External Attribute Source Policies
You can use Access Manager as an identity provider for third-party service providers. Some of these service providers require attributes that are not part of the user store where the user is authenticated. The External Attribute Source policy allows you to retrieve attributes from the external sources.
You can configure this policy with rules to retrieve the attributes. A rule can contain all the conditions available for a policy. To enable this policy, you need to write a data extension class or provide a string constant value. The data extension class can be configured with constant and dynamic properties like any other policies.
For information about the structure and template of a data extension class and example code, see the The Policy Extension API
in the NetIQ Access Manager 4.3 Developer Guide.
8.6.3 External Attribute Source Policy Examples
You can use an External Attribute Source policy to retrieve attributes from external sources. You can create shared secrets from this policy. This shared secret then can be used in configuring other policies or can be used by Identity Servers in their attribute sets to retrieve attributes from external sources.
An External Attribute Source policy must be enabled and configured before using the policy for retrieving the attributes from external sources.
For more information about how to create an External Attribute Source policy, see Section 8.6.2, Creating an External Attribute Source Policy.
This section describe the usages of the External Attribute Source policy with the help of the following scenarios:
For information about sample codes for these examples, see Access Manager SDK Sample Code.
Scenario 1
e_Health is a Web portal for doctors. e_Health uses Med_Association as an external identity provider to verify whether the user is a doctor and obtain the user's professional code and specialization. Med_Association retrieves these details with the help of Access Manager Identity Server.
Med_Association completes the following steps:
-
Write an External Attribute data extension class and use the required attribute to retrieve the professional code and specialization of user.
For more information about data extension class, see Section 8.1.6, Adding Policy Extensions.
For more information about data extension example code, see The Policy Extension API in the NetIQ Access Manager 4.3 Developer Guide.
-
Create an External Attribute Source policy for the data extension.
For more information about how to import the data extension class and configure the External Attribute Source policy in Identity Server, see Section 8.6, External Attribute Source Policies.
-
Define a shared secret for the professional code and specialization.
For more information, see Section 3.5.4, Adding Custom Attributes.
-
Configure this shared secret for a service provider to be sent with authentication.
For more information, see Configuring the Attributes Sent with Authentication.
-
The retrieved details that are professional code and specialization are sent to e_Health.
The following diagram illustrates this scenario:
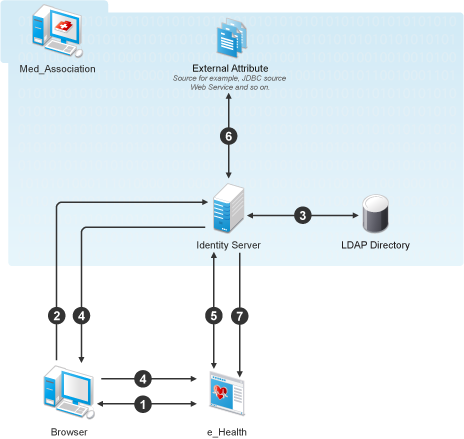
Workflow:
-
User requests for access to e-Health through browser.
-
e_Health redirects the user’s browser to Access Manager Identity Server at Med_Association for authentication.
-
User logs in with providing credentials. User is authenticated with LDAP.
-
On the successful authentication, Identity Server sends the assertion to e_Health.
-
e_Health verifies the assertion with Med_Association by using the back channel communication.
-
After verification, Access Manager Identity Server retrieves the attributes (professional code and specialization) from external sources (for example, database) by using the External Attribute Source policy.
-
Identity Server returns the response containing professional code and specialization in a shared secret attribute. If the user is not a doctor, external source returns null values in the shared secret attribute in the response.
e_Health grants access to the user if it receives valid values for the attributes in the authentication response else it denies Access.
Scenario 2
Company XYZ is a customer of Access Manger. The employees of this company get authenticated to Identity Server. Each employee's mail attribute is retrieved from the user store. XYZ wants only user name part of the email address to be displayed on the Home page after authentication. This can be achieved by using the External Attribute Source policy.
XYZ completes the following steps:
-
Write an External Attribute data extension class and use the mail attribute as the parameter to the class.
For more information about data extension class, see Section 8.1.6, Adding Policy Extensions.
-
In the data extension class, read the email address and parse the name identifier in it and return as an attribute. For more information about data extension example code and example code for this scenario, see The Policy Extension API in the NetIQ Access Manager 4.3 Developer Guide guide.
-
Define a shared secret for the name field of the email address.
For more information, see Section 3.5.4, Adding Custom Attributes.
-
Create an External Attribute Source policy for the data extension.
For more information about how to import the data extension class and configure the External Attribute Source policy in Identity Server, see Section 8.6.2, Creating an External Attribute Source Policy.
-
Create an Identity Injection policy.
For more information, see Section 8.4, Identity Injection Policies and Section 8.4.4, Configuring a Custom Header Policy.
-
Identity Server sends the user ID part of email address to Access Gateway.
In turn, Access Gateway or service provider sends this attribute to the configured web server. For example, John is an employee of XYZ. He provides his email address, john@mail-domain.com, as his user name. After authentication, only John will be displayed on the Home page.
The following diagram illustrates this scenario:
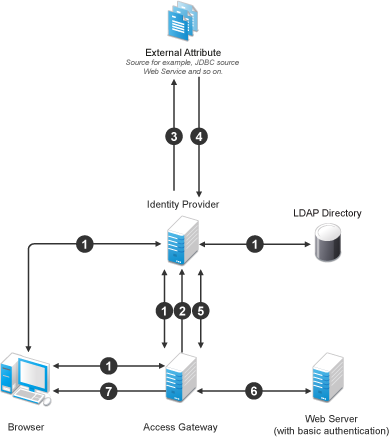
Workflow:
-
User (through the browser) is requesting for a resource. Access Gateway determines whether it is a protected resource and redirects the request to Identity Server for authentication. Identity Server authenticates with the LDAP servers and provides the assertion details to Access Gateway. In turn, Access Gateway verifies the assertion details.
-
The Home page in the resource is configured to display the user ID that has to be retrieved from Identity Server.
-
Identity Server determines whether the attributes can be retrieved from the external source. Identity Server will send the required details to the external source (in this example, an email address).
-
The external source returns the data. In this example, user ID part of the email address.
-
Identity Server sends the data that it has obtained from the external source to Access Gateway.
-
Access Gateway sends the data to the web server.
-
The web server returns the resource.