30.6 Troubleshooting Access Manager Policies

30.6.1 Turning on Logging for Policy Evaluation

Policy evaluation for roles occurs at Identity Server. For Authorization and Identity Injection policies, policy evaluation occurs on the Embedded Service Provider (ESP) where the policy is enabled.

For the Form Fill policies, the evaluation and logging is done by ESP and the proxy service. To set the logging level on Access Gateway for the proxy service, see Enabling Form Fill Logging.

Logging for the policy evaluation done by ESP is controlled by the log settings of Identity Server configuration. To enable this type of logging:

  1. Click Devices > Identity Servers > Edit > Auditing and Logging.

    If you have set up more than one Identity Server configuration, ensure that you select the configuration to which the other Access Manager components have been assigned.

  2. Select Enabled for File Logging.

  3. Select to echo the trace messages to the console:

    • For the Linux Access Gateway Appliance, Linux Access Gateway Service, or Linux Identity Server, this sends the messages to the catalina.out file.

    • For the Linux Access Gateway Service or Windows Identity Server, this sends the messages to the stdout.log file.

  4. (Optional) Specify a path for Identity Server log files.

    If you have a mixed platform environment (for example, Identity Server is installed on Windows and Access Gateway is on Linux), do not specify a path.

  5. For policy evaluation tracing, set the Application level to info in the Component File Logger Levels section.

    If you are only troubleshooting policies at this time, do not select any other options. This reduces the amount of information recorded in the log files.

    To see the policy SOAP messages, you need to set the Application level to verbose.

  6. Update Identity Server.

  7. Click Auditing > General Logging and download Identity Server and ESP catalina.out logs.

    • For role evaluation traces, view Identity Server catalina.out file (Linux) or the stdout.log file (Windows).

      If your Identity Servers are clustered, you need to look at the file from each Identity Server.

    • For Authorization, Form Fill, and Identity Injection evaluation traces, view the log file of ESP of the device that is protecting the resource.

      • Linux Access Gateway Appliance or Service: This is the catalina.out file of Access Gateway where the protected resource is defined. If Access Gateway is part of a cluster, you need to look at this file from each Access Gateway in the group.

        To view the actual ESP log file that contains only ESP log messages, see the nidp.*.xml files in the /var/opt/novell/tomcat7/webapps/nesp/WEB-INF/logs directory (or the directory you specified in Step 4). Depending upon how you have configured File Wrap, the * portion of the filename contains the month, the week, the day, and the hour.

      • Windows Access Gateway Service: This is the stdout.log file of Access Gateway where the protected resource is defined. If Access Gateway is part of a cluster, you need to look at this file from each Access Gateway in the group.

        To view the actual ESP log file that contains only ESP log messages, see the nidp.*.xml files in the \Program Files\Novell\tomcat\webapps\nesp\WEB-INF\logs directory (or the directory you specified in Step 4). Depending upon how you have configured File Wrap, the * portion of the filename contains the month, the week, the day, and the hour.

  8. To understand what you are looking for in the log file, continue with one of the following:

30.6.2 Common Configuration Problems That Prevent a Policy from Being Applied as Expected

When you try to determine what is functioning incorrectly in a policy, you need to turn on policy tracing and understand the evaluation traces. See the following:

The CO entry line of a policy trace identifies when a policy condition evaluates to False or True. The PA entry line indicates whether the Action was applied or ignored. If the results of the policy trace are not what you expected for the user, the next step is to determine why the policy isn’t behaving the way you want it to. Check for the following problems:

Enabling Roles for Authorization Policies

If you are using roles in your authorization policies, you need to ensure that the role is enabled for Identity Server configuration. You can create roles and authorization policies independently of assigning them to protect a resource or to an Identity Server configuration.

If you have not enabled the role, users are not assigned the role when they log in, even when they meet all the criteria for the role.

  • If the Authorization Policy is an Allow policy, the users might be denied access because they haven’t been assigned the role.

  • If the Authorization Policy is a Deny policy, the users might be allowed access because they haven’t been assigned the role.

Whenever an Authorization Policy is not producing the expected results and the policy contains a role, the first troubleshooting step should always be to check whether the role has been enabled for Identity Server configuration. Click Devices > Identity Servers > Edit > Roles. If the role is not enabled, Identity Server cannot assign the role to the user.

The second step should be to ensure that the roles are transferred from for Identity Server to the Embedded Service Provider. Click Devices > Identity Servers > Edit > Liberty > Web Service Provider. The Authentication Profile needs to be enabled in order for Embedded Service Providers to evaluate roles in policies. This profile is enabled by default, but it can be disabled. When it is disabled, all devices assigned to use this Identity Server cluster configuration cannot determine which roles a user has been assigned, and the devices evaluate policies as if the user has no roles.

LDAP Attribute Condition

If you use an LDAP attribute as the condition for a Role policy or an Authorization policy and your users are not being assigned the role or are denied access to a resource, the most likely cause of the problem is the LDAP attribute name used in the policy. Some administration tools for the LDAP user stores display a UI name or an eDirectory™ name rather than the LDAP attribute name. Access Manager policies require the LDAP attribute name.

Use the following steps to identity whether the Access Manager policy has been configured for the LDAP attribute name, a UI name, or an eDirectory name:

  1. Use an LDAP browser to view one of your users in your LDAP user store.

    You can download a Java-based tool from the Internet.

  2. Verify the LDAP name of the attribute and that the user has the expected value.

  3. In Administration Console Dashboard, click Policies > Policies > [Name of Policy] > Rule Number.

  4. View the attribute name and value for the LDAP Attribute condition.

  5. Verify the following:

    • The name of the attribute should match the name as displayed in the LDAP browser. The attribute name is not case sensitive, but it should not contain any spaces. If you need to modify the attribute used by the policy, click the attribute name, then select an attribute from the list or select New LDAP Attribute to add one.

    • The value can be case sensitive, depending upon how you have configured the Mode for the policy. If you have selected case sensitive for the Mode, ensure that the case in the policy matches the case in the LDAP user store.

    • If the attribute is multi-valued and your users typically have multiple values, select Substring as the Comparison type.

  6. If these steps have not solved the problem, see Result on Condition Error Value.

Result on Condition Error Value

If you incorrectly set the value of the Result on Condition Error field, you create a policy that allows an action that you want the policy to deny or that denies an action that you want allowed. You must carefully evaluate whether you want the action applied or ignored when an error occurs during the evaluation of the condition. For positive conditions, the following rules apply:

  • For the action to be applied, either the user must match the condition or the Result on Condition Error must be set to True.

  • For the action to be ignored, either the user must not match the condition or the Result on Condition Error must be set to False.

The logic is harder to follow when you start adding “if not” to the conditions. The user then matches the condition by not matching the condition. For this type of condition, you need to ask whether you want the action applied to any user when an error occurs evaluating the condition.

The logic is even harder to following when you start adding multiple condition groups that can also have “or nots” and “if nots”.

If you have a policy that uses “if not” conditions or uses multiple condition groups and it is not producing the expected results, you might want to rewrite the policy so that it contains only positive conditions.

You might want to modify the condition groups so that the policy uses multiple rules, with each rule containing one condition group with the conditions you want the user to match for the action you assign to the rule.

An External Secret Store and Form Fill

When you create a user store on Identity Server (Local > User Stores) and define it as an external Secret Store (Liberty > Web Service Provider > Credential Profile), some attributes are not being created properly on the SAML affiliate object. The workaround is to access the user store configuration page (Local > User Stores), then exit. This action results in a check to verify that the schema, objects, and attributes exist, and the affiliate object is then re-created from scratch, if necessary.

The following affiliate objects must exist:

authsamlCertContainerDN (container holding trusted certificates, 
   for example: SCC Trusted Root.Security)
authsamlProviderID 
authsamlTrustedCertDN (list of trusted certificate(s))
authsamlValidAfter (180 seconds default)
authsamlValidBefore (180 seconds default)

If these attributes exist, the system works normally. However, if your Identity Server and Secret Store server are not configured to use the same NTP server, time synchronization can be a problem. If time synchronization is an issue, you can change the 180-second default validity times as a workaround.

If your LDAP user store and Administration Console have a firewall separating them, TCP ports 524 and 636 must be open to allow for the creation of the required objects. For more information about ports and firewalls, see Setting Up Firewalls in the NetIQ Access Manager 4.3 Installation and Upgrade Guide.

30.6.3 The Policy Is Using Old User Data

When a policy is first evaluated, it caches information about the user.

  • Some data items are updated every minute.

  • Some are cached for the duration of the request.

  • Some are cached for the duration of the user’s session. When a data item is cached for the duration of a user session, the user must log out and log in for the policy modification to take effect.

Table 30-2 lists how long the data items for a condition are cached before being refreshed.

Table 30-2 Data Caching Limits

Condition

Data Refresh Interval

Authenticating IDP

User session

Authentication Contract

User session

Authentication Method

User session

Authentication Type

User session

Client IP

Request

Credential Profile

User session

Current Date

One minute

Current Day of Week

One minute

Current Day of Month

One minute

Current Time of Day

One minute

HTTP Request Method

Request

Java Data Injection Module

User session

LDAP Attribute

User session; configurable to be cached only for the request with the Force Data Read option.

LDAP Group

User session

LDAP OU

User session

Liberty User Profile

User session

Proxy Session Cookie

User session

Roles for Current User

User session

Roles from Identity Provider

User session

Shared Secret

User session; configurable to be cached only for the request with the Force Data Read option.

String Constant

User session

URL

Request

URL Scheme

Request

URL Host

Request

URL Path

Request

URL File Name

Request

URL File Extension

Request

User Store

User session

X-Forwarded-For IP

Request

30.6.4 Form Fill and Identity Injection Silently Fail

Login with Form Fill or Identity Injection can fail when all of the following conditions occur:

  • Your user store is configured to use Novell® SecretStore®.

  • The shared secrets needed for Form Fill or Identity Injection are locked because the shared secrets are used by another application that is using the enhanced security feature. For example, if the application writes a secret called ssn, and you use that same secret in a Form Fill or Identity Injection policy, that secret is locked whenever the admin changes the user’s password. Access Manager does not use the enhanced security feature when it writes shared secrets.

The new unlock feature for SecretStore can resolve this issue. See Determining a Strategy for Unlocking the SecretStore.

30.6.5 Checking for Corrupted Policies

For a policy to be evaluated correctly, the policy must contain a rule. To verify that your system does not contain any policies with configuration errors:

  1. In Administration Console Dashboard, click Troubleshooting > Policies.

    If you have any corrupted policies, they appear in the list.

  2. Identify the corrupted policy, then click Remove.

30.6.6 Policy Page Timeout

If your policy page hangs, and you have an LDAP group or LDAP ou being used in the policy, check the health of your user stores (LDAP servers) and ensure that they are communicating.

30.6.7 Policy Creation and Storage

For troubleshooting, you can export the policy and send it to NetIQ for debugging. If the policy uses roles, ensure that you also export the Role policies.

Policies are stored as XML documents in the object directory, with one XML document to represent each policy container. The default policy container (Master_Container) resides at:

\\novell\accessManagerContainer\VCDN_Root\PartitionsContainer\Partition\ContentPublisherContainer\mastercdn\xpemlPEP\romaContentCollectionXMLDoc

Other policy containers are stored following the same path, with a unique name string representing the policy name that replaces the ou=mastercdn portion of the above path.

If you are unsure if the policy is being created correctly or if you need to check to see if the policy is enabled, you can view the policy list in the interface. If you think the GUI is not properly displaying the policy, you can also view the XML by navigating to the Policy Conditions on which you edit rules, right click and choose This Frame > View Frame Source.

30.6.8 Policy Distribution

Policy definitions are not replicated, but are referenced by Access Gateways for which the policy is to be evaluated. The policy reference mechanism is a set of XML elements that refer back to the policy definitions stored in the various policy containers. If you have configured a policy for a protected resource and an Access Gateway does not seem to be executing this policy, use the following procedures to verify that Access Gateway has been configured to use the policy:

  1. Set the level of Application logging to verbose. See Section 21.6, Turning on Logging for Policy Evaluation.

    This enables the tracing of the policy enforcement lists.

  2. Search for name of your policy in a <PolicyEnforcementList> element. The ExternalElementRef attribute contains a reference to the policy name.

    You can find these elements in the catalina.out file (Linux) or stdout.log file (Windows).

  3. If you cannot find the policy name, Access Gateway has not been configured to use the policy. The configuration either needs to be applied or the policy needs to be enabled. For information about how to assign a policy to a protected resource, see Section 3.8.4, Configuring Protected Resources.

  4. If you find the policy name associated with the correct protected resource, you need to check why the policy is not evaluating according to your design. Set the level of Application logging to info and examine the policy trace from a user accessing the protected resource. See Understanding Policy Evaluation Traces.

30.6.9 Policy Evaluation: Access Gateway Devices

The following diagram depicts how Authorization policies fit into the protected resource processing for the proxy.

Figure 30-8 Policy Evaluation

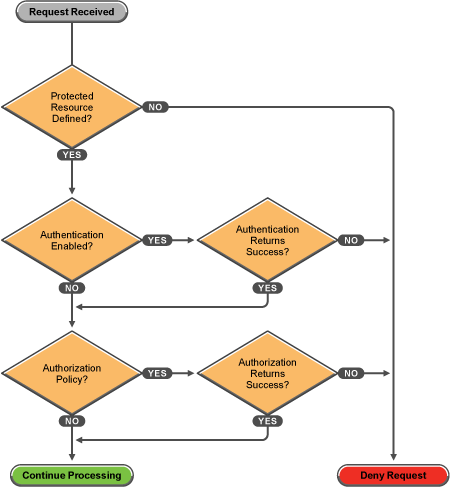
Policies for Access Gateway devices are evaluated by the policy engine in Java. A SOAP interface is used to transition from the proxy to Java and back. To see the SOAP messages, you need to set the logging level of the Application level to verbose. See Section 21.6, Turning on Logging for Policy Evaluation.

The SOAP messages are output to the catalina.out file (Linux) or stdout.log file (Windows). Sample SOAP messages are shown in the following scenarios:

Successful Policy Configuration Example

Note the Policy Enforcement Point (PEP) identifier of AGIdentityInjection in the request and the PolicyID in the response.

Configuration Request

toBufSeg: <?xml version="1.0" encoding="UTF-8"?>
<SOAP-ENV:Envelope xmlns:SOAP-ENV="http://schemas.xmlsoap.org/soap/
   envelope/">
<SOAP-ENV:Body>
   <NXPES ID="12">
      <Configure-ag PEPName="AGIdentityInjection">
         <PolicyEnforcementList
            RuleCombiningAlgorithm="DenyOverridesWithPriority"
            schemaVersion="1.32" 
            LastModified="1138389868885"
            LastModifiedBy="cn=admin,o=novell">
            <PolicyRef ElementRefType="ExternalWithIDRef"
                ExternalElementRef="PolicyID_xpemlPEP_AGIdentity
                    Injection_ii_test" 
                ExternalDocRef="ou=xpemlPEP,ou=mastercdn,
                    ou=ContentPublisherContainer,ou=Partition,
                    ou=PartitionsContainer,ou=VCDN_Root,ou=access
                    ManagerContainer,o=novell:romaContentCollection
                    XMLDoc"
                UserInterfaceID="PolicyID_xpemlPEP_AGIdentity
                    Injection_ii_test"/>
         </PolicyEnforcementList>
      </Configure-ag>
   </NXPES>
</SOAP-ENV:Body>
</SOAP-ENV:Envelope>

Configuration Response

LibertyProcessMsgCB:
<SOAP-ENV:Envelope xmlns:SOAP-ENV="http://schemas.xmlsoap.org/soap/envelope/">
<SOAP-ENV:Body>
   <NXPES Id="" Status="success">
      <ConfigureResponse PolicyId="755OK8P0-7543-518M-8L8M-N0P2LM2
                N3O27">
         <ContextDataElement Enum="2551"/>
      </ConfigureResponse>
   </NXPES>
</SOAP-ENV:Body>
</SOAP-ENV:Envelope>

No Policy Defined Configuration Example

The following is a sample of a configuration request where the policy code detects that no policies are in effect for the protected resource and Policy Enforcement Point (PEP).

Configuration Request

toBufSeg: <?xml version="1.0" encoding="UTF-8"?>
<SOAP-ENV:Envelope xmlns:SOAP-ENV="http://schemas.xmlsoap.org/soap/envelope/">
<SOAP-ENV:Body>
   <NXPES ID="11">
      <Configure-ag PEPName="AGAuthorization">
         <PolicyEnforcementList 
            RuleCombiningAlgorithm="DenyOverridesWithPriority"
            schemaVersion="1.32"
            LastModified="1138389868885"
            LastModifiedBy="cn=admin,o=novell">
           <PolicyRef ElementRefType="ExternalWithIDRef"
               ExternalElementRef="PolicyID_xpemlPEP_AGIdentity
                        Injection_ii_test"
               ExternalDocRef="ou=xpemlPEP,ou=mastercdn,ou=Content
                       PublisherContainer,ou=Partition,ou=Partitions
                       Container,ou=VCDN_Root,ou=accessManager
                       Container,o=novell:romaContentCollectionXMLDoc"
               UserInterfaceID="PolicyID_xpemlPEP_AGIdentityInjection_
                       ii_test"/>
         </PolicyEnforcementList>
      </Configure-ag>
   </NXPES>
</SOAP-ENV:Body>
</SOAP-ENV:Envelope>

Configuration Response

LibertyProcessMsgCB:
<SOAP-ENV:Envelope xmlns:SOAP-ENV="http://schemas.xmlsoap.org/soap/
      envelope/">
   <SOAP-ENV:Body>
      <NXPES Id="" Status="emptypolicyset"/>
   </SOAP-ENV:Body>
</SOAP-ENV:Envelope>

Deny Access Configuration/Evaluation Example

The following is a sample of a configuration request for a Deny policy and an evaluation request for this policy.

Configuration Request

toBufSeg: <?xml version="1.0" encoding="UTF-8"?>
<SOAP-ENV:Envelope xmlns:SOAP-ENV="http://schemas.xmlsoap.org/soap/
   envelope/">
<SOAP-ENV:Body>
   <NXPES ID="17">
      <Configure-ag PEPName="AGAuthorization">
         <PolicyEnforcementList 
            RuleCombiningAlgorithm="DenyOverridesWithPriority"
            schemaVersion="1.32" 
            LastModified="1138718667305"
            LastModifiedBy="cn=admin,o=novell">
         <PolicyRef 
            ElementRefType="ExternalWithIDRef"
            ExternalElementRef="PolicyID_xpemlPEP_AGIdentityInjection
                _custom_test"
            ExternalDocRef="ou=xpemlPEP,ou=mastercdn,ou=Content
               PublisherContainer,ou=Partition,ou=PartitionsContainer,
               ou=VCDN_Root,ou=accessManagerContainer,o=novell:roma
               ContentCollectionXMLDoc" 
            UserInterfaceID="PolicyID_xpemlPEP_AGIdentityInjection
               _custom_test"/>
         <PolicyRef 
            ElementRefType="ExternalWithIDRef"
            ExternalElementRef="PolicyID_xpemlPEP_AGAuthorization_
               deny-all" 
            ExternalDocRef="ou=xpemlPEP,ou=mastercdn,ou=Content
               PublisherContainer,ou=Partition,ou=PartitionsContainer,
               ou=VCDN_Root,ou=accessManagerContainer,o=novell:roma
               ContentCollectionXMLDoc" 
            UserInterfaceID="PolicyID_xpemlPEP_AGAuthorization
               _deny-all"/>
         </PolicyEnforcementList>
      </Configure-ag>
   </NXPES>
</SOAP-ENV:Body>
</SOAP-ENV:Envelope>

Configuration Response

LibertyProcessMsgCB: 
<SOAP-ENV:Envelope xmlns:SOAP-ENV="http://schemas.xmlsoap.org/soap/
    envelope/">
<SOAP-ENV:Body>
   <NXPES Id="" Status="success">
      <ConfigureResponse 
           PolicyId="55N3NL81-L29N-2619-K0M8-2L963M0MM701"/>
   </NXPES>
</SOAP-ENV:Body>
</SOAP-ENV:Envelope>

Evaluation Request

toBufSeg: <?xml version="1.0" encoding="UTF-8"?>
<SOAP-ENV:Envelope xmlns:SOAP-ENV="http://schemas.xmlsoap.org/soap/envelope/">
<SOAP-ENV:Body>
   <NXPES ID="18">
      <Evaluate PolicyId="55N3NL81-L29N-2619-K0M8-2L963M0MM701"
                Verbose="on"/>
   </NXPES>
</SOAP-ENV:Body>
</SOAP-ENV:Envelope>

Evaluation Response

LibertyProcessMsgCB: 
<SOAP-ENV:Envelope xmlns:SOAP-ENV="http://schemas.xmlsoap.org/soap/
      envelope/">
<SOAP-ENV:Body>
   <NXPES Id="" Status="success">
      <EvaluateResponse>
         <DoAction ActionName="Deny" ActionTTL="-1" Enum="2620">
            <Parameter Enum="10" Name="Message" Value=""/>
         </DoAction>
      </EvaluateResponse>
   </NXPES>
</SOAP-ENV:Body>
</SOAP-ENV:Envelope>